Replacing small bathroom tile floor?

joesxm3

Thinks s/he gets paid by the post
Joined
Apr 13, 2007
Messages
1,322
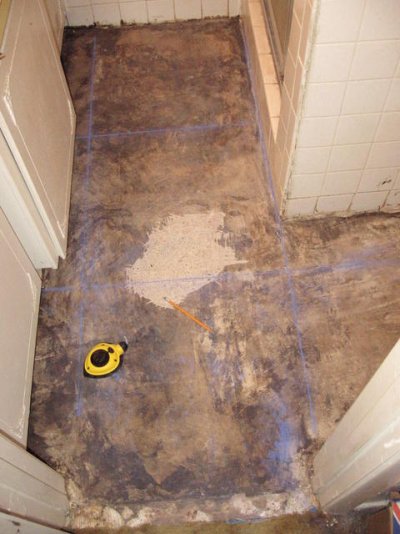
I have a small bathroom (8 by 6) with old 1 inch tiles.

A guy I know keeps nagging me to hire him to redo the bathroom.

I am considering doing it myself. I am no handy man, but it is the 2nd bathroom (only sink and toilet) so it can takes months if necessary.

Am I crazy to think of trying this?

Seems like

1) chisel away the old tile.
2) somehow make the remaining floor level and smooth.
3) coat with thin-set and lay down tiles.
4) grout.
5) replace heating basebard covers, toilet and edges. Maybe have plumber seat toilet.

Has anyone done this before? Do I have to lift the pedestal sink also?

Also - any suggestions on how to clean the grout on my larger kitchen tile floor?

Thanks.
 
You could probably get away with it on a small floor like that. Biggest problem rookies have is getting the floor level. Small floor, less of a problem if its a little ripply.

Where you might get into trouble is loose drains, rotting of the wood sub floor (presuming its wood and not a concrete slab).

A good way to go if you can get away with the increased floor thickness is to remove all the old stuff, roughly fill and level with floor compound, lay a good concrete based backerboard like hardibacker, then grout and lay your new tile.

Suggestion: get away from the small tile and use a larger floor tile. Makes the room look larger and less like a public bathroom.

You should lift the sink and get under it, but you COULD cut around it. Really hard cutting job even for a pro though.

THATS where you could end up with some fun. You'll need to change your supply lines and your drain to handle any changes in depth. Plumbers are more expensive than tile guys, but you might need to do all of this even with a pro tile guy.
 
The hardest part is getting rid of the old floor and ensuring that you lay the sub floor correctly. I used large vinyl tiles in my condo which came out really great and you are able to cute them a lot better than the hard tile.
It does take some time and a lot of patience....I had someone help me do it who was experienced and paid him a $100 bucks and for all of the supplies. It did take about 3 days and it was my only bathroom....thank god I was able to use my neighbor's bathroom!
 
We did this ourselves. We used an electric chisel from the local power tool rental company. The hardest part was finding a tile style we liked. We actually went with a small tile since our room was small too, although CFB has a different opinon.. It was pretty easy, even the reseating of the toilet. Just use a wax ring.
 
I recently remodeled our very small guest bath. I used vinyl sheet flooring. What made the job easy was, this time I removed EVERYTHING first. The toilet, vanity, and baseboard trim. No cutting around anything except the toilet flange (don't forget to temporarily plug the sewer line).

If the toilet is old consider replacing it now with an efficient model (I like the Kohler Wellworth model). If the toilet is only a few years old, this is a good time to replace all the plastic and rubber parts. Its much easier to re-seat the toilet in 2 pieces. Set in the bowl and put a level across the bowl. Level it. If there are any large gaps fill with plaster of paris, not grout, not silicone.

Have fun. You'll end up with a better job and enough saved cash to afford the Charmin.:)
 
I had never tiled anything in my life, and I did about 900 square feet of our house last year. We live on a slab. I simply read several sites and watched videos (all free) and went for it. There is only one spot where I screwed up and no one but me sees the corner of one tile sticking up higher than the rest by about a quarter inch.

I like CFB's recommendation to use big tiles. You'll make fewer cuts that way. One recommendation that is tiny but that saved us a lot of time and worked extremely well: Get the orange corner spacers not the white spaces. The corner spacers definitely help keep the tiles spaced more evenly. I helped my brother with his floor after I did mine (that is kinda the problem doing a good job on something: others want you to help them do theirs :) ), and his floor came out with some minor spacing blemishes.

Also, it's not necessary to remove the base board, but it sure makes it easier and looks better IMO. If you don't, just get as close to the base board as possible (1/4 - 1/8 inch) and cover with shoe molding.
 
hmmm, plan to take up at least one level of sub floor. tile is normally place over luan or plywood; put your pry bar beneath the subfloor by starting either at the tiolet flange (need to pull the tiolet) or by pulling the door treshold. Either way, pull the toilet and tile underneath it ... else it's the ultimate jury-rig.

Once the subfloor is removed leveling is simply replacing the subfloor. Also have had good luck with floor leveler (cement base sold in 50 lb bags) for really "setteled" rooms.
 
good advice above. That johnbridge forums is very good, but there is a lot of chaff to wade through to get to the wheat. As Unclehoney said, 'info and then some'.

You might want to try removing the tile and then see if you want to proceed. Remove that toilet and sink so you don't chip them in the process. The tile I have removed was stuck down hard. It took a lot of swinging to get it off the floor. A lot.

Once the tile is up, if the floor needs work, maybe you want to turn it over to a pro? At any rate, you saved yourself some money by doing the grunt work.

It is best to set the 1/4" hardiboard (cement board) down (on top of a solid floor) into a layer of thinset and screw it down tight. This forms a solid base for the tile. The thinset fills any gaps so the backer won't lift up/down and pull through the screws over time. I did this for a large area I tiled that would be very visible. OTOH, I'm doing a smallish bathroom now, and that old tile I'm replacing never cracked, and the floor is very solid, so I'm just tiling over that old subfloor with no additional backer. I'm not too worried. Any doubts though, use the backer, it's good stuff. But it does not work miracles, you need a solid floor.

-ERD50
 
I don't tile but I do clean grout >Go to home depot and get heavy duty grout cleaner ,rubber gloves and a scrub brush .You apply the cleaner ,scrub it in and voila new looking tile .
 
My DD and I tiled her MBR Bath two years ago. The old floor was not tile but we got down to the sub-floor and then put CONCRETE BACKER BOARD down using thin-set and EXTERIOR GRADE Screws. It was on the second floor of the house so that made for a very solid and stable base. Then it was just thin-set and tile. The tiles were 4X4" to match some they on the tub surround. It was her first tile job and my first that we were trying to match some other tiles. Came out great, she was happy, and SIL was happy too -- fun 4 day job. Rip out and backer board day 1. Thin-set and Tile day 2, Grout day 3 and molding and trim day 4. Room was about 8X8'.
 
On the tile size, you might try getting some large ones and small ones, lay them out on the floor and take back the ones that you decide against.

And make sure any that you put on the floor are made for floor installation. A very smooth tile made primarily for wall installs may be far too slippery and cause a safety problem
 
you're not going to replace that old sink and that old toilet on those new tiles are you? and then you'll need to get nice new glass doors for the shower. go with the very thick glass; makes a world of difference. forget brushed or nichol finish; go with stainless or you'll never get the shower glass frame to match the new faucet for the sink and the shower set. oh, & you'll need a new mirror and halogen vanity light to match the new pedestal sink.

how much time did you say you have for this project?
 
Thanks for all the advice and moral support.

It may take a while for me to start and probably longer than usual to finish working evenings and weekends, but I will report back hen finished (sooner if I screw up and need help).

Sounds like it might be easier to replace the plywood underfloor than to try to scrape the old floor back to smooth. I will see once the tile is off.

I probably should update the sink. Toilet might be ok, still nice and just replaced the seat :)
 
I've only done one small bathroom and hated doing it (looks great, though), but I would avoid using the spacers. I used chalk lines instead. Spacers aren't ideal because the tiles aren't uniformly shaped, and what you want is a straight grout line. Even with inconsistent gaps the grout looks good if the long lines are straight. And with the chalk you can check squareness over a large area with a little trigonometry (a² + b² = c², or if you hate calculating a 3' x 4' x 5' right triangle is easy to remember). Remember that your walls aren't necessarily square, so you can't just measure out from them to get a square layout.

I borrowed a videotape from the library on laying tile, and watching that helped a lot.

I removed vinyl tile and placed tile directly on a concrete slab. But there were two high spots in the concrete. One in the middle and one around the toilet flange. I started trying to lower them with a hammer and chisel, but that was incredibly tiring and frustrating. I finally rented an electric jackhammer with a "bushing tool" (example 1, 2), and that made real quick work of the high spots.

There's a lot of advice out there including from the stores about using that leveler liquid. Mom (it was her bathroom) and I had a big fight about that. There's a difference between flat and level, and you want flat, not necessarily level. If you have high spots then you'd have to use enough liquid leveler to raise the entire rest of the floor to one high spot, and if your floor isn't level then you're raising one side of it more than the other. Anyway small differences can be handled by the thinset, but don't rely on it for flattening too much.

The floor flattening was harder than I expected. The grouting was also harder than I expected--it takes some muscle to work it in. The chalking, thinset and laying the tile was much easier than I expected, and both the tile and grout turned out great. I only goofed up one tile that has one edge kicked up a bit higher than those around it. I guess I missed it when tapping down the tiles with my long board. The battle of the wills was the toughest part, and conflicting store advice just escalates that aspect.

Back to the grouting: after working the grout in, I thought it wasn't going to look right, but the sponging process gives the grout the shape you're used to seeing. It was like magic to me.
 

Attachments

  • floor1.jpg
    floor1.jpg
    57.6 KB · Views: 0
  • floor2.jpg
    floor2.jpg
    51.9 KB · Views: 0
...And make sure any that you put on the floor are made for floor installation. A very smooth tile made primarily for wall installs may be far too slippery and cause a safety problem

The very first tile project I attempted was a tiny foyer in our first house. I did all the steps others have pointed out, except when I went to the tile store I couldn't find anyone to help me select the tile. No problemo. I bought a beautiful mosaic tile with metallic highlights -- not knowing it was a wall tile! It looked great...until I came in on a rainy day and fell flat on my back!

Had to regrout the tile with a sand based grout to provide some "grip". (The regrout job was nearly as hard as the original project, BTW!)
 
Good advice from BMJ. Although I'd have rented a wet grinder to smooth the floor.

And the advice about flat vs level is spot on. Thats one of the biggest things a home fixer has to learn and adapt to is that almost nothing in a home is level or square. Good contractors have learned to "go with the flow" and adapt as needed while homeowners break out the square and level and then wonder why their perfect installation looks crooked.

My favorite was the laundry room in my wifes old house. The doorway wall adjacent to the houses rear wall was 14' wide. The opposite wall was 12.5' wide. Non-patterned lino in that one to hide the sloping side walls, thanks.

Had it on a smaller scale in the small bathroom at our last place. I cut all the tiles square and when I got to the tub I had a nice stepped pattern. The tub was tilted about 3/4".
 
I forgot to add that the walls aren't necessarily straight, either.

I don't know about a wet grinder, but HD had some grinder thingy to rent, but you had to rent or buy a blade to go with it and it was pretty darn expensive compared to the electric jackhammer...3x or 4x the cost IIRC. The bushing bit just breaks up the surface which lowered it the fraction of an inch I needed quite quickly...seconds compared to the hours I spent with a chisel and hammer.

Also a note on positioning the tile. All the instructions I read say to start in the middle. For such a small room I decided it made more sense to put the whole tiles next to the most visible edge which was the shower door edge. This made for some short tiles around behind the toilet, but you don't really see those as much, and the others go under the counter top. I lucked out and the tiles and gaps left a full tile stopping at the doorway, although it was slightly crooked with respect to the doorway. (Will hide that with a threshold when we lay the laminate in the adjoining room.) In short I--with my vast experience of 25 square feet of tile laying--say consider centering the grid but look at what it does to the most visible edges.
 
Thats one of the biggest things a home fixer has to learn and adapt to is that almost nothing in a home is level or square. ...

.

$%#@ got that righ! New daughter = new bedroom remodel, got brave and tried wood laminate for the first time. The end result is nice, but thank God for 1/4 rounds! I still had to cut the last row 3 frickin' times, and you better believe I used half a tube of filling compound for my "learning experiences". Phhhbbb!

As far as tile, I tiled our second bathroom, and it's still a point of contention in our household. My advice? Have a couple extra sponges to wipe the extra grout off the tiles. Mine got saturated and parts are still foggy, even after a couple of grout removal treatments (the chemical took years off my life!). And the grout lines look terrible now, and I have to re-grout them. (Sigh), at least the toilet went back easy, and so far the floor seems level.
 
Back
Top Bottom