Your recent repair? 2013 - 2020

Status
Not open for further replies.
Both of my small generators failed during the recent four day power outage.
On day one I fired up the 1300W Chinese made Alton to run the refrigerator, some lights, the tankless water heater, and propane fireplace fan - alternately the TV/satellite box in the evening. Started on first pull, great!
Day two it stopped suddenly and would not restart. No spark.
OK, no problem, bring out the trusty Yamaha EF1000is. After two pulls it fired up and we are back in business, super!…..for about an hour, and then that one dies too. No spark. Bummer, - It’s cold, damp, dark and I have no internet.
Next up, I turn to the 1500W power inverter and my idling truck for juice.
That gets me through to day three when there is a little sun breaking out and I can investigate the problems.
The Alton has a faulty ignition coil, no easy fix.
The Yamaha has a failed crankcase powered pulse fuel pump. The crankcase is now seriously overfilled with gas/oil mix that triggered a sensor to cut off the ignition. The solution was to drain the crankcase, fill with fresh oil, bypass the fuel pump and use the gas tank from the Alton perched on a box to gravity feed fuel to the carb. Started on first pull to finish out days 3-4. Replacement parts have been ordered.
Lesson learned - having multiple backups is prudent.


In a twist on expectations, the Chinese made generator was easier to get back together and running vs the Yamaha.
It took a little searching but I was able to find the ignition coil from a Chinese supplier on ebay. I bought two at $12 each, they arrived within two weeks.
I ordered the Yamaha fuel pump at the same time. After waiting two weeks, I got a message that the part number had changed and was back-ordered from the manufacturer until early June. Apparently there was a quality issue and a new fuel pump will be forthcoming.
 
Being the extra cautious type when it comes to my lung health, I would add breathing protection to avoid the possibility of inhaling the fine silica dust when blasting.

Good job on the video.

Correct... the hood provides pretty good lung protection. It is sealed on the inside from the neck up. You breath through the small valve in the front.
 
Fantastic Job, and you saved so much money :flowers:

It's more about keeping busy and getting the job done right. But I won't complain about the savings. I just spent this morning re-grouting the pool tiles. Next up is sealing the tiles and acid washing the pool followed by filling the pool with water and about 20 bags of salt and balancing the pool chemistry. I had a quote for $2950 (lowest bid) to do all this work including the bead blasting. I'm going to do it for about $350 including tools and material.
 
I installed a new kitchen sink tap at GF's mother's place today...normally a routine and fairly easy job but she had a big garburator in the way which blocked access and made it very difficult to remove and reconnect the water lines.
 
... It's more about keeping busy and getting the job done right. But I won't complain about the savings. I just spent this morning re-grouting the pool tiles. Next up is sealing the tiles and acid washing the pool followed by filling the pool with water and about 20 bags of salt and balancing the pool chemistry...

I did acid wash on my pool before, after watching it done the 1st time. The pool looked superb after the job. I don't remember how many acid washes I did after that, but the pool had to be resurfaced when the plaster became pitted. Perhaps it was after the 4th time.

I have not done an acid wash on the new plaster since it was done more than 10 years ago, and it has a lot of stain now. I think I will try sanding it when I empty the pool for the tile sandblasting. It may not look as good as acid washing, but should cause much less damage.
 
Not a repair, just home maintenance. Out of desperation, and since it was cheap, I bought a $10 bottle of 'house cleaner' that was supposed to remove mold from siding. I have lots of mold on one side of my 3 story house. Supposed to attach a garden hose to the bottle and spray the stuff on your siding, wait ten minutes, then wash it off with clean water. It took 2 applications, but it worked! I had been all bummed out about the mold since the handyman guys really like to gouge you to pressure wash a house. Could have been $300 or more for just one side. I had read the reviews of the 'house cleaner' solutions last year and had decided they didn't work. Something must have changed since then because this product got all the mold off. The house looks great again. I spent about 3 hours with all the moving around the ladder, spraying a patch, waiting 10 minutes, and so on. Well worth it. edit to add: I had to get creative, and go back to the store and get a different brand of house cleaner, just for the nozzle, which sprayed up higher than the first one. Removed the contents of new sprayer, poured the 'good stuff' into the new bottle, and whaled away. Also, I had to buy an additional gallon of the 'good stuff' to finish the job. Additional gallon only $10. Woo Hoo!
 
Last edited:
On our North side of the house, some mold grows on the siding of the garage. Since it's only 1 story high, I have been able to put bleach and water mixed in a 2 gallon pump sprayer and stream the liquid to the top where it runs down.
It has worked quite well, and I don't care about the grass and patio stones below getting dripped on, which didn't cause any issues.

I might try bleach in an empty hose bottle sprayer next time as that is a good idea.
 
Has anyone replaced the glass in an Anderson double hung window (or any modern window) ?

The outside pane of glass in one of our window sections broke, but not the inside pane.

I can buy an entire section of the window for $200 and swap the parts, but thinking about it, it's really just the glass that is broken.
 
It's not a repair, but I cloned my computer SSD.
Then swapped out the existing SSD for the cloned SSD, and made sure it booted up and acted normally to make sure the clone was good.
Then put back the original SSD (it's a better one) and upgraded from Ubuntu 16.04 to 18.04.
It is working fine, and I'm using right now.
 
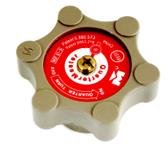
I do have a repair to share, my outside frost free tap started leaking when shut off
The handle looks like the one below:

It's made by BK, and warrantied for life.

So I phoned them at: 800-782-2385 and explained the issue and they sent me a new cartridge.
I pulled out the stem, and replaced the cartridge and now it does not leak :dance:
 

Attachments

  • tapHandle.jpg
    tapHandle.jpg
    5.1 KB · Views: 148
Has anyone replaced the glass in an Anderson double hung window (or any modern window) ?

The outside pane of glass in one of our window sections broke, but not the inside pane.

I can buy an entire section of the window for $200 and swap the parts, but thinking about it, it's really just the glass that is broken.
Not Anderson, but I did replace a failed double-paned (sealed unit) window after watching a technician do it a year earlier. In my case, I had to remove the 4 long strips on the frame portion that held the sealed panel in place...remove damaged window unit, replace with new sealed window unit, replace strips around perimeter. Good to go. [emoji106]
 
Has anyone replaced the glass in an Anderson double hung window (or any modern window) ?

The outside pane of glass in one of our window sections broke, but not the inside pane.

I can buy an entire section of the window for $200 and swap the parts, but thinking about it, it's really just the glass that is broken.


You'll need to replace the entire glass assembly (both panes) if it's a double pane window, there's a gas in between the panes that acts as an insulator and helps keep the moisture out. My local window shop replaced a cracked double pane glass assembly on one of the windows on my house for about $150 but that was a few years ago.
 
Last edited:
I'm still checking out everything on my new to me Casita camping trailer. Yesterday I found the Parallax converter was dead. The circuit board had a soldered in fuse and when I bypassed it with a jumper, it shot sparks and smoke. I'd hoped it was just a loose capacitor or something easy to diagnose for a non-electronically technical person, but no joy. I found that Progressive Dynamics sells a slide in retrofit for the power supply that is also a multi stage smart charger, so Bezos is sending that tomorrow.
 
Installed a grab bar/shelf in the upstairs shower for DW today.

I've been putting it off forever since the shower has marble slab walls and I have never drilled through marble before and the grab bar only has about 3/8" tolerance. Basically a get it right first time or you're done for scenario.

Drilled the first hole with a diamond crusted hole saw. It wandered a bit but I got it in place and with my 86 year old mother standing over me dribbling water on the bit to keep it cool we got it done. The diamond bit went through the marble like butter. It also had to go through a 1/2" cement backer board behind that.

Screwed up the second hole a little bit. It was at a level height but the bit wandered and I was a 1/4" off the mark width wise. Readjusted with a little difficulty but got it done. The scuff marks from the first attempt are thankfully hidden by an escutcheon plate.

The Moen grab bar comes with a neat in wall hidden bracket system. It worked and is supposed to hold up to 300 lbs.

Overall pretty happy with the result. Drilling marble is easy but the tolerance for screwups is pretty small.
 
I'm still checking out everything on my new to me Casita camping trailer. Yesterday I found the Parallax converter was dead. The circuit board had a soldered in fuse and when I bypassed it with a jumper, it shot sparks and smoke. I'd hoped it was just a loose capacitor or something easy to diagnose for a non-electronically technical person, but no joy. I found that Progressive Dynamics sells a slide in retrofit for the power supply that is also a multi stage smart charger, so Bezos is sending that tomorrow.

Smart charger is far superior to the stock charger in topping off the battery.

I replaced the one in my motorhome, even though it was still working.

But it is built for lead-acid batteries, and would overcharge and ruin the LiFePO4 batteries I recently installed.
 
Still struggling with leaking french door. I can't make it leak by spraying water onto my patches, but as soon a rain comes with a north wind, it leaks again. Something about the wind pushing water through an entry point or two.
 

I was not aware of that.

The linked page says that the ordinary charger will undercharge the LiFePO4. Yes, and no.

The normal mode output voltage is only 13.6V which is indeed low at 3.4V/cell.

The boost mode and equalization modes output 14.4V or 3.6V/cell, which is still safe but at the max, and too high for battery longevity.

The charger is still installed, but not switched on unless I need it. In use, I rely mostly on the solar panel with a Morningstar controller which is fully customizable.
 
Last edited:
My Porter Cable 6-gal air compressor started leaking air. It would not leak until tank pressure exceeded about 60 psi. But after that, it was leaking so fast, the pump ran continuously just to maintain about 70-80 psi. The leak appeared to be coming from under the plastic pump housing in the area where the piston is. I disassembled everything hoping to find something simple like a loose hose connection, but found nothing obviously wrong.

Went to the internet/YouTube and quickly determined that it was most likely a failed check valve. The check valve is mounted where the pump output hose enters the tank. It's supposed to allow compressed air into the tank but not back out. Apparently, at 60 psi, mine was letting air flow backwards where it escaped at the piston.

No good online options. Prices were high, non-OEM parts, and long shipping times. Turns out we have a Porter Cable service center about 15-20 minutes away. I called and they had the part in stock for $19. Brought it home and installation was simple. It took a lot longer to reassemble the pump/motor assembly. Only issue was I did not have a replacement crimp-style clamp when reinstalling the hose onto the check valve. So I just improvised a standard worm-gear style hose clamp, which worked fine. Compressor is now holding 120 psi with no leaks.
 
I just picked up two Cub Cadet garden tractors (1250, and a 129) for next to nothing. These both have the really stout cast iron motor, with the HD cast iron hydrostatic rear end that need some adjustment, and a new relief valve to operate properly. The better one will end up for my daughter.
 
This is a pretty light-weight repair when I see what some of you guys are capable of, but I but a new carburetor on my mower, detailed here, for those of you who are very, very bored, or otherwise inclined to watch mower repair videos.


In the fall, I'd taken the cup off the carb and let the fuel drain out...maybe an o-ring fell out without me noticing, or maybe some seal just rotted out over the winter, but when I poured fuel in, it just started dribbling out of the overflow hose that's positioned inside the air filter. I checked, and the float valve was stopping the flow, so that wasn't it. But rather than fiddle with it, I ordered a replacement carb (for only $10, delivered) and put it on.
 
I don't know if this qualifies as a repair, but I just removed heavy calcium build-up from my pool tiles with a $30 abrasive blaster from harbor freight. I paid $850 to do this work in 2013 and the quote this year was $1350 so I decided to try to do the work myself. The results were amazing. I posted a video on YouTube to demonstrate how it was done.


Beautiful pool, nice work! When's the pool party?


Thanks for paying it fwd. A good youtube video is worth its price.
 
........ I ordered a replacement carb (for only $10, delivered) and put it on.
These cheap Chinese carburetors are a real game changer. Ethanol in the gas plays havoc on carburetors and OEM carburetors are so expensive that a lot of good iron goes to the junk yard. I was delighted to fix a Mantis tiller with a new $10 carburetor.
 
I don't know if this qualifies as a repair, but I just removed heavy calcium build-up from my pool tiles with a $30 abrasive blaster from harbor freight. I paid $850 to do this work in 2013 and the quote this year was $1350 so I decided to try to do the work myself. The results were amazing. I posted a video on YouTube to demonstrate how it was done.

kgtest, Many Thanks for sharing this calcium cleaning method for swimming pools. A quick question, if you just take the water down a few inches below the calcium line per your suggestion without emptying the pool, how do you recover or remove the glass beads from the bottom of the pool? Would they block up or possibly damage the filter/pump or in ground cleaning system?


Peter
 
Status
Not open for further replies.
Back
Top Bottom