What We're Making

Looks great. I occasionally make bread, and coincidentally, made some today (that turned out very well).

I'm curious about your yeast proving (proofing?) process. In beer making, they used to recommend this, now it is considered outdated, they say it just saps the strength of the yeast, but beer making is far different from bread making (yeast is active in beer for days/weeks and has to be strong enough to survive high sugar levels, then high alc levels)

I've never done anything to prove/proof the yeast for bread making. But I do know that you add salt to most breads, and that is said to control the yeast growth. But if the yeast comes in contact with a high concentration of salt, it will kill/slow-down the yeast. The directions I follow have you get the salt well mixed in before adding the yeast.

What change did you observe before/after proving/proofing the yeast?

-ERD50

When I follow a recipe that says just add everything and combine, many times my dough does not rise. I bought fresh yeast, but that didn't help. So I decided to add warm water and leave the yeast to sit for about 10 minutes. For pizza dough, I also add olive oil at this time. Within minutes I see a sudden yeast "explosion". They are clearly out to party! Then I combine the salt with the flour to minimize the "shock" to the yeast, and start mixing.

I also find that my kitchen is too cool in winter, so I turn the oven on to the lowest setting while this is going on, and then turn it off before putting the dough inside to proof. I turn the oven light on for some supplementary heat and so I can see what is going on.

This process seems to work well.
 
So far I have learned the following:

Bake the bread in a cast iron pot inside your oven - it's almost like baking bread in a proper bread oven (my grandparents had a wood-fired one and nothing beats that, but the cast iron pot gets you close)
Spray some water on the bread every 10 minutes or so while it bakes to keep the crust thinner and crunchier (that's my preference)
Keep the dough on the drier side when mixing the ingredients. It makes for a better looking bread (if the dough is too wet, the bread will expand horizontally while baking).

Thank you very much. I'm sure that will help me.

Your comment about the wood fired oven brings back memories. My dad's older cousin and my mom baking bread and cooking a huge prime rib for dinner in that oven. You're right there's nothing like it.:)
 
Last edited:
I used to make bread, an especially pizza dough, a lot. Now I use a bread maker but I do sometimes "tweak" things a little. Last thing I made was some dinner rolls using the "dough" cycle. Came out great!

One trick I've learned is to shape the dough BEFORE the first rise, right at the end of the kneading cycle. This is also when I flatten it out, add cinnamon and sugar and roll it back up to make the swirls in cinnamon raisin bread. If you plan to be around (fellow retired folks?) anyway, you can take the kneading paddle out at this point, just make sure you're there to punch it down when you hear the motor run after that.

As for proofing the yeast, I used to add a pinch of sugar to give it something to start eating. Not sure this is the right way, just something I did a lot in winter when the kitchen was cool. Seemed to help get things started.
 
Not bread, but DW made some peanut butter cookies in memory of a recently departed friend of hers who loved them.

x4hp2g.jpg
 
It Took a Year, LOL!

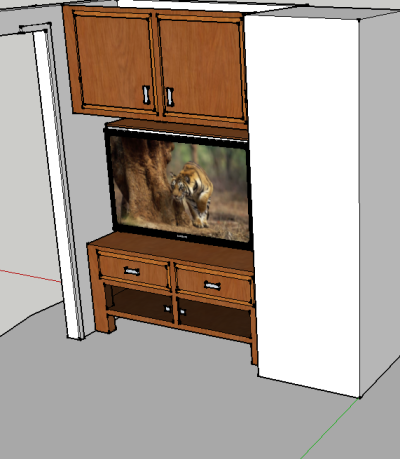
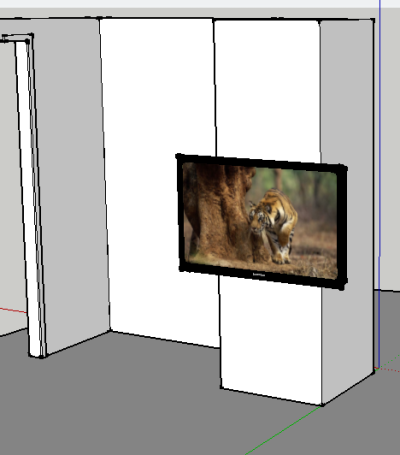
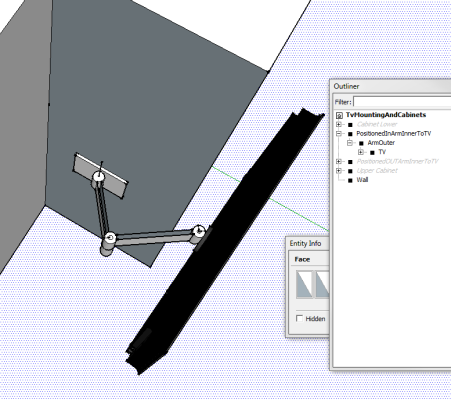
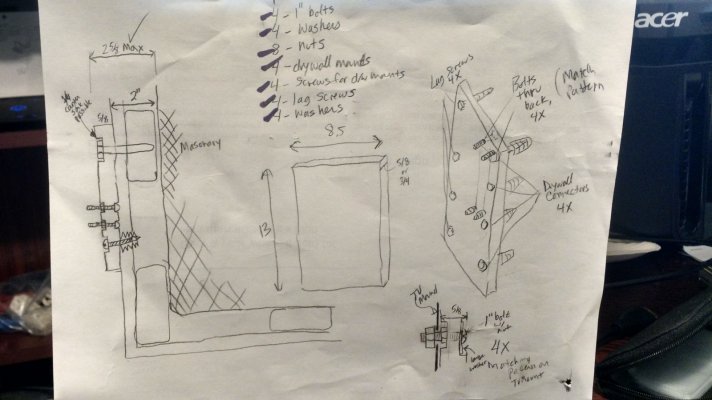
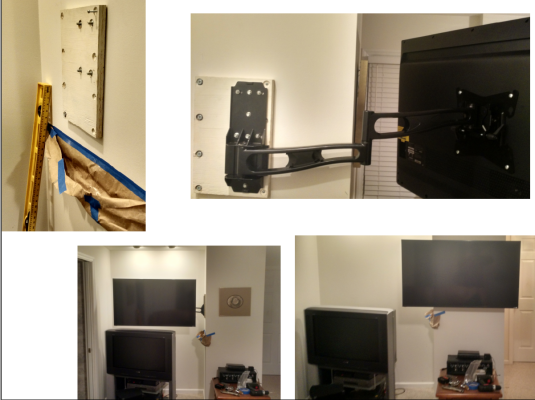
I had this idea and did a sketchup in January 2016. I ordered parts and a TV a few days ago (2/15) and got done on 2/18. TV's are soooo cheap! I just went to dealnews, typed in the size I wanted, and pressed "buy". 1/3 of the expense of this project was in the mounting arm! It was much harder to get the right mounting arm, but luckily, I had that saved in my Amazon wish list.

I had to mount a 5/8 plywood block because there was no structure where I needed it; the placement of the arm was very specific in order to get it to where the TV could be centered in the room, or centered in the recessed area. Along the left side of the block is where the stud is.

And get this: Zero trips to the hardware store! This was one of those rare instances when my "I might need this some day" gene was helpful.

Still, no built-in cabinets. Next year, lol!
 

Attachments

  • tvmount01.PNG
    tvmount01.PNG
    217.2 KB · Views: 44
  • tvmount02.PNG
    tvmount02.PNG
    79.1 KB · Views: 49
  • tvmount03.PNG
    tvmount03.PNG
    34 KB · Views: 46
  • IMG_20170221_140423570_HDR.jpg
    IMG_20170221_140423570_HDR.jpg
    393.5 KB · Views: 46
  • Collage.png
    Collage.png
    1.8 MB · Views: 52
Very clever! Thanks for sharing!
 
For all of you woodworkers....

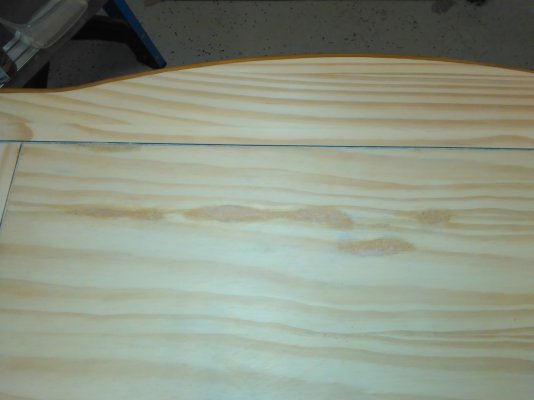
We recently purchased bedroom furniture via craigslist which we thought was solid wood...but unfortunately the very top section actually was a veneer (we are novice refinishers!!!). Well, hubby sanded down below the veneer exposing several sections of particle board. :( Lesson learned!!!!

I've done some research and tried to patch the areas with stainable wood filler, but I think it is a lost cause. The wood filler ended up being a darker color than the wood (I was hoping it would dry lighter. oops).

I think this is a lost cause, and we need to throw in the towel and cover it with a table runner. Hubby would like to keep trying...any suggestions for him?

Here's the sad state of affairs:
 

Attachments

  • IMG_20170221_062305.jpg
    IMG_20170221_062305.jpg
    254 KB · Views: 52
For all of you woodworkers....

We recently purchased bedroom furniture via craigslist which we thought was solid wood...but unfortunately the very top section actually was a veneer (we are novice refinishers!!!). Well, hubby sanded down below the veneer exposing several sections of particle board. :( Lesson learned!!!!

I've done some research and tried to patch the areas with stainable wood filler, but I think it is a lost cause. The wood filler ended up being a darker color than the wood (I was hoping it would dry lighter. oops).

I think this is a lost cause, and we need to throw in the towel and cover it with a table runner. Hubby would like to keep trying...any suggestions for him?

Here's the sad state of affairs:

Paint it white or black.
I think if you stain the entire top, that it will still be uneven.
 
For all of you woodworkers....

We recently purchased bedroom furniture via craigslist which we thought was solid wood...but unfortunately the very top section actually was a veneer (we are novice refinishers!!!). Well, hubby sanded down below the veneer exposing several sections of particle board. :( Lesson learned!!!!

I've done some research and tried to patch the areas with stainable wood filler, but I think it is a lost cause. The wood filler ended up being a darker color than the wood (I was hoping it would dry lighter. oops).

I think this is a lost cause, and we need to throw in the towel and cover it with a table runner. Hubby would like to keep trying...any suggestions for him?

Here's the sad state of affairs:

Re-veneer it yourself. It's not hard. Or paint as Sunset suggested.

-ERD50
 
Use an very warm iron to melt/loosen glue, peel off old veneer, scrape/sand old glue, reapply new veneer. Can be purchased on line, or at your local Rockler's.
 
Use an very warm iron to melt/loosen glue, peel off old veneer, scrape/sand old glue, reapply new veneer. Can be purchased on line, or at your local Rockler's.

Here's some information on applying veneer. I wouldn't make my own as he suggests, it's reasonable to buy.

Fascinating stuff really. We had a veneer mill way back. Funny how it's sliced so easily on a huge razor blade, about 17' long and 12" wide.


https://www.wwgoa.com/article/repair-veneer-on-an-antique/
 
Last edited:
That's what hubby was thinking. We don't the know first thing about that, but glad to hear it isn't hard.

It really isn't that hard. The only difficult part can be finding a veneer that matches the rest of the table. I've got a water stained old desk that has a mahogany veneer, and I can't find a decent match. Eventually I will, though.
 
Use an very warm iron to melt/loosen glue, peel off old veneer, scrape/sand old glue, reapply new veneer. Can be purchased on line, or at your local Rockler's.

Just a heads up. Don't use your good clothes iron for this. Buy a cheapo so if you get glue on it you don't ruin the good one. Don't ask me (or DW) how I know.
 
For all of you woodworkers....

We recently purchased bedroom furniture via craigslist which we thought was solid wood...but unfortunately the very top section actually was a veneer (we are novice refinishers!!!). Well, hubby sanded down below the veneer exposing several sections of particle board. :( Lesson learned!!!!

I've done some research and tried to patch the areas with stainable wood filler, but I think it is a lost cause. The wood filler ended up being a darker color than the wood (I was hoping it would dry lighter. oops).

I think this is a lost cause, and we need to throw in the towel and cover it with a table runner. Hubby would like to keep trying...any suggestions for him?

Here's the sad state of affairs:

DW has recently done some staining/antiquing of furniture. The gel stains can be quite dark and would cover the areas of concern. You could stain the top dark, and have a contrast that looks quite nice.

This is a link to the kinds of stains she has used: https://redposie.com/product-category/general-finishes/finishing-stains-dyes/

Just a thought.
 
It really isn't that hard. The only difficult part can be finding a veneer that matches the rest of the table. I've got a water stained old desk that has a mahogany veneer, and I can't find a decent match. Eventually I will, though.

That's what I'm wondering...how do I find a good match? So hard to know if something online will look ok. I am going to see if any place locally sells veneer.
 
That's what I'm wondering...how do I find a good match? So hard to know if something online will look ok. I am going to see if any place locally sells veneer.

So, based upon the picture I posted, do any of you have a guess as to what kind of wood this may be? The person I bought it from said she had bought it second hand, and the person she bought it from told her it was "Italian wood".

That's all I know.
 
It's hard to say for sure, but it looks like Scots pine (pinus sylvestris). If the piece was imported from Europe, it's a good bet it's Scots pine. Also known as European pine. I don't know if you can buy Scots pine veneer in the US.

Most veneer you find in the US will be white pine, which is a so-so match. You could try yellow pine, which will come closer in appearance although the grain is a bit more pronounced. Radiata pine is similar but the grain is less pronounced.
 
So, based upon the picture I posted, do any of you have a guess as to what kind of wood this may be? The person I bought it from said she had bought it second hand, and the person she bought it from told her it was "Italian wood".

That's all I know.
It is a soft wood, and you can spend many hours trying to fix this. What I might do is paint the top in a contrasting color, allowing some of the grain to show through. Then coat it or cover with glass. Place some family pictures under glass, and go on with life.
 
Back
Top Bottom