Insulating attic floor

joesxm3

Thinks s/he gets paid by the post
Joined
Apr 13, 2007
Messages
1,322
I made a relatively long post a couple days ago that got lost due to a server glitch. The first part was a report on my progress in following all the good suggestions I got a few months ago when I started asking about saving oil. I am pretty tired tonight, but I will try a quick recap of the progress report - thanks to all the original repliers and to SamClem who managed to reply to my lost post.

I worried about losing heat from oil hot water heat pipes in my crawl space and about the pipes possibly freezing when I run the wood stove and cause the zone pumps to shut off.

I got the remote thermometer that was suggested and am loving it - temperature and humidity - working like a champ. It can handle two more sensor units, but Home Depot does not stock them - I may contact the manufacturer and try to monitor attic and cellar as well as crawl space.

I picked up the recommended R10 2 inch foam board insulation and will be installing it this weekend on the cement walls of the crawl space. I will be using TapCon screws with a hammer drill, but may also include the special styrofoam safe adhesive suggested by SamClem.

I also plan to look for air leaks and use the spray foam to seal them up.

Other posters pointed out that I would be better served by making sure I was not leaking out of the top of the house - and boy were they right !!!

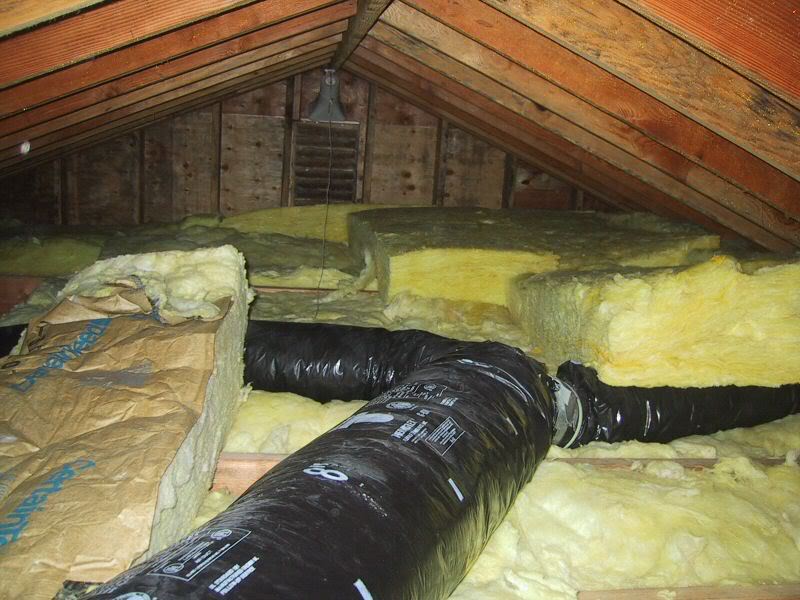
I just finished an exploration of the attic and found many surprises, luckily no signs of major damage or problems. The attic is unfinished and basically a big crawl space.

First there is a lot of junk up there - three mattresses, old bean bag chair, lots of random junk insulation - some that seems to have been pulled up to make a bathroom with a cathedral ceiling and sky lights (probably also a major heat loss item). This will have to go before work begins.

The floor joists seem to be 2x6 boards - They seem about 5.5 inches deep. When I measure the space between the joists I get 14.5 or 15 inches. My step father says that this is standard and means that the joists are laid "16 inches on center".

Looking at home depot I had planned to get some bat insulation that was said to be 16 inches wide and 9.5 inches tall.

?? = My measurement of 14.5 inches compared to the so-called 16 inch insulation at Home Depot has me worried. When they say 16 inch, do they mean it is made for "16 inch on center" joists and it is not really 16 inches wide?

The existing insulation is two layers both with vapor barrier crammed into the 5.5 inch joist space. When I pulled out a piece and tried to stretch it back to normal it seemed almost 5 inches thick or maybe 4 inches. I think that either the insulation has compressed due to condensation or because the original owner pushed it into the space.

In any case it looks somewhat crappy. Some of the discarded insulation shows signs of filtering dust which indicates air leaks.

My current plan is to lift up the existing insulation and either take it to the dump or possibly attempt to reuse it by peeling off the vapor barrier paper or slashing the paper.

?? = I am thinking that I will get some separate vapor barrier material and put it into the bottom of the joist area. I am guessing that I will staple it to the sides of the joists.

I would then get some paper-less bat insulation that will be as tall as the joist area. I am also considering filling the joist area with cellulose fiber insulation but my step father is dead set against it and it may not be worth the hassle - assuming that the so-called 16 inch wide bat insulation is not too wide for my joists.

I figure that the 5.5 inches of insulation in the joists will be about R15-R19.

I then plan to get some un-faced rolls of insulation, probably R15 since it seems to have a "new low price" of about $15 a roll. I would lay this on top of the joists at a 90 degree angle to the first run.

My book says I am in zone-3 and should have R33 for my attic floor.

My house is 20 feet by 50 feet, so I was somewhat shocked when I tried to calculate what covering 1000 square feet two layers deep will cost. However, given that I spent $4100 on oil last year I can probably stomach it.

I do not have the greatest ventilation in the attic. The main problem is my house does not have soffits, so there are no soffit vents.

When I had to replace the roof shortly after buying the house in 1988 (house was built in 1960) I had a ridge vent installed. The first roof baked off because the attic got too hot.

In addition to the ridge vent there is a gable vent that seems to be about 1-1.5 feet wide and maybe 2-2.5 feet tall. On the other end there is a similar vent (only more square) and an exhaust fan.

In the summer I leave the attic hatch stairs open about a foot to allow air to be sucked from inside the house to feed the exhaust fan. Obviously I cannot do that in the winter.

I might be underestimating the ventilation since there are no obvious signs of too much moisture. I guess this is a good reason to get that second remote sensor so I can keep track of things.

I just got a nice respirator that is probably over kill for fiberglass, but it can be used for sanding and paint as well. I look like something out of X-Files when I wear it, but I guess better safe than sorry. I also got some "chemical glasses" that go over my eye glasses and wrap the sides, so I should be all set for digging into the fiberglass.

I saw a video on You-Tube that said to put baby powder on to block your pores and keep out the fiber glass and then to shower off with cold water after.

Sorry for being so long winded.

Any advice or answers to the couple of questions indicated by ??= would be greatly appreciated.

Thanks in advance.
 
joesxm,
Yep, sorry that a lot of our original exchange was lost. I already hit these points and I know you've considered them, but for the sake of anyone else out there in the same situation as you are:
Vapor barrier: Everyone needs one. If the vapor barrier on your present insulation is not good, it's often easier and more effective to apply a vapor barrier to the ceiling inside your house. This works very well--just apply two coats of Zinser BIN shellac-based primer, then paint as normal. This is the product to use, not other primers.
Cellulose is really a wonderful solution to a problem like this. It blows in rapidly, doesn't itch like fiberglass, is non-toxic, has the same insulating value per inch as fiberglass, fills the normal voids and gaps better than fiberglass, costs much less than fiberglass, is more environmentally friendly than fiberglass. Another benefit: it is "tighter" than fiberglass (air doesn't readily pass through it). There are studies (sorry, no time to look them up now, but I posted them on a thread a few months ago) that show fiberglass losing a large share of its insulation value when the difference between inside the home and attic temps are big (approx 60-70 deg if remember right). The pressure gradient of the rising air gets high, and it basicaly starts to flow through the fiberglass. (as we all know, they use fiberglass in the air filters of furnaces. Though insulation is a lot more dense, air flows through it fairly easily) . This is only a factor on really cold days, but it is disconcerting when one's insulation becomes 20% less effective at the very time it is needed most. Even a few inches of cellulose laid on top of the existing fiberglass puts a stop to this, enhancing the value of the existing insulation.

I wouldn't remove the existing insulation. It is paid for and is helping, even if not pretty.

The "16 inch" wide fiberglass is actually narrower than 16" and is designed for openings like you've got. They would fit the standard bays without trimming. It sounds like yopu've got the right equipment for the job. I've done this before--if you use fiberglass get a utility knife and a lot of extra blades (it dulls them incredibly quickly). Bring a couple of pieces of flat board up there with you--one to put under the cut, and another to lay atop the fiberglass and press it down where you are cutting. (Or--go with cellulose! ^-^)


Good luck
 
Sam,

I will be doing the crawl space first so I will have some time to think about things.

I will give some serious thought to using the loose cellulose to fill the space between the joists.

I sometimes go up to the attic to service the fan makes me not want to just blow a foot of loose insulation on top of everything and then have to crawl through it, so if I do use the cellulose I will still probably put bats on top of it, although I suppose crawling over the bats might be worse.

The main argument my step-father has against the blown in insulation is that it will get wet and pack down. I imagine that this is not accurate, but do you know how it handles moisture? His reason is that his parents had some sort of loose insulation that got wet and was no good, some 60 years ago - certainly not modern cellulose fibers.

Good point about the cellulose not itching and being more eco-friendly. Both are a plus.

I have sand-swirl paint on my ceilings so I am a little afraid of re-painting them myself, but I will certainly use the primer to paint the ceiling of the bathroom next spring. This is probably the main source of moisture anyway - shower etc.

Thanks again.
 
Joe,
Seriously consider the cellulose. It is not a tough job at all to tackle. Most of the hardware stores will rent/allow you to borrow the blower if you buy enough of the insulation. One person outside with the bags of insulation feeding the blower, the other(you) above blowing it where needed. When I lived on the farm I did this (in late Nov, when the attic was cool/cold) I was also able to feed the hose all of the way down the walls and was able to blow it in the walls while slowly removing the hose. Helped keep the house much warmer, even though we had free gas heat at the time. I also had to remove lots of junk from the attic - windows, glass, beer cans, etc.
Be sure to leave a gap at your eaves - I stuck a 4" PVC pipe down the roof slope while insulating each section to allow air flow.
 
Great thread - I have promised myself to get up and check my attic very carefully this fall - and now it is Fall!

Samclem - I didn't know cellulose had those advantages. I may just have a few spots that I need to add insulation. We had fiberglas blown in a few years after we moved in, but I still get some condensation in the far bedroom ceiling on the coldest days, so I know I need more there.

So, can you get a few bags of cellulose and just 'rake' it around or something? Do you need the blower if it is just a small job?

-ERD50
 
My tip: Choose the day and time of day carefully so that you work while it's not hot up there. The colder the better, so you can wear long sleeves, gloves, etc.

Here's mine in mid job.

img_736443_0_17a5bb82a9cce02723a5f119ae20aca0.jpg
 
...............

So, can you get a few bags of cellulose and just 'rake' it around or something? Do you need the blower if it is just a small job?

-ERD50

My solution. Toss in handfuls of loose cellulose, turn on vacuum on blower mode.
 

Attachments

  • whatzit 003.jpg
    whatzit 003.jpg
    43.4 KB · Views: 2
I was thinking about that also. I could run a hose on the inlet side, and route it out away from the spray so I don't just clog the filter in 10 seconds.

-ERD50
 
I was thinking about that also. I could run a hose on the inlet side, and route it out away from the spray so I don't just clog the filter in 10 seconds.

-ERD50

If your shop vacuum has an outlet to plug in the hose on the discharge side, this works like a charm. Otherwise you'll need to borrow Fuzzy Bunny's electric leaf blower. ^-^
 
ERD50,
I've heard that it is possible to spread cellulose by hand (with a rake/hoe, etc), but after dealing with it myself I think a mechanical blower of some kind is really a lot better. It breaks up the "clods" in the pre-packaged bale and results in a nice fine spray of powder/flakes. It's no problem at all to shoot it 10 feet with the commercial blowers, which makes it easy to cover all the way out to the eaves of even a low-pitched roof (with limited headroom to work under there). I think for a bale or two the shop vac might work okay. The great thing about using the big blower for the big job is that the blower not only allows you to apply the cellulose, but it moves the 10-40 bales of the stuff for you from outside your house up to the attic. It sure beats carrying them. But, if you want to avoid the rental fee, I'd try the shop vac in blower mode. The stuff flies around a bit, and I wonder if the intake of the vac will be taking in the stuff in the atmosphere--might clog up a filter (backward) if there's one in the way.

I sometimes go up to the attic to service the fan makes me not want to just blow a foot of loose insulation on top of everything and then have to crawl through it, so if I do use the cellulose I will still probably put bats on top of it, although I suppose crawling over the bats might be worse.

After I finished blowing the cellulose I laid some 1/2" plywood (cut to a size I could get through the attic hatch) on top of the cellulose. I made a trail right down the middle of my attic so I can access all the useable space. I put a sheet of plywood wherever want to store (light) stuff. The artificial Christmas tree is up there, empty boxes i might need to send electronics back to the factory, etc. etc If I have to cross the cellulose I just scoot a plank out ahead of me (like the Gumby locomotive laying it's own track--you old timers will know about this:)).


The main argument my step-father has against the blown in insulation is that it will get wet and pack down. I imagine that this is not accurate, but do you know how it handles moisture? His reason is that his parents had some sort of loose insulation that got wet and was no good, some 60 years ago - certainly not modern cellulose fibers.

I like a LOT of things about cellulose, as you can surely tell. There's only a single negative thing about it as far as I am concerned, and it is the potential for leaking water from the roof to be a bigger problem with celluilose than it would be with fiberglass. I'm not worried about transpiration or moisture from inside the house, because I've got a good vapor barrier and ventilation. But, it you get a roof leak, the cellulose will absorb water. Fiberglass insulation will also absorb water, but it will start dripping through your ceiling many gallons earlier than the cellulose will. That's a downside, and your stepfather has a point. I've decided that the advantages are worth it. I've got a new roof, and I'm "betting" that it will be many years before I get a leak. What I'd REALLY like to figure out is some kind of warning/alarm/notification that I've got a leak before I have a lot of damp cellulose (and a celing repair needed), but I haven't found such a thing.

Cost comparison: Where I am, one bag of cellulose costs about $7.50. For a cost comparison to fiberglass, if you distribute the cellulose to an installed thickness of 5.9 inches (settled thickness will be 5.3") then the R-value will be R-19. At this thickness, that bag will cover 40 square feet. Total installed cost = 7.5/40 = 19 cents per foot.

I don't have a price handy for the unfaced fiberglass rolls, but I'm looking at a Lowes ad for R-15 faced rolls (15" wide) that cover 107 square feet. They cost $41.56 = 38 cents per foot. I don't know how much cheaper the unfaced rolls are, but I think your material cost for cellulose is going to be about 1/2 the cost of fiberglass for the same R-value.
 
I also recommend cellulose, I blew in an additional 40 bags over the rockwool insulation in our attic a few months ago (see my thread on the radiant barrier insulation). Home Depot will give you the blower rental free if you buy 20 bags. It is not a bad job to do yourself but you need one person to feed the blower while another works the tube in the attic. Before you do that you might check for other sources of air leaks from the living space to the attic, such as recessed lights, as it will be much easier to replace them before you add the insulation.

I experimented with trying to spread the cellulose by hand and while you could probably do one bag of it that way, trying to do any more would be extremely tedious and give poor results (the blower fluffs up the cellulose much better than you can by hand, improving its insulating characteristics).
 
Al's picture looked a lot like my attic.

Does the blower machine need to be outside the house?

I am not terribly handy and am afraid of trying to take apart the gable vents to make an opening. The side with the exhaust fan is three stories up (garage plus two floors). The other side is only two stories, but it is not particularly convenient to get to and it is an addition with only a tiny hole cut in the wall between old and new.

The only other access is the hatch stairs inside my second floor ceiling.

?? = Given that I have the two halves of the attic blocked by the interior wall with the one hole (one space between 2x4's about 2.5 feet tall), should I try to cut some more holes in the plywood wall to improve the air flow between the two gables?

?? = Given that I do not have any soffits or soffit vents should I try to cut some vents in the gable walls down low out towards the edges to give more air intake? That would be next year though since I have to either get someone who knows what they are doing or make sure I do not mess up the vinyl siding.

?? = For filling the cracks I had my eye on some expanding foam in a can called "Great Stuff" or something like that. They had three kinds, normal cracks, large gaps and door-window. Door-window said it would not be powerful enough to bend things. I was going to get normal to try and just squirt it between the foundation and the wood that sides on it, but when I read the can it said that you needed to paint or seal the foam. I was just looking for something to squirt and be done since I am just doing this in the crawl space and attic. Any recommendations for foam or caulk to fill leaks with?

I don't want to seem ungrateful, but I am leaning towards doing it with the fiberglass batts and rolls since I may want to work on this little by little and it seems like a big project to get the hose up to the attic to blow the cellulose.

Home Depot seems to be dropping the prices lately. I can get some R19 batts that will fit between my joists, these are kraft faced. I can get either R30 or R15 unfaced rolls to put on top cross ways.

I am leaning toward the R19 + R30 since the difference between the two rolls is $10 vs $15 or about $150 for me.

?? = If R19 + R30 is R49 minus some loss and R19 + R15 is R34 minus some loss, living in southern new england do you think it is overkill to put the R30 as the second layer? Is there a danger of having too much insulation other than it not adding enough improvement for the cost?

Late for w*rk so gotta run. Thanks. Joe
 
Here's one advantage of the batting: you can move it. I took advantage of that.

The picture I posted is above the room that my daughter had (she had the master bedroom). She studied up there, and needed it warm. When she left and we moved in. We only sleep there, and like it cool (windows always open at night). So at that point, I moved all the batting to another part of the attic.
 
Al's picture looked a lot like my attic.

Does the blower machine need to be outside the house?
...
The only other access is the hatch stairs inside my second floor ceiling.
I am sure you can put it in your garage or elsewhere, but if it is inside the house, as you load it up with insulation, you will spill some, wherever that may be. The one I used was electric, just run an extension cord to it. I just routed the hose/wire combination up through an outside window on my top floor, then up into the attic. Worked very well. I understand maybe wanting to do it over several weeks. In my case I was able to get the unit for the weekend and did it all on a Saturday (and was glad to do it all in one day).
 
Al's picture looked a lot like my attic.
I am leaning toward the R19 + R30 since the difference between the two rolls is $10 vs $15 or about $150 for me.

?? = If R19 + R30 is R49 minus some loss and R19 + R15 is R34 minus some loss, living in southern new england do you think it is overkill to put the R30 as the second layer? Is there a danger of having too much insulation other than it not adding enough improvement for the cost?
Generally the R19 and R30 come in different lengths, so you might want to recheck your numbers.
I have always heard that you can never have too much insulation. Probably true in NE. Keep us posted on your progress.
 
joesxm,
My comments in bold:
Does the blower machine need to be outside the house?
You'd want it outside the house. There's a lot of cellulose dust on both ends of the process (particularly the atic end) and it would make a mess.
I am not terribly handy and am afraid of trying to take apart the gable vents to make an opening. . . .The only other access is the hatch stairs inside my second floor ceiling.

The attic hatch is the way to go. They give you plenty of hose. Put the blower outside a convenient window, run the hose through the window, through the room, up the stairs (I don't think 3 floors is a problem, but it would be good to check the info on the blower) and through the hatch.

?? = Given that I have the two halves of the attic blocked by the interior wall with the one hole (one space between 2x4's about 2.5 feet tall), should I try to cut some more holes in the plywood wall to improve the air flow between the two gables?

I think this would be a good idea. At least on days when you had a pressure difference between the two gable vents (wind blowing on one side), you'd get better ventilation.


?? = Given that I do not have any soffits or soffit vents should I try to cut some vents in the gable walls down low out towards the edges to give more air intake? That would be next year though since I have to either get someone who knows what they are doing or make sure I do not mess up the vinyl siding.
I'm winging it here. Cutting vents down low on the gables will help, but it will probably result in a "short circuit" with cool air coming in from below, moving directly up the gable walls, then out the top. There won't be much air exchange with your attic. It would be much better to get air introduced along the edge of the roof. You say that you have no soffits--do you mean that your roof has no eaves/overhang at all (like a Cape Cod stye house)? I suppose it might be possible to put a lot of vent intake area down low in the gable ends and then build an air plenum/duct that would allow this incoming air to bleed out along the length of your roof edge, or maybe just down the centerline of your attic. It wouldn't have to be fancy (I'd probably build the duct out of something cheap and easy to work with, like 1" beadboard held together with aluminum tape). It would help get the moisture out of your attic in the winter and keep it quite a bit cooler in the sumer. Again, I'm just pontificating here, I don't have experience with this.

?? = For filling the cracks I had my eye on some expanding foam in a can called "Great Stuff" or something like that. They had three kinds, normal cracks, large gaps and door-window. Door-window said it would not be powerful enough to bend things. I was going to get normal to try and just squirt it between the foundation and the wood that sides on it, but when I read the can it said that you needed to paint or seal the foam. I was just looking for something to squirt and be done since I am just doing this in the crawl space and attic. Any recommendations for foam or caulk to fill leaks with?
You don't need to paint it unless it will be exposed to sunlight. It will turn a darker yellow ver time, but if it is not exposed to direct sunlight it wil be fine. Be aware that this stuff is messy. I'm not a worrier, but you need to wear goggles when using it, and latex/nitrile gloves are also a good idea. It is made of a mix of stuff including polyurethane, (the same stuff that is in Gorilla Gle) and there is no available solvent that will remove it from your skin/eyes/hair, etc. It just wears off over time. You've been warned! Also, once you squirt the first stuff through the straw, it starts to harden up, and if you wait more than a few minutes the stuff sets in the straw/valve and the rest of the can is unusabe. So, plan well and be ready to expeditiously use all the Great Stuff in one continuous session.

I don't want to seem ungrateful, but I am leaning towards doing it with the fiberglass batts and rolls since I may want to work on this little by little and it seems like a big project to get the hose up to the attic to blow the cellulose.
Understood. Every project and homeowner is different. I'm sure you'll get satisfactory results with fiberglass.

?? = If R19 + R30 is R49 minus some loss and R19 + R15 is R34 minus some loss, living in southern new england do you think it is overkill to put the R30 as the second layer? Is there a danger of having too much insulation other than it not adding enough improvement for the cost?

Just to check: Are you comparing rolls of the same length? Often the thicker insulation comes in shorter rolls.
Other than the cost, the only downside of the thicker insulation is the loss of attic space. It doesn't sound like this is a big factor for you, so I'd go with the thicker stuff. I'm a little surprised that you found a recomendaton for less than R-49 in a ceiling in New England. Here's what the DOE says about recomended insulation levels. Nobody thinks energy prices are going down in the long term, so I'd go with more insulation if you can afford it. Also, rather than carting your old insulation off to the dump, is there not some way you could use it? Maybe over a garage? Maybe layer it 90 degrees to the new insulation you are putting into the bays, below the new insulation you are laying crossways (then you could buy the R-19 instead of the R-30 insulation to go on top)? You've got R-15 or more of servicable insulation that you've already paid for--there's nothing wrong with it, it just looks bad. It will save you money every day, and at the very least save you all the hassle of dragging it through your house and taking it to the dump. (As my friends in Greenpeace say:ernew, reuse, recycle!)
 
I did another recon trip to Home Depot today and it confirmed what has been said about the amount of work involved.

I had planned to buy one bundle of 93 inch batts (8 batts) to make sure it was the right stuff before placing the large order and to see what it would be like to install it. However, I decided that I would not be able to fit the bundle into my car.

That sort of drove the point home about carrying them up to the attic and the effort and cost involved with removing the old insulation.

I did a more accurate calculation and determined that filling all my exposed between joist with R19 will take 12 bundles at $28 per bundle. To put R30 rolls over the top will take 38 rolls at $15 per roll (minus some for the area taken up by my bathroom cathedral ceiling).

My revised plan is to clean the junk out of the attic this weekend and to experiment with trying to revitalize the old insulation. I think I will try to pull the paper off of some of it and see if it holds together. If I can fluff it back up I will try to figure out how to reuse it - either to save money or to increase the insulation.

The one thing that concerns me was the chart about the drop-off in insulating value of fiberglass as the temperature difference increases between the interior and exterior temperatures. It showed that blown cellulose stayed constant while fiberglass really dropped off.

?? = Am I correct in assuming that when they talk about the temperature difference they mean the temperature in my attic compared to the temperature in the top floor of my house? It would seem that the attic will be warmer than the outside temperature by a few degrees because of the walls even if it is not insulated above the attic floor.

I really appreciate all the advice, especially SamClem who has gone well beyond the call of duty with his extremely detailed posts.

Thanks.

I will keep you posted on the progress.
 
I did another recon trip to Home Depot today and it confirmed what has been said about the amount of work involved.
I can empathize. When I'm in the planning stage, I always imagine the work will be like the colorful pictures in the DIY magazine--the smiling guy stapling down the insulation in a well-lit area with plenty of room. Only when I'm in the middle of the project does the truth become clear: crawling out to the edges of a dark, hot attic with 2" between my head and the rusty nails poking through the roof sheathing, itching like mad, sweat pouring into my eyes. Finally in the right spot after crawling out to the edge, I think I've got the batt in the right spot, squeeze the staple gun handle--KERCHUNK. But, no staple. I'm out. Time to crawl out and find box of staples somewhere in the garage. We've all been there.

?? = Am I correct in assuming that when they talk about the temperature difference they mean the temperature in my attic compared to the temperature in the top floor of my house? It would seem that the attic will be warmer than the outside temperature by a few degrees because of the walls even if it is not insulated above the attic floor.
Yep, you've got it right. What counts is the temp difference between the air right against the ceiling inside the top floor of your house and the air inside your attic. While your attic might not be as cold as the outside temps, your goal is to get it as close as possible through good ventilation (this helps reduce ice dams as well as assuring your water vapor gets out). The air at the ceiling of the top room will, of course, be a few degrees warmer than the temp in the room at shoulder level.[/quote]

I really appreciate all the advice, especially SamClem who has gone well beyond the call of duty with his extremely detailed posts.
My pleasure. Good luck!
 
Here is a short progress report on the attic project.

We hauled down all of the attic junk except for a large bean bag chair left by the former owner. I think I will cut it and take the styrofoam peanuts out in trash bags.

I got 80 pieces of R19 batt insulation today. I think I need 24 more, but 10 packs were all that could fit in my step-father's small pickup.

I managed to haul all ten packs up to the attic this evening.

My next step will be to suit up and crawl to the edge of the attic to lift up the old insulation and look for leaks to seal and to try to install some of the new stuff. I plan to move the old insulation to the other side while I ponder what to do with it.

I had one close call. I was using a very thin particle board to crawl on and it cracked in half and I almost put my knee through the ceiling. I will be more careful going forward.

I am hoping to take a vacation day or two to work on the attic this week.
 
- You've probably done the right thing in focusing on this and letting the crawlspace project stew until next year.

- Consider buying a cheap headlamp if you are having trouble getting light up in the attic. Sometimes it's easier to have a lamp strapped to your head than to keep moving a shoplight around or using one paw to hold a flashlight. Harbor Freight sells this one for about four bucks. It's not super bright, but I've used mine a lot. Just don't let the neighbors see you wearing it, it makes an unfavorable fashion statement.

Good luck.
 
I made the first major excursion into the attic for the insulation project tonight.

I cut another 16 inch by 24 inch hole in the wall that separates the original house from the addition and moved in several small pieces of plywood that I had lying around. I made a crawl zone almost to the end of the addition.

I have lots of wire running around and I am hoping to be able to remove some of it because it is probably obsolete.

One two wire pair is black and connects to a "splitter" labeled UHF/VHF/FM. I am assuming that this is some sort of antenna that no longer exists.

?? = Another wire is like a ribbon and appears to have four our five wires side by side in it. Any idea what this might be?

There is lots of white wire that I think is called "romax". This seems to be the main power wire and I have tracked it to the ceiling light in my bedroom and over to the wall where it goes down, presumably to feed the wall outlets. I plan to watch out for this wire.

We had an electrical survey at work yesterday and the electrician told me that it is ok to put insulation over the romax wire. Do you agree?

I bought the head lamp that SamClem mentioned, a respirator with two canisters that handles N95 and organic vapor and some chemical goggles that fit around my eye glasses. I took a picture of me all suited up, but I am not sure how to put it into my post.

I lifted up the existing batt insulation and there is two types. The top layer has a metalic vapor barrier and is about 3 inches thick. It seems in relatively good condition.

The vapor barrier separates easily from the insulation so I can convert it to unfaced insulation if I want to. I am considering reusing it.

The lower layer has a paper vapor barrier. This is only one inch thick. I had never heard of such thin insulation. I wonder if it used to be three inch and now is degraded from 25 years with the double vapor barrier. I think that this layer will be discarded.

The lower layer has the paper stapled to the joists. The edges lift up where the staples are leaving a little gap which I think is not good.

?? = Does a vapor barrier have to be only one thing or could I put more than one thing down for the vapor barrier. For example, would it be ok to leave the original kraft paper and then put the new insulation with its own kraft paper directly on top? Or would it be ok to get some new vapor barrier material and lay it between the joists and then lay the new
insulation with the kraft paper on top of it.

On one hand it seems like the two layers immediately on top of each other would catch some leaks. On the other hand I wonder if there still would be condensation between the two pieces.

A smart guy at work told me that he made an insulated cover for his attic hatch and he said that he got some metalic thin insulation that he put on the bottom and then he put some foam panels on top. He said that the metalic insulation would immediately reflect infrared radiation while the foam would block normal heat transfer. Does this make sense?

That is what gave me the idea of possibly getting some metalic vapor barrier and putting it down first and then puting the kraft-faced batts on top. I suppose if I wanted to do it that way I should have gotten unfaced six inch thick batts so I would not be doubling up on the vapor barrier (too late now for that).

Since I have already purchased 10 bundles of kraft-faced batts I am committed to using them.

If there is negative or no benefit to trying to double the vapor barrier I will just lift up the original kraft paper and lay in the new batts.

I explored the edge where the outside wall meets the attic. There is a small area with no insulation about six inches deep directly against the wall. The bottom of this seems to be a 2x4 which I assume is the top of the wall framing. There is a 1/32 inch gap on the inside side of the 2/4.

?? = Should I caulk the 1/32 inch gap? Should I put insulation into the 4 inch area along the wall? I do not have soffits so there are no soffit vents to block. My neighbor warned me not to go to close to the edges because he said I want to have air moving up inside the wall for ventilation purposes. I am not sure if he was correct.

When the moisture condenses inside the wall on the vapor barrier which is directly against the inside sheet rock, does it get eliminated by rising up through the wall insulation and out the top?

My protective equipment worked pretty well so far, but I did bang the top of my head on one nail. I had been looking for a little hard hat that was sort of like a baseball cap but did not find one. I think I may cut a cheap aluminum pie plate and make a little skull protector to wear under my cap just in case.

Sorry for such a long post - so much to report - so much to wonder about.

Thanks again and in advance for all the help.
 
I hope you don't mind if I chime in again.

?? = Another wire is like a ribbon and appears to have four our five wires side by side in it. Any idea what this might be?
Hmmm. I'm not familiar with any sort of 4-5 conductor cable used in homes that is a flat ribbon. Most of these small 4-5 wire cables are either for telephones or thermostats (from the thermostat to the furnace/boiler/AC unit)

There is lots of white wire that I think is called "romax". This seems to be the main power wire and I have tracked it to the ceiling light in my bedroom and over to the wall where it goes down, presumably to feed the wall outlets. I plan to watch out for this wire.
. Yep, probably Romex. Today the white stuff is normally for 20 amp circuits, the white stuff is for 15 amp circuits, but that might not have been the standard in the past.

We had an electrical survey at work yesterday and the electrician told me that it is ok to put insulation over the romax wire. Do you agree?
. Putting insulation (foam, fiberglass, cellulose) in contact with the cable is allowed by code. It is okay to do it, but think ahead and if you might someday need to access the wire, it might be best not to bury it under insulation.

?? = Does a vapor barrier have to be only one thing or could I put more than one thing down for the vapor barrier. For example, would it be ok to leave the original kraft paper and then put the new insulation with its own kraft paper directly on top? Or would it be ok to get some new vapor barrier material and lay it between the joists and then lay the new
insulation with the kraft paper on top of it.

On one hand it seems like the two layers immediately on top of each other would catch some leaks. On the other hand I wonder if there still would be condensation between the two pieces.
Are we in the attic now, or still inthe crawlspace?

There should not be condensation (liquid water) anywhere if everything is working right. Your goal is to keep the water vapor above the dewpoint. By putting the vapor barrier on the "warm side" (next to your floor and next to your ceiling, with insulation outide to keep in the heat) you are stopping the flow of moisture out of your house at a point where it should always be above the dew point (thus remaining a gas, not condensing to a liquid). In this case, I don't think it is likely to cause much problem having the two vapor barriers right up against each other with the insulation on the outside, but two "partially intact" barriers won't be as effective as a single intact, well installed VB. I'd probably tear out the top one, and install a good one before adding the insulation.

A smart guy at work told me that he made an insulated cover for his attic hatch and he said that he got some metalic thin insulation that he put on the bottom and then he put some foam panels on top. He said that the metalic insulation would immediately reflect infrared radiation while the foam would block normal heat transfer. Does this make sense?

That is what gave me the idea of possibly getting some metalic vapor barrier and putting it down first and then puting the kraft-faced batts on top.
This reflective metalic stuff is caled a "radiant barrier". It does work to block the flow of heat that occurs by IR radiation, but it is commonly mis-used and there are a lot of scammers out there. The bottom line s that these barriers need a minimum of 3/4" air gap on at least one side to be effective. If the barrier is touching anything on both sides (including insulation) then the primary heat transfer mode is by conduction, not radiation, and the barrier is worthless. Imagine it this way: you are in a very cold room right beside a red-hot stove. You can feel the heat radiating from the stove very well, because it is radiating directly (as long-wave IR "light"). If you put even a thin piece of aluminum foil between yourself and the stove, it would do a very good job of blocking that heat transfer. On the other hand, it you put the foil right on the stove and touched the foil firmly, it would not do a good job of blocking the heat transfer, and you'd get a nasty burn for your trouble. It is the same with these radiant barriers--they only work with an air gap. Your friend's attic hatch cap might be effective if it has a gap, but if it doesnt he would have been better off to spend his money on another 1/2" of foam.
I explored the edge where the outside wall meets the attic. There is a small area with no insulation about six inches deep directly against the wall. The bottom of this seems to be a 2x4 which I assume is the top of the wall framing. There is a 1/32 inch gap on the inside side of the 2/4.

?? = Should I caulk the 1/32 inch gap? Should I put insulation into the 4 inch area along the wall? I do not have soffits so there are no soffit vents to block. My neighbor warned me not to go to close to the edges because he said I want to have air moving up inside the wall for ventilation purposes. I am not sure if he was correct.

When the moisture condenses inside the wall on the vapor barrier which is directly against the inside sheet rock, does it get eliminated by rising up through the wall insulation and out the top?
There should be condensation of water in the wall. The warm, moisture-laden air (or the water vapor itself passing through the materials) inside your home is prevented from entering the stud bay by the vapor barrier placed right against the wall. The vapor never gets cool enough to condense. If it did, you'd have mold and other problems.
I'm having a hard time visualizing the construction at the top of your walls. It's not like what I've seen. Does your house have any overhangs or eaves at all, or does the roof end right at the wall (Cape Cod style?)
 
SamClem - I was hoping you would reply and appreciate your time since you seem to be busy. I saw the great post you just did to help with the wet basement.

Yes, my question about the double vapor barrier pertained to the attic. Did I understand correctly that you feel the optimal choice would be to remove the old paper barrier adn get some separate vapor barrier material and install it in between the attic floor joists and then put my kraft-faced batts in between the joist with the kraft paper down? And the second best choice was to remove the old paper barrier and just put the kraft-faced batts paper down between the joists?

The wall I was talking about was on the gable end of the attic, not on the roof side. It seems that the second floor wall was made by building a rectangle out of two by fours and then putting the wall studs in. This would have then been raised to vertical and the attic floor joists put on top. The floor joists are parallel to the gable walls, same as the 2x6's making up the roof arch. It seems that the last floor joist is right next to the 2x4 that makes the top of the second floor wall. There is plywood nailed to the outside of the wall frames.

This results in a space next to the gable wall made up of the 2x6 joist on the inside (4 inches showing), the 2x4 top of the wall as the bottom of the space (4 inches wide) and the exterior plywood on the outside of the space. This is a 4 inch deep, 4 inch tall, 22 foot long cavity at the gable edge of the attic floor. The second floor wall insulation would be inside spaces bounded by 2x4's in the wall. We cut a small hole once and it looks like we have minimal 4 inch insulation in the walls.

When the windows and siding were done, they brought in an insulation contractor and he decided that it would be too hard to blow into the wall cavities and adding foam board under the siding would make the siding stick out past the windows. They said the best thing would be to blow insulation into the attic but they wanted me to remove the old insulation first and the project drifted into never never land. That was around 2002.

I have not yet crawled down to the area where the roof meets the wall of the house.

However, there is no overhang at the point where the attic meets the second floor. In the front of the house there is a 9 inch or 1 foot overhang between the first and second floors. This is what would have been the soffit for the attic to have soffit vents, but it is an entire floor too low.

I had considered trying to push some PVC pipe up from below to make a nine foot soffit vent, but I think that I would hit the wall insulation and I am suspecting that there will also be a 2x4 across the top of the wall cavity that I would have to cut holes in.

The back of the house has no overhang at all.

I will know better tomorrow morning, but I am guessing that the second floor wall along the roof sides of the attic is built like the gable side with a 2x4 across the top of the wall cavity. I guess that the roof rafters must be cut at an angle on their ends and just sit on top of the second floor wall frame without sticking out past it.

I read more about ventilation and now think I have a possibly conflicting mix of ventilation systems.

Originally the attic had two rectangle gable vents with louvers and screens. From reading this seems to be about one square foot of effective ventilation per vent taking the louver blocking into account. There was an exhaust fan on on gable. There was the interior wall blocking the two gable vents and only having the 14 inch by 24 inch opening cut in the wall.

When I bought the house that setup had roasted the roof shingles.
I had the roof replaced and the contractor insisted on putting in a ridge vent across the whole top of the attic. When I pointed out that there were no soffit vents they sort of shrugged and made some comments that the exhaust fan on the gable would probably end up sucking air in through the ridge vent instead of the other way around.

Having read a little about ventilation it now seems that I want to be taking in air from the bottom and having it go out the top.

I plan to cut several openings in the interior wall to increase the air flow. When I cut the one additional opening tonight I could see a large increase in the breeze between the two gable vents.

I think I should get rid of the gable exhaust fan and use the two gable vents as air intakes rather than trying to exhaust through one. This would give some hope of air coming in half-way down the gable wall and going out through the ridge vents.

I also think that I should get an exhaust fan that mounts in the roof to supplement the ridge vent.

Since the exhaust fan needs air intake I think I need to make some more vents. I am considering getting two more square gable vents and mounting them in the gable wall on one end of the house as close to the floor as possible. One end is two stories while the other end is three stories due to a garage at the cellar level with a sunken driveway. I am ok with doing two stories on the ladder but three is pushing it for me.

Based on what I said about the wall cavities having a two by four across the top I would imagine that there is not a lot of air flow up the wall cavity.

What I was asking about is whether I should caulk the crack between the wall top 2x4 and the attic floor joist next to it and whether I should put some fiberglass insulation into the 4inch by 4 inch by 22 feet space next to the wall.

A similar question would apply to the roof side walls once I look at them.

Thanks for taking the time to help me so much.

This project is very educational and I seem to be making massive strides at being able to do stuff. Last year the idea of installing the roof exhaust fan terrified me, but now it seems just like cutting a little plywood and sticking in a unit. I still may have the local electrician do the wiring, but the electrician at work yesterday convinced me that I can change the light switch at the top of my cellar stairs so I may become a wiring guy too someday soon.

One question with regard to cutting the vents in the wall. I have vinyl siding and I will have to cut a square in the siding for the vents. Would I have to get some sort of edge piece for the siding or do you think that the cut siding edges will just go under the vent exterior frame?
 
.............Hmmm. I'm not familiar with any sort of 4-5 conductor cable used in homes that is a flat ribbon. Most of these small 4-5 wire cables are either for telephones or thermostats (from the thermostat to the furnace/boiler/AC unit) ...............

I found a similar wire in my attic. It used to control the TV antenna rotation.
 
joesxm,
Thanks. I'm starting to see your situation more clearly.

Did I understand correctly that you feel the optimal choice would be to remove the old paper barrier adn get some separate vapor barrier material and install it in between the attic floor joists and then put my kraft-faced batts in between the joist with the kraft paper down? And the second best choice was to remove the old paper barrier and just put the kraft-faced batts paper down between the joists?
There are several satisfactory answers. While it is important to impede (not necessarily stop) the flow of moisture through materials, stopping the mass flow of air (through cracks, holes, etc) around materials is much more important. In your shoes, I'd probably lift out the old insulation in a single bay, then (with a good ability to see the roof framing/ceiling interface now that the insulation was out of the way) carefully caulk all seams, cracks, holes that could allow air into the attic, then I would probably put in new kraft-paper backed insulation (paper side down, as you know) into the bays. (Alternatives to the kraft-paper --you could paint either the top or the room-side of the ceiling with 2 coats of Zinser BIN, or you could lay in a separate vapor barrier--even plastic. The kraft-paper-backed insulation is probably easiest). At that point, I'd probably tear the VB off the old insulation and put it back on top of the new insulation I'd just put in, then move on to the next bay. When all the bays are done, lay additional unfaced insulation 90 degrees to the joists (again re-using any servicable insulation left over from the original stuff.) As mentioned previosuly, I'd actually blow cellulose over the fiberglass, but I understand your decision.

This is a 4 inch deep, 4 inch tall, 22 foot long cavity at the gable edge of the attic floor.
I understand now. Just push some insulation down there (start with a piece with VB at the very bottom) to fill the gap. Get busy with the caulk here--you're likely to find cracks that let air go from the inside of your home into the attic where all this framing comes together.

When the windows and siding were done, they brought in an insulation contractor and he decided that it would be too hard to blow into the wall cavities and adding foam board under the siding would make the siding stick out past the windows. They said the best thing would be to blow insulation into the attic but they wanted me to remove the old insulation first and the project drifted into never never land. That was around 2002.

If you saw 3-4" of fiberglass insulation in your walls when you looked , don't spend the money to have anything else blown in or inserted into the stud bays. Be glad you have insulation in the walls at all. I can't remember if you mentioned the age of your home, but wall insulation wasn't standard in some areas until well after WW II. If there are spots without any wall insulation, it would be worth exploring the options for inserting some (dense-pack cellulose, icythene, etc), but if you've already got 3-4" of fiberglass it won't help much (aing more now is an "iffy" process--gaps are common since the contractor can't see what is actually hapening in the bay as he fills it, it compresses your existing insulation making it less effective, etc. Your money is best spent elsewhere).
I had considered trying to push some PVC pipe up from below to make a nine foot soffit vent, but I think that I would hit the wall insulation and I am suspecting that there will also be a 2x4 across the top of the wall cavity that I would have to cut holes in.
That's the kind of (whacky? innovative?) idea I would have considered, too. It's a good thing you rejected it. Aside from the pipe being too small to do much good, it also would have introduced a cold "line" running up your wall. On the inside of the house this would be below dew point on cold days, and even if it never produced visible condensation, it would have quickly produced a dark line where dust was attracted to the moisture. This same thing happens with metal framing in walls sometimes.

It's really too bad that you couldn't get just 1/2" of foam put on the outside when the siding was done (I know I hit this before-sorry). What's done is done, but it would have significantly reduced heat loss through the wood studs, added a little to the R-value of the inter-stud spaces, ad also reduced air leaks through the wall. Maybe next time.

I read more about ventilation and now think I have a possibly conflicting mix of ventilation systems.
I think you may be right. I didn't know you had a ridge vent, too. It sounds like all your ventilation is up high, with no good way to get replacement cool air into your attic. This is causing your attic to be hotter in the summer and increasing the possibilty of moisture problems in winter.
I think I should get rid of the gable exhaust fan and use the two gable vents as air intakes rather than trying to exhaust through one.
If you've got a full-length ridge vent along the top of your house and these gable vents, you don't need any more vents to let air out of your attic. You definitely don't need power ventilation-it won't improve the situation (the negative pressure from the exhast fan will just draw fresh air in through the nearest high vent, but you want the air to be going out of the high vents.)

Since the exhaust fan needs air intake I think I need to make some more vents.
Absolutely. It sounds like the very biggest issue in your attic ventilation "challenge" is admitting outside replacement air into the attic. Again, you've got plenty of "out" area up high, you need some "in" vent area down low. A series of vents at the base of the gable wall might be the best option, though I think you'd be best off if you can get this cool air into the interior of the attic (again, maybe using an easily-built plenum leading from the low vents on the gable wall to the interior of the attic.) Just installing the vents low on the gable wall will result in the air moving directly up the gable wall and out, without intermingling with the warm, moisture-laden air in the rest of the attic. I don't think that there's likely any replacement air being routed up your exterior walls and into the attic, but let us know what you find when you explore the roof-edge portion of the attic. Or, look at the base of the walls outside--is there any evident place where air is supposed to be admitted?

One question with regard to cutting the vents in the wall. I have vinyl siding and I will have to cut a square in the siding for the vents. Would I have to get some sort of edge piece for the siding or do you think that the cut siding edges will just go under the vent exterior frame?
It depends on the vent frame you buy. It might have a lip to accommodate vinyl siding, and that's the kind you want to buy. BTW, a good way to cut the vinyl siding is with a circular saw, but flip the blade backward so that the teeth don't "bite" into the vinyl. Wear eye protection, and don't try this when the vinyl is very cold/brittle. It worked well for me.

One other question-is there any chance you might want to make a small usable room in this attic? Maybe a study or other place with heat? I didn't think so based on your other comments, but if there is then we would do everything differently regarding insulation and ventilation (i.e. it would make more sense to approach this as a type of cathedral ceiling, don't bother with ventilation, and insulate the underside of the roof decking instead of the attic floor).
 
Back
Top Bottom