Home Improvement

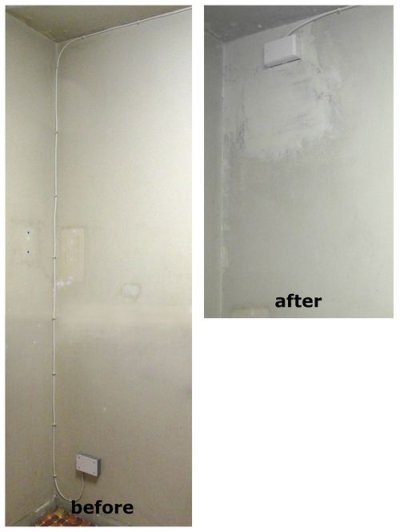
We put these in our kitchen as the older cans were showing their age (the white turns yellow over time from the bulb heat). We had previously been using LED bulbs, which alone made a big difference, including a reduction in the heat output.

It's basically about 2-3 times the effort of replacing just a bulb. And they look nicer, it's a clean flush look. And if I have to replace these in 7 years? nbd.

One issue I ran into was the LEDs not dimming as well as the old incandescents. They'd only dim down a bit, then go completely off. I temporarily resolved that issue by leaving one can with an incandescent, which allowed the entire 6 cans on the switch to dim properly. It did leave one can with a different color, but not very noticeably. I replaced the last one when I switched out the dimmer to an LED compatible one.
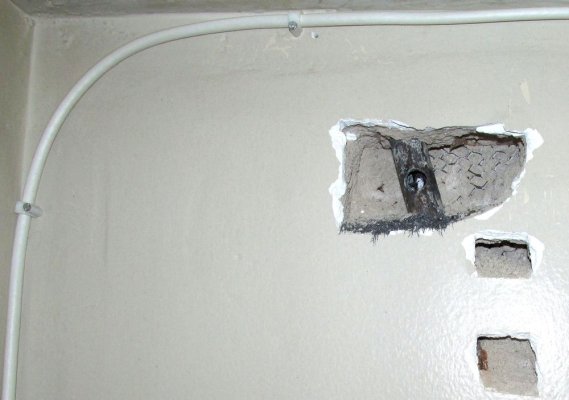
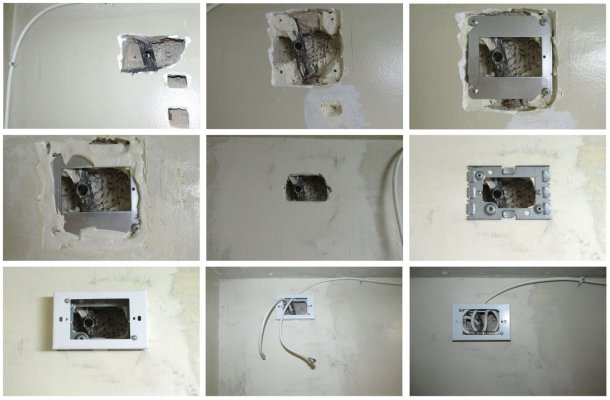
 
The lighting discussion made me go back and grab links to the latest fixtures I bought ...

These are the COOLEST :). Whether you are removing an old can, or adding to a current set, or remodeling, or even building ... if you can get a cable to an area above you drywall ceiling, you just cut a hole (I use a 4" hole saw and slightly increase diameter a bit with a drywall saw just working the edges), grab the snake the line voltage cable through the hole from above, connect it to the built in plugs in the fixture box - no wire nuts required. Push the code box back into the ceiling, connect the cannon plug, and slide the fixture into the hole holding the spring tabs up - then released ... like magic - zero failures in three years. $10 each!

https://www.amazon.com/gp/product/B06XW2C91H/ref=ppx_yo_dt_b_asin_title_o00_s00?ie=UTF8&psc=1

And, these gimbaled lights for cans ... shows unavailable now, but probably just slight model change ... high quality, no failures in three years - fixes the problem when builders or unaware owners install standard can lights on vaulted ceilings.

https://www.amazon.com/gp/product/B01JVE1QWG/ref=ppx_yo_dt_b_asin_title_o00_s00?ie=UTF8&psc=1
 
And, one last item for remodel from three years ago - repainted the common sort of oak cabinets - must be millions of them in the US. Wife wanted white uppers and gray lowers (the usual fashion choice :)).

Benjamin Moore Advance paint - easy to tailor color choices, huge pallet of options. https://www.benjaminmoore.com/en-us.../product-catalog/awiap/advance-interior-paint

Knowing how oak tends to bleed if not perfectly sealed and how there is deep grain, I initially primed with a synthetic shellac which is alcohol/ammonia clean-up- the difference chemistries of the two paints keep them from combining except at the surface layer (I think). Pulled all the doors and drawers, removed hardware, used Krud Kutter to remove oils and waxes, then sanded and then more Krud Cutter, then primer coat, then three coats of Advance thinned a bit with waterborne acrylic Pentrol, sanding lightly and cleaning with tack cloth between each coat.

Then, I thought - hmmm, so tried a couple of doors without the shellac primer, just using light coat of Advance - seemed to work as well, so I would simply put on three coats of Advance.

All this, btw, including the cabinet carcasses - with a very nice angle cut 2-3" (depending on surface) trim brush. A few brush strokes, but on the oak it is very hard to tell - the Advance lays pretty well.

Doors and drawers I painted horizontally.

The Advance takes waaaay more time to harden than regular water based paints. Figure 24 hours between coats to sand effectively. And about a 30 day curing time - longer is harder.

Easy cleanup!
 
I drilled through conduit and cut out a section of the old, probably never again needed master antenna coaxial cable that was probably installed in the mid-60s. I'll run the modern coax for TV and internet through a low voltage surface mount box that I'll install at the hole, and down the conduit, eliminating the visible vertical section running down the kitchen wall.

The thing that bugs me is that a similar building a block away, same height, from the same era, still has an antenna where master antennas go. But I'm pretty sure my building doesn't.
 

Attachments

  • conduit-exposed-2.jpg
    conduit-exposed-2.jpg
    85 KB · Views: 38
Last edited:
The lighting discussion made me go back and grab links to the latest fixtures I bought ...

These are the COOLEST :). Whether you are removing an old can, or adding to a current set, or remodeling, or even building ... if you can get a cable to an area above you drywall ceiling, you just cut a hole (I use a 4" hole saw and slightly increase diameter a bit with a drywall saw just working the edges), grab the snake the line voltage cable through the hole from above, connect it to the built in plugs in the fixture box - no wire nuts required. Push the code box back into the ceiling, connect the cannon plug, and slide the fixture into the hole holding the spring tabs up - then released ... like magic - zero failures in three years. $10 each!

https://www.amazon.com/gp/product/B06XW2C91H/ref=ppx_yo_dt_b_asin_title_o00_s00?ie=UTF8&psc=1

And, these gimbaled lights for cans ... shows unavailable now, but probably just slight model change ... high quality, no failures in three years - fixes the problem when builders or unaware owners install standard can lights on vaulted ceilings.

https://www.amazon.com/gp/product/B01JVE1QWG/ref=ppx_yo_dt_b_asin_title_o00_s00?ie=UTF8&psc=1

So can you usually dismount the old can lights from below?

I have replacement LED ones that supposedly can be installed from below.

Don't really want to go into a truss attic with blown cellulose insulation everywhere.
 
So can you usually dismount the old can lights from below?

I have replacement LED ones that supposedly can be installed from below.

Don't really want to go into a truss attic with blown cellulose insulation everywhere.

Many can be dismounted from below but it depends on how they were installed. If they were installed when the house was built they may be nailed to the studs, you might be able to remove these by pushing up on the fixture from below to break it loose (turn circuit breaker off). If they were installed after the drywall was up they are probably just held in by clips connected to the drywall, just need a screwdriver to release the clips and it will drop down.
 
Here's one for throwback Thursday, but I intend to build two more corners like this - one opposite the one pictured to extend a closet and the other in the kitchen to turn a 36" space intended for the old ranges that had storage compartments into a 30" space.

The new corner is on old asbestos tile. I avoided removing the tile, which is attached to the subfloor with black mastic that could also contain asbestos. I didn't want to drill holes through the tile either. All I removed was the carpet and the base molding. I made a base for the new corner by screwing pieces of lumber to a cement block. I placed the base wood side down on the tile and bracketed it to the walls. Not even to studs or blocking, just to the plaster walls with plastic anchors. I wonder how it would hold up to that kicky tool that carpet installers use.

I'm curious how it would be done if I paid a pro. :confused:

My method seems ridiculous but I may do it the same way again. If the asbestos is ever abated, that could be a problem because they may have to tear out the corners I built. Still, I'm saving a bunch of money even if I have to rebuild it after abatement. I don't plan on ever getting asbestos abatement though.
 

Attachments

  • low-voltage-brackets.jpg
    low-voltage-brackets.jpg
    20 KB · Views: 29
Last edited:
I finally finished my (partial) kitchen cable hiding project. If I ran it along the bottom of the wall, just above the base molding like the cable guy does, it would have to go around a doorway and the ceiling run looks better IMO. Hollow molding all around everything would have concealed it but there are complications to that. I may run narrow raceway across the ceiling. It enters the apartment through a kitchen cabinet so I put a connection in the Wiremold box to make it easier to detach and reattach.

My joint compound went bad and I spent way too many days inhaling Ready Patch fumes. I won't do that again.
 

Attachments

  • conduit-before-after.jpg
    conduit-before-after.jpg
    27.4 KB · Views: 22
  • conduit-coaxial-progress.jpg
    conduit-coaxial-progress.jpg
    373.8 KB · Views: 26
Little corner cabinet project.
 

Attachments

  • BABFC2BF-B810-4C48-AF63-B9E057E714AF.jpg
    BABFC2BF-B810-4C48-AF63-B9E057E714AF.jpg
    486.7 KB · Views: 22
  • F09D9857-8FD5-4875-93E0-A4B478D92D9D.jpg
    F09D9857-8FD5-4875-93E0-A4B478D92D9D.jpg
    512.1 KB · Views: 21
Last edited:
Back
Top Bottom