Your recent repair? 2013 - 2020

Status
Not open for further replies.
I decided my SSD in my computer was too small at 250 Gig. So I bought a new 100 Gig one.
I used clonezilla to clone the small one to the big one.
Problem was the big one kept pretending to be small, the issue appears to be that I have my disk encrypted.

It took many hours over many days.:mad:.. so many I started telling DW I might give her the new drive as I needed some way to get some value out of the $100 it cost me. :LOL:

Finally today, I decided I'd clone again and then follow another set of steps off the internet.. and it finally WORKED..... :dance:

I've decided I'll hold off on further upgrading my system for a couple of years :cool:

As I recall from looking at Clonezilla eons ago, since it is literally creating a clone, the target drive is sized to the same size as the source drive. Otherwise, it's not a clone, is it?

The same 'problem' occurs in reverse. People though they should be able to clone a 500GB drive to a 250 GB drive, because they only had 100GB of data. Makes no difference, it's a clone. They have to be equal, unused space and all. In both directions.

I would think you'd just need to use a partitioning program to add the unused space to that cloned partition.

-ERD50
 
I once had a chainsaw become impossible to start, turned out the fuel line had rotted/dissolved away after 30 years.

Years ago, I had a slight gasoline odor in the garage. Couldn't figure out where it was coming from.

I then realized the fuel line on my garden tractor had just become rotted/dissolved/permeable. Gasoline sort of wicked through it, but it evaporated before it could cause a drip or noticeable leak. Local auto store sold fuel line by the foot, so it was a quick/cheap fix.

-ERD50
 
As I recall from looking at Clonezilla eons ago, since it is literally creating a clone, the target drive is sized to the same size as the source drive. Otherwise, it's not a clone, is it?

The same 'problem' occurs in reverse. People though they should be able to clone a 500GB drive to a 250 GB drive, because they only had 100GB of data. Makes no difference, it's a clone. They have to be equal, unused space and all. In both directions.

I would think you'd just need to use a partitioning program to add the unused space to that cloned partition.

-ERD50

The first time after cloning, I used gParted (a partition manager) to enlarge the partitions, but this has no effect on system view of the encrypted file size.

Using clonezilla with the advanced settings and the -k1 switch allows it to proportionally resize all the partitions to a larger size (in my case). This was a lot better than resizing them myself. :)

I spent a LOT of time researching to understand the steps needed and trying them out on my new clone. Once I figured out I had the answer, I redid the clone to have a clean updated copy.

Then I did about 10 command line commands to adjust the system file size.
 
For laminating the PVC, I would not want to cut it into sections as joining them nicely will be hard.
Maybe use a paintbrush to slop on the glue quickly, it doesn't have to be waterproof like a pipe joint so not quite as critical in coverage.

Alternatively, how about using a pressure treated wood piece and painting it, or covering with a PVC sleeve ?

I opted for using a piece of pressure treated wood. The handyman custom made a piece to use in the french door repair. So it's all from one piece, not two glued together. I did use PVC for the brick mould. I got the kind with the notch in the back. Looks good.
 
Twelve years ago we installed a simple drain in our driveway to prevent a lake from forming when it rained. This summer we replaced the center drain with a full width channel drain.

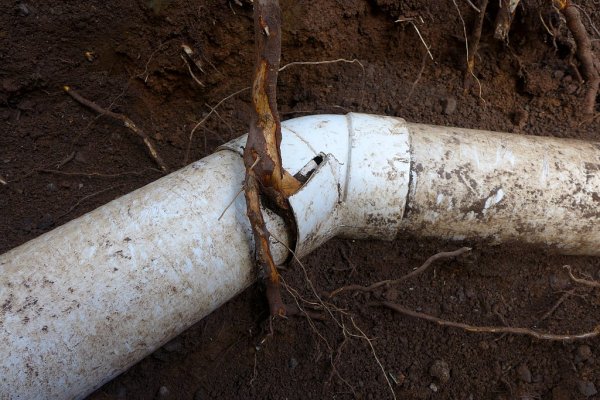
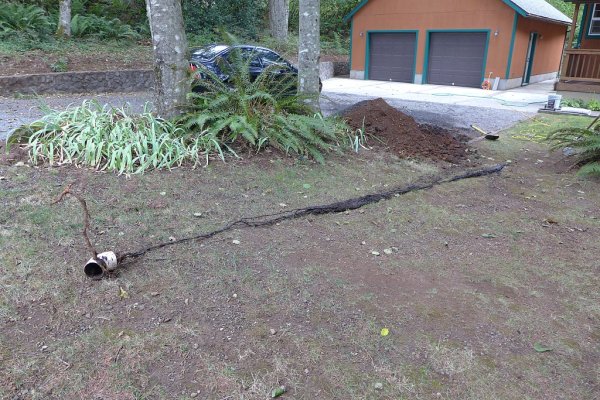
A few days ago we had a heavy rain and noticed a small lake was forming again. It eventually drained, but slowly. I ran a snake down the drain to see if I could find the clog, but it kept getting stuck partway in and there were small roots on the end of the snake when I pulled it out. So I measured the distance to the clog and decided to dig up the line and investigate.

Turns out a tree root had found it's way into one of the elbow slip joints (Polyethylene drain pipe, so the joints weren't glued). It had grown to about 3/4 inch thick and had busted the elbow apart. I cut out the elbow and discovered the root continued inside the pipe for another 18 feet! It was quite the workout pulling the roots and associated mud seal out of the pipe. It's amazing the snake could make it past all those roots without getting stuck.

I replaced the old 45 with a couple of 22.5 elbows for a smoother bend and used rubber Fernco couplings to add the repair in the buried line. Hopefully the tighter seal will prevent future root intrusion.
 

Attachments

  • 2020-09-21 124601 - Repairing driveway drain clogged with tree root.jpg
    2020-09-21 124601 - Repairing driveway drain clogged with tree root.jpg
    283.1 KB · Views: 35
  • 2020-09-21 144600 - Repairing driveway drain clogged with tree root.jpg
    2020-09-21 144600 - Repairing driveway drain clogged with tree root.jpg
    379.7 KB · Views: 40
You wouldn't think tree roots would be that "smart", but the little extra water leaking out of the 45 was like gold on those hot dry days. Glue!
 
You wouldn't think tree roots would be that "smart", but the little extra water leaking out of the 45 was like gold on those hot dry days. Glue!

Yeah, it was amazing to see how the tree could seek out that tiny water source and work it's way through the very tight gap into the pipe. In just 12 years the root had to grow at least two feet outside the pipe, and another 18 feet inside the pipe. Amazing.

When I was struggling to pull the long root out of the pipe it almost seemed alien. I just kept pulling, and pulling, and pulling. Disbelief and a little freaky. :)
 
FINALLY got the Honda FG100 tiller running right. First thing in the spring, it wouldn't start at all. Tried cleaning the carburetor, that didn't work and then replaced it. That worked, I thought, but only for a while. After some period of running, usually about a half hour or so it would start bogging down and eventually quit. After some time fussing with this aspect of things, it dawned on me that this always happened at about a half tank of fuel. Filling the tank made it run fine again, so clearly there was a hole in the fuel pickup line in the tank. It took a while to find that type of fuel line, it has to be thin-walled and very flexible to follow the "clunk" type fuel filter in the tank.

The thing is, I took that line out of the tank and examined it in minute detail, with a magnifying glass even, and couldn't find a thing wrong with it. Nonetheless, replacing that line fixed the problem and now it runs fine with a quarter-tank of fuel in it.

Another thing to check is the vent hole in the tank cap. On my mower, it clogged up and the mower would starve for fuel shortly after starting it. Cleaned it and no more problems.
 
That poor tree is trying to tell you something. Water me! :LOL:

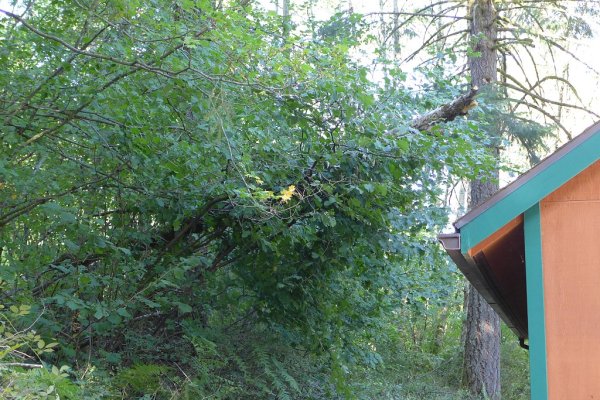
We are planning to remove those two alder trees (either side of the fern in the second photo). They are getting old and drop a lot of limbs every year. Kind of dangerous to have around the cars. They also tend to rot inside around this age and fall over unexpectedly. We actually had another Alder that size break off a couple weeks ago behind our garage during a wind storm. Thankfully it was so rotten it was light enough to sit on top of the small vine maples and not land on the garage roof or take out the gutters. I threw a rope around it and pulled it down where I could cut it up.

Unfortunately, we've had too many other projects this summer, so the tree removal will probably have to wait till next summer.

The alders literally grow like weeds around here. I'm constantly pulling the new seedlings from the flower beds. Unfortunately, they don't live very long.
 

Attachments

  • 2020-09-08 164102 - Debris from Wind Storm.jpg
    2020-09-08 164102 - Debris from Wind Storm.jpg
    366.7 KB · Views: 31
Another thing to check is the vent hole in the tank cap. On my mower, it clogged up and the mower would starve for fuel shortly after starting it. Cleaned it and no more problems.

I did think of that and checked it, the vent was clear. Besides, the engine ran fine until the fuel level reached the 1/2 tank level (where the fuel line exited the tank) and only then did the engine begin bogging down and running lean. That strongly suggested the fuel line inside the tank. Replacing it did in fact fix the problem.
 
I managed to lock myself out of the house today and then found the garage door keypad no longer works. Once I got back inside, I set about figuring out the keypad problem. Initially, I thought it was the battery, but it tested as good and a new battery didn't help. I tried repeatedly to reprogram the PIN thinking I'd forgotten it, but was unable to reprogram it.

Long story, short, it turns out the original PIN used just 3 digits for a 4 number PIN, so those keys were worn out. I was able to set a new code using digits not previously used. Saved about $40. :dance:

Next challenge, to re-pin a half dozen of the Schlage door locks to a common key. The previous owner seemed content to have 7 different keys to seven different doors, some of which have no known key at all. This drives me nutz.
 
...

Long story, short, it turns out the original PIN used just 3 digits for a 4 number PIN, so those keys were worn out. I was able to set a new code using digits not previously used. Saved about $40. :dance:...

Pretty cool that you figured it out and figured a work-around. Years ago, I had a similar problem on my little netbook, I couldn't get through the logon. I finally figured out one of the keys used in the password wasn't working. Thought I was stuck, but fortunatly it recognized an external USB keyboard before logon, and I got in with that until I found a replacement keypad on ebay (it just snapped in, ez fix, but it wasn't a North American keyboard, so a few keys were a little different, and maybe it sent all the keystrokes to Russia?).

-ERD50
 
Another thing to check is the vent hole in the tank cap. On my mower, it clogged up and the mower would starve for fuel shortly after starting it. Cleaned it and no more problems.


Yup. That’s where I thought Walt was heading. Easy to check by loosening the cap a bit to see if the problem goes away.
 
Replaced a pilot assembly on our pretty old patio heater that we have not used for a couple of years because it was finicky and not lighting. Should get more patio Fall time now. Was happy that the $27 didn't go to waste and it worked on the 1st try. Perhaps the thermocouple was bad or the flame wasn't hot enough (bluer now than the before more yellow flame). Black piece is a mercury switch for tilt and came with a new assembly.

Best video I've seen on how this (gas water heater or propane heater) --

26Ujone.jpg
 
Nice fix on the heater. The thermocouple went out on my water heater a long while back and I replaced it, no problem. There were urgings to "call the man" because it involved natural gas. But I did the soap bubble test on my connections and lived to tell about it.
 
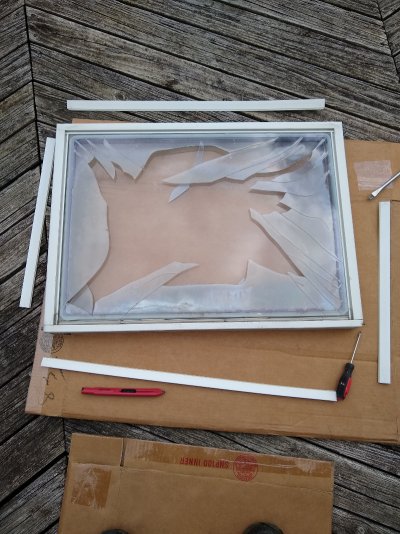
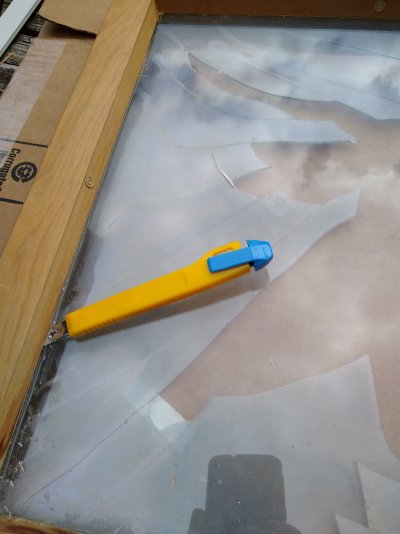
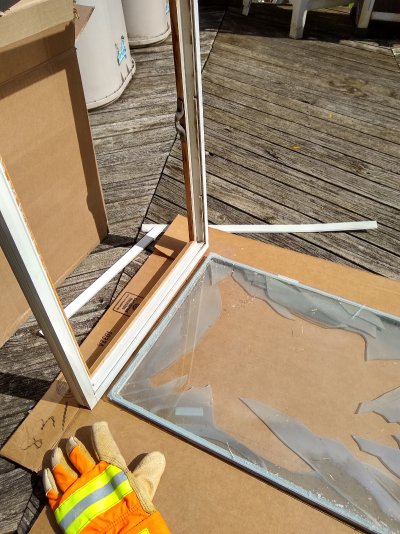
I replaced the IGU of an upper sash Anderson window.

It's pretty easy, the cost of the glass was $64 delivered. I'm amazed it didn't break as it came Fedex from Washington State.

The steps were:

  1. Remove the sash from the window, it is made to be removed in my window.
  2. Remove the trim, which was easily pryed up, being careful not to bend it too much, and then simply straighten it out and set aside.
  3. Then I could see the silicone that needed to be cut free, only on the inside trim side.
  4. Flip over the window.
  5. Slice the silicone, which is some work, maybe a larger blade would work better, but after 4 times around the window, the IGU fell free.
  6. Clean up the frame.
  7. Dry fit my new glass IGU.
  8. Remove my new IGU.
  9. Silicone the frame like before, only on the inside frame portion.
  10. Lay in the glass, making sure it is pressed into the silicone, and let it cure for 4 hours without moving.
  11. Snap back in the trim.
  12. Re-install the sash in the window.
 

Attachments

  • trim_removed.jpg
    trim_removed.jpg
    403.7 KB · Views: 36
  • cutting_free.jpg
    cutting_free.jpg
    230.1 KB · Views: 36
  • Frame_separate.jpg
    Frame_separate.jpg
    461.5 KB · Views: 35
Patched a hole on the side of the driveway where the ground underneath the asphalt had subsided/eroded away. The asphalt then collapsed, leaving a hole just the right size to get your foot trapped in and break your ankle. Looking around for something to fix it with I came across some stuff call Aquaphalt that although more expensive than most fixes came with almost universally favorable reviews. Pour it in the hole, tamp it down (I used a tamper with a jackhammer, that worked great!) and then water it. The water sets off some chemical reaction that solidifies it almost as good as hot asphalt mix. Maybe similar to latex paint? I had wondered if the 3.5 gallon bucket would be too much and what I'd do with the leftover stuff but needn't have worried - it was almost exactly the right amount and I had maybe one trowel's worth left over which I just left in the bucket that will go out with tomorrow's trash pickup. So far it looks good but I'll know better in a few years.

The hardest part of all that was carrying everything out to near the end of the driveway and then back when I was done. The actual repair was pretty easy.
 
My 2006 Hyundai Azera:

Replaced struts and shocks.
Replaced sway bar end links
Replaced upper control arm
Fixed driver side heater.
Fixed power seat switches.
Replaced hood and trunk struts
Fixed a dent
Touched up all the stone chips

Thanks all to Youtubers posting how to DIY.
 
I built my wife a 12'x16' sheshed a little over a year ago to replace a smaller one that had electricity. Her smaller shed was crushed after hurricane Micheal blew a tree down on it. When I built it I placed the electrical conduit under the 2"x4" that is the bottom plate of the wall. I marked the position inside the shed with a pencil mark. now a year later I decided to add a light and outlet to HER sheshed. I drilled a 1-1/8" hole through the plate. It lined up perfect with the conduit coming up from the ground. Only one hickup, the wires were so close to the bottom of HER sheshed, that the drill bit cut through the insulation and popped the circuit breaker. I managed to fish the 3 wires up though the plate, and added an insulator over the wires to protect where I the cut insulation. I added more conduit up to a switch and added an outlet, installed a 4ft LED light, plugged it in and "there was light"


PS.

I emphasized HER sheshed, because as she's moving things out for a yard sale, I suggested she didn't need 3 rakes or 4 limb loppers, and three pitch forks, she made it clear this is her shed and she can store them if she wants. :) That's OK, I did move all those lawn and garden tools to her shed from mine after I got hers built!
 
Turns out a tree root had found it's way into one of the elbow slip joints (Polyethylene drain pipe, so the joints weren't glued). It had grown to about 3/4 inch thick and had busted the elbow apart. I cut out the elbow and discovered the root continued inside the pipe for another 18 feet!

You wouldn't think tree roots would be that "smart", but the little extra water leaking out of the 45 was like gold on those hot dry days. Glue!

Even in NC where we've had a lot of wet, my corrugated plastic drains got roots, presumably through tiny nicks made on installation or through movement against sharp rocks (no joints). I'm betting the bad droughts of the late 2000s caused the roots to go into water-seeking-missile mode. Once in, they'll take advantage.

I spent the better part of the last two days trying to clear them. I give up. Solid roots. Future "recent repair" will be to dig up and replace with PVC, and oh yeah, those joints will be solidly glued.
 
Got the fan working on my 25 year old dehumidifier condenser.

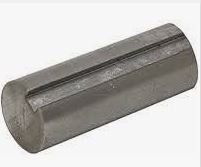
The rubber blade assembly was pressed on the 1/4" motor shaft with a key that has either deteriorated or disappeared. Recently, the fan was only turning at 1/16th speed, and mostly slipping on the motor shaft, which was keyed (see pic).

The FIX: place fan blade on shaft, then jam a piece of 14 gauge copper wire through the key area of the shaft. This effectively pressed against the fan blade assembly and secured it.

BTW, I got the idea of copper wire from some HVAC repair forum. Turns out this is a pretty common trick to secure things. Copper has good properties of stickiness and malleability, while still retaining shape and withstanding some heat.
 

Attachments

  • motor.JPG
    motor.JPG
    12 KB · Views: 146
Last edited:
All this talk of roots in drain pipes, has me wondering about a septic system I'm installing.
At first I thought, I'll just glue the joints, but that seems silly as the pipes have drain holes in them.
Do roots cause big issues with septic systems ?
This system is in a forest.
 
...the wires were so close to the bottom of HER sheshed, that the drill bit cut through the insulation and popped the circuit breaker.
I'm not overly careful with 110 AC, but I probably would have had the breaker off already if I was drilling towards some wiring. But when you heard the pop and smelled it, that was a good sign to stop drilling :LOL:

Do roots cause big issues with septic systems ?
This system is in a forest.
Yes. And gluing wouldn't help, of course.
 
All this talk of roots in drain pipes, has me wondering about a septic system I'm installing.
At first I thought, I'll just glue the joints, but that seems silly as the pipes have drain holes in them.
Do roots cause big issues with septic systems ?
This system is in a forest.

We're in a forested area too. When we had our septic system installed, they ran pipes for the drain field on both sides of an alder tree. I never thought about roots growing into the pipes, and they didn't say anything about it. Over the years that tree grew big and healthy, much larger than any other alder on our property. We eventually cut it down a few years ago because we tired of picking up the limbs it dropped every year.

Considering how healthy that tree was, and drain lines that are intentionally perforated, I can't help but think it probably grew roots into the lines. At least into the drain rock, if not into the pipes themselves.

Having said that, our septic system is 30 years old now and we have never had an issue with it. The tree is gone, so any roots left in the drain field will eventually rot away (many years from now). I'll never know without digging up the drain lines, but if it ain't broke, don't fix it. :)

If I were doing it over, I would try to keep the trees away from the drain lines as far as possible.
 
Status
Not open for further replies.
Back
Top Bottom