Your recent repair? 2013 - 2020

Status
Not open for further replies.
Interesting to know as I've never heard of that.
If a person has a second fridge in the basement and doesn't want to run it empty all year for those few times when its needed like for parties/celebrations.

Would it be good to plug it in for 3 days every month, just to mix up the freon ?


I am giving advice based on what I've been told and actually having used fridges die with a line of gas leaking holes across the evap coils - but - I'd say plugging in for a few minutes every 2-3 months would be plenty good. Would depend on how long it takes for the acid/freon/oil to all separate and form distinct layers.
 
Why not put it on a timer and have it turned off and on automatically?
 
Just signed on to have two chimneys rebuilt and some other brick work attended to. Time for a new dishwasher too. (Like a mechanical one I mean!)
 
It was last Wednesday night, after a very stressful day at work. Wednesday is also known as "Pickup Night." The housekeepers come on Thursday. That means Wednesday night is when we clear off all the horizontal surfaces so they can be properly cleaned the next day.

As I was straightening up, I noticed a little water leaking in one of the bathrooms. It appeared to be from between the toilet base and the tank.

So i got out my tools, then set out to block in the water going to the toilet. The valve leaked three or four drops a second while I was closing it, but I wasn't too worried. I know that those seals are really only made to hold when the valve is fully open or fully closed.

But when I got it fully closed, it was still leaking quite a bit. I tightened down a bit more, and it seemed to slow down a bit, so I put some more muscle on it.

Well, the doggone valve stem broke right off in my hand and a gushing jet of water exploded out, soaking me and the rest of the bathroom. While trying (mostly unsuccessfully) to hold back the surging torrent with my hands, I hollered at my wife, "Debbie, turn of the main water supply!"

Then I realized Debbie doesn't have any idea where the main water valve is, so I abandoned the bathroom Niagara and ran full speed to the back yard, my sneakers squishing with every step.

On the way back from the back yard, I picked up a handful of old towels. As I began mopping up, my wife found me, and I told her what had happened. She asks, “Now, the water is only off in this bathroom, right?”

When I explained that the water was off in the whole house, she said, “Well, we’ve got to get someone out here tonight, because I really need to take a shower and wash my hair before bible study tomorrow.” (Debbie retired about two years ago.)

I hate doing plumbing work, so I don’t mind hiring a plumber, but I don’t want to pay the after-hours charges, so I told her, “God and the bible study ladies will forgive you if you don’t get a shower tomorrow.” She didn’t seem convinced, so I pulled the water supply line loose from the valve. (By the way, in this case, it hardly mattered, but if you pull that line loose without first flushing, you’ll spill a gallon of water on the floor.)

Then I set out to remove the busted valve. On a compression fitting, of course, the threaded open end of the nut faces away from the wall, so that it can hold the valve body on to the tubing coming out of the wall. When you’re facing the wall, if you grab on to the valve body and turn it counter clockwise, it will turn and turn without ever breaking the threads loose. It had been 10 years or so since I had assembled a compression fitting, so I forgot. When I turned it the right direction, it came off easily, and I was off to Home Depot.

Once I had the part in hand, everything went together smoothly. The whole episode was probably less than an hour start to finish, including time spent chasing parts.

Still, I really don’t need this kind of excitement on a weeknight after a hard day at work. Especially on pickup night.

The moral of the story: I really need to retire.
 
....
But when I got it fully closed, it was still leaking quite a bit. I tightened down a bit more, and it seemed to slow down a bit, so I put some more muscle on it. ....

Now what DIY'er didn't wince, knowing exactly what was coming...

Well, the doggone valve stem broke right off in my hand and a gushing jet of water exploded out, soaking me and the rest of the bathroom.
And there it is! :LOL: (well, it wasn't funny at the time, I'm sure!)


Once I had the part in hand, everything went together smoothly. The whole episode was probably less than an hour start to finish, including time spent chasing parts.
I'm impressed, that's pretty fast work.

Only once in my life did a plumbing job go smoothly. So when I finished, I took a nap, and made sure to get up just before DW got home from grocery shopping, so I could be busy cleaning up the tools as she walked in ... "Went pretty well, just finishing up!". :cool:

-ERD50
 
:er:Once I had the part in hand, everything went together smoothly. The whole episode was probably less than an hour start to finish, including time spent chasing parts.:er:
With my luck, once the valve was replaced, I would have found the original leak.
 
Slow But Steady
That was quick work. It was clever of you to break the valve while HD was open for business.

"Then I realized Debbie doesn't have any idea where the main water valve is, so I abandoned the bathroom Niagara and ran full speed to the back yard, my sneakers squishing with every step."

This is the part that surprised me. I never lived in a house without a main shutoff inside the home. We have about 24" of snow on the ground right now so if I was in this situation it would likely take 15 minutes or more to get to the shutoff resulting in many more gallons worth of cleanup.

Which raises an interesting question does every adult and teen ager in the house know where the various shut off valves are? It probably is something anyone who is likley to be in the house alone should know. One might also write a brief description of these things as well. (Include where the electrical panels and main shutoffs (if not in the panels) would be located.
 
And there it is! :LOL: (well, it wasn't funny at the time, I'm sure!)

It wasn't that funny at the time. But you have to laugh or cry.

I'm impressed, that's pretty fast work.

-ERD50

My wife judges my projects by the number of Doggone Its she can hear from the other room. So you'd be less impressed if you knew that this was about a 6 doggone it project. In addition to the usual dropped the tool or dropped the fastener type things, I also banged my funny bone on the toilet paper holder, and cut the back of my neck on the sharp point of the flush handle.

The problem with plumbing is that it's always in places that you can't reach.
 
With my luck, once the valve was replaced, I would have found the original leak.

Lucky for me, the original leak was a very small one. I actually left it for the next day, because I wasn't in the mood to tempt fate again.

It was just a matter of tightening the screws that hold the toilet tank to the base.
 
Slow But Steady
That was quick work. It was clever of you to break the valve while HD was open for business.

That was actually the most clever thing I did that night.

This is the part that surprised me. I never lived in a house without a main shutoff inside the home. We have about 24" of snow on the ground right now so if I was in this situation it would likely take 15 minutes or more to get to the shutoff resulting in many more gallons worth of cleanup.

Interesting, but it makes sense.

I've only lived in California and Texas, but I've never had a house with a shut-off valve inside.
 
Which raises an interesting question does every adult and teen ager in the house know where the various shut off valves are? It probably is something anyone who is likley to be in the house alone should know. One might also write a brief description of these things as well. (Include where the electrical panels and main shutoffs (if not in the panels) would be located.

By now, I've shown Debbie the main water valve. I should probably show her the main electric shut-off in the breaker box as well.
 
Lucky for me, the original leak was a very small one. I actually left it for the next day, because I wasn't in the mood to tempt fate again.

It was just a matter of tightening the screws that hold the toilet tank to the base.


Hope yours is not like mine... all 3 commodes had leaks where you have within a years time frame... all 3 I had to replace the rubber gasket...

Not a terribly hard job, but you would be surprised how many gaskets there are and how they look alike.... and your old dried crushed one you bring with you looks nothing like what is in the store...
 
That was actually the most clever thing I did that night.


Interesting, but it makes sense.

I've only lived in California and Texas, but I've never had a house with a shut-off valve inside.
In Mi and In shutoff valves are inside, since the freeze line can be as deep as 48 inches (Detroit area). As a result water pipes have to be buried that deep so water lines come in thru the basement floor.
 
Came home from my hike yesterday and turned the heat up, made dinner, and found I wasn't warming up. So I went and turned the thermostat up.
That's when I noticed the temperature wasn't rising.
I opened the furnace cover and found the igniter wasn't glowing when the furnace ran through a cycle. I ran another cycle and saw a bright white glow when it got to the point the igniter gets its juice.
I spent a half hour removing the igniter then noticed I need to remove the bracket it attaches to instead. Oops, could have saved 25 minutes.
By then everything was closed, but luckily it only went down to 35 last night and the house stayed above 50 till morning.
This morning I spent an hour going to three different supply houses to find the part but I did find it! It only took ten minutes to attach the igniter to the bracket and install the bracket in the furnace. Ran it through a cycle to verify all was working and vacuumed the interior of the furnace.
Disaster averted and the repair only cost $24.80 in parts.

Your furnace may also have a flame sensor? Mine is the old standing pilot model, so I'm not 100% up on the igniter types.

In my case, I have a spare thermocouple on hand, since those are pretty cheap, and are a common failure. You might want to buy a spare of any of these items. Not only save you a service call, but you can fix it faster and save the running around. And probably get them cheaper on-line than a local supply house.

Congrats on getting it fixed - $25, some running round and a little effort is pretty good compared to what a service guy has to charge for this to make a living.

-ERD50
 
OK... finally 'fixed' the water hammer.... I do not know why it started, but I have had it for a few years... I did try draining the whole house and it was less, but still there... got worse, so I thought I would add some arrestor below the sinks upstairs...


Take a look at cr@p.... those stupid valves with the small metal hoses that are not separate.... you know, like they have on toilets... I checked the whole house and every faucet except the kitchen has them.... and the kitchen is a mess of pipes for some reason....

Sooo, decided to try and drain the pipes again.... but this time I did not open the faucet to the wet bar... hey... that acts like an arrestor.... since we do not use that sink I can just put some tape or something else there so the cleaners do not touch it!!! I might even take off the handle so nobody can use it...

Not a great fix, but solved the problem....
 
Keurig coffee maker quit making a full cup of coffee. A google search revealed it probably to be descaled. Used white vinegar and ran through several cycles. Flushed with water and now all is well. Until the next time.
 
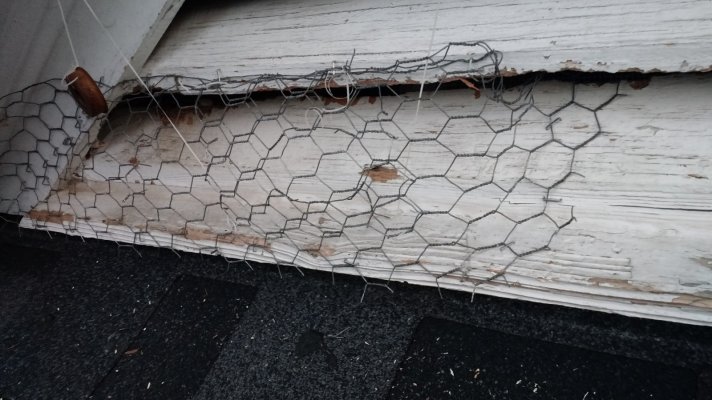
Here's my quick attempt at a one-way squirrel door.

Chicken-wire completely blocking off the hole except for in the very center of the picture, there's a hole in the mesh. In front of the hole is a "door" of chicken wire, hinged on top (tied with dental floss), and dental floss is tied to the bottom of the door. The floss goes through screw-eyes and is weighed down. There are two weights (one outside the shot...not a very good picture for showing the mechanism). Theoretically, the squirrel will push through, but the door will shut behind it, closing off access. Not sure it will work, but it was pretty quick to build.
 

Attachments

  • IMG_20160206_180109738.jpg
    IMG_20160206_180109738.jpg
    482.5 KB · Views: 13
Last edited:
Here's my quick attempt at a one-way squirrel door.

Chicken-wire completely blocking off the hole except for in the very center of the picture, there's a hole in the mesh. In front of the hole is a "door" of chicken wire, hinged on top (tied with dental floss), and dental floss is tied to the bottom of the door. The floss goes through screw-eyes and is weighed down. There are two weights (one outside the shot...not a very good picture for showing the mechanism). Theoretically, the squirrel will push through, but the door will shut behind it, closing off access. Not sure it will work, but it was pretty quick to build.

I hope it works for you. There's a TV commercial running recently that cracks me up (I have no idea what the product is), but a retired looking 'Mom' is talking on the phone with her adult son, rambling about the goings on there. Something like this, in a dry monotone:

"The squirrels are back in the attic again. And your Father won't hire an exterminator. He says it's personal this time."

I don't know why - it just cracks me up.

Ahhh, here it is - Geico!


-ERD50
 
Your furnace may also have a flame sensor? Mine is the old standing pilot model, so I'm not 100% up on the igniter types.


In my case, I have a spare thermocouple on hand, since those are pretty cheap, and are a common failure. You might want to buy a spare of any of these items. Not only save you a service call, but you can fix it faster and save the running around. And probably get them cheaper on-line than a local supply house.


Congrats on getting it fixed - $25, some running round and a little effort is pretty good compared to what a service guy has to charge for this to make a living.


-ERD50


Yes it does have a flame sensor. In fact I took that out and cleaned it before I even trouble shot the problem as it should be cleaned every year and has been the issue before. I'll order a spare from Amazon soon, that will be cheap insurance.
 
The motor in my Eureka Bravo vacuum cleaner started making those horrible noises a few days ago. It is a used motor I bought 6 years ago for $15, and installed myself, so I got my money's worth out of it (not including labor, which is OK with me). When the original motor borked, ball bearings came out of it onto the rug. This time no bearings falling out yet, but an awful sound and the smell of something electrical getting way too hot. Gonna open it up and look around. Probably some inaccessible, factory-sealed motor bearing wearing out? Oh well, maybe I can get another used motor for $15 or so. But hoping it will be something fixable. Good to have this low stress project to occupy my time. And I have 2 other backup vacs to take over for the Eureka while I'm fixing it. :)
 
Motivated by this post I replaced 4 fluorescent tube lights, 2 each on two fixtures, with LEDs. It was not that difficult and I didn't burn down the house (my greatest fear:)). Even better, these lights are in the laundry room and closet, and they are always left on (I won't say by whom). :)

Now all I need is to find a way to dispose of the tubes.
 
Put them by the curbside with a label: FREE, only 100 hours of on time.
 
Motivated by this post I replaced 4 fluorescent tube lights, 2 each on two fixtures, with LEDs. It was not that difficult and I didn't burn down the house (my greatest fear:)). Even better, these lights are in the laundry room and closet, and they are always left on (I won't say by whom). :)

Now all I need is to find a way to dispose of the tubes.
I'm all over this! We've got a closet that has flickering on one fixture and the ballast is defunct on the other (that one's dark).
 
Status
Not open for further replies.
Back
Top Bottom