Your recent repair? 2013 - 2020

Status
Not open for further replies.
Replaced the two front caster wheels on the ZTR mower. After fighting with flat tires for years one of them finally bulged on the sidewall and blew out. I drove all over looking for a replacement and finally found it where I should have started - Amazon. Bought two no-flat wheel and tire assemblies that are bumpy but I can forget the air compressor every time I mow. The task was very straightforward too; I was counting on a siezed nut or something but it only took me a few minutes.

While I was on Amazon shopping for mower parts I figured I should also get around to replacing the broken grass deflector. That was pretty easy, too.

But it didn't take long to work up a sweat. I think the humidity was somewhere around 1,000%!
 
Gutted the tile and wall underneath in the upstairs bath of our 1942 all plaster walled house to the studs. Jackhammered out the 3 1/2" cement with mortared tile on the floor. Because the drains were imbedded in it and were galvanzed steel, and practically fully plugged. Busted up the original cast iron tub (already refinished twice, and peeling again). Had to sister the floor joists to get a new level. Install pvc plumbing. Decided to i stall a 60x30 shower instead of tub. Sweat in new fixtures. Once the walls are up (5/8s sheetrock + 1/4" hardie backer), I will pay to have the subway tile installed. 10 years ago, I would have done everything, but just doing all the demo, prep, plumbing and construction saves me around $5-6k. That's good enough. Original plan was to wait until I was retired to do it, but when the galvanized started to leak.....
 
Replaced the hot and cold water cartridges in our kitchen sink. $18.00 and a trip to Ace Hardware. The Lowes personnel were clueless on the replacement parts; even another customer made that comment.

Ed
 
... Once the walls are up (5/8s sheetrock + 1/4" hardie backer), I will pay to have the subway tile installed. ....

Do yourself a favor, skip the sheetrock, and go 100% cement board. They make a 1/2" thick panel (3'x5'?) that is lightweight. Use with proper moisture barrier (see their guides for details).

The cement board is so superior to any green sheetrock, it isn't even funny.

-ERD50
 
Do yourself a favor, skip the sheetrock, and go 100% cement board. They make a 1/2" thick panel (3'x5'?) that is lightweight. Use with proper moisture barrier (see their guides for details).

The cement board is so superior to any green sheetrock, it isn't even funny.

-ERD50
+1. Green board is for damp, not wet areas.
 
I'm aware of that. But I must have 7/8" thickness to match existing plaster it will mate to. Since all sheetrock will be covered with 1/4" Hardie backer, (Hardie backer is CBU, cement based underlayment) with sealed seams, makes no difference if its green rock, purple rock or regular sheetrock. Provides more sound and and thermal isolation as well, and stiffer wall, plus all that wall surface will be covered with subway tile. The actual shower will be a Trugard membrane waterproof system. (Similar to Schluter-kerdi). Original contractor that I got a quote doing all the work was going to shim the 2x4s with plywood strips and just cover with 1/2" greenrock, and roll on a liquid membrane.
 
Last edited:
OK... getting the new HVAC system in today....

The first problem we come across.... the thing is so BIG that it will not fit through my gate!!! We looked at taking it through the garage and through the regular door that is on the other side.... still it is too big.... They are looking at removing a section of fence close to where it is going to go...


Second problem... they said the new pad would not fit between the two sprinkler heads.... yes, the old owner had put sprinkler heads right up against the old AC.... I said I thought they were on the old system as I had never seen them work before.... but NOOOOO, :facepalm: it was on a working section... so had to run to Home Depot to pick up a short pipe and a cap to cap it off.... and that is TWO heads.... and they are so close together that the new pad will not go down!!! So, we are going to put the new pad on the old pad so it will clear the plugs....

Will update if anything else goes wrong!!!

Amazing how many things can wrong even if you think all you are doing is replacing one HVAC with another.... ;)
 
Gutted the tile and wall underneath in the upstairs bath of our 1942 all plaster walled house to the studs. Jackhammered out the 3 1/2" cement with mortared tile on the floor. Because the drains were imbedded in it and were galvanzed steel, and practically fully plugged. Busted up the original cast iron tub (already refinished twice, and peeling again). Had to sister the floor joists to get a new level. Install pvc plumbing. Decided to i stall a 60x30 shower instead of tub. Sweat in new fixtures. Once the walls are up (5/8s sheetrock + 1/4" hardie backer), I will pay to have the subway tile installed. 10 years ago, I would have done everything, but just doing all the demo, prep, plumbing and construction saves me around $5-6k. That's good enough. Original plan was to wait until I was retired to do it, but when the galvanized started to leak.....
I'll be going down this road soon. Our bathrooms/shower are "plasterboard" walls (like drywall, but 18" wide, installed horizontally), with plaster over them and another smooth coat of something else. Tiles were applied to this with mastic. I'm surprised it lasted for 65 years. I redid all the tile in our main bath a couple of years ago, now the tiles in the master bath shower are slightly buckling, not a good thing.
 
I'll be going down this road soon. Our bathrooms/shower are "plasterboard" walls (like drywall, but 18" wide, installed horizontally), with plaster over them and another smooth coat of something else. Tiles were applied to this with mastic. I'm surprised it lasted for 65 years. I redid all the tile in our main bath a couple of years ago, now the tiles in the master bath shower are slightly buckling, not a good thing.

We had a similar shower problem in a house about 20 years ago. We let the walls dry out for a good long time and brought in an outfit that removed the grout and replaced it with an epoxy grout. They did the epoxy grout for the lower 3 or 4 feet. It totally fixed the problem. The contractor said the tile would break before the grout would.
 
That is my wall construction as well. Dimensional 2x4s anywhere from 16- 18 on center with the 18" high plaster board then a coat of cement/plaster. Then the fine white coat. Because it was all by hand, wall thickness varies from 7/8- 1" thick. If it was like my house, they didn't use mastic on the tiles. It is cement. Mastic allows you to remove the tile and leave the wall intact. Not so with cement. Walls came down to the studs. PO had the tiles refinished. Which just allows the mold to build up behind the refinish layer and grout.
 
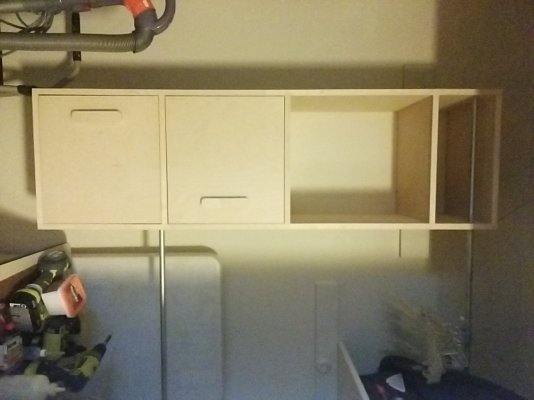
Designed and built a closet in the extra bedroom...
 

Attachments

  • IMG_20170715_113445.jpg
    IMG_20170715_113445.jpg
    551.6 KB · Views: 12
Shower surrounds have changed so much over my lifetime. Old style was green (some places had blue) board drywall that was more water resistant. Relied on the grout being perfect to keep the water out. Shower pans were cement, usually with a rubber liner, then went to fiberglass with cement. Then came the cement boards for the surround. They would tolerate constant moisture. Now they have paint on membranes. Some installers trust the paint so much they are going back to drywall. I'm doing the shower and in typical over-cautious mode I used cement board AND the membrane paint. Don't want to deal with this again in my lifetime. Whatever you use for backer now I would strongly suggest using the paint. For <$100 in material it is a bargain insurance policy against future problems.
 
After changing oil, sharpening, blades, my old Murray lawn tractor refused to start. Poked around, tried starting fluid, nothing. Crank, no run. Pulled one plug, no spark on cranking. Disconnect coil's grounding (kill) wire, in case it is shorted to ground, nope still no spark.

Must be bad coil. Ordered new one, prices ranged from $12 to $60. Got one from fleebay for 12 free shipping. It arrived yesterday. Remove cooling fan's shroud, air cleaner assembly, remove old coil, install new, set gap to .20. Crank, have spark.

Classic case of co-incidence, not causation.

Reassemble, fired up, mowed lawn. And again all is well. Until something else breaks.
 
Last edited:
We had a similar shower problem in a house about 20 years ago. We let the walls dry out for a good long time and brought in an outfit that removed the grout and replaced it with an epoxy grout. They did the epoxy grout for the lower 3 or 4 feet. It totally fixed the problem. The contractor said the tile would break before the grout would.
I don't think I can get away with that. There's some serious "slumping" going on, and I know the stuff behind those nice, shiny tiles is not pretty.

Then came the cement boards for the surround. They would tolerate constant moisture. Now they have paint on membranes. Some installers trust the paint so much they are going back to drywall. I'm doing the shower and in typical over-cautious mode I used cement board AND the membrane paint. Don't want to deal with this again in my lifetime. Whatever you use for backer now I would strongly suggest using the paint. For <$100 in material it is a bargain insurance policy against future problems.
+1. I used the cement board (HardiBacker) and the membrane stuff (RedGard?) applied over it, with reinforcing mesh in the corners and seams. Any water that gets behind the time (it's just a matter of time . . .) should stay on top of the board/membrane. I installed the board so it was on top of the flange for the cast-iron tub, I'm optimistically hoping any water will find its way to the bottom of the board and sit in that pan to dry out. I even thought about leaving a weep hole every couple of tiles, so water could drain into the tub, but I decided water would just enter those weepholes and cause trouble each time the shower was used.

Both of my tub/shower surrounds failed where the soap dish/washcloth porcelain thingy was located. The one I redid has >no< little cubbies, trays, vending machines, or anything else that goes through the tile and board except for the faucets and some small brushed stainless steel posts/knobs that are well above the splash zone. DW uses these to hang storebought racks on. And I've marked where the grab bars will go, when that time comes. I'll do the same thing on our master bath surround.

That is my wall construction as well. Dimensional 2x4s anywhere from 16- 18 on center with the 18" high plaster board then a coat of cement/plaster. Then the fine white coat. Because it was all by hand, wall thickness varies from 7/8- 1" thick. If it was like my house, they didn't use mastic on the tiles. It is cement. Mastic allows you to remove the tile and leave the wall intact. Not so with cement. Walls came down to the studs.
Thanks--maybe I had cement, because those tiles took chunks of the wall with 'em when they came off.

The thinset products are darn good today, but there's gotta be a better way for a nonprofessional to put up tile. If you've done a good job with the backerboard (shimming studs if required), you have a very, very flat surface to affix the tiles to. Then, you use the recommended notched trowel and slather on thinset and set the tile. There's a lot of goo, and it's not hard to set tiles just a little bit tilted in that bed of goo (not entirely flat to the wall), which may become apparent when you lay in a tile next to it or (my luck) when everything is set and the shiny tiles don't all reflect the light the same way. The backerboard was flat, why introduce another source for mistakes? I want to use a lot less cement/mastic, press the tile until it makes contact with the backer (the glue is pressed into the ridges on the tile back), done. As a bonus, if the glue lines are vertical, maybe that water that eventually gets through the grout will actually have a chance to drip down and not be trapped behind the tile.
 
Last edited:
The ballast on the fluorescent light fixture in the kitchen was buzzing and driving me crazy so I bought 4 LED tubes and bypassed the ballast.

What I thought would be a 5 minute job turned into an hour because I had to rewire the clips that hold the lights as the LED tubes have both the hot and the return at one end as opposed to the hot on one end and the return on the other end for the old fluorescent tubes.
 
Dehumidifier in basement not doing its thing very well. Filter is clean, always vacuum and wash it. The check filter light came on. The water in the bucket looks cloudy. Took it outside blasted it with the hose, electronics and everything. Some lint came out of the hose connection . I only use the bucket, never the continuous hose. After trying to get all the water out, I waited about 10 minutes and plugged it in. I didnt fry anything so that was a plus. Of course all the digital readings now are water logged and crazy. I went to amazon and bought a replacement, took a 3 year which means a 5 year extended warranty. This was 2 days ago its seems to be limping along doing a better job with the continuous drain, the bucket thing must be clogged. Fedex tracker says Monday delivery for new unit.
 
This is somewhere between my recent repair and shoddy work. I have been having a problem with the condensate drain in my AC backing up. I could suck all the water out with my shopvac, but that never solved the problem.
The first guy just blew the line out and left. Same problem
The next guy, who apparently knew what he was doing, went under the house to check the line. Instead of rigid PVC pie all the way, there was a flex hose between the tray and the outlet.
It turned out the hose had sagged in 2 places, making the equivalent of 2 P-traps! The head pressure from the tray was not enough to overcome the trapped water.
The second guy straightened the flex out and only charged me for a service call. I gave him an extra $20 for solving the problem.
DW is happy:dance:
 
This is somewhere between my recent repair and shoddy work.

Snip...........

The second guy straightened the flex out and only charged me for a service call. I gave him an extra $20 for solving the problem.
DW is happy:dance:

Would work in the tipping thread also.
 
Dehumidifier in basement not doing its thing very well. Filter is clean, always vacuum and wash it. The check filter light came on. The water in the bucket looks cloudy. Took it outside blasted it with the hose, electronics and everything. Some lint came out of the hose connection . I only use the bucket, never the continuous hose. After trying to get all the water out, I waited about 10 minutes and plugged it in. I didnt fry anything so that was a plus. Of course all the digital readings now are water logged and crazy. I went to amazon and bought a replacement, took a 3 year which means a 5 year extended warranty. This was 2 days ago its seems to be limping along doing a better job with the continuous drain, the bucket thing must be clogged. Fedex tracker says Monday delivery for new unit.

Follow up; Apparently I didnt repair anything, its still broken, and the new unit is in Tennessee. I have no idea what I looked up before for the estimated delivery but Monday came and went and no unit.
 
The ballast on the fluorescent light fixture in the kitchen was buzzing and driving me crazy...
I guess listening to a B flat was getting kind of old.

I got rid of the ballast and put in LED's in the kitchen and one closet. That's the standard fix around here now: if any fluorescent tube light doesn't work perfectly, it gets replaced by LED's.
 
Replaced the hot and cold water cartridges in our kitchen sink. $18.00 and a trip to Ace Hardware. The Lowes personnel were clueless on the replacement parts; even another customer made that comment.


Ed


I've taken advantage of Delta faucets lifetime warranty several times. Sometimes I figure it's easier to just go to local hardware store but between cluelessness of the clerks and variation in faucet sets it's better for me to go with the factory. The shower cartridge was 40 bucks and the kitchen sink cartridge was difficult for them to identify even with pics
I have yet to try the cartridge they sent.
 
So this is not really a "repair", but...

I've finally been "convinced" to put down what she's calling "luxury vinyl plank" in the "kitchen", but that includes laundry and breakfast room.

They stay start on the longest wall. There IS no longest wall! Seems like no matter where I start, I'll need to start in more than one place and meet up. Luckily, it's a floating thing, so I think I'll be able to slide it around.

Anybody ever done anything like this? Where would you start?
I'm done with the project!

If I did it again, I'd do it a bit differently. What I did was snap a line on the longest row, then measure out to the far end, and start there. It wouldn't have been that bad, but every time I did anything, the whole thing slid, and that played heck with my wall gap spacing. So I'd temporarily nail something down very early so it wouldn't slide.

And of course it was SUPER tedious around the doors because it had to be under the door jamb and then no more than 3/8 out from the wall (I re-used the 7/16 shoe moulding). The instructions said to leave 1/2 between the plank and the wall, and I couldn't do that or the shoe wouldn't cover the gap! I'm sure there are faster ways than I did it. I should have researched youtube before I started. I did watch the official how to from Lumber Liquidators, but it has no detail. Then I suffered through a couple of minutes of some other youtube videos without learning anything, then gave up. I'm sure there are good videos, but I didn't have the patience to find them. Not that it's a good technique, but I made my own youtube on my approach to going under door jambs.

https://www.youtube.com/watch?v=qD3UFC52tZI
 
I'm done with the project! ...

What a coincidence! Yesterday, I helped DD and SIL install a 'click lock' flooring in the room they are setting up for the soon-to-arrive baby.

Home Legend Brazilian Oak 3/8 in. Thick x 5 in. Wide x Varying Length Click Lock Hardwood Flooring (19.686 sq. ft. / case)-HL322H - The Home Depot

This was stiff, very little bend to it. We were doing OK, they had already removed the baseboards, cleaned out most of the junk under them, painted and re-nailed them at the right height for this flooring to slip under, with a 1/4" cork underlayment. So getting it right to the edge of the baseboard gave it the required 1/2" to expand, and a 1/2" shoe molding would cover that edge and some shrinkage. So it was going OK, I decided my DD should select every board and placement so she would be 100% satisfied, and I double checked to get good seam placement, randomizing it and keeping them more than 6" adjoining. So a little time consuming, but not so bad.

Then we got to the door jambs (the door and one closet). Hmmmm. You don't put shoe molding around the door jamb, well, we got it cleared out far enough so that we could get it under, and still have room for expansion, but then HOW to get it under? As I said, this was a very stiff board, and the 'click-lock' process requires it to be raised up 30 degrees, and you just can't do that and get it under the jamb. What to do?

Told DD to search youtube, she didn't find much that was helpful (maybe yours wasn't up yet!). These could NOT be hammered in sideways, they just would not go, at least not w/o damaging the flooring, or shifting the entire floor. Then I figured out how to trim away just the right parts of the tongue-groove interlock, so it would slide with just some moderate tapping, and still semi-lock in place (good enough since the boards next to it would be fully locked.

I told her - we should video this, and put it on youtube! :LOL: You beat me to it (though ours are a little different).

Oh, and I did a :facepalm: when I saw you use that Harbor Freight tool to trim the jambs. DD knew I had the flat hand saw that is used for that, and asked me to bring it, and I never thought about that power trim saw! SIL had that job, and it was a struggle. I think he hit some staples or nail, so the saw was probably really dull on top of it! I'm not sure I should tell him about that power tool ;).

When we were done, I was shocked how good it looked. This floor has a matte finish, and to me it has such a warm wood look, no 'plastic'/shiny look to it. Looks far better than our satin finish hardwood flooring. Really nice.

But man, that's a LOT of stooping and hard on the knees. And I helped the other DD move the previous day, into a terrace apartment, so a flight of stairs (at least down when loaded) - my legs are shot (oddly, not very sore, just really 'tired' - like "don't ask me to climb another stair, or kneel again, please").

Took all day, and I really wanted to see the shoe molding go in place, so I could enjoy seeing our work completed, but I was tired and just could not handle it. We decided to get some take-out, and then I supervised SIL to get the shoe molding in, spent another night there as it was late by then, and drove home a little more refreshed in the AM. Whew!

And then.... the bi-fold doors didn't fit back, the flooring was higher than the old carpeting (and the door rubbed on that). Had to cut some off the bottom of one (the framing was not square), and I over-did it a bit, doesn't look so great, but they work pretty well. They are cheap/flimsy doors, I think they will replace them with some nice solid panel or louvered doors that they can paint trim-white.

-ERD50
 
Put a new storm door on the house. Of course, it's never that simple! Previous owner had shimmed out the storm door and then re-sided the house, covering the ends of the shim boards. I had to tear off the storm door , the aluminum trim and the shim boards. Re-shimmed the opening to make it even with the outside of the house, then cut and painted trim boards to fit around the new door. Looks great and has two features I really love--a step-on hold open closer that holds the door open but releases by slightly opening the door a bit more and 2) the roll-up screen that lets you position the window anywhere fast and easy.


Sent from my iPad using Early Retirement Forum
 
Status
Not open for further replies.
Back
Top Bottom