Your recent repair? 2013 - 2020

Status
Not open for further replies.
Last road trip, oncoming truck tossed a rock in our windshield and cracked it. Replacement covered by insurance thru Safelite but not for an OEM windshield. Mercedes dealer said that many times Safelite glass comes to them scratched and today mine was no exception. They called Safelite and was authorized to use OEM windshield which is what we wanted all along but did not want to pay extra.
 
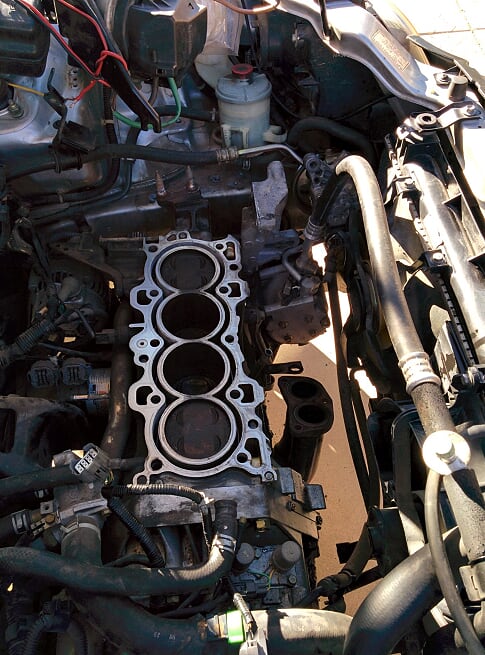
Got my toad running again, after working on it on/off for 2 weeks. At one point, the engine looked like this.

It's a bit of work. I did a few jobs like this when I was younger (and poorer), and thought I was done with this kind of work now. But seeing aja8888 and his RV and genset repairs, and he being more than a decade older, I could not slack off and tried to keep up.


10965-albums220-picture1747.jpg


That is a lot of work to accomplish in two weeks.....and it runs, good job!
Hope there aren't too many leftover parts that go way down there somewhere :).

Kinda looks like the mirrored image of a Honda CR-V -(serpentine drive belt should be on the passenger side).
I am aware of one known problem that could lead to this much work - the camshafts of some model year Hondas received a faulty heat treatment leading to excessive wear of the roller/lobe interface especially on the exhaust cam.
At this stage (photo), I usually go ahead and service or replace hard to access components like the water pump and starter etc.., no sense in revisiting in a year or two.
 
Last edited:
This is one of those ultra-satisfying "repairs", one where my tenacity really paid off. This all started with a "financial review" with DW yesterday and agreement to burn some cash in the next 3 years on some home improvements, things that MUST be fixed before we sell. We have a large 4 season sunroom out back with 9 pairs of sliding glass doors. 5 or 6 of the panels (insulated, double pane panels) have "leaked" and are foggy and grey on the inside. So I had agreed to start looking into the cost of replacing them. On my Monday morning do-list was to call a few window and glass shops an see if I could get someone over for a quote. Set up 2 appts. for tomorrow.

Then the DIY'er in me kicks in and figures that those doors must come out somehow, so I Google/Youtube it. Of course there is a video. Grab a drill and screwdriver bit and in less than 10 mins, I have both the slider, and it's neighbor the "fixed" panel out (those things weigh a TON!).

Since I have to run errands anyway, I slip the fogged up one in the truck and go out to visit two glass/door shops.

First one quotes $350 per door, if I bring them in and let them install the glass. I ask about the glass, they tell me they are made "in Maine", have to be ordered and it takes 1-2 weeks. They carefully measure the door and glass and give me a printed quote.

Second one is in the city, not so great neighborhood, but the website was real professional and they advertised about fixing fogged windows by changing out the glass panel. The guy comes out to the truck measures it, does some numbers on his calculator and says $479 per panel, plus $25 to change out the glass. I ask where the panels come from and he says that they have to be ordered from a place "in Maine". I ask him if there are any cheaper alternatives, like just buying a whole new framed panel, and he says "I don't know, see if you can find a label on it and look it up."


There was a label on the bottom so when I got home I took pick of it with my phone. No name of a manufacturer, but lots of part/model numbers. I Google one, nothing, then I see "5500B", so I Google it, comes back with some hits of 5500 series vinyl patio slider. Keep clicking and hit a link to a "72x80 fixed patio door". At Home Depot. Hit that link, my local HD has one in stock.


And it's $125


Can't find accurate measurements anywhere on the site. But the HD is 8 minutes from my house, so door still in truck, I head out. In the store it is boxed and wrapped in plastic and the guy in windows and doors really doesn't want me to unpackage the only one they have. So I measure best I can and take a chance and buy it. For $125, maybe I can take the glass out and put it in my frame if I need to.

Don't you know the thing slipped right in. 5 mins. In fact it appears to be exactly what I already have in every aspect. AND, they have the sliding one for $135. I could replace all 18 panels in that room for a tad over $2k!


Two screws to lower the slider rollers down and a grunt and out it comes. 2 more screws on the fixed one, and hefty lift and it swings out too. And the HD ones are made by Andersen.


My only challenge now if figuring out how to dispose of the old, foggy ones appropriately.
I love it when life goes right. Great to hear a little research and luck saved you a ton of money!
 
That is a lot of work to accomplish in two weeks.....and it runs, good job!
Hope there aren't too many leftover parts that go way down there somewhere :).

Kinda looks like the mirrored image of a Honda CR-V -(serpentine drive belt should be on the passenger side).
I am aware of one known problem that could lead to this much work - the camshafts of some model year Hondas received a faulty heat treatment leading to excessive wear of the roller/lobe interface especially on the exhaust cam.
At this stage (photo), I usually go ahead and service or replace hard to access components like the water pump and starter etc.., no sense in revisiting in a year or two.

It is a Honda CR-V (towed behind my RV). Two of the exhaust valves got their seats eroded, and the valves got sunken into the head. I ran out of the adjustment range on the rocker arms to compensate, and the valves could no longer close completely. Left in this state, the valves would burn due to the blowby gas in no time.

While on the Alaska RV trip earlier this summer, I already had to open up the valve cover, and remove the rocker arm of one exhaust valve so that it stayed closed permanently. Hobbled around like that for the remaining of the RV trip, with one cylinder running with only 1 of its 2 exhaust valves working. Ran OK, but with some vibrations due to 1 of 4 cylinders not completely aspirated.

It cost me $370 to buy a rebuilt head with valves installed, and swap out the old head. Would not be all that hard on older cars with rear-wheel drive, but all transverse engines are painful to work on, with the intake manifold against the firewall, and the belts against a fender.

PS. It took me 5 days, working about 5 hrs each day. The two weeks were due to having to wait for the rebuilt head getting shipped. I did take the occasion to replace the engine mounts. These sons of bitches are impossible to get to with the engine in place. Took 1 day just for that.
 
Last edited:
It is a Honda CR-V (towed behind my RV). Two of the exhaust valves got their seats eroded, and the valves got sunken into the head. I ran out of the adjustment range on the rocker arms to compensate, and the valves could no longer close completely. Left in this state, the valves would burn due to the blowby gas in no time.

While on the Alaska RV trip earlier this summer, I already had to open up the valve cover, and remove the rocker arm of one exhaust valve so that it stayed closed permanently. Hobbled around like that for the remaining of the RV trip, with one cylinder running with only 1 of its 2 exhaust valves working. Ran OK, but with some vibrations due to 1 of 4 cylinders not completely aspirated.

It cost me $370 to buy a rebuilt head with valves installed, and swap out the old head. Would not be all that hard on older cars with rear-wheel drive, but all transverse engines are painful to work on, with the intake manifold against the firewall, and the belts against a fender.

Nice effort! I guess you have it all back together and running.
 
....
PS. It took me 5 days, working about 5 hrs each day. The two weeks were due to having to wait for the rebuilt head getting shipped. I did take the occasion to replace the engine mounts. These sons of bitches are impossible to get to with the engine in place. Took 1 day just for that.

Congrats, but that just does not sound like fun to me. And you know I'm the type to 'invest' way too much time on some DIY project for the 'fun' of it.

But that's something I'd gladly pay a mechanic to do.

-ERD50
 
As mentioned, I did quite a bit of vehicle repair and engine work when I was younger, mostly to save money. Now, I do it - if it is something that I think I can finish - to stay active, as I am not the kind of guy to go to a gym but do real work as an exercise (in addition to walking and hiking).

It has never been that much about fun, although when I was young I wanted to see the innards of things. Now, when I am older, the curiosity factor has much declined, but the job satisfaction is still there.

PS. When I was in poor health a couple of years back, I did send my cars to service shops for them to fix.
 
Been having rain water pooling near foundation (no basement, thank God) in back yard and side yard in last few years (why not sooner?). Heat pump is in side yard and h2o comes up into the base of it during heavy rains ! So... for side yard, Rube Goldberged a flexible elbow onto the rain downspout, and flexible elephant trunk onto the elbow, to reroute the water into front yard instead of side yard. The Goldberg contraption is working as a rain-flow-to-side-yard limiter, since it leaks a lot at the elbow, which feeds into the side yard pool, but if it rains hard enough, there is overflow that goes into the elephant trunk and into the front yard, where it does no damage to anything, one hopes. Hoping it stops the rainwater from rising up into my heat pump. Keeping an eye on it. Need a few more heavy rains to test it out.
 
Been having rain water pooling near foundation (no basement, thank God) in back yard and side yard in last few years (why not sooner?). Heat pump is in side yard and h2o comes up into the base of it during heavy rains ! So... for side yard, Rube Goldberged a flexible elbow onto the rain downspout, and flexible elephant trunk onto the elbow, to reroute the water into front yard instead of side yard. The Goldberg contraption is working as a rain-flow-to-side-yard limiter, since it leaks a lot at the elbow, which feeds into the side yard pool, but if it rains hard enough, there is overflow that goes into the elephant trunk and into the front yard, where it does no damage to anything, one hopes. Hoping it stops the rainwater from rising up into my heat pump. Keeping an eye on it. Need a few more heavy rains to test it out.

Lots of things can cause water to pool over time. Have you had any trees or shrubs removed in those areas? It takes years for any remaining roots to rot and the soil to fill in where the roots were. Soil wasn't tamped around the house when it was built? Water sitting in the same spot over time can depress the soil. Drought can cause some soils to shrink. Earthquakes? Sink holes? Sometimes it's just a matter of bringing in fill soil and grade it to flow the rainwater away from the foundation. It wouldn't take much soil.
 
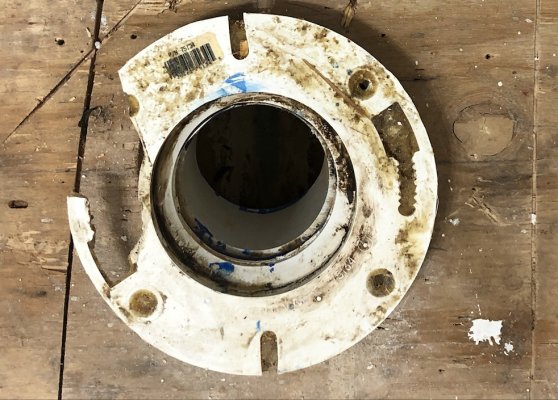
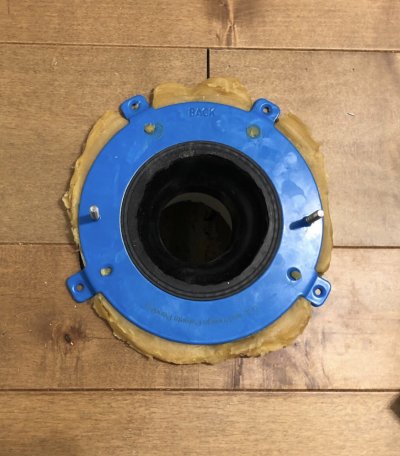
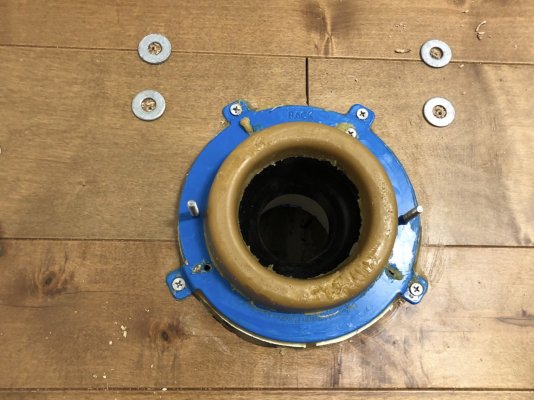
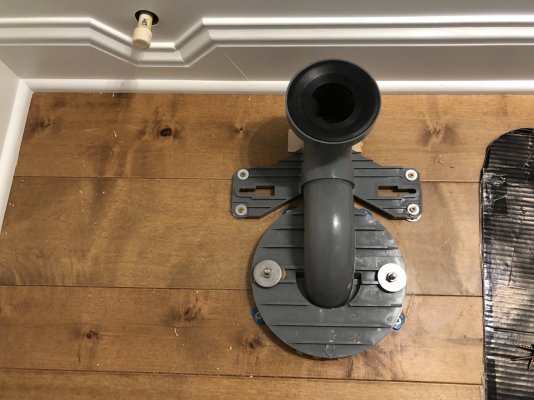
During my remodel, I tore up the tile flooring and underlayment. Got a little carried away in the bathroom and broke off a piece of the toilet flange. Found a repair flange online. Put a wax ring on the old flange, the repair flange on top of that, and then another wax ring on top of the repair flange. Then I installed the pvc Toto trapway over that and then the toilet. No leaks. All is well.
 

Attachments

  • IMG_0995.jpg
    IMG_0995.jpg
    840.3 KB · Views: 25
  • IMG_0997.jpg
    IMG_0997.jpg
    1.1 MB · Views: 27
  • IMG_0999.jpg
    IMG_0999.jpg
    538.8 KB · Views: 25
  • IMG_1002.jpg
    IMG_1002.jpg
    475.2 KB · Views: 27
During my remodel, I tore up the tile flooring and underlayment. Got a little carried away in the bathroom and broke off a piece of the toilet flange. Found a repair flange online. Put a wax ring on the old flange, the repair flange on top of that, and then another wax ring on top of the repair flange. Then I installed the pvc Toto trapway over that and then the toilet. No leaks. All is well.
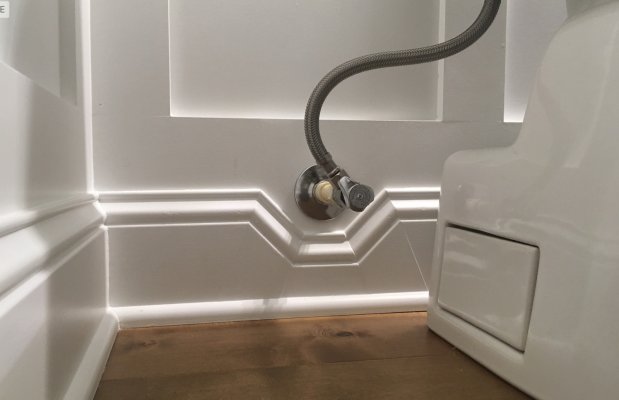
A thing of beauty. Wow, someone did some nice work on the floor trim molding around the water supply.
 
A thing of beauty. Wow, someone did some nice work on the floor trim molding around the water supply.

I didn't notice at first. Yes, nice. 999/1000 times, that would have been 'fixed' with copious amounts of caulk! :)

I've never seen a toilet trap like that, I've always seen them just molded into the toilet, and the toilet just sits on the floor flange. Maybe just the picture angle, but the ID seems small? But I guess you always want to go from smaller to larger, so any clog occurs as close to the source as possible.

-ERD50

I'd like to see a side view of that gray flange.
 
I never saw one of those. Whatever is heading for the sewer line sure needs to make a sharp right turn though.
 
A thing of beauty. Wow, someone did some nice work on the floor trim molding around the water supply.

Thanks - saw that trick on a you tube video. Unfortunately my new baseboard trim is taller and the top would have been even with the center of the escutcheon - so I needed a work around,. This worked out nicely.
 

Attachments

  • IMG_1003.jpg
    IMG_1003.jpg
    320.3 KB · Views: 19
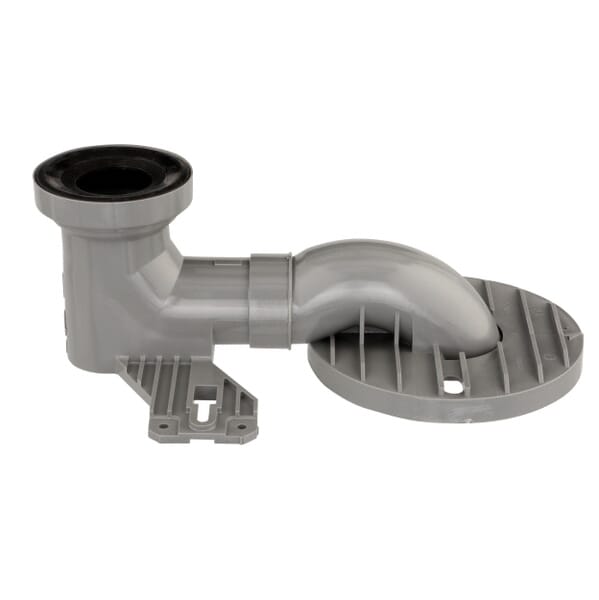
Found this:

https://www.homedepot.com/p/TOTO-12-in-Toilet-Trapway-TSU03W-12R/301768301


Doesn't really seem like a trap to me, sure looks like you would still get air across the top. The trap itself must still be in the toilet.

-ERD50

That's it. Yes the trap is still in the toilet. The good thing is that this part comes in 3 sizes. For 10", 12" or 14" from center of flange to wall. Standard is 12" and comes with the toilet.

I had a 12", but added wainscoting, baseboard and shoe that made the toilet too close to the back wall. So I bought a new 10" trapway, and now the toilet fits fine with the more pronounced trim.

It does seem that the inside diameter is a little small, but everything sent at it so far has gone through.
 
I've always been kind of amazed by wax rings - it seems like a 16th Century solution that just never dies, though it seems to mostly work..
 
I've always been kind of amazed by wax rings - it seems like a 16th Century solution that just never dies, though it seems to mostly work..

Hey, where do you think the expression "If it ain't broke, don't fix it" came from?:D
 
I've always been kind of amazed by wax rings - it seems like a 16th Century solution that just never dies, though it seems to mostly work..

Yep, sometimes the old ways are the best.

The only issue I have with the wax rings, is it is a one shot at it type thing. If you don't get the toilet down on it just right the first time, it's no good. Not an issue for anyone with a little experience, but a little intimidating for a guy like me who has only done it a few times in his life.

So the two recent toilet replacements I did, I used this:

https://www.homedepot.com/p/Toilet-...PIPHorizontal2_rr-_-205762183-_-203564758-_-N

It was nice to be able to place the toilet down and not worry too much about it shifting around as you do it, just needed to get it on the bolts.

Gets good reviews, I was happy with it, it will adapt to a pretty wide range of flange heights. But will that plastic hold up? It has not stood the test of time like good old wax. But if it outlives me, I'm good.

-ERD50
 
Yep, sometimes the old ways are the best.

The only issue I have with the wax rings, is it is a one shot at it type thing............-ERD50
Well that and the fact that if the toilet rocks around the seal can leak and then you have yuck water seeping into the floor boards. And how is the toilet secured? Two little bolts attached to a plastic flange that breaks easily and doesn't really hold the toilet in place relative to the floor. But it sort of works mostly.


The ring you linked is certainly an improvement.
 
Status
Not open for further replies.
Back
Top Bottom