Your recent repair? 2013 - 2020

Status
Not open for further replies.
In case no one has told you, Volkswagens are very strange mechanically. You're lucky you didn't have to buy some special VW tools to do the job. And there are few mechanics that know anything about modern VW's or their premium sister cars, Audi's.

There are so many people on here that show ingenuity. It's something lacking in society today.


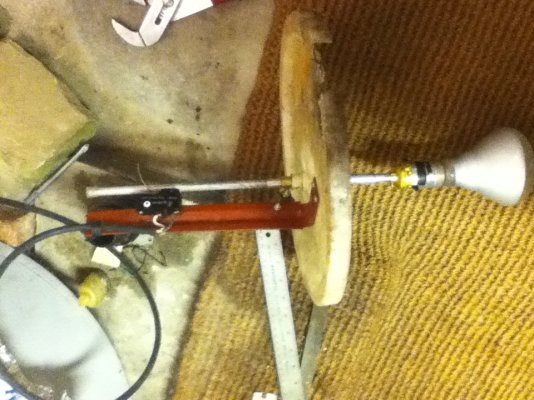
I've been driving VWs my whole life and working on them the same. I have a well outiftted shop so not that hard, save for one CV axle that was corroded/stuck in the hub to the point that I had to take both out as one, soak with PB Blaster overnight, then heat and put in a 20 ton press to free them. I also have a couple vintage VWs, a '57 Beetle that I spent 7 years restoring and a '56 VW flatbed truck that I bought in CA this past fall. I'm used to mechanical "challenges, believe me...
 
Not exactly a repair, but an upgrade. My garage has three access doors and only one door had a light switch. I added an X10 manual switch to the main door and a remote transmitter switch to a second door so I could use either to operate the overhead lights. That worked so well, that I added a second transmitter switch for the third door. I ended up having to put in a bigger electrical box to house the new switch next to an existing outside light switch.

So, the way it works is that there is a main switch that can be operated manually or remotely by a transmitter. To add additional transmitters, you just have to connect them into wiring that is fused on the same side of the breaker box as the main switch. This three way operation can be accomplished by adding additional hard wiring, but with the electronic X-10 switches, the signals are sent over the existing wires.

This is the main switch, which works with LED bulbs. https://www.amazon.com/Quiet-Relay-...8&qid=1546221015&sr=8-6&keywords=x-10++switch

This is a remote transmitter switch to control the main switch https://www.amazon.com/gp/product/B007GEU5JY/ref=oh_aui_detailpage_o01_s00?ie=UTF8&psc=1
 
On the topic of Upgrades.
I bought a Obihai OBi200 , which is a tiny little box about 3"x3"x1" that allows a person to phone over the internet using a regular phone.

I plugged it into my switch (could have been a router) and the wall for electricity, and plugged a regular phone into it.
Then I configured it to use my google voice phone number. Which was easy, once I use the chrome browser to do it, it didn't like my firefox browser.

So now we have our regular landline, and a new set of phones in the house that use the internet as VOIP.

The big advantage is we have free long distance in USA and Canada at zero dollars cost per month.

I bought the Obihai device on a great sale for $34 + tax.
I also bought a phone set with extensions, so I plugged the base into the Obihai and now we have 3 extension phones using VOIP.
The phone set is: [FONT=Arial, Sans-serif]Panasonic® 4-Handset Single-Line DECT 6.0 Phone With Answering Machine, KX-TGC364B and cost $40 + tax.
[/FONT]
 
That OBi is a nice solution. I ended up with the Ooma, but it's $5/mo.


TL, if you need to get an X10 signal to the other side of the breaker box, you can wire a capacitor across.
 
If you need to get an X10 signal to the other side of the breaker box, you can wire a capacitor across.
Thanks. I've heard that, but I wasn't sure how to make it a safe fused installation, so I shuffled some wires, one side to the other.
 
Last night about 10PM noticed the sump pump running a long time.
Quick check, the float switch failed in closed mode. Not a good time to find a hardware store of any kind open. I had to invent and make a float switch.


Using a light bulb, a socket, some aluminium tubing, epoxy, a hastily made bracket for a leaf switch, along with bag ties and paper clips. I assembled a float valve. Took about an hour for brain work and the scrounging then the process of assembly. Some more time to mount it on the sump pump's lid. Sometimes it comes handy to have a good collection of stuff. Lightbulb? yeah that is the float!

It works.

Per Sunset's request attaching photo:
 

Attachments

  • Float switch.JPG
    Float switch.JPG
    320.5 KB · Views: 34
Last night about 10PM noticed the sump pump running a long time.
Quick check, the float switch failed in closed mode. Not a good time to find a hardware store of any kind open. I had to invent and make a float switch.


Using a light bulb, a socket, some aluminium tubing, epoxy, a hastily made bracket for a leaf switch, along with bag ties and paper clips. I assembled a float valve. Took about an hour for brain work and the scrounging then the process of assembly. Some more time to mount it on the sump pump's lid. Sometimes it comes handy to have a good collection of stuff. Lightbulb? yeah that is the float!

It works.

Per Sunset's request attaching photo:

It's a thing of beauty.
 
Kind of a repair. Total gut and redo of our kitchen. Lots of interesting sub- repairs. Had to run a new electric line for the cooktop due to updated code. DW got a deeper sink this time, make connection to existing waste line difficult. Wall repairs needed after tearing out old backsplash. Had to knock out part of a wall to fit new fridge. Had to move microwave receptacle and dishwasher electric supply to fit new appliances. Just finished the backsplash today.
 

Attachments

  • kitchen before.jpg
    kitchen before.jpg
    509.3 KB · Views: 35
  • kitchen4.jpg
    kitchen4.jpg
    400.9 KB · Views: 38
Nice! I can't get over the kitchen looking wider with the cabinets than without. :)

Camera angle/focal length is everything, I guess.
 
Nice! I can't get over the kitchen looking wider with the cabinets than without. :)

Camera angle/focal length is everything, I guess.

Thanks - And as far as camera angle/ focal length - I keep reading that the pro landscape photographers use a longer focal length lens to bring a distant object closer to you. I think that is what is going on in my 2 photos. The before was iPhone at 4mm focal length. The after is dslr at 24mm. And it seem like the back wall is closer to the camera in the after photo.
 
Kind of a repair. Total gut and redo of our kitchen. Lots of interesting sub- repairs. Had to run a new electric line for the cooktop due to updated code. DW got a deeper sink this time, make connection to existing waste line difficult. Wall repairs needed after tearing out old backsplash. Had to knock out part of a wall to fit new fridge. Had to move microwave receptacle and dishwasher electric supply to fit new appliances. Just finished the backsplash today.

It looks great, really nice.
Okay, here's the moment of truth: How did you move the microwave receptacle? Options: 1) Got rid of the old box and pulled a new cable from the last junction box before it. 2) Pulled a cable from the old receptacle box to the new one and put a nice cover plate over the old one so I can get to it later. 3) Same as 2, but just put a plain steel cover on the box and bury it under the new backsplash or behind the new cabinets. Pray I never get inspected or need to fix anything in that box. 4) Get rid of the old box, use wire nuts to connect the new cable to the old, and left the splice loose in the wall. No problems so far! ☺
I've seen #4 several times in houses I've lived in. I'm a #2 kind of fixer. If paid by the hour (or the wall was open anyway) I'd choose # 1.
 
Last edited:
Kind of a repair. Total gut and redo of our kitchen. Lots of interesting sub- repairs. Had to run a new electric line for the cooktop due to updated code. DW got a deeper sink this time, make connection to existing waste line difficult. Wall repairs needed after tearing out old backsplash. Had to knock out part of a wall to fit new fridge. Had to move microwave receptacle and dishwasher electric supply to fit new appliances. Just finished the backsplash today.

Nice work! You did all that yourself? Ran into a similar issue with the deeper sink, wasn't able to re-connect the existing garbage disposal.
 
I pray I never get inspected or need to fix anything in that box.

I recently had to track down an "open neutral" in one of our home circuits (had been in place for 20 years). Hope those connections are good and tight. :)
 
It looks great, really nice.
Okay, here's the moment of truth: How did you move the microwave receptacle? 1) Got rid of the old box and pulled a new cable from the last junction box before it. 2) Pulled a cable from the old receptacle box to the new one and put a nice cover plate over the old one so I can get to it later. 3) Same as 2, but I just put a plain steel cover on the box and burried it under the new backsplash or behind the new cabinets. I pray I never get inspected or need to fix anything in that box. 4) I got rid of the old box, used wire nuts to connect the new cable to the old, and left the splice loose in the wall. No problems so far! ☺
I've seen #4 several times in houses I've lived in. I'm a #2 kind of fixer. If paid by the hour (or the wall was open anyway) I'd choose # 1.

Thanks - I only had to move it about 6" up. There was enough slack in the romex cable that I used the same receptacle/box. So mine was a lot easier than yours.
 
Nice work! You did all that yourself? Ran into a similar issue with the deeper sink, wasn't able to re-connect the existing garbage disposal.

Thanks. I didn't make the cabinets - me and BIL installed them. I did the rest. Appliance company installed appliances in the cabinets.

Good thing that I didn't have a garbage disposal. The dishwasher connection presented a problem. The extra bit of riser for the dishwasher connection made the trap almost too low to come back up and connect through the wall.
 
I got a set of LED 48in tube lights to put in my florescent light, as it only sometime came on.

I put them on , and no light ?
I put them into another florescent light that works all the time, and no light.

The glass tubes are 40W and these LED's say they replace 32W bulbs, but maybe because the light fixtures are probably about 20 years old, it is the ballast that is wrong ?
I'm guessing here, but I'm thinking the ballast is magnetic, and internet searching suggests they are magnetic.
The LED's say they are for instant start electronic ballast lights only.

Question for everyone:
Is it easy to change out the ballast to electronic, or should do something else, or even just skip it, and buy glass fluorescent tubes lights as there is no bad sound from the light, I just thought the LED's on sale were a good idea ??

I highly recommend you just eliminate the ballast. It wastes energy, probably hums and is just another thing to go wrong. I got these three years ago,2 have been in daily use in the kitchen, 2 others used often in my workshop. ~ $15.50 each at the time, now it looks like a 4-pack for $44?:

https://www.amazon.com/gp/product/B00SSNPGSC/ref=oh_aui_search_detailpage?ie=UTF8&th=1

Is it possible you damaged the LEDs if they are designed for electronic ballast and you connected them to a magnetic ballast? Might want to read up on that.

-ERD50
 
This was a small victory for me. we have 2 10 bulb strings in series across our front porch. It has always been a PITA to take them down and pull the bulbs and use an ohmmeter until I found the right one.
This time I had a better idea- I used a small flashlight and a jeweler's loupe to look at each filament. I found the bad one in about 5 minutes! It was number 5 in the string of 10.:dance:

I used to do that. IIRC, it helped to have a white sheet of paper behind the bulb, easier to see the tiny filament.

Then you'd run into the strings with 2 or more bad bulbs. And maybe a loose connection somewhere. It became a battle, I'd spend 20 minutes to save a $2.99 string! :LOL:

Then I started moving to LED when they got down to $5.00 for a string of 50. Only a few legacy strings are left for a few odds and ends, but everything else is LED. I'd have to check records, but some of the strings are at least 4 years old, probably more. I monitor as I wind them up to put them away - not a single failure in that time. I've got about... 16 strings now. Nice to just not bother with those burn outs.

Oh, and FYI - comparing to LED 'bulbs' in the home, a different story. The holiday lights are low power, and strung out far from each other so no heat build up from being crammed in a single bulb together. And no real 'driver' circuit - they go simple/cheap for these. The simple/cheap design results in flicker (you'll notice if you move them around in front of you), but there are no caps or chips to go bad, just a resistor. These are so low power, efficiency losses in a resistor (as opposed to the more advanced switching circuits) just are nothing to worry about. They might outlive me.

edit/add: Speaking of switchers, how's your diesel coming?

-ERD50
 
I switched all lights to LED.
I noticed our electric bill went up for Christmas, before I made the switch, now I can't see the increase, so I estimate (very unscientific) we are saving $10 electricity each December.

I did have 1 net light of LED's go out, I haven't looked at it to see why.
 
This was a small victory for me. we have 2 10 bulb strings in series across our front porch. It has always been a PITA to take them down and pull the bulbs and use an ohmmeter until I found the right one.
This time I had a better idea- I used a small flashlight and a jeweler's loupe to look at each filament. I found the bad one in about 5 minutes! It was number 5 in the string of 10.:dance:
You can also use a non-contact voltage tester. It quits beeping at the dead bulb.
 
Replaced the grille on DD's Subaru Impreza. She didn't notice the car in front of her was stopped. Only dropped 3 screws, and eventually found them all. It would be great if I could get through a job without dropping something essential in a nearly irretrievable spot, but it seems to happen every time.

Found a new genuine Subaru grille from a Subaru dealer online for over $100 less than local dealer wanted.
 
I switched all lights to LED.
I noticed our electric bill went up for Christmas, before I made the switch, now I can't see the increase, so I estimate (very unscientific) we are saving $10 electricity each December.

I did have 1 net light of LED's go out, I haven't looked at it to see why.

I’ve been very disappointed with outdoor LED Christmas lights. I have four or five strands where a third of the strand will not light. I don’t know how to repair them or if it’s even possible or worth it. I’m about ready to go back to the regular bulbs. At least those worked a couple years and could be replaced cheaply buy shopping after Christmas deals. The LEDs that we’re supposed to last many (10+) years lasted three or four years and cost way more than the regular bulbs.

Inside, all bulbs in my lamps and fixtures are LED and I’m very happy with them.


I wonder why my experience is so different? I just buy them at Walgreens (I got a decent price ~ $5 for a 50 string IIRC), and I wanted to try to get the same for as much consistency in the 'warm white' color as possible. So I'm not buying anything of superb quality, just commodity stuff. There is a site where they sell high end LED strings, all filtered for no flicker, etc.

It's really odd to have 1/3rd of the string out. All my 50 LED strings seem to be wired as 25 in one polarity, 25 in the other ( so each half is lit on one-half cycle of the AC). So @ about 3V per LED, that's 75V at their full ON threshold, and the resistor drops the voltage above that up to the AC peak of ~ 160V. So even an open somewhere (bad wire or connection) would end up with half out?

I have not had any failure, but I think I read that an individual LED will fail shorted, so the remaining series LEDS would stay on, but their life would be less if the added current over heated them (not likely with just one out).

-ERD50
 
Status
Not open for further replies.
Back
Top Bottom