Your recent repair? 2013 - 2020

Status
Not open for further replies.
DS tested one of those GFCI outlets when he was 5 or 6. He was old enough to know better and too old for the outlet covers to do any good... He put both ends of tweezers in a GFCI outlet. Melted both ends off the tweezers and welded the receptacles shut before it popped.
When I was about 6 I stuck a plug 1/2 way in the socket and tried to cut the prongs off with a scissors, needless to say the fuse blew. (way back in the 1950s)
 
When I was about 6 I stuck a plug 1/2 way in the socket and tried to cut the prongs off with a scissors, needless to say the fuse blew. (way back in the 1950s)

I was about 15, and a plug into an extension cord was really stuck, I couldn't pull it out. So I used my pocket knife to pry the plug out :facepalm:

The size of the spark was amazing and it melted a notch in my knife blade. :eek:
 
Did you buy GCFI equipped outlets. Garages can get wet and in wet places GCFI plugs or GCFI circuit breakers also provide additional safety (as well in Bathrooms and Kitchens)

It did come with GCFI outlets in the garage, kitchen, and bathrooms. Some have other outlets after them in the circuit, I think this is no longer allowed but I'm not sure.

The first outlet installed in the house is directly below the breaker panel in the basement so the construction guys could run their power tools. That of course is a GCFI outlet. Then one day the garage outlet was dead and I couldn't figure out why - found out that one is after the one down in the basement in the circuit.:facepalm: Sometimes they seem to just trip for no apparent reason.
 
Today I replaced the furnace filter and found the furnace flooded. Water on the floor and water in the furnace itself. We have a storm today and I wanted to see where the water was coming from so I dried it all out and turned the furnace on. Right from the furnace (condensing) and I could watch the water coming from the heat exchanger pipes building up in the collection bin and the water leaking out.

The Co. that installed it is out of business so I looked for a York dealer local. I called and they said "how about today", sounds good to me. Advised the guy would be here sometime between 2 and 4. Guy arrived before 2 with the needed part and installed it and was gone in an hour and a quarter. Best service call ever - :)

It was a "known issue", the factory put this clear plastic plenum over the exchanger pipes so you can see the "condensing" furnace in operation. But the plastic cracks in 4 to 6 years and the furnace floods. The new part is opaque and more robust and you can't see the condensate anymore, but you won't see it leaking out either. So I got the part for free and installed for a discounted rate and I am free to crank the heat again.

Which is a good thing in the winter time - :)
 
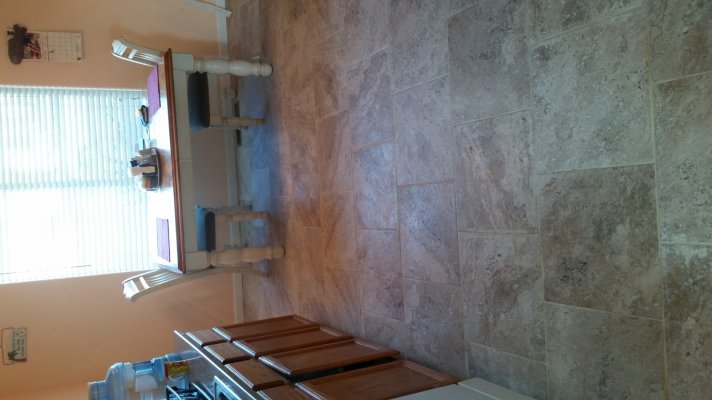
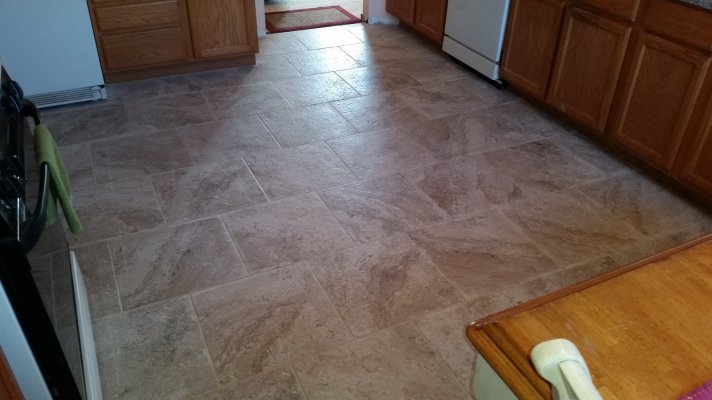
I tore out old vinyl flooring in our kitchen and installed 18" ceramic tile along with new baseboard. Kitchen looks marvelous!

Doing front bathroom now and may use a marble tile?
 
I tore out old vinyl flooring in our kitchen and installed 18" ceramic tile along with new baseboard. Kitchen looks marvelous!

Doing front bathroom now and may use a marble tile?

You could impress us with a photo !

One thing with certain tiles it can become dangerously slippery when wet, probably the smooth polished ones.
 
You could impress us with a photo !

One thing with certain tiles it can become dangerously slippery when wet, probably the smooth polished ones.

20161217_083242(1).jpg

20161217_083312.jpg

It's not slippery, has a little texture on it. ;)

sorry pic is sideways, couldn't get it to upload correctly?
 
Is this a slab on grade situation? No backer-board required? Did you use thin set mortar (ie glue)? Big tiles and uneven surfaces sometimes require more. Where 4 tiles come together, did you have a hard time getting those perfectly flat? Big tiles sometimes are stubborn to get installed 'flat'.
 
Is this a slab on grade situation? No backer-board required? Did you use thin set mortar (ie glue)? Big tiles and uneven surfaces sometimes require more. Where 4 tiles come together, did you have a hard time getting those perfectly flat? Big tiles sometimes are stubborn to get installed 'flat'.

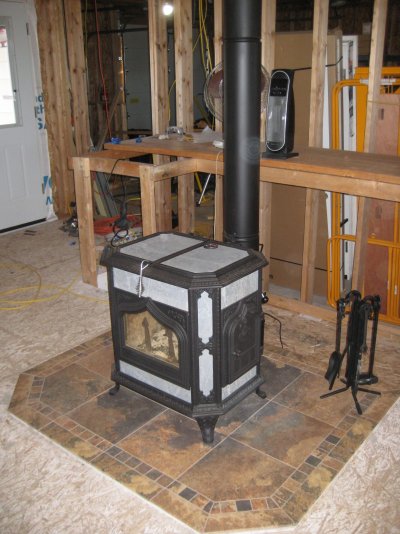
This is the first tile work I have done. I used thin set. I didn't have a problem with where the big tiles came together and the backer board was not perfectly flat. I pushed some of the 2 inch squares down a little too far. It doesn't look bad, but I will know better next time.
 

Attachments

  • IMG_1100.jpg
    IMG_1100.jpg
    619 KB · Views: 28
I spent last night installing two new toilets--after changing colors away from dark brown. (We just bought the house 4/2016.)

I'm also in the process of tiling the master bath in our old house--for resale. I installed Wonderboard with thinset mortar (and screws) and am installing the tiles with more thinset--and backbuttering the tiles. I'm using a 1/8" grout spacing which makes it more difficult to install than wider grout spacing.

They're also right about the difficulty installing 16" or larger tiles. They've for sure got to be backbuttered when installed and close attention paid to the 4 corners coming together.
 
I'm also in the process of tiling the master bath in our old house--for resale. I installed Wonderboard with thinset mortar (and screws) and am installing the tiles with more thinset--and backbuttering the tiles. I'm using a 1/8" grout spacing which makes it more difficult to install than wider grout spacing.
I did our guest bathroom in 4" tiles about 2 years ago. I did the shower surround (full tearout of the plaster, installed Hardiebcker and tiles) and the lower 42" of the walls (thinset over the intact plaster walls). It is a tiny bath, but that was one of my least enjoyable projects. It looks pretty good, but what a PITA to cut all those tiles for corners, window surround, etc. I called four tilers for estimates, only two came out and only one ever gave me a bid: $6k+ for less than 200 sf of wall--I don't think he really wanted the job. So, I did it myself. And I know I'll have to do our master bath very soon (60 years old, tiles spongy around soap dish--a very bad sign).
The folks at the tile shop were trying to talk me into epoxy grout, but it sounded like large potential mess. The "regular" grout is almost magic in the ease with which it goes on, fills the gaps, and cleans up--very satisfying.

They're also right about the difficulty installing 16" or larger tiles. They've for sure got to be backbuttered when installed and close attention paid to the 4 corners coming together.
I even backbutter 12" tiles, though I use a fairly fine trowel. It's much slower and messier than just applying the compound to the floor, but it just seems to adhere to the tile better. There's nothing worse than getting a floor finished and later hearing the hollow sound of a tile that's got a big area not stuck down.
 
Is this a slab on grade situation? No backer-board required? Did you use thin set mortar (ie glue)? Big tiles and uneven surfaces sometimes require more. Where 4 tiles come together, did you have a hard time getting those perfectly flat? Big tiles sometimes are stubborn to get installed 'flat'.
Thinset under backerboard, screwed down. More Thinset with 1/4" trowel then tile.

If you buy a quality tile with uniform widths you're less likely to have probles at corners.

This was my 4th tIle job and I think I'm getting better after each job. Taking time laying out best pattern and squaring off definitely makes for a better job.

Getting your Thinset mixed to the right consistency, spreading it out even, level tiles as you go along with spacers all helps.

Back buttering isn't really needed on laying floor tile, I just press them down good into thinset. Marble tile, yes, backbutter them.
 
I had to dismantle the center console of my Lexus because something dropped down inside the cupholder door/lid. A google search showed this is quite a common problem with some difficult solutions. People had accidently let a key, a credit card, pens, and other things get down inside this thing which could not be opened from the bottom. Nor could these things get fished out.

But I'm telling you all this because the solution may be applicable to some other problems you may have.

Basically, I had to pry up the edges of very tightly fitted plastic parts without scratching them. A screwdriver would not work. Fortunately, I remembered that I had some Michelin tire levers for my bicycle tires. The levers have a very thin, very strong edge just perfect for this kind of prying. Here's a pic of the tire levers. The very thin edge is on the left end and pointed upward in the middle lever:
michelin%20tyre%20levers.jpg


So if you have to do some dashboard work or pop out some close fitting parts that you don't want to damage with a screwdriver, I think this is one answer that is probably cheaper than the geniune Lexus prying tool.

And a bonus: I bought this vehicle used, so when I popped this open I was unsurprised to see a sticky mess from a coffee spill from more than 3 years ago.
 
Last edited:
So if you have to do some dashboard work or pop out some close fitting parts that you don't want to damage with a screwdriver, I think this is one answer that is probably cheaper than the geniune Lexus prying tool.

I've done some stereo upgrades on vehicles and found an auto tool pry kit to be a necessity for removing door and dash panels without damaging the panels and the clips that hold them in. Can get a decent basic plastic pry kit on Amazon for ~$6 that would be sufficient for most needs.
 
Last edited:
I had to dismantle the center console of my Lexus because something dropped down inside the cupholder door/lid. A google search showed this is quite a common problem with some difficult solutions. People had accidently let a key, a credit card, pens, and other things get down inside this thing which could not be opened from the bottom. Nor could these things get fished out.

But I'm telling you all this because the solution may be applicable to some other problems you may have.

Basically, I had to pry up the edges of very tightly fitted plastic parts without scratching them. A screwdriver would not work. Fortunately, I remembered that I had some Michelin tire levers for my bicycle tires. The levers have a very thin, very strong edge just perfect for this kind of prying. Here's a pic of the tire levers. The very thin edge is on the left end and pointed upward in the middle lever:
michelin%20tyre%20levers.jpg


So if you have to do some dashboard work or pop out some close fitting parts that you don't want to damage with a screwdriver, I think this is one answer that is probably cheaper than the geniune Lexus prying tool.

And a bonus: I bought this vehicle used, so when I popped this open I was unsurprised to see a sticky mess from a coffee spill from more than 3 years ago.

Good idea,
I have a Toyota Sienna and it has this flip up top for the console.
Sure enough a small thing on it like a paperclip or toothpick or pen has gone down the gap when the compartment is opened.

The pen caused the lid to get stuck and not want to go down. after a bunch of wiggling, the pen fell further down and the lid works again.

Someday I'll have to open the thing up, so I'll keep these type of tools in mind to avoid scratches.
 
I've done some stereo upgrades on vehicles and found an auto tool pry kit to be a necessity for removing door and dash panels without damaging the panels and the clips that hold them in. Can get a decent basic plastic pry kit on Amazon for ~$6 that would be sufficient for most needs.
Thanks! Now that I see those things it makes total sense that there would be pry tool kits. I wonder if anybody has used one of them for a bike tire lever?
 
Furnace problem fixed!

We woke up this morning to an inside temperature of 62 deg., outside about 20 deg.

I diagnosed & replaced the flame sensor on our gas forced air furnace. Thanks to Youtube videos it was easy, and the symptoms were very clear (it would "fire up" for 30 seconds, then shut down and retry several minutes later).

Two hours and $20 later it's working fine.

I felt pretty proud of myself, and saved at least $100. DW thinks I'm a hero, too :dance:

Good job! Now that I have a new, modern furnace and water heater, I need to research the common failure parts and have spares on hand.

For my old units, that was thermo-couples (standing pilot), for my older, older furnace, that was also a belt for the blower (everything is direct drive now). Over the years, a few simple/cheap thermo-couple replacements got me up and running faster and far fewer $$$ than a service call.

I need to check out just how these igniter systems work on these units I have.

-ERD50
 
I think the flame sensor might be a thermocouple (temperature sensor). My understanding is that when the thermostat calls for heat the controller opens the gas valve and starts the electronic ignitor. The tip of the flame sensor is positioned where the flame will be.

If after 30 seconds the sensor does not detect the hot flame, then it registers as an error and the controller shuts the valve off. This prevents natural gas from being poured into the combustion chamber if the ignitor doesn't ignite. In my case there was flame but the sensor wasn't detecting it.

Some sites recommend burnishing the old sensor with steel wool because a crusty build up can prevent the sensor from reading accurately. I just went to the appliance parts store & got a new one.

From the number of Youtube posts it seems this is the #1 thing to check on an electronic ignition gas forced air furnace that isn't starting.
 
Last edited:
I fixed my Samsung lower freezer compartment ice maker. It had stopped working and some "parts" were hanging down. My upper one where ice comes out of the refrigerator door was still working.
I watched some tube videos and took the old one out to see if it could be fixed. I was missing a part so at some point I must have thrown that away when it fell into the ice bucket without knowing what it was.
Identified and then located the ice maker on the Samsung site and with their replacement parts company and then sourced it. Amazon was the cheapest ($74). I installed it the day it arrived and had ice in a couple of hours! I had to get resourceful as I could not take the freezer door off and even if I had I was afraid I would not be able to lift it to get it back on. Placed a bench beside and some long pillows across the open door to give me leverage, laid across the door and managed to get half my body into the freezer (5'3") . A push and two screws and I was back in business.
 
I haven't fixed anything recently because my wife is an engineer. I stay out of the way. On the other hand, she fixed the kitchen sink faucet since multiple nozzles were blocked.
 
I have a SS double sink in the kitchen and the top rim of sink drain assembly had become discolored over the years so decided it was time to replace the drain assembly on both sinks. The plumbing under the sink was kind of a mess so decided to re-do that also. One thing that caught my eye to replace all the old plumbing in one shot is the Snappy Trap drain kit, had good reviews on Amazon. I'm sure most plumbers would never consider using it but it looked like an easy DIY install and would likely provide more room under the sink. Have to say it went together really easy and because the hoses have some flexibility they can be routed in multiple ways to provide good drainage and also maximize the space under the sink. It drains well and no leaks, time will tell how well it holds up.
 
I was at DD's house this past week. She told me her clothes dryer was flashing F40 and wouldn't dry. I googled and found out the most likely cause was a thermal fuse. I had to drive 30 miles to get one during the holiday week, but I found one and got it fixed. I've never worked on a dryer before, so it was interesting pulling the front off. Got DGD (10 y.o.) to help(/hinder) me, holding screws and vacuuming lint out since we had to pull the lint filter duct. It was fun explaining how things worked and letting her see not to be afraid of trying a repair. As I explained, the worst that could happen is we'd have to call a repairman, and that's where we were before we started. I conveniently forgot to mention that if you really screw it up it could be a lot more expensive. That's a lesson for her to learn at a later date. But she was very proud of helping fix the dryer for her Mom.
 
Status
Not open for further replies.
Back
Top Bottom