Your recent repair? 2013 - 2020

Status
Not open for further replies.
Snowthrower blade DIY fabrication

Just in time for this gift of frozen white bliss many of us are experiencing.


My little Toro S-120 electric snowthrower needed new rubber blades. It's a tiny machine (about 11" wide, 7 amps), but it is handy and still works well. The original solid rubber blades had cracked and come apart. Replacement blades aren't available from Toro anymore (and when they sold them they were about $25 for a pair).
I bought 1 foot of conveyor belt fabric from Rural King ($6, enough to make 2 sets), and spent about 20 minutes cutting them out and fitting them to the machine. I just used them for about two hours moving snow on my driveway, they worked great and look to be holding up well. Yea! I'm optimistic that they'll last awhile as they have reinforcing fabric that the original rubber blades lack. We'll see.

I got the idea from a YouTube video where a guy was cutting replacement blades for a bigger snowthrower from the sidewalls of an old tire. He mentioned that conveyor belt fabric was the best thing, but not always available. From what I saw, it looks a lot easier to make them from conveyor belt fabric than a tire sidewall.
 
Last edited:
Just in time for this gift of frozen white bliss many of us are experiencing..........
I did something similar only I used a heavy truck mudflap. It had an internal fabric reinforcement.


Sadly, I left it behind when I moved to warmer climes.
 
Not sure if this post should go on this thread or "What did you order from Amazon recently".:)

A few days ago we found an unknown plastic part in the bottom of the dishwasher, obviously broken off something and somewhat mangled. I had absolutely no idea what it was or where it had come from or fallen off of. Examining it more closely I found what I hoped were part numbers - 8268326 and 8268355, one above the other.

Searching on "Kitchenaid" and one of the two part numbers at a time I discovered that this was either a manifold tube or feed tube, depending on what site I found it on. It feeds water from the back of the dishwasher to the upper spray arm to get water to the glasses/dishes on the top rack.

Other places had it cheaper, but I was more confident that Amazon Prime would get it here in a reasonable amount of time so I ordered it and the silverware basket (ours has a hole in one basket). They promised it by Wednesday and it arrived today, two day's early! I had to do a little cutting and fitting on the funnel end since it was too big to fit through the other part that aligns it with the water pipe at the back of the dishwasher, but in all other respects it fit just right. Five minutes and a Phillips screwdriver were all that was needed.

If it starts a flood or fire I'll let y'all know, but at the moment I'm optimistic.:D
 
Last edited:
We have a circa 1992 Subzero built-in fridge. About a year ago, the light would intermittently not come on when the door was opened. There's a switch at the bottom of the door that controls the light. DW and I quickly figured out that if you lightly tap the switch with your toe, the light would come on. Sometimes it took two taps.

Fast forward one year and the toe tapping routine no longer worked. I found the parts list for our model online, located the part number, and ordered the new switch on Amazon, which was available for same-day shipping. Install could not have been simpler, using just a Phillips screwdriver. I probably should have turned the breaker off to the fridge, but everything hooked up with insulated slide-on connectors, so I didn't bother. Total repair time, about 10 minutes. Cost $14.95 (and that was for a two-pack of switches, so I have a spare... if I live that long).
 
Similar experience with our washer. Went out the Sunday before NYE with a house full of sick kids. Not good. Was going to be a 5 day wait for repair. Got online and started troubleshooting and quickly determined it was likely the drain pump. Ordered a new one on amazon that shipped for next day delivery free with prime for $55. Installed it in about an hour 24 hrs after it died. DH thinks I’m a rock star! :)
 
Just completed an install of an on-demand water heater. Was quite the project - involved running gas line, water line, electric, pvc vent, and drain line for condensate. https://www.faucetdepot.com/faucetdepot/ProductDetail.asp?Product=176008&. I think I covered nearly all the areas of mechanical systems, even got to get a bit of concrete dust going with a hammer drill to mount it on the wall in the cellar.
 
Replaced faulty flush valve, tank washers and bolts in my toilet. Total cost...$40.00. Plumber would have charged $100 for the service call plus a premium for the parts.
 
I'm currently almost done with a full bathroom remodel/rebuild. The old toilet was leaking, and caused the floor to get soft, and we hadn't used the tub in ages.

I tore everything out down to the studs on the floor, walls, and ceiling, replaced all the electrical, and plumbing. I hung, mudded, taped, sanded all of the drywall, and installed a new floor that was 2 layers of 3/4" plywood, and then laid down new lino. There are new LED can lights in the ceiling, and a 4 bulb fixture on the wall over the new mirror. I put a 5'x3' shower base, with surround walls, and mounted all the new fixtures with PEX line that had to be connected to our old copper water lines. I replaced all the drains, and traps in the basement all the way to the septic tank, ran new supply lines for the toilet, sink, and shower, and had to strategically drill new holes in the new floor to route them in the proper places. My wife painted the whole room, and I still have a barn style sliding door to build in the next month or so for privacy.
 
Last edited:
Not much to repair in the little snowbird condo, but I managed to swap out kitchen and bathroom can light bulbs with led fixtures.
 
Yesterday I cut and installed 8" tall preprimed, MDF baseboard around two rooms in our new house. I was lazy and did the cutting inside (it is -2F outside). So today I have sweep up all that fine dust since the shopvac can't touch it.

Also coughing a fair bit today... was also to lazy to wear a mask yesterday...

There's a pattern here somewhere.....

My dad was a master carpenter and passed from lung cancer, the primary cause was likely breathing in saw dust over many years, hardly anyone wore mask back in those days. And yes, MDF is some nasty stuff with all the fine particles created when cutting it. The risk are probably minimal for short term exposure but still worth investing/using a good mask.
 
I'm currently almost done with a full bathroom remodel/rebuild. The old toilet was leaking, and caused the floor to get soft, and we hadn't used the tub in ages.

I tore everything out down to the studs on the floor, walls, and ceiling, replaced all the electrical, and plumbing. I hung, mudded, taped, sanded all of the drywall, and installed a new floor that was 2 layers of 3/4" plywood, and then laid down new lino. There are new LED can lights in the ceiling, and a 4 bulb fixture on the wall over the new mirror. I put a 5'x3' shower base, with surround walls, and mounted all the new fixtures with PEX line that had to be connected to our old copper water lines. I replaced all the drains, and traps in the basement all the way to the septic tank, ran new supply lines for the toilet, sink, and shower, and had to strategically drill new holes in the new floor to route them in the proper places. My wife painted the whole room, and I still have a barn style sliding door to build in the next month or so for privacy.

Big job! Post a picture if you can. :cool:
 
My HW tank sprung a leak last night...actually, very good timing as I'm leaving on a lengthy trip on Monday. I picked up a new Rheem 40 gallon (48 US) tank for $349...after tax and 2 SharkBite fittings, I have a brand new HW tank for about $435.

Local quotes run around $1200 - $1300 after tax so I saved about $800 for 2 hours of work. :dance:
Congrats. My Rheem 6 year water heater died at about 5 years (I think it was the salt in our softened water). FWIW, Rheem and HD both gave me a little static regarding my warranty claim. They said I could have a new water heater if I paid the difference between the price I bought mine for and the price on the current model of the same thing. That's not a bad deal, but my warranty said I'd get a replacement water heater (no charge) if it died before 6 years. I had to call Rheem, read the rep the exact wording, quote her the form number and revision date, then she finally "found" the correct (more generous) version of the warranty. They then offered to honor the old wording, or I could pay the difference (about $100) and the replacement water heater would come with a 6 year warranty. So, I opted to pay the $100 to get the 6 year warranty.


Bottom line: I recommend you hold on to your warranty paperwork (mine is in a big ziplock bag taped to the water heater) in case they again weaken the warranty and "can't find" the version that applies to you.

I also installed an active anode device in place of the stock Mg sacrificial anode. I'm now hoping to get 20 years or more out of this WH.


Good luck!
 
Last month my front bumper came loose when it tapped a snowbank in a parking lot up North when I was traveling. Went to a mom and pop repair shop. Charged me only $60 to attached it back together. Still good and honest people in this world.
 
I also installed an active anode device in place of the stock Mg sacrificial anode. I'm now hoping to get 20 years or more out of this WH.

I've never heard of active anode rods until reading your reply, so now I'm doing some research. They supposedly also help eliminate smelly well water (which I have), so maybe that's an option for me.

Thanks!!
 
Who needs Rock Auto when you have Home Depot...
 

Attachments

  • Door handle.jpg
    Door handle.jpg
    34.1 KB · Views: 29
Last edited:
I've never heard of active anode rods until reading your reply, so now I'm doing some research. They supposedly also help eliminate smelly well water (which I have), so maybe that's an option for me.

Thanks!!
Sure, I hope it works for you (us). They are supposed to be >great< for getting rid of stinky water smell.
I bought this one, and it seems well made, installation was easy. I tried another brand in an electric water heater at my daughter's house, but I was less impressed with the build quality (plastic portion in the way of the socket so it was hard to get the unit seated, and it didn't have sufficient depth to allow it to thread into the tank while the top stayed above the outer sheet metal. I think it was designed before the insulation standards increased). So, I returned it and got this other style.


Hopefully, if you decide to go this route, you've got enough room above the WH to allow you to remove the long stock anode rod (it is easier to do this swap before moving the WH into position). I kept the stock rod--it will go back in if I have to return this water heater. . .


Anyway, I hope to not need another WH for a LONG time.


Good luck!
 
I was adjusting the temp of the GF's ancient countertop oven and the lever suddenly went slack. Now the oven is stuck on 300 degrees. Which is OK for cooking lots of different stuff. May leave it alone. Otherwise will remove 4 screws on the back and see what I find and hope I don't make it worse! I can see what looks like a long spring inside the area the lever goes into. Spring may have broken or come off. Or I could recycle it and buy a new one! Or just use one of her many crockpots instead. Lots of options.
 
Picked up a GRR-Ripper push block for my table saw, the advanced model normally goes for $79 new, purchased a returned one on Amazon for $64. When I received it one of the brass screw inserts had a big black X marked across it with a sharpie, that didn't look promising. Sure enough when I attempted to install the screw in the insert it was stripped out. Sent an email to the vendor complaining about getting an item that was obviously damaged. They responded offering a 50% credit, could also have returned it for a refund. Used my tap and die set to re-thread the insert, now good as new. Took the 50% off offer, got the tool for $32.
 
I've never heard of active anode rods until reading your reply, so now I'm doing some research. They supposedly also help eliminate smelly well water (which I have), so maybe that's an option for me.

Thanks!!

I replaced our WH a few years back. The smell came in a couple of weeks. I never had that smell before. I treated the water to kill the Iron Rust bacteria, and within another 3 weeks we had that smell again. Rheem recommended a special resistive anode. That worked for about 5-6 weeks before the smell came back. I then got a powered anode. several years later, still going strong.

In our case, the smell came from iron rust bacteria. Perfectly harmless to humans. They feed and multiply on the anode material. The old tank was about 27 years old and had no anode! The powered anodes are not cheap. A couple hun IIRC. but well worth it. (pardon the pun).
 
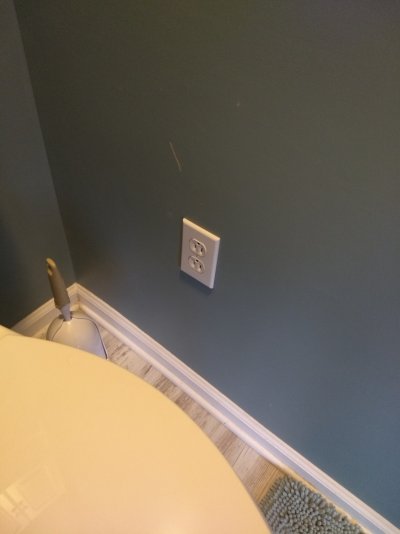
I installed this outlet. There's one on the other side of the wall, but there's a stud between that I had to drill through. Since the TP holder came off easily that gave me access. Took less than an hour.
 

Attachments

  • IMG_20190124_093455879.jpg
    IMG_20190124_093455879.jpg
    413.6 KB · Views: 27
I hope that new outlet is on a GFCI protected circuit. Oh, and you have the outlet upside down. Typically the ground lead is toward the bottom. (my preference)
 
Last edited:
My HW tank sprung a leak last night...actually, very good timing as I'm leaving on a lengthy trip on Monday. I picked up a new Rheem 40 gallon (48 US) tank for $349...after tax and 2 SharkBite fittings, I have a brand new HW tank for about $435.

Local quotes run around $1200 - $1300 after tax so I saved about $800 for 2 hours of work. :dance:

This must be the season for leaky water heaters. I replaced one this week, did pretty much the same repair except that I went for a 50-gallon model.

Now all I have to do is get the 80-gallon dinosaur it replaced out of the basement.
 
Status
Not open for further replies.
Back
Top Bottom