Your recent repair? 2013 - 2020

Status
Not open for further replies.
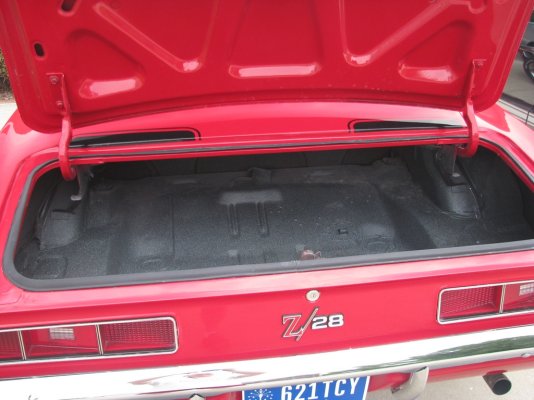
Changed a headlight in my 1969 Camaro. I never drive it at night but just the thought of it being out bugged me lol.

Changed all the small bulbs in the dash to new LED brighter bulbs on the same car. Now my lights are much brighter and it looks really nice.

Also removed the gauge lenses for the speedometer and gas tank and used a polishing system to clean them up...they had lots of spiderweb scratches from years of touching/cleaning. This worked really well and they are nice and clear now.

It's nice to finally have time to work on my show car.


Very cool. Let's see some pics of the whole car. :cool:
 
Replaced the lock on the kitchen sliding glass door. It's been fussy for a while, one had to "jiggle" it a bit to get the locking bit to drop down to engage the door frame. To my surprise I found that the local Home Depot had it in stock so I no longer had any excuse to avoid fixing it. So I drove there, bought it (and a few other things) and replaced the lock. It took removing and replacing four screws.

Well, that's enough work for one day.:)
 
Very cool. Let's see some pics of the whole car. :cool:

Here you go. I also have a 2007 Shelby GT500 that's been modified and now produces 638 horsepower at the rear wheels...equivalent to a 740 HP engine.

Camaro Rear 1.JPG

Camaro Front 2.JPG

Camaro Trunk.JPG

136-3662_IMG.JPG
 
Our Honeywell Electronic Air Cleaner in-line for the return to the HVAC system stopped working a while back. Followed diagnostics on the inside cover as well as what I found at https://electronicaircleaners.com/ .

Exchanged msgs with the electronicaircleaners support team and after hearing what I tried suggested the circuit board ($150). It had a 30 day return policy with a 10% restocking fee. Figured it was worth a shot as we are selling in a few years and would like to state that it is working.

Put the board in today and tested with the electronics cover still off. Saw a little spark with a wire to the chassis. Turned it off after a few seconds. Don't know how long it did that in the past until it finally stopped working.

Appears that the wire dry rotted and the hot wire that goes to the core which sparks the dust bunnies was shocking the side wall inside the unit. It was not doing this when I was testing the old board. Perhaps the board shorted out.

Replaced that section of wire and it all appears to be working.

https://i.imgur.com/jxhY0kw.jpg
jxhY0kw.jpg


https://i.imgur.com/YVxjnu8.jpg
YVxjnu8.jpg
 
Last edited:
Yikes, good catch!
Thanks! It was all enclosed in metal housing so I don't think there is a real fire risk. Everything was grounded properly as well. As well in our city/state all the electrical is in conduit which certainly lowers any electrical fire risk.
 
RE: online tire ordering via TireRack.COM
I drive a 5400 lbs Tesla Model X 100D and like many modern cars it does not have a spare. I watch the tire pressure and tread depth pretty closely. I still have close to 5/32nd but have over 39000 miles on them. We are going on long weekend a multi-state trip this month as well as next month so seemed prudent to get tires now instead of after the trips. (i.e. safety)

I've followed various threads and did many comparisons of spec data but I've been pretty happy with the performance and ride of these tires. They are very efficent as well (ie. energy-wise). In the end I just ordered the same ones I had.

TireRack.COM was very informative and easy to order from. They let me pick from their partner installers and I just shipped the tires there 'free of charge'. Installation cost was $92. They wanted to sell me an alignment but my tires were wearing perfectly so I skipped that.

Highly recommend TireRack.com but I suspect many here use them as well.

My tire specs:

Continental CrossContact LX Sport; Crossover/SUV Touring All-Season; ContiSilent
Front: 265/45R20 108V XL; UTQG: 480 A A; Tirerack Per Tire: $309 (a few yrs back: $349.25)
Rear: 275/45R20 110V XL; UTQG: 480 A A; Tirerack Per Tire: $291 (a few yrs back: $338.25)

Following via: http://www.tirerack.com/tires/tiretech/techpage.jsp?techid=35

Load Index of 108 = 2205 lbs | 1000 kgs
Load Index of 110 = 2337 lbs | 1060 kgs

jRy9nxB.png


Speed symbol is V for 149 mph max

vMdr2OC.png


69Y2OBE.png


And yes, you can put a tire patch on these tires like any other. Continental has a description. You just use a knive to cut out the little section of the foam, Patch it as normal and then use same tire patch cement to put that piece of foam back. Trivial. GM puts them on some cars to: https://gm-techlink.com/?p=8677
contisilent-image-01a.png
 
Last edited:
Not exactly a repair but I did find a good use for that five gallon bucket:
 

Attachments

  • HD_bucket_use.jpg
    HD_bucket_use.jpg
    74.1 KB · Views: 29
That is a great use of the 5 gallon bucket, love the toilet roll holding.

We did buy a $15 snap on toilet seat from Cabela's for a 5 gallon bucket and take it with us in the van as it seems more private and civilized than pulling to the curb in stop and go traffic on the freeway.

Had the bucket for 4 years now, and haven't had to use it.

I put wood shavings in the bottom of the plastic bag to absorb. (kitty litter might be better but is heavier and I don't have a cat).
 
Our 10-yr old elliptical exercise machine started smelling smoky-like last spring when I was using it, and then "puff" sent out a bunch of smoke from the flywheel area beneath the front console. I quickly unplugged it and monitored to make sure it wasn't going to burn my garage down. The machine is a fairly nice one, and we use it a lot in the winter and spring when it is cold and rainy out, so I thought that I'd try to see if I could get it repaired.

I couldn't find anyone locally who wanted to fix the thing, so I asked the owner of a local PT place who took care of repairs and maintenance of his equipment. He gave me the number of a mobile repair outfit in Sacramento and said that they usually have a technician out in our area once or twice a week. I called the place up and they said they'd be happy to repair my elliptical. It would cost $200 to come out and pull it apart to see what is wrong. Then they'd order parts, and when the parts came in it would cost another $200 to come out and put the new parts in...unless it took more than an hour, in which case it would cost $200/hr for any additional time.

Well, I decided that for that kind of money I wouldn't mind going into the exercise equipment repair business...at least for one elliptical machine. The smell and the smoke had come from the flywheel area, so I started taking out screws and taking off plastic covers and splitting apart the flywheel case until I could finally see inside a little. I had found a schematic of the unit online and guessed that the problem was either with the main power supply or with the main controller board. I couldn't see the power supply very well so I wasn't sure if there was a problem with it, but I did see some discoloration of the controller board. I decided to order new parts to replace both, at a total cost of about $100. The parts/service guy I talked to in Alabama was very nice and helpful, and the parts arrived in about a week.

After removing a bunch more nuts, bolts, covers, levers, and arms, I was finally able to contort my meaty hands and arms enough to just reach the power supply and circuit board in the elliptical. I wrestled the old parts out, and somehow got the new parts back in with all the electronic leads in the right places. When I replaced all the levers, arms, and covers on the machine, I only had one screw left over, which I took as a complete success! And when I plugged the machine in, it worked perfectly...no reversed wires and no glitches on the LCD control panel as many others who have worked on their units have reported! I always expect to somehow get the wrong parts or install the right parts the wrong way the first time, so it was a very pleasant surprise tp have it work on the first try.

I have to say thanks to my son-in-law for helping me lift the 200-lb behemoth machine onto sawhorses so that I could work at a comfortable height. I never could have gotten down to floor level to get inside the guts of the machine with my two metal-and-plastic knees. And thanks to my DW for helping me get it back down off the sawhorses without pinching or bruising anything.

Overall I saved a $400-600 repair labor bill and it only took me about 6 hours of work. Not a bad payday for a retiree.
 
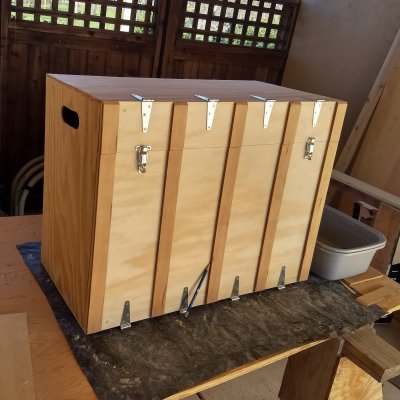
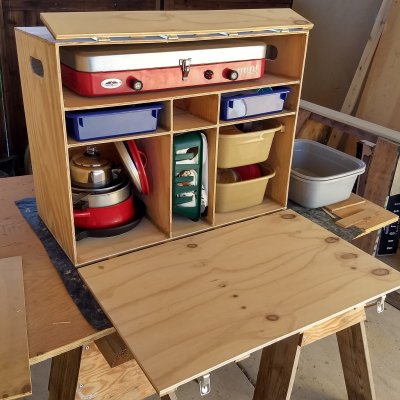
After building a fishing boat two winters ago, I ended up with a bunch of extra plywood scraps. I decided to use it to build a kitchen box to use when we went car camping. I got out all of our camp cooking gear out, measured it, bought a couple of tubes of construction adhesive, and went to work cutting and gluing. Here's the result.
 

Attachments

  • IMG_20190124_153132026_HDR.jpg
    IMG_20190124_153132026_HDR.jpg
    622.4 KB · Views: 31
  • IMG_20190124_153152678_HDR.jpg
    IMG_20190124_153152678_HDR.jpg
    696.9 KB · Views: 31
After building a fishing boat two winters ago, I ended up with a bunch of extra plywood scraps. I decided to use it to build a kitchen box to use when we went car camping. I got out all of our camp cooking gear out, measured it, bought a couple of tubes of construction adhesive, and went to work cutting and gluing. Here's the result.

Very nice.

I did something similar about 40 years ago when we were spending time camping in a pop-up tent trailer with our two young daughters. Yours looks much more professional than the one I built.
 
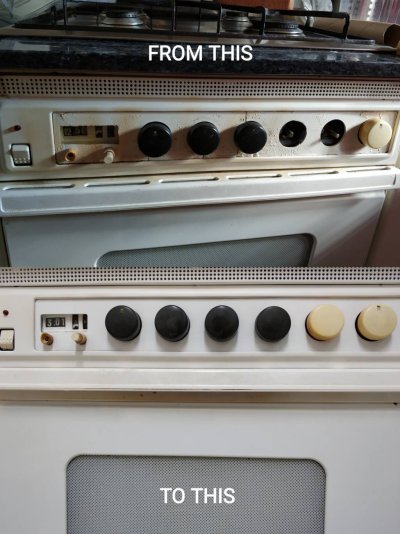
Small visual repairs for an oven of a relative.
Redesigning some elements and laser cut them was 10x cheeper than buying a new one.IMG_20190901_192003.jpeg
 
Our 55 inch plasma tv stopped responding to the remote. I could operate it from the builtin buttons so I knew the TV worked.
Thing is, we replaced the remote about 5 months ago ( $8) .

First I changed the batteries, then tested the batteries in a flashlight and all was good.
Then I used my phone video camera mode, to look at the remote as I clicked the buttons and could see the IR light. So the remote is working.

Tested the old remote and it was working too :(

So thinking it's the TV IR sensor, searched on it, instead found site with lots of people claiming by pushing in a earphone jack a few times into the "remote control input socket" in back it would fix it.

With nothing to lose, tried it, and surprise it works fine now. :D
 
Not exactly a repair. My old pu, the previous owner put some kind of alarm system on it that I've been meaning to take off. Dang wires going everywhere and not the best job of splicing into the original wires. Still have 5 wires I wasn't able to trace down where they're going. Thank the Lord it did start after I had most of the mess out! Keeping fingers crossed
 
Have a truck camper. A few years had some of the plywood delaminating. Company fixed and put some tin sheets to prevent further damage. Two weeks ago saw some plywood on one of the sides that sits in the bed having same issue. I looked to do a self fix but upon inspection there was no way. Took in in and thought maybe highest guess was $1k. Nope, estimate was $2k. Took three days. Great job on it but another unexpected spend. Thank goodness those things don't break the bank.
 
Our 55 inch plasma tv stopped responding to the remote. I could operate it from the builtin buttons so I knew the TV worked.
Thing is, we replaced the remote about 5 months ago ( $8) .

................................ snip So thinking it's the TV IR sensor, searched on it, instead found site with lots of people claiming by pushing in a earphone jack a few times into the "remote control input socket" in back it would fix it.

With nothing to lose, tried it, and surprise it works fine now. :D

Amazing! Glad you found the secret!
 
"Bir48die....Have a truck camper. A few years had some of the plywood delaminating."


I've been doing the underneath of my truck camper which I've been building most of this year with "Flex Seal". Supposed to seal things up nice and not allow moisture in...We'll see??
 
"Bir48die....Have a truck camper. A few years had some of the plywood delaminating."


I've been doing the underneath of my truck camper which I've been building most of this year with "Flex Seal". Supposed to seal things up nice and not allow moisture in...We'll see??
My experience with campers is that water comes in from the top down. And it seems to be easier to seal water in than to seal water out.
 
Status
Not open for further replies.
Back
Top Bottom