Your recent repair? 2013 - 2020

Status
Not open for further replies.
Re: air cleaner with a mind of its own:
So, I tried opening it to clean it from the inside and discovered two of the six screws aren't ordinary Philips heads. A 1/8" allen wrench fit one of them well enough that I was able remove it with difficulty. They're T20 tamper proof screws but the one I removed had a short stem so the allen wrench fit. For the other one I ordered a screwdriver from Hong Kong ($2) so I'm suddenly extra interested in a resolution to their conflict.

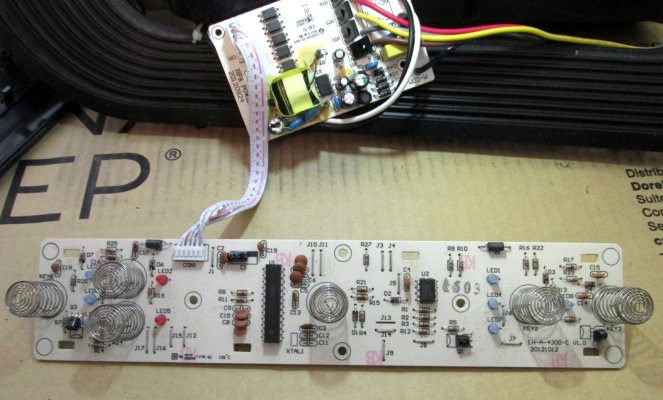
I got the screwdriver and opened up the air cleaner but there was no visible dirt at the switches that I could see. I think they're capacitive switches that you barely have to touch (when they work). I didn't know what to do to make a better connection between the springs and the foil looking thing they press against so I just reassembled it and cleaned up some of the interior of the case. The motor and fan blades didn't look so dirty so I didn't bother to access that area for a complete cleaning. It seemed like I accomplished nothing but it's working now. Maybe the dust that I did clean was causing static or reseating the switches created better contact somehow.
 

Attachments

  • IMG_1810.jpg
    IMG_1810.jpg
    479.5 KB · Views: 20
Replaced our water filter discharge piping. It had developed a leak. Hopefully now it will be good for another 25 years.
 

Attachments

  • Screen Shot 2019-12-06 at 7.32.41 AM.jpg
    Screen Shot 2019-12-06 at 7.32.41 AM.jpg
    412.4 KB · Views: 26
Replaced my 20 year old garage door opener today. Took 4 hours and wore me out. The old gray mare...

Heh, that reminded me of my own garage door opener project. Got the original pair of openers back in 1990. The first one broke about 10 years in. Not too impressive, but 10 years is 10 years. Sears had a great sale going on at the time, so I figured, well, what the heck, the other one will probably bust soon too, so I'll just go ahead and buy the pair so that I have the second one ready to go when it happens.

Well, it's a hair shy of 2020 now and the Sears replacement opener for door #1 still works like a charm (20-year life span so far). Not bad!
However, it's Sears mate is still sitting in the original box in the back of the garage as the 1990 model of door #2 is still hanging in there, and I have been able to procrastinate about its replacement for all this time.... now THAT takes dedication to the task...
 
I just replaced the GFCI outlets around our house with GFCI breakers. We had a power line go down last week that caused a power surge. When the power came back on the GFCI's made a terrible noise and smoke came out. I figured I would put all the GFCI's in one place in the breaker panel instead of all over the house. Spendy though, cost me $250 for five breakers!

I also replaced the GFCI outlet in our pump house, but there was no reason to opt for the spendier breaker when it's only two feet above the outlet. :)

The power surge also burned out one of my network switches. Fairly inexpensive and not hard to replace, other than it's located in our crawlspace. Always fun to go down with the dust and spider webs.

When I was replacing the GFCI's in the garage, I noticed the other outlets were the dingy almond color with broken covers and a few with minor damage. So I'm in the process of replacing the outlets in the garage with clean new white ones. I've done ten so far, still have another 5-6 to do when I can find the time. No rush, I'm not out there much in the winter.

Last week the battery in my daughters car died, so I had to replace that. Then my wife's car battery died a few days ago, so I had to replace hers too.

Today I need to clean our sink drain. I just cleaned and snaked it several weeks ago but it's plugged up again. I must have missed something in there.
 
I've replaced the entire guts of a few toilet tanks. It's surprisingly easy, as the $15 kits I bought had everything inside, including the plastic nuts for the outside bottom of the tank.
As long as you can reach the underneath, I've never found a need to remove the tank for this type of replacement.

Thanks for the encouragement! As a last resort, I would go ahead and install the new FluidMaster ballcock. It's the vertical pipe going from the floor up to the bottom of the tank, and the 2 connections on the pipe ends, that have me worried. 2 different connections, each of which has the potential to be one of those 'I put it back together exactly the way it was before, but now it leaks, no matter how many times I redo it' scenarios. If I can do the job with only opening the upper pipe connection, then that might be fairly easy. Another thing: the 'straight' pipe isn't really straight, it has a slight bend in it, so I'd have to get the alignment exactly right, to avoid a leak, if I have to loosen up both connections. As of now, I have applied the Goop to the crack inside the ballcock, and am waiting for it to dry. 24 hours minimum. And yes, I have a second toilet, thank goodness! lol...
 
I just replaced the GFCI outlets around our house with GFCI breakers. We had a power line go down last week that caused a power surge. When the power came back on the GFCI's made a terrible noise and smoke came out. I figured I would put all the GFCI's in one place in the breaker panel instead of all over the house. Spendy though, cost me $250 for five breakers!

I also replaced the GFCI outlet in our pump house, but there was no reason to opt for the spendier breaker when it's only two feet above the outlet. :)

The power surge also burned out one of my network switches. Fairly inexpensive and not hard to replace, other than it's located in our crawlspace. Always fun to go down with the dust and spider webs.

When I was replacing the GFCI's in the garage, I noticed the other outlets were the dingy almond color with broken covers and a few with minor damage. So I'm in the process of replacing the outlets in the garage with clean new white ones. I've done ten so far, still have another 5-6 to do when I can find the time. No rush, I'm not out there much in the winter.

Last week the battery in my daughters car died, so I had to replace that. Then my wife's car battery died a few days ago, so I had to replace hers too.

Today I need to clean our sink drain. I just cleaned and snaked it several weeks ago but it's plugged up again. I must have missed something in there.

While you're in the main panel, you might want to consider adding a whole house surge protector to prevent more damage in the event of future surges.
 
We have two RV's - a travel trailer that we tow with a pickup truck and a Class B (van) motorhome. Both require hand-on time to keep them in reasonable shape. Thanks goodness I enjoy repairing things and doing basic maintenance. I can't imagine paying somebody to perform the work.

So, on to my recent repair. One of the overhead cabinets fell off the ceiling in the motorhome! Yikes! This happened when we were on a trip, thousands of miles from home. We rebuilt the cabinet while we were on teh road but realized the installation was going to be delayed until we returned home and had more equipment available.

A few pictures and descriptions are shown below. I posted a more extensive description on Air Forums. The main reason the cabinet fell was the screws were not properly installed and IMO there were too few screws. It was an intersting rebuild but sure aggravating to have to go through it.
 

Attachments

  • Part1-1.JPG
    Part1-1.JPG
    114.9 KB · Views: 48
  • Part1-2.JPG
    Part1-2.JPG
    113.4 KB · Views: 49
  • Part2-1.JPG
    Part2-1.JPG
    151.9 KB · Views: 28
  • Part2-2.JPG
    Part2-2.JPG
    120.4 KB · Views: 28
  • Part3-1.JPG
    Part3-1.JPG
    180.1 KB · Views: 30
  • Part3-2.JPG
    Part3-2.JPG
    129.2 KB · Views: 29
  • Part3-3.JPG
    Part3-3.JPG
    130 KB · Views: 29
  • Part4-1.JPG
    Part4-1.JPG
    107.5 KB · Views: 30
  • Part4-2.JPG
    Part4-2.JPG
    120.8 KB · Views: 27
  • Part5-1.JPG
    Part5-1.JPG
    119.2 KB · Views: 23
Thanks for the encouragement! As a last resort, I would go ahead and install the new FluidMaster ballcock. It's the vertical pipe going from the floor up to the bottom of the tank, and the 2 connections on the pipe ends, that have me worried. 2 different connections, each of which has the potential to be one of those 'I put it back together exactly the way it was before, but now it leaks, no matter how many times I redo it' scenarios. If I can do the job with only opening the upper pipe connection, then that might be fairly easy. Another thing: the 'straight' pipe isn't really straight, it has a slight bend in it, so I'd have to get the alignment exactly right, to avoid a leak, if I have to loosen up both connections. As of now, I have applied the Goop to the crack inside the ballcock, and am waiting for it to dry. 24 hours minimum. And yes, I have a second toilet, thank goodness! lol...

Update: Success! I once again have avoided having to mess with the pipe at the bottom of the tank which feeds water in. I was able to seal up the small crack at the top of the ballcock tube (same thing I did 8 years ago). Apparently 8 years of water flowing over it dissolved some of the glue. Reapplied the glue to the crack, after cleaning, and let it dry for 3 days. So far so good. No leak! Knock on wood, etc. Hoping for another 8 years. Good to know, from responses here, that messing with the pipe under the tank is possibly not a big deal, if I decide to do that sometime.
 
Attempted to get the screws out of my old countertop oven, which now only heats at 300 degrees, no higher, no lower. Thought maybe I could reconnect something that slipped off, etc. Of course the screws wont come out, and trying harder just strips the slots off the Philips edges. Solvent won't help since the screws are 9 inches long (I did get one out) and the threads are at the other end. So..... I may be tossing the old one and buying a new one! Already have one picked out. Blow that dough, lol.
 
Thanks for the encouragement! As a last resort, I would go ahead and install the new FluidMaster ballcock. It's the vertical pipe going from the floor up to the bottom of the tank, and the 2 connections on the pipe ends, that have me worried. 2 different connections, each of which has the potential to be one of those 'I put it back together exactly the way it was before, but now it leaks, no matter how many times I redo it' scenarios. If I can do the job with only opening the upper pipe connection, then that might be fairly easy. Another thing: the 'straight' pipe isn't really straight, it has a slight bend in it, so I'd have to get the alignment exactly right, to avoid a leak, if I have to loosen up both connections.

Do you have a shutoff valve for the toilet, either on the floor or on the wall beneath the toilet? If so, you could easily replace that "straight pipe" with a flexible stainless steel hose. Just take the old pipe to the home center so you can match up the length and make sure it has the right fittings on each end. They usually have rubber gaskets on each end, so it's essentially just like hooking up a garden hose. Thread on the fitting, the rubber gasket makes the seal when you tighten it. Nearly impossible to mess up.
 
I have a GE double oven (Gas) range. The lower oven stopped working. I figured it had to be the igniter, so I took that out and it just looked like it had an open on one of the ends. I bought a new igniter online and replaced it.

Not hard to do just a few screws to take a plate out of the bottom, that exposes the igniter, then another heat shield in the back (5 screws on that). Unplug old igniter in the back of the oven, then the igniter from the front (two screws to take it off the mount) and pull it out the front. Feed the wire from the new one through the hole to the back and screw it back down. Put all shields and plates back in.

I did opt for the higher priced GE part after seeing reviews on the lower priced ones that said they didnt last but a few months.
 
^^^^^^^
Good catch, I missed that in the discussion, and they are really easy to use.
DSC00973.jpg

I've heard from plumbers that it's better to use a much longer flexible hose, say 16" to 24" in your case, in order to have a service loop. The service loop can be positioned so it remains mostly hidden behind the toilet. The loop provides for variation in length of the hose in the event the toilet becomes loose or otherwise rocks. You don't want to stretch the hose or pull on the fittings.
 
I've heard from plumbers that it's better to use a much longer flexible hose, say 16" to 24" in your case, in order to have a service loop. The service loop can be positioned so it remains mostly hidden behind the toilet. The loop provides for variation in length of the hose in the event the toilet becomes loose or otherwise rocks. You don't want to stretch the hose or pull on the fittings.

Yes, just make sure the longer hose is longer enough, because if it's only an inch or two longer, then the bend in it makes it harder to install. Much easier if you can do a real loop.
 
I've heard from plumbers that it's better to use a much longer flexible hose, say 16" to 24" in your case, in order to have a service loop. The service loop can be positioned so it remains mostly hidden behind the toilet. The loop provides for variation in length of the hose in the event the toilet becomes loose or otherwise rocks. You don't want to stretch the hose or pull on the fittings.

Plumbers probably say that so they only have to keep one or two hose lengths on hand. One size fits all.

Personally, I wouldn't want a loop behind my toilet. It's just a visual thing, but it would drive me crazy, and could potentially snag on things while cleaning or whatnot. I chose hoses a couple inches longer than I needed. That's plenty of slack to account for movement, and really a toilet shouldn't be rocking or you risk breaking the seal to the drain.

My shutoff valves come out of the wall, so I have a natural curve running up to the toilet. This makes it easier to accommodate hoses of different lengths.
 
Do you have a shutoff valve for the toilet, either on the floor or on the wall beneath the toilet? If so, you could easily replace that "straight pipe" with a flexible stainless steel hose. Just take the old pipe to the home center so you can match up the length and make sure it has the right fittings on each end. They usually have rubber gaskets on each end, so it's essentially just like hooking up a garden hose. Thread on the fitting, the rubber gasket makes the seal when you tighten it. Nearly impossible to mess up.


That's hoping the plumber who originally installed the shutoff valve didn't try to save a few bucks and put in a one piece shutoff valve/flex hose kit like they did in my house. If the flex hose starts to leak you'll need to replace the shutoff valve also. I ended up replacing all the shutoff valves and hoses in the bathrooms and kitchen in my house, the hoses used in those one piece units are cheap and will eventually leak if moved around.
 
Last edited:
Whenever possible, I like to replace the faucet type shut off valves with a quarter turn/ball valve style one too. Much more reliable IMO.

I've had no end of issues over the years with ancient shut off valves, especially the cheap ones, leaking or being impossible to turn. You don't get that with the quarter turn ones.

+1
We had one of the old many turn ones spontaneously give way, spraying water out. It had not even been used in the last few years, so it's not like we broke it.
 
Do you have a shutoff valve for the toilet, either on the floor or on the wall beneath the toilet? If so, you could easily replace that "straight pipe" with a flexible stainless steel hose. Just take the old pipe to the home center so you can match up the length and make sure it has the right fittings on each end. They usually have rubber gaskets on each end, so it's essentially just like hooking up a garden hose. Thread on the fitting, the rubber gasket makes the seal when you tighten it. Nearly impossible to mess up.

Yes, there is a shutoff valve on the top of a (different) straight pipe that comes out of the floor under the toilet. The smaller, curved pipe comes out vertically, from the top of the shutoff valve. I checked the other toilet in the house and it has the same setup, but the smaller, curved pipe has even more of a bend! I'm imagining the plumbers heating up the small pipes and bending them into the needed shape during the install! (Just guessing) I thought I had previously mentioned that I wanted to avoid using a braided line, but looking back, I see I did not. I may end up having to go with a braided line, since who knows if the new ballcock's threaded shank will come down the exact same distance as the previous one, out of the bottom of the tank, and the pipe won't fit in exactly. I'd get a braided line with a standard coupling on one end, and whatever coupling I need to connect to the shutoff valve on the other end. Too bad I'll lose the extra tank support the solid pipe had been providing. I used 'sharkbite' connectors on a flexible braided line to fix my water heater, and they are really convenient, and work great, but it's true you have to get them long enough so that you can get the actual connections on flush, without straining the connections one way or the other.
 
I wanted to avoid using a braided line

I have the braided lines all over our house for the toilets and sinks. They work great with no problems. However, I have had corrosion issues with the larger braided hoses for water heater hookups. I switched to stainless flex hoses for those.

You can also get stainless flex hoses for toilets, such as the flexible toilet connectors about half way down this page. You just need to determine the length and the fitting you need for the shutoff valve.

https://www.plumbingsupply.com/flexes.html
 
Yes, there is a shutoff valve on the top of a (different) straight pipe that comes out of the floor under the toilet. The smaller, curved pipe comes out vertically, from the top of the shutoff valve. I checked the other toilet in the house and it has the same setup, but the smaller, curved pipe has even more of a bend! I'm imagining the plumbers heating up the small pipes and bending them into the needed shape during the install! (Just guessing) I thought I had previously mentioned that I wanted to avoid using a braided line, but looking back, I see I did not. I may end up having to go with a braided line, since who knows if the new ballcock's threaded shank will come down the exact same distance as the previous one, out of the bottom of the tank, and the pipe won't fit in exactly. I'd get a braided line with a standard coupling on one end, and whatever coupling I need to connect to the shutoff valve on the other end. Too bad I'll lose the extra tank support the solid pipe had been providing. I used 'sharkbite' connectors on a flexible braided line to fix my water heater, and they are really convenient, and work great, but it's true you have to get them long enough so that you can get the actual connections on flush, without straining the connections one way or the other.


I had bent metal hoses on two of the toilets in my house and to put the flex line in a new valve was needed to fit the flex hose. One big advantage of the flex hoses is if you ever need to replace the valve in the Toilet, you don't have to move the tank i.e loosen the bolts holding it to the bottom of the toilet. (The third one had the pipe replaced sometime in the past with a flex hose.) Generally if you replace the toilet they replace the flex line as well.
BTW if you look at the new valves they say don't use the chlorine tablets in the tank to keep it clean as it does destroy the plastic.
 
BTW if you look at the new valves they say don't use the chlorine tablets in the tank to keep it clean as it does destroy the plastic.
Beyond that, those bleach tablets shouldn't be used in any toilet that has a rubber flapper valve, a rubber gasket between the tank and the main commode, or any plastic in the fill valve/overflow.

Basically, they don't belong in any modern toilet.
 
Generally if you replace the toilet they replace the flex line as well.

I've replaced dozens of toilets for family and friends...every toilet gets a brand new braided line.

It's also a good idea to replace the washing machine water hoses every now and then.
 
Beyond that, those bleach tablets shouldn't be used in any toilet that has a rubber flapper valve, a rubber gasket between the tank and the main commode, or any plastic in the fill valve/overflow.

Basically, they don't belong in any modern toilet.

There's a solution I've been using for four years, with Spa bromide tablets. It keeps the tablets in a separate container connected to the fill tube that goes into the overflow tube. So the bowl gets a shot of sanitizing/cleaning bromide, but none of it is in the tank water:

https://www.amazon.com/gp/product/B00K1KVPI0

51y8PFeMZKL._SL500_AC_SS350_.jpg


-ERD50
 
Status
Not open for further replies.
Back
Top Bottom