Your recent repair? 2013 - 2020

Status
Not open for further replies.
I replaced my 7 day programmable heat/cool battery backed up thermostat with a good old fashioned Honeywell round dial manual one because I got tired of reprogramming it.

You could have just turned off program mode and adjusted temperature the "old fashioned" way.

My thermostat is programmable but I've never programmed it...I just adjust the temp as required. It's Wi-Fi so I'll make the adjustment from my phone when I wake up or when I'm on the way home.
 
17MAY2017 - massive hailstorm with golf ball sized hail stones.
Insurance payout of $32K USD.
27JAN2020 - we approach the finish line.
Expected completion before the 3 year mark.

I never want to deal with this situation again.
Our contractor (Lumin Systems) was not very good. Poor communication. Crappy subcontractors. Employee turnover.
 
17MAY2017 - massive hailstorm with golf ball sized hail stones.
Insurance payout of $32K USD.
27JAN2020 - we approach the finish line.
Expected completion before the 3 year mark.


It took 3 years to complete the hail damage repair? Can see why you weren't happy with the contractor, could have built a half dozen new houses in that time.
 
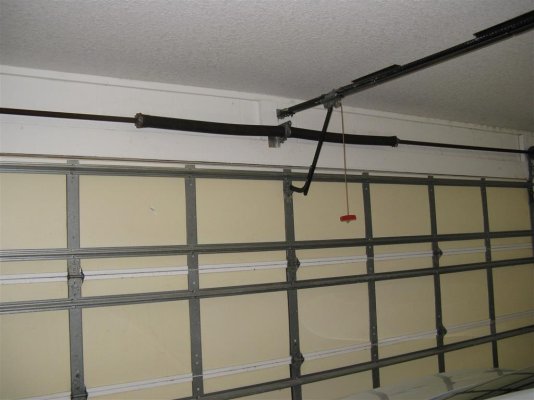
Replaced and adjusted Garage Door Torsion Springs. Had to Make some Turn bars out of 1/2" Steel rod ($8 from Home Depot). Had to measure the existing springs and order new ones, then had to install and test them.

Why? My neighbor had one snap/break, our homes are about the same age, ~17 years. Cost him $607 to replace them and repair the damage caused by the spring breaking during an open cycle, the opener broke and pulled a support strut off the door.

Garage Torsion springs have a 10,000 cycle average life, that is about 9 years with 3 cycles per day.

So I thought I would do some preventative maintenance. Adjusted the door closing/opening force and height at the same time.

Total Cost including springs, center bearing and tension rods = $75! This 66 year old patted himself on the back for this one.
 

Attachments

  • IMG_9472 (Medium).JPG
    IMG_9472 (Medium).JPG
    82.5 KB · Views: 29
We had the older style extension spring break while we were in the the living room. It made a heck of a noise and were both looking at each other wondering "what was that"?
I bent a new hook on the spring and it worked another 10 years until we had a hurricane that damaged the door.
 
When one of ours broke, I replaced both as I figured the second one had a short life left.
I did buy the steel levers from the site that sold the springs, they cost around $12-$15 for the pair.
The amount I saved over paying someone to do the fix was great.
I watched a number of you tube videos, (some do it wrong) to be sure to see how to do it safely.
 
The hardest part with the torsion springs is that when both springs are unwound and loose, the cables want to slip of the end pullies. I wound each one 5 turns to provide a little tension, but allowed me to turn the torsion bar by hand, all 17' of it, just enough to slip the cables back onto the pullies and then I continued tensioning each spring till I got to MY calculated turn ratio of 28 x 1/4 turns (7 full turns). When they are correct you should be able to lift the door to about half way, and it should stay there. Then it is "balanced".

I wonder how many folk here would attempt such a repair vs hire it out? I would rate it about an 8 out of 10 for difficulty level, mainly because you have to be VERY careful doing it. Those torsion spring adjustment bars will only need to slip off once to cause you and perhaps the door very serious damage. Anyone see a Poll coming... :)
 
Last edited:
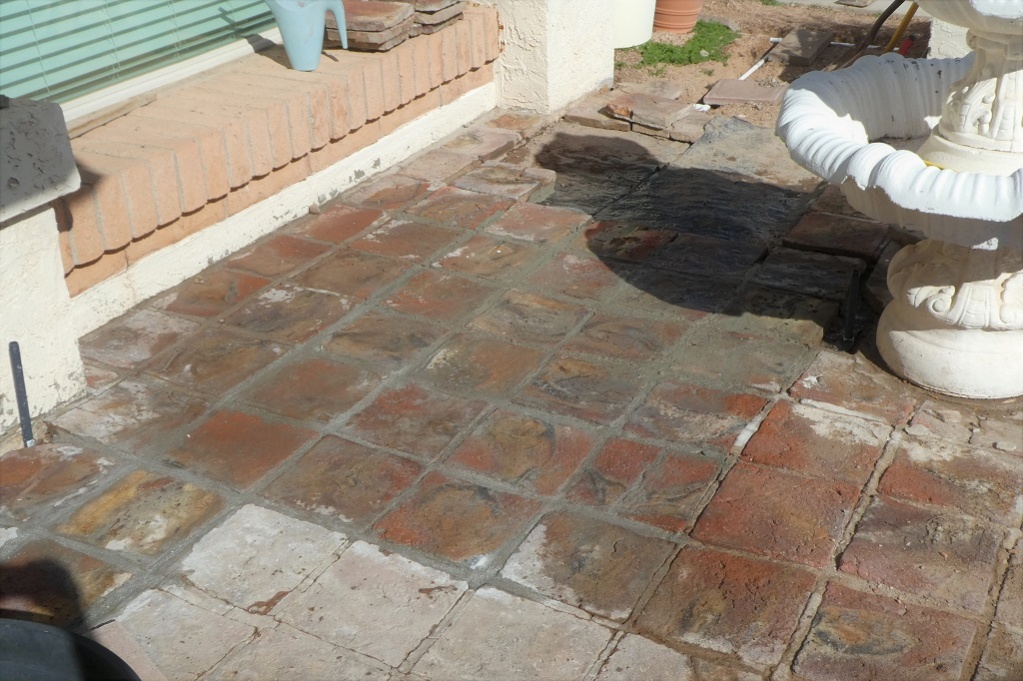
The pavers of my courtyard were buckled by the roots of a couple of pine trees 15 ft away. The pine trees have been removed and their root systems mostly dug up a few years ago (a big project that was hired out), but I kept procrastinating on repairing the courtyard myself.

Recently, finally decided to do that before it gets hot here, and also to fix the underground plumbing of a drip system.

I originally built the courtyard to have a rustic look for ease of building, as perfection was not needed. It works out well for repair too.


10965-albums255-picture2105.jpg
 
Last edited:
I'll be adding an approximately 6' x 6' concrete pad to set our grill on in the near future. Now it just sets on four flag stones, and to cook, you stand in the grass/dirt/mud, depending on the season. I want it an all concrete area.
Lots of plans, little gumption!
 
I'll be adding an approximately 6' x 6' concrete pad to set our grill on in the near future. Now it just sets on four flag stones, and to cook, you stand in the grass/dirt/mud, depending on the season. I want it an all concrete area.
Lots of plans, little gumption!

You could fill a 6x6 area with gravel (dig it out to 8 inches deep) then fill up about 6 - 7 inches with gravel, and put paver stones on it and fill cracks with with sand. Since it's not for a car to park on, the paver stones can be the thin ones which are about an inch thick.
 
Forgot to comment about the torsional springs for the garage door.

I had to replace mine more than 20 years ago. The original springs only lasted about 8 years. The replacement springs are of better quality, and work till now.

Thought about replacing them myself, but was busy with work, plus the safety issue scared me. It was so long ago, but I think it cost perhaps $200-250 then.

It's too bad there's no way to torque the springs when the door is up. That's when the springs are under the least tension.

^^^^^^^^^^^^^^^^^^^^^^ Good Job, I need to do the same. Gotta get some sand.

Thanks.

I did the courtyard myself 30 years ago. Gosh, I am so much older now. It looked really nice until the darn tree roots destroyed it. They even lifted up a section of masonry block fence, and that was when I said they had to go.

These adobe pavers are quite popular in the SW. I think they are made in Mexico. I laid them on gravel, then used mortar to grout the joints to keep them in place. I got sloppy and the mortar got on top of the pavers, and looks like hard water deposit. Oh well. Maybe I can clean it out with a bit of muriatic (pool) acid.


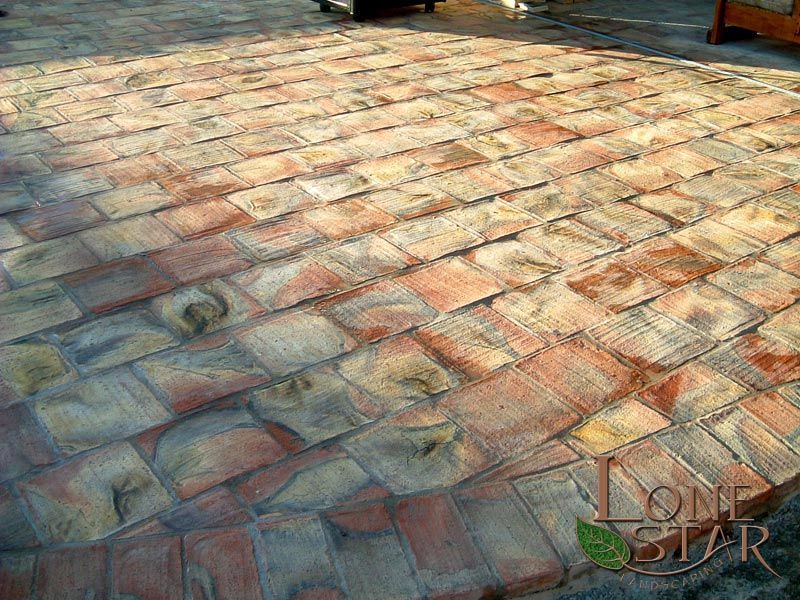
Burnt adobe pavers are colorful, and when new look like this (photo from the Web).

44b5433cabeceda865bd88237264ebc4.jpg
 
Last edited:
…...I wonder how many folk here would attempt such a repair vs hire it out? I would rate it about an 8 out of 10 for difficulty level, mainly because you have to be VERY careful doing it. Those torsion spring adjustment bars will only need to slip off once to cause you and perhaps the door very serious damage. Anyone see a Poll coming... :)

I did one many years ago, borrowed home made winding bars from a friend. Just one side broke, the other side's spring lasted for many years. I went back years later to the garage door company that would sell parts, besides installation. All I needed was a new door bottom seal. Their parts area was totally gone. A guy in an office there quietly sold me the seal I needed, said he really wasn't supposed to do that. He knew I bought the door there years before. I asked why no parts sales anymore? He said their installers were being traumatized by what they saw in some residential garages that they were being called to, really grim, where a guy was picked up by paramedics, and the floor was a mess. The installers did not want to see or work in those conditions anymore.

The oldest spring finally broke, and I bought a new set online, with winding cones pre-installed (rather than prying out and re-using old winding cones like I did before). The company I bought them from had info on how one could upgrade for a few $, by using a longer spring, and I think a diameter change went with it. This reduced the torque per unit length that winds up/unwinds so many times, leading to a much longer life. I went that route, and I bought their winding bars too. I work slowly, think twice, act once. With no one right around me to distract me. Keep brain 100% on task and safety.

I think very very few people do this task themselves. That has never deterred me, I have done all sorts of things that most people won't do themselves. And almost all of it totally on my own, no one around to help me if something went badly awry.
 
... And almost all of it totally on my own, no one around to help me if something went badly awry.

I set up a camera to video me cutting down a big tree, so if someone came around later and found my body, they could watch the video to know what happened. Since it all worked out I have a nice video of the tree cutting :cool:
 
Replaced and adjusted Garage Door Torsion Springs. Had to Make some Turn bars out of 1/2" Steel rod ($8 from Home Depot). Had to measure the existing springs and order new ones, then had to install and test them.

Why? My neighbor had one snap/break, our homes are about the same age, ~17 years. Cost him $607 to replace them and repair the damage caused by the spring breaking during an open cycle, the opener broke and pulled a support strut off the door.

Garage Torsion springs have a 10,000 cycle average life, that is about 9 years with 3 cycles per day.

So I thought I would do some preventative maintenance. Adjusted the door closing/opening force and height at the same time.

Total Cost including springs, center bearing and tension rods = $75! This 66 year old patted himself on the back for this one.

I had one side spring break about 3 weeks ago, and I replaced both, easy peasy. Yesterday the 1/3 HP opener failed, it's been in operation since 1993. A pro wil replace ours with a 1/2 HP model for $415.00 Blow that dough!
 
We had the older style extension spring break while we were in the the living room. It made a heck of a noise and were both looking at each other wondering "what was that"?
I bent a new hook on the spring and it worked another 10 years until we had a hurricane that damaged the door.

Wow, that’s what I call “out-moneymoustaching Mr Money Moustache”. :LOL::LOL::LOL:
 
Last edited:
Replaced and adjusted Garage Door Torsion Springs. Had to Make some Turn bars out of 1/2" Steel rod ($8 from Home Depot). Had to measure the existing springs and order new ones, then had to install and test them.

Why? My neighbor had one snap/break, our homes are about the same age, ~17 years. Cost him $607 to replace them and repair the damage caused by the spring breaking during an open cycle, the opener broke and pulled a support strut off the door.

Garage Torsion springs have a 10,000 cycle average life, that is about 9 years with 3 cycles per day.

So I thought I would do some preventative maintenance. Adjusted the door closing/opening force and height at the same time.

Total Cost including springs, center bearing and tension rods = $75! This 66 year old patted himself on the back for this one.

Very well done!


This reminds me that I had to replace my second garage door opener a couple of weeks ago. We moved into our brand new 2 garage door house 30 years ago. After about 12 years, one of the two openers broke. I figured the other one would probably break soon too, so I took advantage of a sale at Sears and bought two new openers. I installed the first one and just stored the 2nd new one in the back of the garage. Well, it took another 18 years for the second one to break....!!! But finally, I got to install it! Works like a charm - AND it is FINALLY out of my way in the back of the garage.
:facepalm::facepalm::facepalm:
 
The hardest part with the torsion springs is that when both springs are unwound and loose, the cables want to slip of the end pullies. I wound each one 5 turns to provide a little tension, but allowed me to turn the torsion bar by hand, all 17' of it, just enough to slip the cables back onto the pullies and then I continued tensioning each spring till I got to MY calculated turn ratio of 28 x 1/4 turns (7 full turns). When they are correct you should be able to lift the door to about half way, and it should stay there. Then it is "balanced".

I wonder how many folk here would attempt such a repair vs hire it out? I would rate it about an 8 out of 10 for difficulty level, mainly because you have to be VERY careful doing it. Those torsion spring adjustment bars will only need to slip off once to cause you and perhaps the door very serious damage. Anyone see a Poll coming... :)

I replaced side springs.myself a few times but after I switched over to torsion springs, I decided to leave that part to the pros. The amount of energy stored in the fully wound springs scares me too much....
 
The amount of energy stored in the fully wound springs scares me too much....

That's my take on it too. I'm about 99% sure I could install and wind them, but there's a 1% that I want nothing to do with being a part of.

Like the bomb squad guy said "You only get to say 'Oops' one time...."
 
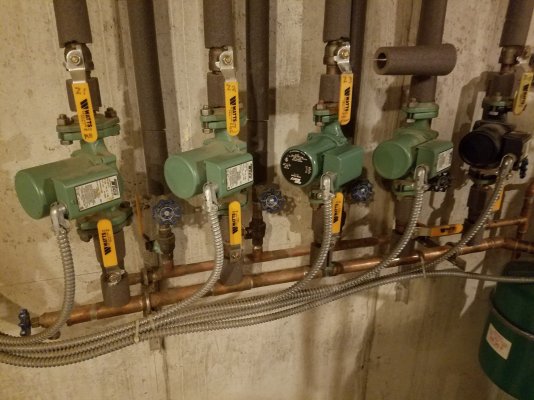
Replaced a circulation pump on the downstairs heat zone for the second time in 3 months. Came home the other day and it was 57 degrees in the house. Opened it up and found the terminal board where the wires connect to the motor was burned looking.. Was a little skeptical about the plumbing supply place giving me a warranty replacement but they did.

Grateful that the guy who built our house (and lived here) was quite OCD and all of the systems are laid out very well. 4 bolts and about a 15 minute swap with electrical and all.....
 

Attachments

  • 20200201_170534.jpg
    20200201_170534.jpg
    613.9 KB · Views: 29
Your recent repair?

Our water had a sulfur smell when turning on a hot water faucet. We are on well water. We just had an iron curtain water treatment system installed, and the dealer come to check the system. He suspected the water heater. My online research seemed to verify the water heater as the culprit, specifically the anode.

I found online that replacing an anode with a powered anode will eliminate sulfur smell. So I shut down the water heater, turned off the water, and drained the water heater.

Trouble began when I couldn’t get the existing anode out of the water heater, even with an 8’ cheater bar connected to the socket ratchet.

So I refilled the water heater, and turned it on while I regrouped. But now the sulfur smell is gone. So I have a fix - at least temporarily. I’ll need an impact driver for when I decide to take the anode out next time.
 
Wow, that’s what I call “out-moneymoustaching Mr Money Moustache”. :LOL::LOL::LOL:


I'm not sure if you mean because I was to tight to buy a new spring or if you thing it was hard to bend the spring, I had to heat it to make the hook.
It is just me, to figure out if I can fix it rather than replace it.
I will ad, after the hurricane we had a new door installed and the new door is soooo quiet compared to the old one. I joked with the installers that they had to make it more noisy so I'll know when my wife tries to sneak out!
It is nice to have it so quiet while opening.
 
Woke up to wife saying there's no water. Checked and found no hot or cold. Heard some water winning in the basement. Feared the worst. Found the water heater was leaking like crazy, faster than the well pump could keep up with. There's a floor drain near the water heater so no flooded basement. Wife wanted to call a plumber. This old DIY person is not ready to give up yet, but I'm beyond wanting to wrestle a water heater up and down the stairs to the basement. Got one phone quote from a plumber, about $925, but for a shorter 6y guarantee WH. We're replacing a 8 year Richmond gas WH that has lasted 26 years.
Checked Menards. They have a 9y Richmond of similar size. Cost me $110 for delivery to the basement and take away the old WH. There's a 11% rebate on the before tax total and I get to use my $80 worth or rebates from previous purchases. $520 went on my charge card. I'll get $50 back from Menards, 2% back from my charge card. It will work out to about $460.
I got the old heater drained and out of position, and all the reusable fitting off of it, a fan running to dry up the floor and the new WH comes tomorrow


Good for you! I replace my water heaters. I always manage to make it take a few hours longer than necessary sweating pipes, etc, but not something I’m ready to pay for.
 
Our water had a sulfur smell when turning on a hot water faucet. We are on well water. We just had an iron curtain water treatment system installed, and the dealer come to check the system. He suspected the water heater. My online research seemed to verify the water heater as the culprit, specifically the anode.

I found online that replacing an anode with a powered anode will eliminate sulfur smell. So I shut down the water heater, turned off the water, and drained the water heater.

Trouble began when I couldn’t get the existing anode out of the water heater, even with an 8’ cheater bar connected to the socket ratchet.

So I refilled the water heater, and turned it on while I regrouped. But now the sulfur smell is gone. So I have a fix - at least temporarily. I’ll need an impact driver for when I decide to take the anode out next time.


Changing to an aluminum rod (available at HD) can also make big difference - if you can get old out!
 
Status
Not open for further replies.
Back
Top Bottom