Your recent repair? 2013 - 2020

Status
Not open for further replies.
Replaced the defrost board and sensor on my heat pump last winter.

Mckittri, I was thinking of doing this a few years ago when my heat pump was defrosting too often. But it fixed it self somehow after I just cleaned out some leaves and junk from around a sensor, and repositioned it. I called around and the board was about $300, I think. They would have charged $100 labor to install it. Where did you buy the new board? How much? How hard was it to replace? Thanks
 
I realized my washing machine was barely agitating. So a few minutes of googling suggested that there were cogs (or AKA “dogs”) on Kenmore/Whirlpool/Roper washing machines that have been used with an unchanged design for like, for-evah! They limit the motion of the agitator to one direction, but they, of course, can wear out. I “risked it” and ordered a replacement set of cogs for the princely sum of $4 delivered.

After prying off the agitator cover, expecting to find a nut to engage with the socket, what do I see but a square hole? Kinda big square hole. I quickly surmised that it fit a 1/2” square drive tool. I looked around, and the thing that came to hand was my 24” breaker bar, which conveniently had an extension on it already. So, bottom line, I used a damn breaker bar to unscrew the plastic threaded piece, that probably needed about 0.0004 foot-pounds torque to unscrew. I held the bar vertically and used it like a screwdriver. Good thing I had a breaker bar! ;)

The job took less than 5 minutes. Unscrewed the retainer, found 3 of 4 cogs broken, popped ‘em out, replaced them, screwed back together, snap the cover back on. When I first discovered the problem with the agitator, I honestly thought I would need to replace the 22-year-old washing machine, but I guess I saved another $600 or so.

Way to go, Man! Thanks for that info. My GE Hotpoint from 1986 is still chugging along. Fortunately, I only use it once a month at most these days. I assume it has the agitator dogs you mention, but I'm not sure. I had to replaced the pump once, that's it so far. I would hate to have to buy one of those overpriced pieces of new junk they sell these days, lol. It's great that you got a good price on the dogs, too.
 
Mckittri, I was thinking of doing this a few years ago when my heat pump was defrosting too often. But it fixed it self somehow after I just cleaned out some leaves and junk from around a sensor, and repositioned it. I called around and the board was about $300, I think. They would have charged $100 labor to install it. Where did you buy the new board? How much? How hard was it to replace? Thanks

My unit was icing on the outside so I definitely needed to replace it. I found my board (the next generation of it) on Amazon. It came with the sensor and it was less than $50. I took a pic with my cell phone so I could refer to it when hooking up the wires so I would have less of a chance screwing it up. Less than an hour replacement and I would rate my skills at moderate. It's gone up in price but it's still not bad https://www.amazon.com/gp/product/B00DS7X7YS/ref=ppx_yo_dt_b_asin_title_o03_s00?ie=UTF8&psc=1.
 
My unit was icing on the outside so I definitely needed to replace it. I found my board (the next generation of it) on Amazon. It came with the sensor and it was less than $50. I took a pic with my cell phone so I could refer to it when hooking up the wires so I would have less of a chance screwing it up. Less than an hour replacement and I would rate my skills at moderate. It's gone up in price but it's still not bad https://www.amazon.com/gp/product/B00DS7X7YS/ref=ppx_yo_dt_b_asin_title_o03_s00?ie=UTF8&psc=1.

Well done! Good price on the hardware. And doing it yourself, you know it was done right. Thanks for the reply.
 
I think I've replaced the dogs three times on our 30+ years old Kenmore by Whirlpool. The last time I bought them, I bought a quantity 2 set, so I have a ready spare set... which increases the lifetime of the parts presently in use :)

Just as an FYI, over the years I eventually replaced:
The solenoid fill valve 'round back, just got weak over many years.
The pump, easy to replace with the 3-sided cabinet taken off, it's bearing went, rounded out the seal, which caused it to leak into our handy utility room floor drain.
The pressure switch that senses water level for Low-Medium-High, it became finicky, I suspect the rubber diaphragm inside wore out.
The timer assembly, because the clutch in it became problematic and finally could not push/pull to start it up, this one was at the ~25+ year point.

It has gotten a lot of use all these years, and I would like it to outlive me. Can't get a heavy duty machine like those anymore. There are people in the appliance business who look for the old Whirlpool/Kenmore direct-drives with the tub tri-mount setup, who replace a part or two in them and then sell them as used machines in good condition.

We bought a used one for one of our kids in college from a lady who was living in a mobile home, she was moving out to live with her daughter. That machine (replaced the dogs once) soldiered on through college, rental houses after college, into a permanent home, where it was eventually replaced (it was still working fine) by a new fancy LG washer with all sorts of bells and whistles... The new fancy machine after a couple years blew up on spin, breaking drywall on two sides, luckily no one was in the room when it's tub suspension failed miserably. Piece of crap. Both LG and Samsung had the same idiotic design. Newer top-loader Whirlpools also went to top tub suspension from four corners, but they use all-steel suspension, with heavy steel rails up top where the shock absorbers hang from, they won't rip out.

Thanks. That is some good info there.

Prior to this, I have only had to replace the coupling between the motor and transmission. But I had to do that ~3 times, until I got smart and bought TWO of the couplers. Now, as with your experience with the dogs, having the spare makes the installed one last longer!
 
Not a big deal, but a first for me. DW just ordered a vertical fire pit that uses 1 pound LPG bottles. I did some research, and viewed some YouTube videos.
I bought DOT legal refillable bottles and an adapter for the 20 pound tank.
I hooked it up, opened the little valve, and voila! it took about a minute each to fill the bottles:)
 
Got a leak in the ceiling at the fireplace that has been an ongoing headache for a few decades. About 6 years ago had the roof replaced (again) but this time with standing seam metal roofing. The chimney was expertly sealed and flashed so no water could ever get through. But it did. It appears that the cement cap on the top of the chimney from 1955 was the source of the problem.
I can't/won't climb a ladder up there to fix it anymore. It is frustrating that I have become a little too compromised and arthritic to take the chance. So a painter that has helped me before is up on the roof now with elastomeric paint. I called him yesterday, he came out an hour ago, and immediately went out and bought the paint to take care of it before the rains come. We are officially in hurricane season until October so he wanted to take care of it now. Every once in awhile you get lucky.


Cheers!


Glad you found the problem,

Will the paint hold up to temperature and chemicals in the smoke NOx SOx etc? Would you be better off putting a metal chimney cap on it?
 
Glad you found the problem,

Will the paint hold up to temperature and chemicals in the smoke NOx SOx etc? Would you be better off putting a metal chimney cap on it?


I couldn't answer you question. This cement cap is on the top of the chimney around the ceramic flue. I haven't use the fireplace in years. I live in North Florida and there just are not many cold days. The cement would not get hot anyway since it is not in contact with the rising smoke.

The painter finished in about 30 min. on the roof. With the initial inspection and then getting the paint maybe about 2 hours total. He only wanted $85 and I still have about 2/3 gallon of the paint left for another coat in maybe 5 years. I gave him a check for $100 to buy him lunch. Nobody would have come out that quickly to inspect and then do the job right then. He is also the best painter I have ever worked with. Anybody else would have charged more.


Cheers!

It seems like a good call
 
...It appears that the cement cap on the top of the chimney from 1955 was the source of the problem.
I can't/won't climb a ladder up there to fix it anymore. It is frustrating that I have become a little too compromised and arthritic to take the chance. So a painter that has helped me before is up on the roof now with elastomeric paint. I called him yesterday, he came out an hour ago, and immediately went out and bought the paint to take care of it before the rains come....

A few years ago I completely rebuilt the top of my brick chimney, on an 8 in 12 roof. The cap was cracked every which way, and the top row of bricks had broke their mortar bond with the course below. The cap was mortar, so pretty weak for the big area required on our big chimney.
I hammer drilled and broke out the whole cap, removed bricks, cleaned them, chiseled away old mortar. The clay flue tiles were in good shape. I laid rebar with sheet metal on top as a base to span the area, then used concrete and a bonder to make a new cap, used sand mix for the top layer, all wet poured. I used a strip of foam plastic to provide an expansion gap all around between the top flue tile and the concrete cap I poured.
After a week, I pulled out the foam, and used the orange hi-temp silicone caulk to fill that gap. That allowed flue tile and cap to be mechanically isolated, but elastomerically sealed. It is a tall chimney!
Then I putty-knifed and brushed 2 layers of Chimney RX Brushable Crown Repair from edge of flue caulk to out and over and down the outside of the top layer of bricks.
Then I measured and ordered up a big stainless steel screened peaked chimney vent cap from a place in North Carolina, it was top quality. Attaching it to the bricks was a job, as our bricks are solid, some with stones inside, used quite a few masonry bits. That was the hardest part of job, oddly enough. Using my hammer drill was too much for me to balance on the down slope side of chimney, heavy drill way over my head, used a regular battery drill, no hammer action instead. Wow the force I had to exert way overhead on a horizontal!
But no leaks at all any more, have belt, suspenders, another belt, another set of suspenders, it's fixed for a long time!
 
............Then I measured and ordered up a big stainless steel screened peaked chimney vent cap from a place in North Carolina, it was top quality. ...........
I think this is the robust way to fix it. It seems like using a mortar cap is just a hope and a prayer method as with all the heat and exposure, the mortar always cracks. A cap acts more like flashing where you are not trying to seal it, but rather taking advantage of gravity to guide the water where you want it to go.
 
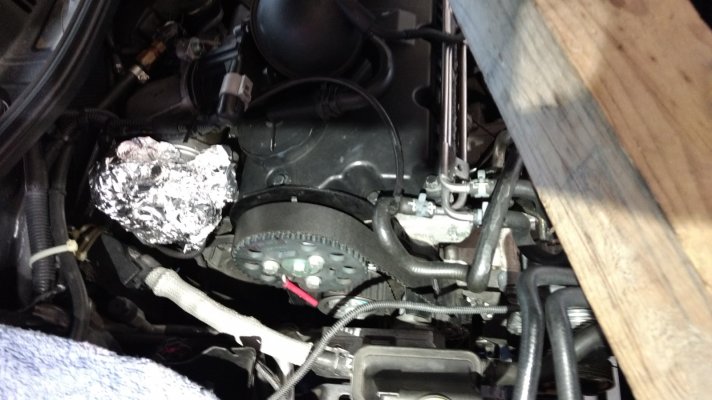
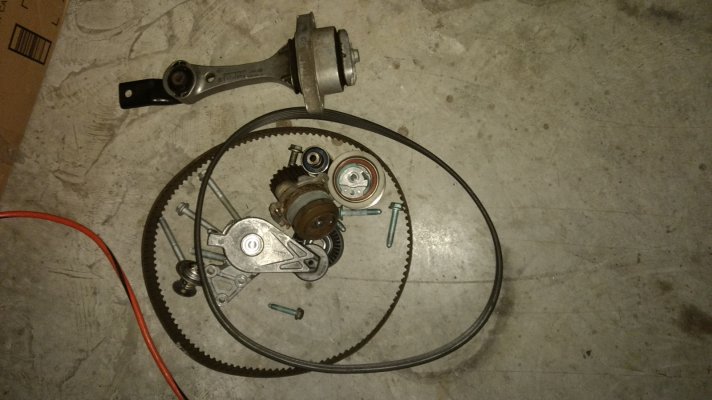
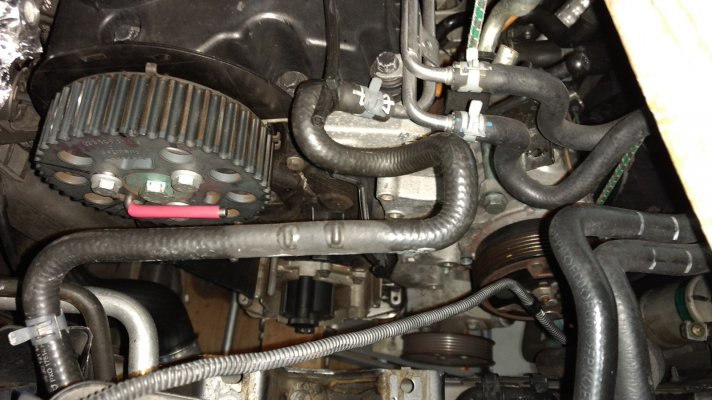
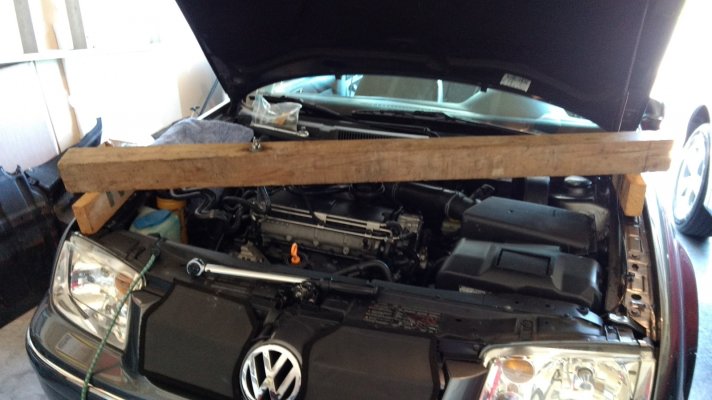
Replaced Timing Belt and Water Pump on the Jetta TDI

I replaced the timing belt and related parts on my '04 Jetta TDI with almost 200,000 miles on it. This is the second timing belt I replaced on this car. I also replaced all parts in the timing belt's path (tensioner, water pump, and roller). I replaced the thermostat since the coolant was drained. The serpentine belt and its tensioner also were replaced. I used the factory timing tools and a home made engine support brace because the right side engine mount had to be removed because it bolts to the engine block, inside of the timing belt's path. I also rethreaded the aluminum engine mount threads, using a TimeSert steel thread sleeve kit. I replaced the single use (torque-to-yield) engine mount fasteners.

Replaced the transaxle pendulum mount too.

When done, I experienced the first no start out of the many timing belts I replaced in various cars over the years. I scanned the engine control unit with my professional European automotive scan tool. Fault code recorded was no signal from the engine speed sensor (I did move the engine speed sensor harness out of the way to remove the coolant flange to replace the thermostat). I removed the sensor with its intergral 2-foot wiring loom and checked it electrically with my volt ohm meter. Two of the three sensor wires were shorted together. I slit the sensor's cable sheath with a razor blade and found that the insulation on the wires had completely disinigrated. I repaired the sensor wiring using wire from a junk wiring harness and soldered in the replacement wires and used heat shrink tubing on the solder connections. I added a new outer sheath from a salvaged appliance power cord.

Car started right away after installing the repaired sensor.
 

Attachments

  • IMG_20200530_113520290.jpg
    IMG_20200530_113520290.jpg
    435.4 KB · Views: 31
  • IMG_20200530_113721413.jpg
    IMG_20200530_113721413.jpg
    434.6 KB · Views: 25
  • IMG_20200603_144457674.jpg
    IMG_20200603_144457674.jpg
    452.7 KB · Views: 27
  • IMG_20200526_145028357.jpg
    IMG_20200526_145028357.jpg
    475.3 KB · Views: 28
I, too, put 2 stainless steel caps on my twin chimney, in order to keep chimney swallows from nesting every spring. They were horrific, every time we went into living room or basement, they would be all aflutter, chirping, squawking raising a ruckus.

All was well until a bolt of lightning smacked it in the middle of the night, I thought we were hit by an airplane. It knocked about 6 feet off the top of the chimney and but a pretty good jagged edge in the stone fireplace in the living room. It took $4,000 of insurance money to repair, as well as my deductible.

Three years later, DW made me put another cap on last year, the birds were just unbearable. I cringe at every thunderstorm since.
 
Well done, NateW ! I enjoyed reading your post about repairing your Jetta. Satisfying to see a project done well.
 
Well done, NateW ! I enjoyed reading your post about repairing your Jetta. Satisfying to see a project done well.

Goofiness at the crank position sensor (speed sensor?) is a common no-start condition with Bosch engine management systems. An easy fix, if you know what to look for -- which is where the knowhow comes in.

I'm in the middle of an a/c repair on my Dodge (Mercedes) Sprinter, so heavily into DiY work on German vehicles. I'm about 75% done with the fix and will add to this thread when I'm sure I've succeeded (otherwise, fuggedaboutit). :rolleyes:
 
I replaced the timing belt and related parts on my '04 Jetta TDI with almost 200,000 miles on it. This is the second timing belt I replaced on this car. I also replaced all parts in the timing belt's path (tensioner, water pump, and roller). I replaced the thermostat since the coolant was drained. The serpentine belt and its tensioner also were replaced. I used the factory timing tools and a home made engine support brace because the right side engine mount had to be removed because it bolts to the engine block, inside of the timing belt's path. I also rethreaded the aluminum engine mount threads, using a TimeSert steel thread sleeve kit. I replaced the single use (torque-to-yield) engine mount fasteners.

Replaced the transaxle pendulum mount too.

When done, I experienced the first no start out of the many timing belts I replaced in various cars over the years. I scanned the engine control unit with my professional European automotive scan tool. Fault code recorded was no signal from the engine speed sensor (I did move the engine speed sensor harness out of the way to remove the coolant flange to replace the thermostat). I removed the sensor with its intergral 2-foot wiring loom and checked it electrically with my volt ohm meter. Two of the three sensor wires were shorted together. I slit the sensor's cable sheath with a razor blade and found that the insulation on the wires had completely disinigrated. I repaired the sensor wiring using wire from a junk wiring harness and soldered in the replacement wires and used heat shrink tubing on the solder connections. I added a new outer sheath from a salvaged appliance power cord.

Car started right away after installing the repaired sensor.

Nice job, Nate.:cool: I've had 3 early TDI's and did TB jobs on them. Once you have done a couple, they get easier. Need the VagCom cable though!
 
I fixed our 52 inch flatscreen Samsung tv. It would turn on and have sound but no picture. A search online indicated this was a common problem with these TVs and was caused by the failure of 2 capacitors on a circuit board. A YouTube search resulted in a video of the replacement of the 2 failing capacitors. Ordered new capacitors of same size for a couple $ and replaced them with a soldering iron. And it is still working fine 3 years later
 
My 20 year old Kenmore washer would stop mid cycle. Push down on the lid and it would continue cycle. Ordered a washer lid switch from ebay for $6.50. Very good instructions from the nice lady on youtube. Although you can see the switch right there, I had to take the whole shell off to replace the harness assembly. After testing I declare the repair a success.
 
On my newish (~6 mos.) Bosch dishwasher, I started getting the infamous E24 error code, which indicates a clog or kink in the discharge line or pump. It was intermittent, and I could get it to clear by just retrying on a rinse cycle, or cleaning out the pump area (usually!).

It got worse, and I pulled the D/W out, played with the hoses, cleaned the pump, etc., and still no joy. On a whim, I pulled apart the airgap and found a large chunk of gunky detritus! :facepalm: Momma always said to try the simple fixes first...

I don't want to jinx it, but so far, so good!
 
Replaced the system hard drive on my desktop with a new 1TB drive. Instead of mirroring the drive I used the restore cd's. Huge increase in performance!

Solved the slow performance on our laptop by restoring the it back to the original settings...getting rid of all the trash and unwanted data.
 
Maytag top load washer makes the noise but routinely won't agitate sometimes or spin others. But sometimes it does everything fine. 3 possible repairs per youtube. One was free, trimming a pc of tubing. Didnt work. One was a $55 part. Didn't work. $3 part on order. Least likely to work but worth a shot. I really don't like the reviews on all the new washers now. Returning the $55 part.
 
Nice job, Nate.:cool: I've had 3 early TDI's and did TB jobs on them. Once you have done a couple, they get easier. Need the VagCom cable though!
Thanks aja8888. VagCom is what I have; it's indespensible. Been repairing my own cars since I was 16 and don't recall ever having one in a repair shop, except for warranty work. My first car was a non-running 1964 VW Beetle that I paid $100 for. Towed it home and discovered the generator was siezed, which prevented the starter from spinning the engine fast enough to start. After the successful repair of installing a rebuilt generator I wanted perform all my automotive repair and maintenance and read all I could about it. Been driving VW diesels since 1990.
 
Status
Not open for further replies.
Back
Top Bottom