Your recent repair? 2013 - 2020

Status
Not open for further replies.
It totally escaped my mind to check out the local Fry's Electronics. :facepalm:

I used to go to the store all the time, but ever since this Covid have been there only once. The store was deserted, with only a half-dozen workers for a vast space. There were only 2 or 3 customers besides myself browsing. The shelves that used to overflow with merchandise were mostly bare, as they did not bother to restock. Most of the lights were turned off, apparently in an effort to save costs. It was very sad.

I just went on the Web site to check out what they carried. The closest temperature rating they had was 170C, but it was out of stock, along with all other temperatures. The store is nothing but an empty shell there.


Ouch! I guess the one here is in the same shape. I haven't been to it in a year or so.
 
Ouch! I guess the one here is in the same shape. I haven't been to it in a year or so.

You may want to go to the store to see for yourself how empty it is - empty of both people and merchandise.

It is fair to say that my local store was already in decline before the pandemic, judging from the number of cars in the parking lot compared to how it looked 5-10 years ago. Maybe people already had all the electronics they cared to own. Maybe there have been no new gadgets that people must buy. Maybe Amazon stole all the business.

But the store was still alive, and had some customers. This pandemic simply nuked it. Very sad.
 
Last edited:
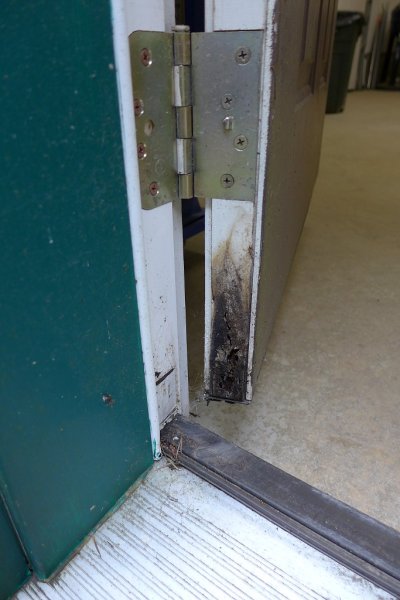
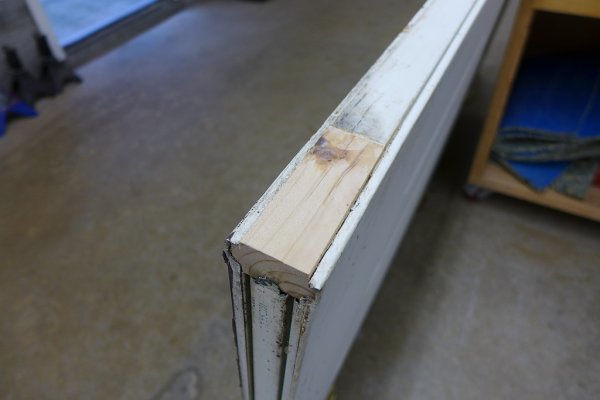
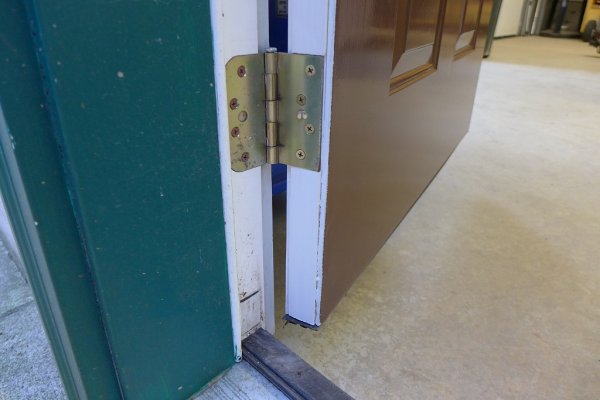
Repaired Steel Entry Door

A few years ago I replaced the door frame on my garage entry door as it had rotted at the bottom. I replaced it with a composite frame so it wouldn't rot again, but the steel door itself was still in good condition so I kept the original door.

Unfortunately, while the door skins are steel, the door still has wood internals. It started rotting on both of the two bottom corners. Rather than replace an otherwise good door, I thought I would try repairing it with some scrap pressure treated lumber I had laying around. Overall, I think it turned out nice and after priming and repainting it should last for many years.
 

Attachments

  • 2020-10-01 103901 - Repairing rotted garage entry door.jpg
    2020-10-01 103901 - Repairing rotted garage entry door.jpg
    152 KB · Views: 48
  • 2020-10-02 101103 - Repairing rotted garage entry door.jpg
    2020-10-02 101103 - Repairing rotted garage entry door.jpg
    85.8 KB · Views: 28
  • 2020-10-02 170604 - Repairing rotted garage entry door.jpg
    2020-10-02 170604 - Repairing rotted garage entry door.jpg
    126.7 KB · Views: 27
A few years ago I replaced the door frame on my garage entry door as it had rotted at the bottom. I replaced it with a composite frame so it wouldn't rot again, but the steel door itself was still in good condition so I kept the original door.

Unfortunately, while the door skins are steel, the door still has wood internals. It started rotting on both of the two bottom corners. Rather than replace an otherwise good door, I thought I would try repairing it with some scrap pressure treated lumber I had laying around. Overall, I think it turned out nice and after priming and repainting it should last for many years.

Nice job!
 
Nice recovery. I wonder what percentage of air fryers in that state would have hit the dumpster. I'm betting >90%. My kids probably would have the skill, but might not want to take the time. They might "let me fix it"...give the old man some purpose :LOL:
 
Not quite a repair, but its getting cool here, so I cleaned the firebox in our fireplace insert and chimney. The unit has tubes that need to be removed in the top of the firebox and a plate that needs to be removed to access the chimney.

Once I got the tubes and plate removed I found a large amount of ash and creosote on top of the plate. I suspect this was filling the base of the chimney to some extent. When everything was disassembled, I went to the roof and cleaned the chimney. We've had a fire going the last few days instead of starting the furnace.
 
Late yesterday afternoon I turned off the hose bib and the handle snapped off. I took the pieces to two hardware stores looking for a replacement, but no luck.
The thought occurred to me I was being stupid. What I should have done was just buy a new hose bib with a better handle, which was what I did.
Since it was late, I decided to do it this morning. I laid out the tools and the Teflon tape in readiness.
So this morning I shut off the water and had a bucket ready as I removed the old valve. The whole operation took about 5 minutes, which was a lot less than the time I spent yesterday:(
 
They might "let me fix it"...give the old man some purpose :LOL:

My boys like to give me the opportunity to feel needed and some purpose regularly. Ha! Not only do I fix and install stuff, last was a whole house fan, but they don't need to clutter their garage with all the tools and spare raw materials I do. I have enough lumber, metal scrap, wire of all sorts, electrical boxes, outlets, sockets, switches, etc to cover most MacGyver any project. I'm always excited to find a need to purchase a new tool. Lately been upgrading to battery powered tools, doing away with extension corded stuff.
 
Nice recovery. I wonder what percentage of air fryers in that state would have hit the dumpster. I'm betting >90%. My kids probably would have the skill, but might not want to take the time. They might "let me fix it"...give the old man some purpose :LOL:


Same as many posters here, I am of the tinkerer and frugal type who hates to throw away things that can be repaired. Quite often, some simple and inexpensive components can be replaced, but people lack the inclination to learn how to do that.


... I'm always excited to find a need to purchase a new tool. Lately been upgrading to battery powered tools, doing away with extension corded stuff.


The only cordless tools I have are 3 drills. They are the old-style NiCad type, which means they are never charged up and ready to go when I need them. I used to leave them plugged in, but that trickle charge dried out the batteries. I managed to buy loose NiCad cells and rebuilt the battery packs, but they are getting worn out again.

I have been playing with different lithium-ion cells, and been thinking about converting the drills over to lithium-ion. The hard part is to fit a different size of cells into the pack enclosure, and with a BMS circuit board to boot.

It still looks possible because a lithium cell is 3.6V, which is the voltage of 3 NiCad cells, and even has more energy. Fewer cells needed means some extra space inside the pack enclosure.

Lithium cells are wonderful. They have enough power to allow a slew of cordless tools not previously practical with NiCad cells. However, I hate to throw away my corded tools, and am not building things as much to invest in upgrading them.
 
We are ready for the rainy season. I blew out the gutters and replaced all 5 of the downspout strainers. One had corroded and broken off and the others were caked with mud. Kinda amazed that they worked at all being so blocked.
 
My boys like to give me the opportunity to feel needed and some purpose regularly. Ha! Not only do I fix and install stuff, last was a whole house fan,
I had a whole house fan in one of our houses 30+ years ago. We really liked it in the fall, when it was cooling down. At night we could open the bedroom windows a few inches and turn on the fan it brought in a nice cool breeze in all night.

How much noise does the fan make?
The one I had 30 years ago was a little noisy, but it was old when I got it.


My first house in Florida in 1975 was built in 1950. It was a little less than 1000 sq ft. In the winter heat was from a kerosene heater in the middle of the house and in the summer there was a whole house fan in the hall ceiling . When the fan was turned on it sounded like you were standing on the runway of an international airport. We spent a lot of time in the grocery stores, malls, and the dollar movie theater.


Cheers!
 
The only cordless tools I have are 3 drills. They are the old-style NiCad type, which means they are never charged up and ready to go when I need them.
Exactly. Instead of throwing out three, I threw out two and took the best batteries out of each battery pack and made one reasonably good pack. I looked for new but inexpensive NiCD's, but didn't find any cheap enough to justify the tinkering. You can get an entire new drill with new batteries at Harbor Freight for what they want for just a battery!

I have been playing with different lithium-ion cells, and been thinking about converting the drills over to lithium-ion. The hard part is to fit a different size of cells into the pack enclosure, and with a BMS circuit board to boot.
This idea went through my head too, because I'd seen those 3.7V Lithiums that power my toy-grade quad copters were so cheap. I figured I could just use plenty of them, some in parallel to handle the amperage, and some in series to get the voltage where I wanted it. Then I figured I'd never be able to charge them in that configuration without special hardware. Only then did I open the Internet machine and find out it's a more complicated problem. If you make a design that works well, I'd be interested.
 
Exactly. Instead of throwing out three, I threw out two and took the best batteries out of each battery pack and made one reasonably good pack. I looked for new but inexpensive NiCD's, but didn't find any cheap enough to justify the tinkering. You can get an entire new drill with new batteries at Harbor Freight for what they want for just a battery!


Yes, technical and financial feasibilities are two different things. In my case, I happened to run across a surplus electronic Web site that had some NiCad packs that were unused. The sub-C cells were in a waterproof enclosure meant for some unknown consumer products that were discontinued. I salvaged the cells, and they were of the same size as in the drills.

However, the cells wear out after several years, and I want to renew the drills again with Li-Ion cells.


This idea went through my head too, because I'd seen those 3.7V Lithiums that power my toy-grade quad copters were so cheap. I figured I could just use plenty of them, some in parallel to handle the amperage, and some in series to get the voltage where I wanted it. Then I figured I'd never be able to charge them in that configuration without special hardware. Only then did I open the Internet machine and find out it's a more complicated problem. If you make a design that works well, I'd be interested.


The Li-Po flat cells for RC toys and drones are amazingly powerful and lightweight. However, I have been playing more with the abundant and less expensive cylindrical common 18650 cells.

The 18650 cells can be of the energy or power types. The energy cells are used in electronic products such as laptop packs. They have high energy density, but do not support high current drains (they heat up and may get damaged). The power type is what used in power tools. They may store only 2-2.5 Ah/cell, which is less than the 3-3.5 Ah/cell for the energy type. However, the power cells can support current draws of 20A or more.

I have some of both types, and have been experimenting with them.

Well, in fact I have 1000+ of the energy cells, destined to go into my solar shed. :) Still working on assembling them into packs, with careful testing of each cell, and then of each pack. I want to track their degradation with age and usage.

Have not started on figuring out how the power cells will go into the drills, along with the necessary electronics.

So many things to play with. So many things to keep busy on, including surfin' the Web for future travel.

PS. Some of the lithium cells are amazingly powerful. The common larger size than the 18650 cell is the 26650. Note that the Tesla S and X models use the 18650, while the M3 uses the 21700, which is smaller than the 26650 I will talk about.

The 26650 is a bit longer than the common C battery. Yet, a lithium-iron-phosphate power cell of that size can sustain a draw of more than 100A. A guy on the Web wired up 4 of these cells to get 12V, then used it to start his car. It worked! The cells would not last long when abused like that, but they did not blow up.

Note that the above cells have 100+ amp rating. Ordinary cells would not work and may blow up. I have 8 of these cells, but have not done anything with them yet, other than doing some measurements.

Too much on my plate. Heh heh heh...
 
^ That's some good tinkering. I've got one device with 18650's, and some with the flat LiPo's, but very little experience with any improvised use of these next gen batteries. I'm going to try to learn more.
 
I don't know about the current flat Li-Po cells, but the 18650s of the newer generation are getting safer. The spec for the LG-Chem cells that I have says that the cells will not explode or burst into flames if shorted or crushed even when fully charged. I read that the separator film between the electrodes is made of a material that irreversibly changes its property when heated and blocks the flow of ions, hence the current flow. That would also protect against the thermal runaway problem of the early cells, which is very scary.

Breaching of the separator causes high amounts of current to flow directly between the anode and cathode, short-circuiting the cell and producing tremendous amounts of trapped thermal energy. At the onset of thermal runaway, the battery heats in seconds from room temperature to approximately 700°C.

That temperature of 700C is 1300F. When one cell in a pack ignites, the whole thing goes.

PS. These LG cells are guaranteed not to explode if overcharged to 4.30V for 7 hours. The normal max voltage is 4.20V.

Nothing is said about overcharging to higher than 4.30V though. :)

I would never try to exceed these limits to see what would happen. In fact, in usage in my DIY solar system, I will use a max voltage of 4.00V per cell in order to maximize their operating life, even though that will result in lesser useable capacity.
 
Last edited:
I went out to the front of my house to find the ground flooded. After much troubleshooting, and viewing a great manufacturer's video, I found I had a stuck solenoid on the drip irrigation valve,
Quick check of local places did not turn up any, so I went on the internet and found a replacement valve for $10, but the shipping was $20!
Finally went to my go to place, Amazon, and found an entire valve for $19 with free shipping. It will be here Tuesday.


On another subject, be careful with Lithium batteries. We had a case where a number of people died on a dive boat because some batteries they were charging caught fire and the could not escape.
 
I gave up on battery operated power tools. I have a power inverter in my truck and a 20 ft extension cord that so far has reached everywhere I need to go.
 
I went out to the front of my house to find the ground flooded. After much troubleshooting, and viewing a great manufacturer's video, I found I had a stuck solenoid on the drip irrigation valve,
Quick check of local places did not turn up any, so I went on the internet and found a replacement valve for $10, but the shipping was $20!
Finally went to my go to place, Amazon, and found an entire valve for $19 with free shipping. It will be here Tuesday.


What a coincidence! Yesterday, one of my sprinkler valves was stuck open while I happened to be out in the backyard applying fertilizer to the plants. So, I did not lose too much water.

I had some spare solenoids to try on, but that was not the cause of failure. The diaphragm inside had failed.

Just came back from Home Depot. A new valve is $16.69 including tax.

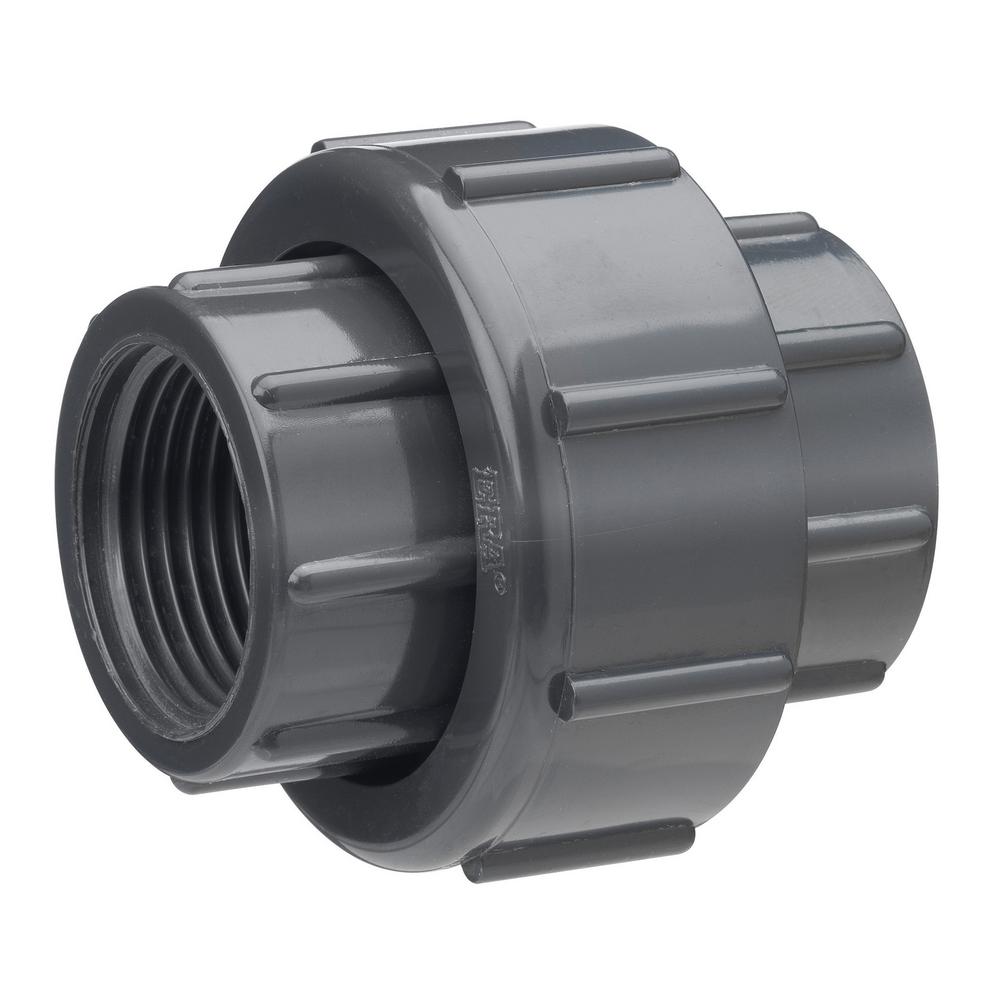
Replacement took 5 minutes. I learned from past mistakes, so when I built the valve manifold, I installed PVC union joints. No cutting and gluing the new valve into place. Just teflon tape on the threads, and screw everything back on. Beautiful!

gray-homewerks-worldwide-pvc-fittings-512-44-34-34b-64_1000.jpg


On another subject, be careful with Lithium batteries. We had a case where a number of people died on a dive boat because some batteries they were charging caught fire and the could not escape.


Definitely! Don't mess with this stuff if you don't know what you are doing. Any application of a lithium cell requires a BMS circuit (Battery Management System). The BMS circuit protects the cell from overcharging, overdischarging, overcurrent, and charging in freezing condition.

I test all the BMS circuits that I buy, to verify that they actually work. And when I am done, I will have dual redundancy. It means two independent BMS, and both have to fail before the battery gets stressed. One of the 2 BMS is home-built.

No, make it 3 failures. One of the solar chargers also has to fail and try to overcharge, in addition to the 2 BMS both failing to shut down the whole mess.
 
Last edited:
Or was it $10 with $9 shipping? ;)
The first place offered just the solenoid for $10 PLUS shipping. I bought the entire valve on Amazon which included the solenoid for $19 with free shipping. Now I have a spare valve.


NW-Bound: +100 on unions. The connection from my main water to the drip valves was just a straight piece of pipe. That meant I had to shut off the water to the whole house to work on the system. I replaced the pipe with 2 nipples, a ball valve AND a union,.
 
Last edited:
Garbage Disposal took a sh_t and rotted out the cabinet base board (particle board) so had to get some 6x1 pine to make a foundation and some sanded plywood to make the base. Much stronger and nicer than the original. Messed with my home brew timing but it all worked out.
 
Last edited:
What a coincidence! Yesterday, one of my sprinkler valves was stuck open while I happened to be out in the backyard applying fertilizer to the plants. So, I did not lose too much water.

I had some spare solenoids to try on, but that was not the cause of failure. The diaphragm inside had failed.

Just came back from Home Depot. A new valve is $16.69 including tax.

Replacement took 5 minutes. I learned from past mistakes, so when I built the valve manifold, I installed PVC union joints. No cutting and gluing the new valve into place. Just teflon tape on the threads, and screw everything back on. Beautiful!
A scheme I've used is to have a spare valve handy, and if a diaphragm or other part on top failed (other than an easy to replace solenoid), install the top half of the new valve onto the bottom of the old valve. This way, no need to touch any pipe connections. Works for every failure, except a cracked lower half, which I have not experienced.
All of my valves are distributed, no manifold, that is common around here.
 
Replaced some fluorescent light fixtures in the woodshop with LEDs...much brighter. DW put the old ones in the paper for sale, already sold them...applied that to what we spent on the LEDs...good update.

Next up is one of our toilets...about once per day the valve leaks and you can hear the tank refill partially. I'm saving that job for a rainy cold day lol.
 
Status
Not open for further replies.
Back
Top Bottom