Midpack
Give me a museum and I'll fill it. (Picasso) Give me a forum ...
I have a problem, and I am hoping for a better solution than the one I've come up with.
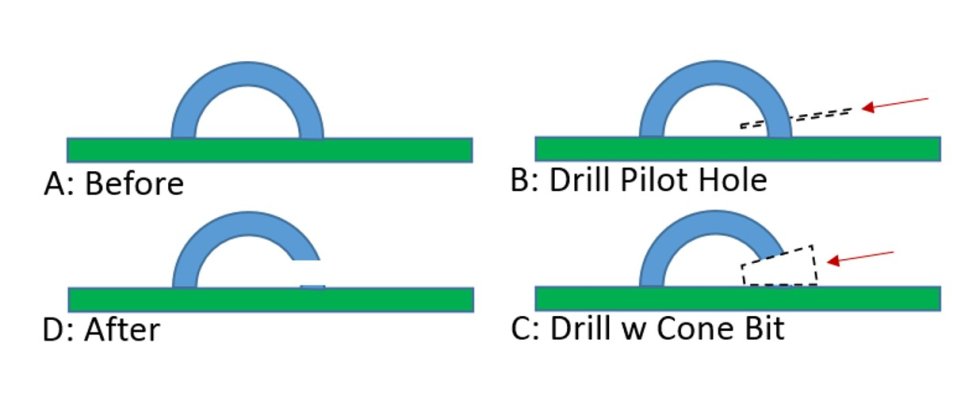
All I've come up with is drilling a pilot hole as shown in pic B. And buying a cone shaped bit to drill and enlarge the hole as shown in pic C. I would proceed cautiously, drilling and looking repeatedly (with flashlight), in the hope that would prevent me from nicking the green surface.
Any other cost effective ideas?
- I am starting with pic A. The fiberglass thickness and hole are about 1/2-5/8" for some scale.
- I am trying to drill a hole thru a piece of fiberglass channel (blue) that is bonded to another flat fiberglass surface (green). It was supposed to have a hole drilled as shown in pic D, but it was missed by the manufacturer.
- Space is very limited (I think a basic power drill at an angle will fit, but barely), and I can only drill from one direction (right to left in pic).
- The hole would have been constant OD/parallel (like pic D), but it does not have to be parallel to the green surface, as long as the bottom of the hole is (like pic C).
- The hole must be as close to the green surface as possible...
- ...but it's critical that I don't nick/drill into the green fiberglass while drilling through the blue.
- I am only drilling two holes, and the project is over.
All I've come up with is drilling a pilot hole as shown in pic B. And buying a cone shaped bit to drill and enlarge the hole as shown in pic C. I would proceed cautiously, drilling and looking repeatedly (with flashlight), in the hope that would prevent me from nicking the green surface.
Any other cost effective ideas?
Attachments
Last edited:

") .using Early Retirement .//82339)
.using Early Retirement .//82339)