How to repair wooden floor

donheff

Give me a museum and I'll fill it. (Picasso) Give me a forum ...
Joined
Feb 20, 2006
Messages
11,331
Location
Washington, DC
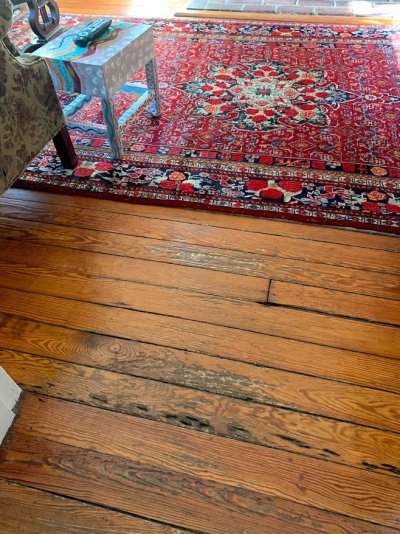
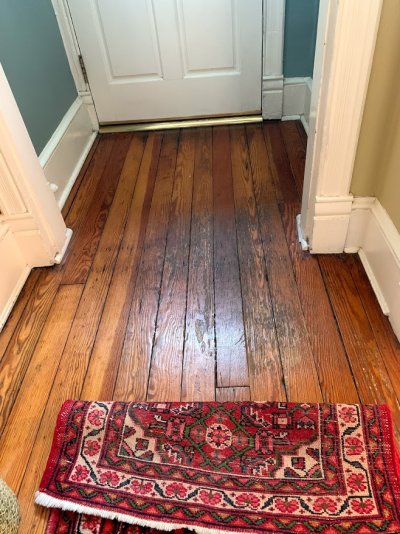
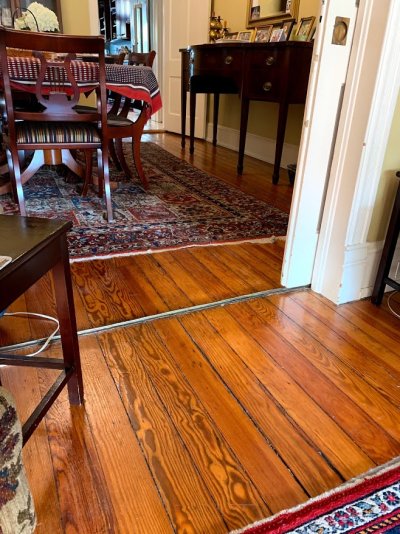
Taking a page from T-Al's home mechanics how-to posts I thought I would ask the experts for advice on repairing my old wooden floor. My floor is about 120 years old and in bad shape from the point of view of pros but in decent shape for what you expect to see in my historic old neighborhood, with the exception of a few areas that got extremely worn from foot traffic, years of running Golden Retrievers, and lack of maintenance by me. The pros recommend replacing the entire floor or the Full Monte professional sanding and refinishing. I considered the full job but DW and I don't want to live through the mess. Also, we have been living with the screwed up floor for years and will be satisfied with a marginal repair that removes the worst of the damage. I am posting two pictures - the first shows a damaged section of the floor in the hallway. The second shows a section of the floor between the living room and dining room that was nearly as damaged as the hallway until I repaired it.

My repair approach was to sand the damaged section down to bare wood with a belt sander I ordered off Amazon for $38 - it got good reviews and made more sense than renting. I first used 40 grit paper then moved up to 60 grit and finally 80 grit spreading out a little to adjacent undamaged areas. I followed that with a light buff with something called a purple sanding block that I read about somewhere for scuffing polyurethane before adding a coat. I buffed out into untouched surrounding floor so the patch would blend in. Next I stained the sanded areas with a stain mix that approximated the rest of the floor. Finally I gave the area two coats of semi-gloss polyurethane.

The results so far were better than I was expecting but I think I can probably do better on the rest of the damaged areas. I can feel that the repaired area is rougher than the adjacent areas. I think I need to do more sanding with higher grit papers to make the repair areas smoother before staining but I am not sure how much is needed. Any thoughts on this? And as I move up in grit levels should I continue using the belt sander or should I switch over to hand. My last question has to do with the finish. I am not sure whether I should be using semi-gloss or satin. From some angles with light streaming in the rest of the floor looks like it may be semi-gloss. At other times it seems more like satin. If I coat the repair with satin and want to go back to semi-gloss can I just buff the satin and toss on a glossier coat?
 

Attachments

  • Floor Damage.jpg
    Floor Damage.jpg
    199.3 KB · Views: 64
  • Floor Repair.jpg
    Floor Repair.jpg
    204.7 KB · Views: 66
If your repairs feel rough, then yes, go through to a finer grit to finish. Don't skip grits (the sanding block might have been too big a jump?). As you go finer, I think you will get better results with some kind of oscillating sander.

Question: Can you tell if the damage in the 1st photo is just on the surface? It might not sand out.

Connecting a shop vac to the sander will reduce dust somewhat. I'd check labels on the finish for compatibility with a 2nd coat, but I'd assume no problem with switching from semi-gloss/satin or back in the same product, following their directions for a 2nd coat.

Stick with an area rug, and consider the floor condition as adding "character" to the house?

-ERD50
 
While a belt sander will remove rough wood to make it smoother, you must sand with the grain to prevent tearing of the wood fibers. Also, you may sand 1 board/slat more than the next and create an unevenness that would be perceptible to your feet and not necessarily to your eye. Also, start with a coarser paper, and move to a finer grade each time.

As to your finish, a semigloss will reflect light different than your satin. DW refinished an antique kitchen table, and the winter sun, as it is lower on the horizon. The semigloss finish on the table turns the table into the greatest mirror and sometimes blinds folks in the room. To answer your question about recoating, you must scuff up the previous finish with a finer sandpaper/steel wool, clean up the dust, then recoat. The scuffing wilt make the new finish stick better.
 
I wonder if using some steel wool between coats of stain, plus a tack cloth, would help better prep the surface. Just applying stain may raise the grain if you took the surface down to bare wood. I bet Ronstar could better advise.
 
Question: Can you tell if the damage in the 1st photo is just on the surface? It might not sand out.

-ERD50
Some of the damage goes pretty deep. But that was the case on the section in the repaired photo and on another section I already did in the back of that photo between the dining room and the kitchen. I just kept sanding until I got down to raw wood. There is one strip where a large splinter of wood got pulled out between the boards a few years ago. No way I can do much with that but I accept it as "adding character" as you so aptly put it.

I will do more sanding with finer grits in the next sections and see how it turns out. I have to fight my inclination to take the quick way out. With my 71 year old creaky knees I had to use knee pads from my roller hockey days to do any of this. :)
 
For an old floor, leaving character is a must. Have you seen the latest in old cars? They basically leave all the rust patina! It is in trend, so your floors with character are fine.

80 grit isn't bad when the whole floor is done with it, but since you are blending into other areas, you need to go at least to 100 with the belt, and then probably feather into the existing area with 120, by hand. Maybe that's your purple block. If so, feather gently into the existing while giving it a a more vigorous hand sanding in the previously sanded repair area.

There's no substitute for graduating grits. It is painful, but usually worth it. Ask anyone who has ground or polished optical mirrors for astronomy. :)
 
I wonder if using some steel wool between coats of stain, plus a tack cloth, would help better prep the surface. Just applying stain may raise the grain if you took the surface down to bare wood. I bet Ronstar could better advise.


+1

Also steel wool between coats of the finish you’re using (polyurethane or whatever). Dust will settle into the drying finish. Using steel wool will pull the dust specks out before applying another coat or after applying the final coat.

0000 steel wool would be sufficient. It will pull out the dust specks without significantly dulling the finish...
 
There's no substitute for graduating grits. It is painful, but usually worth it. Ask anyone who has ground or polished optical mirrors for astronomy. :)
That is an analogy I understand since I helped my daughter build a 6" Dobsonian for a science project 20+ years ago.
 

Attachments

  • Jenn Scope.JPG
    Jenn Scope.JPG
    29 KB · Views: 206
I also think a 120 grit final belt sanding and then going to a 180 with an oscillating sander will solve your roughness issue. You could even go to 240 grit. Using a 240 or finer sanding between coats will produce a smoother finish, and provide better mechanical adhesion for the new coat.
There is no easy solution, it takes work. You're doing good. Matching older stain and also the glossiness can be tough. As also suggested, being 120 years old, some character is to be expected.
 
No advice but your floors really are in amazing shape for their age. Very nice.
 
Now that's a house! Awesome job when comparing the unrepaired vs repaired sections. Those old fir floors are soft and absorbent, so stains can go down further than you would like - and if you keep chasing the stain you end up with swales and dips from the sanding - we have some. The good thing (I keep telling myself) is it just adds character. Think Winemaker has the best advice on sanding. Since we refloored much of this house with used flooring from several different old buildings we called in the pros for sanding and prep. The pro sander has about a 12" wide belt and is used with the grain; corners and edges were done with a scraper tool. Finish sheen is tough - you are trying to match what exists, which is old and abraded - gloss, semi-gloss, eggshell? tough call. In some 40's rental apartments with hardwood floors I cheated: scrubbed the floors clean, used a tack cloth, and then wiped the entire floor down with an oil based gym floor finish that I cut with paint thinner. I was using maybe 4 oz of uncut finish/100 sq ft., wiping on a wet coat with very thinned out finish. I could come back in a day and the floor would be dry, at which point I would re-coat. Areas that had totally lost their finish would shrink with each application and I would just concentrate on coating them. When done the whole floor would have the same sheen. The lamb's wool applicator was a huge waste of time - I did much better with very thin coats with a lint free cloth.
Looking at your repair I think you are the master here.
 
I also think a 120 grit final belt sanding and then going to a 180 with an oscillating sander will solve your roughness issue. You could even go to 240 grit. Using a 240 or finer sanding between coats will produce a smoother finish, and provide better mechanical adhesion for the new coat.
There is no easy solution, it takes work. You're doing good. Matching older stain and also the glossiness can be tough. As also suggested, being 120 years old, some character is to be expected.
I won't disagree completely, but remember this is a floor (with character) and not a bookcase. Floors generally don't have to go too fine.

I think the OP just wants a match that feels right, and the OP is going to have to find that through experimentation. Perhaps 240 is required.

No advice but your floors really are in amazing shape for their age. Very nice.

Agree!
 
Very nice, I love that you are keeping the floor. They add a lot of character to your home.
 
Nice floors.

We used a waterborne matte poly for our softwood floors on the 2nd floor. Diamond by Minwax. Haven't tackled the hard maples on the 1st floor yet, way down on the reno list, but will probably use the same product.

Recommended by a floor refinisher who uses it on the casino floors. Seems to hold up really well to the nails from 3 dogs. We like the matte finish as scuffs don't seem to show as well as you might get on more shiney surfaces.


As an FYI to other DIYers who are new to doing things, don't use steel wool if you are going to finish with a waterbourne product-- unless you like a bit of rust color to show through.
 
I agree with most all information you've been given. Be careful sanding too deep, as you can easily get into the nails--time to stop. Since floors are not furniture, I see no need to go any finer than 120 grit.

Most of the oak floors I've finished have been stained with Minwax Golden Oak. It is the most popular flooring color and always available universally. Wipe on, let sit, wipe off.

I usually use satin finish on the final coats mopped on. And I most often will do a very light buffing with 0000 steel wool. Then carefull clean before the next coat or two.

WHATEVER YOU DO, USE WATER BASED POLYURETHANE FINISH FOR FLOORS. I made the mistake on my first refinish and used oil based poly--and it leached strong smells for a whole month.

I also agree with covering most of the floors with rugs. Our rottweiler sleeps on a pair of heirloom handmade Turkish rugs.
 
Last edited:
I might go looking for a safer type of chemical cleaner, and try a small area at first. That way I could avoid a lot of the sanding and dust that kicks up. Still would need sanding, but maybe not so much.

You have to be careful with anything used indoors. Be very careful.

The blackish area is due to water, I would guess.
 
Most of the oak floors I've finished have been stained with Minwax Golden Oak. It is the most popular flooring color and always available universally. Wipe on, let sit, wipe off.
I had a hard time figuring out what stain to try I picked Minwax Golden Pecan as appearing the closest. I ended up adding a dash of a darker Early American and got pretty close. I don't even know what kind of wood these floors are. I always assumed some kind of pine.

The blackish area is due to water, I would guess.
Yes, that is probably right. That area is by the front door where we and the dogs have tracked in a lot of snow and rain. The areas I already did had more general foot and dog claw traffic wear and not the water stain. It will be interesting to see how that water stained area does. I will have to be careful here because I am getting close to the nails that Bamaman warns about. I noticed that in the sections I finished.
 
Good looking floors! I love the patina that old floors have. Looks like pine to me also. I have had little success in spot staining/ finishing parts of something to blend in to an existing finish. But judging from the posts above, you have blended quite well.

A few things that I have learned:

Don't overdo it with a belt sander. An overdone belt sanding will create scratches that are tough to remove. I like to use an orbital sander - doesn't sand as aggressively as a belt sander.

Graduate grits through the sanding process. Start at 60 or 80, then 100, then 120, then 150. I doubt that you need to sand floors past 150.

After sanding, vacuum up sawdust. Then wipe down with a tack cloth with a little mineral spirits on it. This will get the fine dust out.

Apply stain, wiping off excess stain shortly after applying stain. Easy to wipe on additional to even the tone. Not easy to lighten stain after it has dried.

Apply poly topcoat. Can be water base or oil base. I try to use a water base topcoat when I use a water base stain. And oil base topcoat when I use an oil base stain. I would lean toward water base for a large floor area due to the smell. After dry, lightly sand to get the nubs out, vacuum and tack cloth the surface. I use 0000 steel wool to sand between coats. Apply additional coats as needed, sanding between coats. Don't sand final coat.

Topcoat can be gloss, semi gloss or stain. The amount of shine can be lessened by putting on a final coat of satin over previous coats of semi gloss and vice versa. The poly is a film and builds up layers on the surface.

I see you are using minwax. Although I've seen pros poo poo minwax, I have had no problems with it. I use Minwax satin wipe on poly (oil base) a lot. And I have recently been using Minwax Polycrylic water base. Both great products on furniture - haven't used either on floors. The oil base poly will tend to add a more amber tone. The water base polycrylic dries clear. If you want a Minwax topcoat, check the minwax site to see what product they recommend for floors.
 
Last edited:
Nice floors.

We used a waterborne matte poly for our softwood floors on the 2nd floor. Diamond by Minwax. Haven't tackled the hard maples on the 1st floor yet, way down on the reno list, but will probably use the same product.

Recommended by a floor refinisher who uses it on the casino floors. Seems to hold up really well to the nails from 3 dogs. We like the matte finish as scuffs don't seem to show as well as you might get on more shiney surfaces.


As an FYI to other DIYers who are new to doing things, don't use steel wool if you are going to finish with a waterbourne product-- unless you like a bit of rust color to show through.
Interesting comment about rust that piqued my interest. I am in the process of sanding down my cultured marble bathroom vanity top (and replacing the faucet). Just started the steel wool stage, but I think I need to revisit the sandpaper.

I do not want to derail this thread as I still trying to figure out which products to use for the finish. Whether it is some generic poly, spar urethane, epoxy, or 511 impregnator seal. So far looks like the 511 is best choice for my application. Since the marble vanity is not as porous as natural wood I don't think I need to worry about steel wool fragments remaining behind...but you have given me something to think about.
 
Last edited:
Thank you for all the advice. I added some higher grit bands and did a lot of hand sanding with fine blocks before staining the rest of the damaged area. I also switched to semi gloss polyurethane for the third coat. You can still see a few problem areas like the water damage by the front door and, of course a few deep gouges are there to stay. But it is good enough for us and a whole lot less disruptive than doing the whole downstairs floor. Once I roll the rugs back the repairs will blend in nicely. Here are a few before and afters.
 

Attachments

  • Floor entry before.jpg
    Floor entry before.jpg
    243.1 KB · Views: 16
  • Floor entry after.jpg
    Floor entry after.jpg
    177.4 KB · Views: 14
  • Floor front door before.jpg
    Floor front door before.jpg
    199.3 KB · Views: 16
  • Floor front door after.jpg
    Floor front door after.jpg
    173.7 KB · Views: 14
Looks great! If you ever want to do something about the gouges in the future - they can be filled with 2 part epoxy with a dye.
 
Great! And quick, too!

The water stains did look sort of 'dirty' before your repair. Looks much, much better now, and still has lots of 'character'.

I also would think about filling those gouges, if nothing else just so they don't collect dirt. I've never tried epoxy/dye that Ronstar suggest, but he sure knows his stuff with wood projects. I would think it would be tough to make it not stand out. I think generally, patches look better when they are darker than surrounding wood. And it helps to get some variation in color, like natural wood. A homogeneous patch tends to stand out. But so do the gouges. Whatever you might try, experiment!

But really, really nice. I'm impressed.


-ERD50
 
Very nice work. I don’t think I could bring myself to even try something like that. You are a craftsman and an artist.
 
Looks great! If you ever want to do something about the gouges in the future - they can be filled with 2 part epoxy with a dye.
Good grief, I looked on Amazon and found hundreds of 2 part epoxies. Do you have a suggestion about what to get and do you buy clear and then add dye or buy epoxies with a dye? If you add dye, is it something special or just the stain I used on the floor (or maybe a little darker)?
 
Very nice work. I don’t think I could bring myself to even try something like that. You are a craftsman and an artist.
Actually, I am a thoroughly incompetent DIYer but I wanted the floors to look better and didn't want the disruption of a major pro job so I HTFU'd and did the work. If I can do it, you can do it. Just be careful.
 
Back
Top Bottom