Light bulb and socket problem

MichaelB

Give me a museum and I'll fill it. (Picasso) Give me a forum ...
Site Team
Joined
Jan 31, 2008
Messages
40,749
Location
Chicagoland
My garage door opener has a light bulb that turns on when motor is used. Very helpful when returning at night in the dark. Lately, however, the bulb won't turn on. If I reach up and tighten it a bit it does, but after a few days it goes dark once again.

The bulb is not making contact inside the socket. I saw a little metal tab on one side, pulled it out a bit, and that fixed the problem, but only for a few days. I guess the metal tab is permanently flattened to one side.

Any suggestions on what I can do to remedy this problem of the light bulb no longer having adequate contact inside the socket? The socket itself is not removable.
 
If the poor contact is caused by oxidation of the tab, a bit of sanding should clear it up. To reach inside the socket, I would wrap a bit of sandpaper onto the end of a wood stick. Of course, power would be turned off to be safe.

If this does not solve the problem, I would mount an external socket to the ceiling of the garage, and wire it to the opener. This would require taking the cover off the opener and find a way to connect the wires.

No matter what it takes, I am not going to replace the entire door opener just because of a bad contact.
 
How many early retirees does it take to change a light bulb?

None, it's too much work.
 
Try a new bulb, it may have just enough extra metal to make contact.
 
I thought your answer would be: "None. Some do not even have a garage, let alone a door opener".

My answer would be: "One. But ten to advise on how to do it right."
 
Try a small strip of soft solder laid lengthwise across the threads of the bulb as it is screwed in. This should keep the bulb from vibrating loose. Power off for safety of course.
P.S. a small piece of twisted steel wool will also work - threaded section only, avoid continuity with the center contact. (bizzzt)
 
Last edited:
Umm... Be careful that this strip of solder does not get pushed in, shorting out the two terminals. :)
 
Umm... Be careful that this strip of solder does not get pushed in, shorting out the two terminals. :)

Yes, I did try to make that point in my p.s. ;). I have done this fix and it works fine. I used solder but most soft metals will work e.g. - small piece of twisted aluminum foil. Once screwed in tight, it stays put.
 
Its easier to use an eraser on an old fashioned pencil to clean the contacts rather that sand paper. Just make sure end of the eraser is clean and not dried out.
 
Or, you could rig up a light using another socket in the garage, that's not even connected with your garage door opener in any way. Get something that you can turn on and off remotely.

Sojourner reported on the Amazon thread that he got this inexpensive device that can be operated via smart phone. Seems pretty cool to me, and maybe it could be pressed into service in a situation like MichaelB's.

http://www.amazon.com/TP-LINK-Amazon-Electronics-Anywhere-HS100/dp/B0178IC734

Since the interior car lights turn on when the ignition is turned off, it would be easy to get to one's smart phone and turn on the light before stepping out of the car. Or, you could set it up for voice control and just speak to turn it on.

I know, it's probably not as innately satisfying as just fixing the original light. But, you'd get to play with this cool new toy, and there's some value in that.
 
Last edited:
First turn off the circuit breaker. My method is then to use a small screwdriver to scratch the middle tab a few times. You could change bulbs as well, they sometimes have a bad connection inside the Edison base.
 
People usually put a 100W bulb there, as the operating cost is not of a concern for something that stays lit so short. The heat of the bulb may have softened the tab in the socket. Hence you bend the tab, and it only works for a while. A new LED light will prevent this problem.
 
No new opener. This one opens the garage door just fine. I've changed bulbs to no avail and use 60W as instructed by the manufacturer (LiftMaster)

So, it's clean the contacts, then wrap some solder or aluminum foil around the thread of the bulb - but don't let it touch the base. Did I get that right?

If that doesn't work the smartphone operated remote light is a good fallback.
 
So, it's clean the contacts, then wrap some solder or aluminum foil around the thread of the bulb - but don't let it touch the base. Did I get that right?

My proven method is to lay the solder, or other twisted soft metal across (perpendicular) to the threads on the bulb base (don't make contact with the center conductor). You are trying to create a pressure point, not wrap the threads. Sorry, I don't have the skills to draw a diagram. This assumes that the problem is a loosening bulb, not a faulty connection elsewhere.
 
Last edited:
A friend had a similar problem, and it turned out that his opener wasn't mounted as securely as it could have been. That gave it quite a bit of vibration when it operated, which messed up the filament inside the bulb. He bought a "vibration proof" light bulb (Home Depot carries them) and that fixed it.
 
If a repair doesn't work, mount a cheap motion sensor light inside the garage...or if you already have a motion light on the outside, simply connect another fixture from that to a light inside the garage.
 
The issue is not the filament, for certain. The contact in the socket is not solid enough ( I think). There are two bulbs, and it has happened to both. Tomorrow I'll see if I can get a photo of the socket.

The LiftMaster tech support has a FAQ question on this

With a small flathead screwdriver, pry the two contacts inside the socket out so that they will make better contact with the bulb.

I did this (using a piece of wood) but the fix only lasts a few hours. I'm reluctant to continue doing this for fear of breaking the contact.

The motion sensor light in the garage is another good idea.
 
Of course the problem is poor electrical contact, but it is not always between the bulb and the light socket contacts. It can be the tabs from the light sockets to the wiring harness. A bit of motion, of wriggling, of vibration may give some electrical continuity, but then it will fail again.

I would open up the case and pinpoint the source, and fix it once for all. If the light socket is bad, as I said, an external porcelain socket can be mounted to the ceiling, and wired to the opener.
 
The issue is not the filament, for certain. The contact in the socket is not solid enough ( I think). There are two bulbs, and it has happened to both. Tomorrow I'll see if I can get a photo of the socket.

The LiftMaster tech support has a FAQ question on this


I did this (using a piece of wood) but the fix only lasts a few hours. I'm reluctant to continue doing this for fear of breaking the contact.

The motion sensor light in the garage is another good idea.

Isn't that what pennies are for?:D

Sent from my SAMSUNG-SM-G920A using Early Retirement Forum mobile app
 
If a repair doesn't work, mount a cheap motion sensor light inside the garage...or if you already have a motion light on the outside, simply connect another fixture from that to a light inside the garage.

Actually, that sounds like a better idea than buying the gizmo for smartphone operation of a light, like I had suggested. Maybe not as much fun :(, but cheaper and it wouldn't depend on wifi connectivity.
 
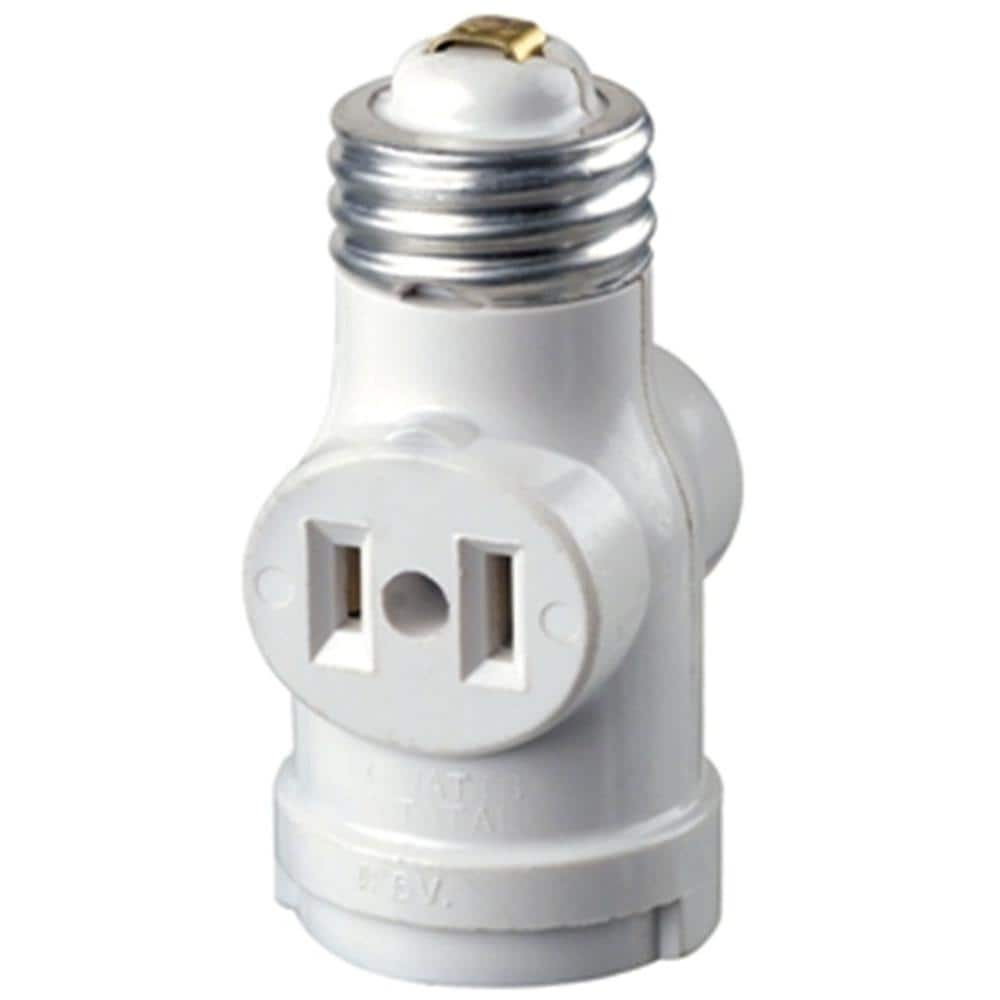
Try one of these gadgets. Unlike a standard light bulb you can really torque this in place of the bulb then screw the bulb into the gadget.

fec53c4e-b7c3-4c94-a8e3-626872bed67f_1000.jpg
 
Are you sure the socket isn't replaceable?

How to replace the light socket

To replace the light socket, follow the steps below.

1. Unplug the garage door opener.
2. If the opener has a back-up battery, unplug the battery.
3. Remove the end panel. (held on by two screws at the top and one or two screws at the bottom)
4. The wire harness for the light socket has 2 wires, one wire is orange, one wire is white. Unplug the two wires.
5. The light socket has a tab that secures the light socket to the end panel. Use a screw driver and press down on this tab to compress the tab. Requires a little force. Push the light socket out of the end panel.
6. Insert the new light socket in the end panel. Requires effort to push the tab in place.
7. Reconnect the orange and white wires to the back of the light socket.
8. Push the end panel back towards the motor head, replace the screws in the end panel.
9. Inside the light socket there are 2 copper tabs, one is on the side, one is on the bottom. Use a small screw driver to pull up the 2 copper tabs a little. (this ensures that the contacts are making good contact with the light bulb)
10. Replace the light bulb.
11. If this opener has a back-up battery, plug in the battery.
12. Plug in the garage door opener.
13. Press the door control or remote control.
When the opener is plugged in or when the motor runs, the light in the opener should turn on.
 
Good ideas to improve the contact area for the bulb in previous posts so won't repeat. Might be worth doublechecking your entire opener and tracks to make sure something hasn't loosened causing more vibration than normal causing the bulbs to loosen.
 
This article explains screw light sockets pretty well:

Light Bulbs | Ask the Builder

After you bend the tab, is it 20 degrees?

If the bulbs you are using are all from the same batch, they may all have same flaw. For example, the solder on bulb end might be too flat.

In the article it mentions that the light should come on before screwed tight. In a table lamp that is pretty easy to test, but in a garage door opener requires another step, like open the garage door.
 
Back
Top Bottom