Solved a nasty plumbing problem that would have been a lot messier without it. I wouldn't have thought of using it if it hadn't been mentioned here earlier.
We've been upgrading our home's 20-year-old FuturaStone sidewalks to stamped concrete. (Friends don't let friends do FuturaStone.) It's a horribly expensive, noisy, and lengthy process but it's the only alternative to equally costly/frequent maintenance-- or demolition.
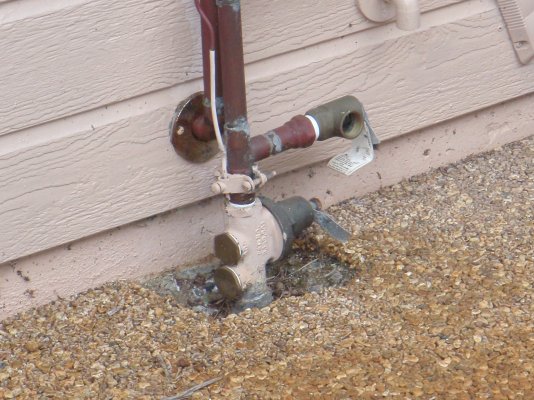
As is typical in our tropical climate, our house's water-pressure reducer was originally mounted outside near ground level. Also unfortunately typically, the cheap lazy sidewalk contractor poured the concrete around the street water pipe and the reducer's union nut. (See the first image down below-- we discovered later that he poured it over more than that.) The additional FuturaStone layer covered the union nut. The sidewalk also sloped toward the house to puddle rainwater against the foundation, so we were dealing with an attractive combination of footing efflorescence, moldy FuturaStone, and brass verdigris. Yummy.
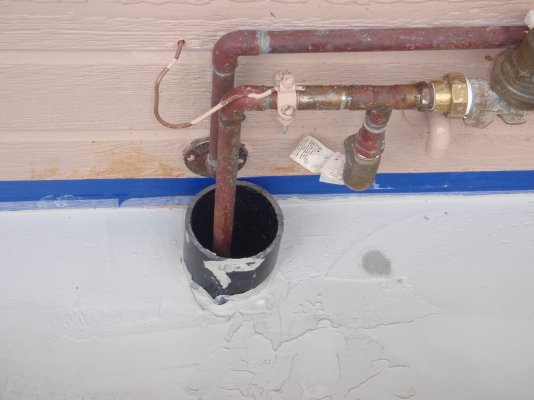
Leveling the sidewalk meant that the stamped concrete contractor was going to pile another inch of concrete around the reducer, so I decided to move it. I chiseled it out of the sidewalk and soldered it in a foot higher. The soldering access was very tight but it went OK. As I poked around in the hole I realized that the street water connection was actually a tee with a leg going out from the house and under the sidewalk to the yard's sprinkler piping. It was an inch below ground level under the concrete. It seemed like a good idea to leave this accessible so we had the concrete poured around a 5" mold with the water pipe coming up the middle of the circle (second image).
Building up the sidewalk added quite a bit of weight to it, and it might have settled. Part of the FuturaStone removal involves a scraping machine attached to a heavy forklift. Another part of stamped concrete requires smacking the rubber molds with heavy weights to make the impression. We had over a dozen contractors running around, and who knows who tripped over what or hit whatever with their equipment. Somewhere in that process the hole in the concrete began to slowly fill with water.
It looked like the leak was coming from the top joint of the tee, the closest joint to the last joint I'd soldered. Sure, it could've been my fault, but I'm better than that. So I whipped out my propane torch again, but I couldn't keep the flame lit inside the bottom of the slightly deeper hole. The flame was either getting blown out by the warm updrafts or fresh air wasn't getting in fast enough to support combustion. Ruh-roh. So I epoxied the heck out of the joint and the hole dried out again.
A week later the hole was refilling--faster. More epoxy. Great [-]gob[/-] job but no effect on the leak rate. In fact, this time I couldn't find the leak. I finally realized that it was dripping along a root at the back of the hole where the tee led to the sprinkler connection. More ruh-roh.
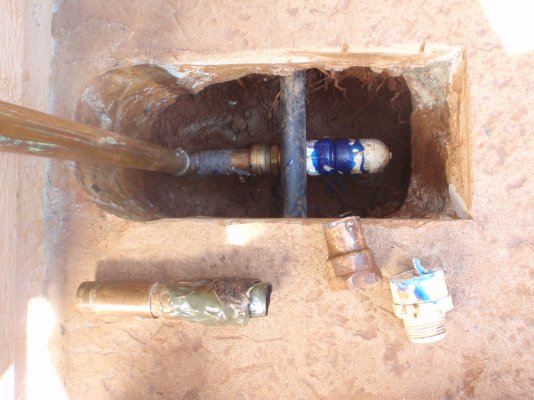
So, grimacing with the pain of destroying what we haven't even paid for yet, I sawed into our freshly stamped concrete. I was able to turn the hole into a 5"x12" rectangle and, after a few hours with a sledge & cold chisel (plus pruners and a root digger and a trowel and several square inches of skin), I'd exposed the tee's connection to the sprinklers. The copper female pipe thread adapter had probably been soldered in place and then the PVC male pipe thread adapter had been screwed into it and attached to the rest of the sprinkler pipings. Just to make things more interesting I uncovered a black plastic pipe that doesn't seem to have anything (like water) in it. I think it's part of the house's termite-treatment system but it had been laid on the ground across the copper-PVC joint and then three inches of concrete had been poured on top. Freakin' idiots.
After excavating another cubic foot of roots & dirt, the problem was clear. The PVC had been cross-threaded onto the copper and, judging from the root jungle, had probably been leaking for years. (Did I mention that we've had termites in this area too?) It was dented and out of round. Either all the concrete work had disturbed it, or my first excavation had allowed the water to leak in a new direction and announce its presence.
I could've cut the PVC adaptor out of the sprinkler piping but there was no room in the existing hole (and no flex in the PVC piping) to thread on the new adaptor and then glue it to the PVC. There was no way to solder a new joint into the system (too close to the PVC, even with wet rags and soldering blankets). There was no room to fit a PVC or brass union into the piping. I could have cut the stamped concrete the rest of the way across the sidewalk, torn up the sprinkler piping, and started over again. And who knew what else I'd cut into as I was hammering out the concrete. But that seemed to be the only practical option.
So we went back to the store for more concrete saw blades. Spouse noted the Sharkbite display and I remembered Samclem's mention of its plug-in no-solder copper piping connection. Whaddya know-- they had PVC adapters. Thanks, Sam!
It takes a certain amount of [-]blissful ignorance[/-] fortitude to hacksaw through PVC and copper at the main water connection, but it had to be done and I was a lot cheaper than a licensed plumber. The resulting five-inch piping gap was barely enough room to tightly screw together the adapters, slide the Sharkbite onto the copper pipe (no soldering or melting PVC!), and glue the PVC adapter to the sprinkler piping. (I mean "barely" in the submariner sense of "holy cow was that a tight fit; hope I didn't spring any more piping joints".) Since we were already waiting for PVC adhesives to cure, I epoxied the tee's remaining solder joints. It took an hour to finish the connections and a mere 21 more hours of "Is it done yet?" before I felt the PVC glue was cured enough to risk pressure. No leaks!
If this plumbing rots any further then it's all coming out. I'll hacksaw the tee off the street pipe, replace it with a Sharkbite tee, and cap the stub to the sprinkler piping with another Sharkbite part. That'll only interrupt house water service for 30 minutes. Then I'll fix whatever's leaking on the sprinkler piping and wait for the glue to cure. Next day I'll pop off the cap with the special Sharkbite tool and plug in the Sharkbite PVC adaptor. No soldering, no combustion problems or melted plastic, no epoxy, no lengthy water outages. Priceless.
We've been upgrading our home's 20-year-old FuturaStone sidewalks to stamped concrete. (Friends don't let friends do FuturaStone.) It's a horribly expensive, noisy, and lengthy process but it's the only alternative to equally costly/frequent maintenance-- or demolition.
As is typical in our tropical climate, our house's water-pressure reducer was originally mounted outside near ground level. Also unfortunately typically, the cheap lazy sidewalk contractor poured the concrete around the street water pipe and the reducer's union nut. (See the first image down below-- we discovered later that he poured it over more than that.) The additional FuturaStone layer covered the union nut. The sidewalk also sloped toward the house to puddle rainwater against the foundation, so we were dealing with an attractive combination of footing efflorescence, moldy FuturaStone, and brass verdigris. Yummy.
Leveling the sidewalk meant that the stamped concrete contractor was going to pile another inch of concrete around the reducer, so I decided to move it. I chiseled it out of the sidewalk and soldered it in a foot higher. The soldering access was very tight but it went OK. As I poked around in the hole I realized that the street water connection was actually a tee with a leg going out from the house and under the sidewalk to the yard's sprinkler piping. It was an inch below ground level under the concrete. It seemed like a good idea to leave this accessible so we had the concrete poured around a 5" mold with the water pipe coming up the middle of the circle (second image).
Building up the sidewalk added quite a bit of weight to it, and it might have settled. Part of the FuturaStone removal involves a scraping machine attached to a heavy forklift. Another part of stamped concrete requires smacking the rubber molds with heavy weights to make the impression. We had over a dozen contractors running around, and who knows who tripped over what or hit whatever with their equipment. Somewhere in that process the hole in the concrete began to slowly fill with water.
It looked like the leak was coming from the top joint of the tee, the closest joint to the last joint I'd soldered. Sure, it could've been my fault, but I'm better than that. So I whipped out my propane torch again, but I couldn't keep the flame lit inside the bottom of the slightly deeper hole. The flame was either getting blown out by the warm updrafts or fresh air wasn't getting in fast enough to support combustion. Ruh-roh. So I epoxied the heck out of the joint and the hole dried out again.
A week later the hole was refilling--faster. More epoxy. Great [-]gob[/-] job but no effect on the leak rate. In fact, this time I couldn't find the leak. I finally realized that it was dripping along a root at the back of the hole where the tee led to the sprinkler connection. More ruh-roh.
So, grimacing with the pain of destroying what we haven't even paid for yet, I sawed into our freshly stamped concrete. I was able to turn the hole into a 5"x12" rectangle and, after a few hours with a sledge & cold chisel (plus pruners and a root digger and a trowel and several square inches of skin), I'd exposed the tee's connection to the sprinklers. The copper female pipe thread adapter had probably been soldered in place and then the PVC male pipe thread adapter had been screwed into it and attached to the rest of the sprinkler pipings. Just to make things more interesting I uncovered a black plastic pipe that doesn't seem to have anything (like water) in it. I think it's part of the house's termite-treatment system but it had been laid on the ground across the copper-PVC joint and then three inches of concrete had been poured on top. Freakin' idiots.
After excavating another cubic foot of roots & dirt, the problem was clear. The PVC had been cross-threaded onto the copper and, judging from the root jungle, had probably been leaking for years. (Did I mention that we've had termites in this area too?) It was dented and out of round. Either all the concrete work had disturbed it, or my first excavation had allowed the water to leak in a new direction and announce its presence.
I could've cut the PVC adaptor out of the sprinkler piping but there was no room in the existing hole (and no flex in the PVC piping) to thread on the new adaptor and then glue it to the PVC. There was no way to solder a new joint into the system (too close to the PVC, even with wet rags and soldering blankets). There was no room to fit a PVC or brass union into the piping. I could have cut the stamped concrete the rest of the way across the sidewalk, torn up the sprinkler piping, and started over again. And who knew what else I'd cut into as I was hammering out the concrete. But that seemed to be the only practical option.
So we went back to the store for more concrete saw blades. Spouse noted the Sharkbite display and I remembered Samclem's mention of its plug-in no-solder copper piping connection. Whaddya know-- they had PVC adapters. Thanks, Sam!
It takes a certain amount of [-]blissful ignorance[/-] fortitude to hacksaw through PVC and copper at the main water connection, but it had to be done and I was a lot cheaper than a licensed plumber. The resulting five-inch piping gap was barely enough room to tightly screw together the adapters, slide the Sharkbite onto the copper pipe (no soldering or melting PVC!), and glue the PVC adapter to the sprinkler piping. (I mean "barely" in the submariner sense of "holy cow was that a tight fit; hope I didn't spring any more piping joints".) Since we were already waiting for PVC adhesives to cure, I epoxied the tee's remaining solder joints. It took an hour to finish the connections and a mere 21 more hours of "Is it done yet?" before I felt the PVC glue was cured enough to risk pressure. No leaks!
If this plumbing rots any further then it's all coming out. I'll hacksaw the tee off the street pipe, replace it with a Sharkbite tee, and cap the stub to the sprinkler piping with another Sharkbite part. That'll only interrupt house water service for 30 minutes. Then I'll fix whatever's leaking on the sprinkler piping and wait for the glue to cure. Next day I'll pop off the cap with the special Sharkbite tool and plug in the Sharkbite PVC adaptor. No soldering, no combustion problems or melted plastic, no epoxy, no lengthy water outages. Priceless.
Attachments
Last edited: