You are using an out of date browser. It may not display this or other websites correctly.
You should upgrade or use an alternative browser.
You should upgrade or use an alternative browser.
What We're Making
- Thread starter davemartin88
- Start date
MRG
Give me a museum and I'll fill it. (Picasso) Give me a forum ...
- Joined
- Apr 9, 2013
- Messages
- 11,078
Here's a screen door I'm nearly finished with for our house. The door is an inexpensive pine door from Lowes, I then made the lower panel from cherry and carved the picture on the CNC. Took about 15 hours to carve. Finish is mainly shellac and a bit of stain to bring out some details. I'm happy with how the cherry and pine look together, wasn't sure I was going to be okay with it.
Very nice. I wouldn't have thought the cherry and pine would work. Really really nice!
Sent from my SAMSUNG-SM-G920A using Early Retirement Forum mobile app
davemartin88
Full time employment: Posting here.
- Joined
- Aug 26, 2008
- Messages
- 812
Dave, Great carving. Have you done something like this before?
I've done a bit of woodworking but first time with a carving like this integrated to the project. I've done a couple of small 3D cuts on the CNC and cherry cuts really well and requires very little sanding or clean up. I also happen to have a good supply of cherry, walnut, and oak to pick from from trees that have fallen or been taken down on our property and milled. I've milled these over the last few years so after air drying, it's all ready to use. I was hoping the darker stain on the pine would work with the cherry which only has a clear coat and happy with how it turned out.
For those interested, the removed material from the carving is about 1/2" thick at its deepest points and done in a 3/4" panel that was glued up from 3 pieces of cherry. I was/am worried that the panel will warp. The panel was oversize on the CNC machine and screwed flat around all the edges while being cut. I cut it for about 5 hours each day, for 2 reasons. First was I don't want to leave the machine running when I'm not in the shop and second, thought it might help to relieve some of the stress in the wood from the cutting by only cutting part of the pattern each day. Once the carving was complete, I put on two coats of shellac to seal the wood before I took it off the router, then immediately applied two coats to the back side to keep the panel from drying at different rates. I really like to use shellac as you can easily apply 3 coats in just a couple of hours and it builds to a nice finish.
The panel is held in the door with pocket screws from the back side running in to the frame, about 3 screws on each side, then plugged the pocket holes with a cherry plug. Again, hoping this will help to hold the panel flat but will see what a season of temperature and humidity changes do. It's under a roof so won't be directly hit by the weather.
MRG- I took a 6" square from the carving and cut it out in cherry as a preview which gave me something to use to clear coat with shellac and compare to the the pine door and the house. My original plan wasn't to use the dark stain on the door frame but we decided the pine was too light so put some of the darker stain on it to get it closer to the color of the house- it will darken a bit with time as it is the same stain used on the logs of the house which are also pine. I added the trim at the top and on the inside of the door around the screen so there would be a bit more cherry to balance it out, we'll see!
Thanks for the comments and thanks to all for keeping this thread alive, some amazing things being created.
Exit 2024
Recycles dryer sheets
- Joined
- Jun 23, 2015
- Messages
- 414

Philliefan33
Thinks s/he gets paid by the post
- Joined
- Oct 20, 2014
- Messages
- 1,677
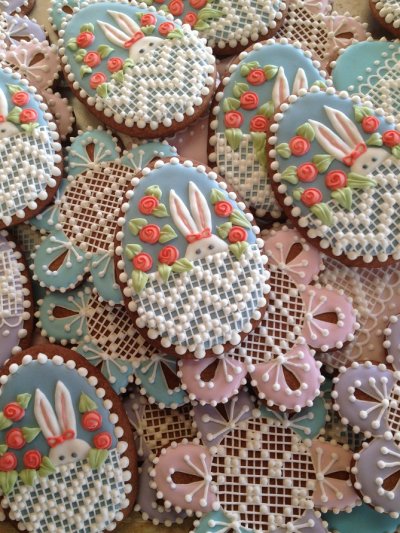
Wow, those cookies look like artwork. My sugar cookies usually look like they were decorated by a five year old.
- Joined
- Sep 10, 2006
- Messages
- 4,073
Wow, those are beautiful!!!! Such talent!
Exit 2024
Recycles dryer sheets
- Joined
- Jun 23, 2015
- Messages
- 414
splitwdw, no stencils on those, all hand painted with icing
Wow, they look like Wedgwood china. I'd be afraid to bite into one and break a tooth!
- Joined
- Sep 10, 2006
- Messages
- 4,073
splitwdw, no stencils on those, all hand painted with icing
That's amazing!
Exit 2024
Recycles dryer sheets
- Joined
- Jun 23, 2015
- Messages
- 414


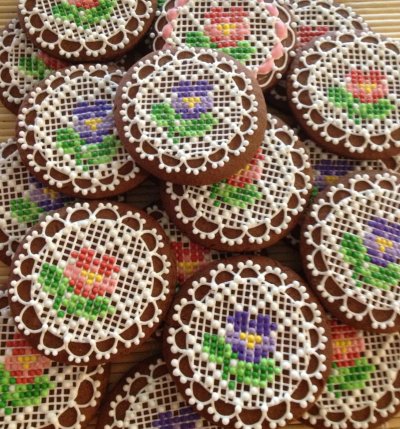

That is such incredible detail work. You have real talent and ability there.
Ronstar
Moderator Emeritus
Wow, Exit 2024 - those cookies are awesome!
MRG
Give me a museum and I'll fill it. (Picasso) Give me a forum ...
- Joined
- Apr 9, 2013
- Messages
- 11,078
They look like that AND I can eat them!")
Excellent.
Excellent.
Exit 2024
Recycles dryer sheets
- Joined
- Jun 23, 2015
- Messages
- 414
Now you all know the real reason to FIRE for us ASAP - more free time means more cookies
Exit 2024
Recycles dryer sheets
- Joined
- Jun 23, 2015
- Messages
- 414
redduck, it depends on design and number of colors used , white and blue 26 eggs took probably 7-8 hrs total split in 3 days. It takes much longer to came up with doable idea though
davemartin88
Full time employment: Posting here.
- Joined
- Aug 26, 2008
- Messages
- 812
Wow, the cookies are amazing!
Exit 2024
Recycles dryer sheets
- Joined
- Jun 23, 2015
- Messages
- 414
davemartin88, thank you for opening such a great topic, I was really enjoying looking at all that work shared here, so many so talented people, although honestly I am not that surprised. It takes a lot of patience, determination and attention to details to perfect different crafts, same skills are very applicable to achieve FIRE
Lsbcal
Give me a museum and I'll fill it. (Picasso) Give me a forum ...
For me it's personally very rewarding to perfect skills. One does not have to do this in retirement. It's a choice.davemartin88, thank you for opening such a great topic, I was really enjoying looking at all that work shared here, so many so talented people, although honestly I am not that surprised. It takes a lot of patience, determination and attention to details to perfect different crafts, same skills are very applicable to achieve FIRE
Yes, perfecting skills was critical at work yet there is something different going on. Maybe it's just that these skills cannot be co-opted by an institution run by others. Not that those institutions are bad, have to admit they are a necessary part of society. It's just that I never felt I was in charge and always had to prove those skills to a manager.
Ronstar
Moderator Emeritus

Last fall my DW and I finally got married after being together for 17 years (no more shacking up !  )
)
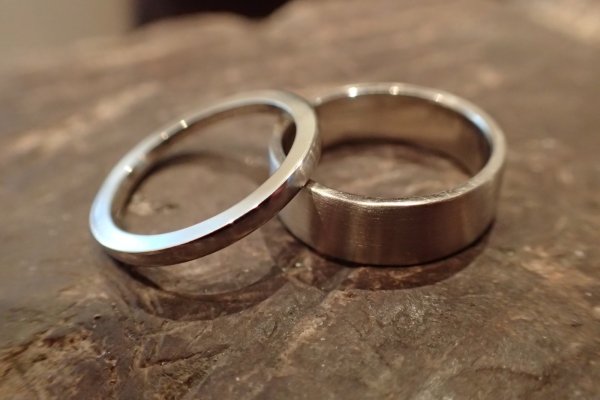
Since we're in our forties and we had a [-]cheap[/-] small family only wedding at a Victorian inn here in town, we decided to splurge on one thing and make our own wedding rings.
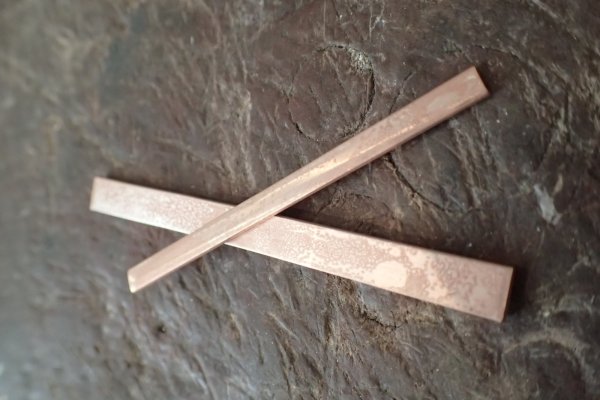
A jeweler in Toronto runs a workshop where you come in and fabricate your own rings. You choose the blank metal billet you want (gold, silver, etc..) and then go through the whole process of shaping, rounding, soldering, sanding and polishing.
They turned out better than we could have imagined (the picture doesn't really do them justice), are a conversation piece and really mean a lot to us.
First picture is the raw billets (rose gold) and second is when they were 99% done (polished a bit more after).
)Since we're in our forties and we had a [-]cheap[/-] small family only wedding at a Victorian inn here in town, we decided to splurge on one thing and make our own wedding rings.
A jeweler in Toronto runs a workshop where you come in and fabricate your own rings. You choose the blank metal billet you want (gold, silver, etc..) and then go through the whole process of shaping, rounding, soldering, sanding and polishing.
They turned out better than we could have imagined (the picture doesn't really do them justice), are a conversation piece and really mean a lot to us.
First picture is the raw billets (rose gold) and second is when they were 99% done (polished a bit more after).
Attachments
Meadbh
Give me a museum and I'll fill it. (Picasso) Give me a forum ...
- Joined
- Jul 22, 2006
- Messages
- 11,401
Last fall my DW and I finally got married after being together for 17 years (no more shacking up !
Congratulations Mr and Mrs Koogie! I love your idea of making your own wedding rings. Working together on a project that will last a lifetime, and a small family wedding, seems much more meaningful than those horrid excesses one sees in the media.
Exit 2024
Recycles dryer sheets
- Joined
- Jun 23, 2015
- Messages
- 414
Ronstar, very nice table! I always admire someone's ability to do quality woodwork and flower is just an icing on the cake
Koogie, never heard of someone making their own wedding rings but that is such a cool idea!!! Congrats on wedding and rings look awesome
Koogie, never heard of someone making their own wedding rings but that is such a cool idea!!! Congrats on wedding and rings look awesome
Meadbh and Exit, thank you both. Our wedding turned out to have a Victorian theme (not something we planned) and so I rented a full morning suit to wear instead of a tux (I saw a lot of them at my cousins weddings over in Wales and England growing up).
Our house is only 1.5km from the inn so on the morning of the wedding I walked over, all suited and booted, carrying an umbrella as a walking stick. Got a lot finger pointing and a couple of honks... lol
Our house is only 1.5km from the inn so on the morning of the wedding I walked over, all suited and booted, carrying an umbrella as a walking stick. Got a lot finger pointing and a couple of honks... lol
Similar threads
- Replies
- 67
- Views
- 4K
- Replies
- 14
- Views
- 894
- Replies
- 136
- Views
- 11K