Your recent repair? 2013 - 2020

Status
Not open for further replies.
Our dryer was screeching and squealing for a couple of years. I had previously wiggled the belt and it had quieted down for some weeks. But this time I let squeal and screech although you could hear it in the entire house for the 2 years !

Suddenly there was wonderful silence... Until DW said the dryer is broke.

So I checked youtube and went down and opened it up, found a broken belt.
Watched the videos to be sure I knew what to do, and they suggested the screeching was the drum bearing.

So back to the basement, pulled out the drum and found it was super worn, and had cut through part of itself (its in 2 parts that fit together). This totally explained the loudness.

I ordered the parts from partSelect which has great videos on repairs of the parts. It was $100 , once I got the parts in 3 business days, it took about 1 -> 1.5 hours to replace everything and put it back together.

Tested it quickly and it all worked super quietly... Now I can't tell if DW is doing the laundry anymore :D
 
Our old home, now a rental, wouldn't keep the pilot lit in the water heater. So Wednesday I replaced the thermocouple. Today, we enlarged the access panel and put on a new door. Removed the washer/dryer. Replaced the water heater and some nearby plumbing. Replaced the floor and subfloor. Reinstalled washer and dryer with new hoses and cleaned the lint from dryer and dryer vent lines. Takes a lot of work to keep that pilot light lit!
 
A question did the toilet have a metal or flex fill line, that makes a tremendous difference in how hard it is to fix. I had a plumber in to change out the 2 metal pipes with flex lines and put new fill valves in so that in the future it would be much easier to change (No need to mess with the tank bolts then)

Usually it is very easy to change these to flex lines. I think I've see one house where I had to replace the shutoff to change the line type. All the others I've found that the new lines with the rubber grommets on the end work just fine.
 
Usually it is very easy to change these to flex lines. I think I've see one house where I had to replace the shutoff to change the line type. All the others I've found that the new lines with the rubber grommets on the end work just fine.
In my house the shutoffs had to be changed, and that took the plumber a bit of work. At the same time I had a faucet that started leaking changed, and changed that to flex lines also (The house date from 1986 btw)
 
I've purchased a $35 Harbor Freight tool set to leave at such person's homes for my convenience. It is fairly complete for simple tasks. You can use the 20% coupon on top of the (continuous) sale price.

Digital Savings and Coupons from Harbor Freight

+1 I've purchased a couple of these sets and am quite happy with them. One in the Jeep and one in the plow truck. I use them quite a bit with no problem. The screw drivers are even holding up reasonably well.
 
Our old home, now a rental, wouldn't keep the pilot lit in the water heater. So Wednesday I replaced the thermocouple. Today, we enlarged the access panel and put on a new door. Removed the washer/dryer. Replaced the water heater and some nearby plumbing. Replaced the floor and subfloor. Reinstalled washer and dryer with new hoses and cleaned the lint from dryer and dryer vent lines. Takes a lot of work to keep that pilot light lit!

Wow! Thats quite a task to keep a pilot light up and running! Gotta love when a plan works out...I would enjoy an adult beverage after this excercise =)
 
Got a check engine light on my winter beater truck. My scanner identified P0301. #1 plug misfire. Removed plug, broken insulator. Replaced all 8 plugs. The other seven looked normal. Chances are that cylinder is having some other problems.

Either partially clogged injector or valve issues letting oil in, or rings. Did not do compression check. Too lazy. maybe in the spring time. On the next dry day might give it an Italian tuneup. It will either kill it or cure it.

Since it is past 190,000 miles, not too concerned.

My check engine said P0141...O2 sensor. Spent a good bit of time trying to figure out if I needed the California or Ex. California sensor (CARB one is $50 more). I pulled the seat and looked at the connector, and it turns out both parts have the same connector:facepalm:
So after wasting a bunch of time on the modern internet machine with no clue provided (just a bunch of misdirection), I finally went old school and called the stealership...they said the only way to tell is to enter the VIN into their system. I called out the VIN and learned I have a US version, so I ordered the $45 one instead of the $95 one from Amazon. Not yet a "fix", but without the preliminaries I'd never get around to the fix!


I always spend time confirming the problem. In my case I have a few diganostic tools which let me observe some details while the engine is running. I was able to watch misfires on #1 plug. Then after pulling the plug the broken insulator inside was evident. I also have a few other ways, like oscilloscope with inductive pickup to narrow down primary and secondary ignition issues. Or just plaing looking under the hood in a totally dark garage, and see corona and spark in places they should not be.

In 02 sensors the, the problem may in fact be the sensor orsome other fueling issue, or continuity of wiring and bad connections in plugs. Hopefully in your case that is exactly the problem that code refers to the heater of the 02 sensor. The problem can be ascertained by disconnecting the plug and measuring with an ohm meter.

It can be a ROYAL PITA but far less so than actually changing the sensor. Which excersize at times requires a blowtorch to make it let go from the threads.:mad:. And remembering righty tighty upside down under a jacked up car and having the right socket wrench.
 
Couple of years ago I changed the O2 sensor on DW car. I used a generic replacement part.
I didn't have to use a torch, just ran the car a bit to warm up but not make too hot the exhaust, then applied a lot of penetrating oil and went inside to read for 1/2 hour to give the oil time to soak. It came off pretty easy.

Also manual said to remove passenger seat to disconnect the wires, but folks on internet said just push the wire though the gromment so its under the car, and unplug it, then shove back in when done. A lot easier.
 
I just installed a gas range in the kitchen. Have done a bunch of propane things at my camp, so figured Natural gas can't be too different.

Didn't figure on the standards changing, had to move to 1/2 instead of 3/8 nipple and flexible pipe.

Ended up making 3 extra trips to the hardware store, one was a lesson I will remember forever, which is always buy the 60" flexible pipe. Its amazing how short 30" appears when you want to be between the wall and the back of the range during hookup. Size does matter :D

And buy the leak detector liquid as it makes you feel safe and confident to test it a lot, and even test the factory connections near the range regulator. That stuff really sticks.
 
HAd been putting off tightening up a really annoying loose light bulb assembly in a lamp, due to the job looking very,very awkward, needing weird unavailable tools, etc. Decided to spend at least 2 minutes just staring at it, waiting for the answer to come. Had to rip off part of the felt on the base of the lamp to get access to the hole. Hole too small for hand. Nut that needed to be secured was way up inside the lamp base. Like 2 feet! Finally Mac Guivered it by using long thin piece of wood which I awkwardly torqued against the nut and was miraculously able to turn the screw from above slowly, slowly until tight!! All snugged up now, lamp working normally, no more wobbly loose awkward nonsense going on. Amazing what one can do when bored enough.
 
Still working on the Grundig 9068. Have moved on to the attached turntable. It is a Perpetuum Ebner Rex Deluxe from 1958. Motor wasn't spinning. So, I took it apart and cleaned and oiled it. Also replaced belts, and rebuilt the idler wheel. Running now, but slow. That will be next. http://youtu.be/Q0biIZF8thM
 
It is fun in the old car. I imagine its wonderful for bikers.

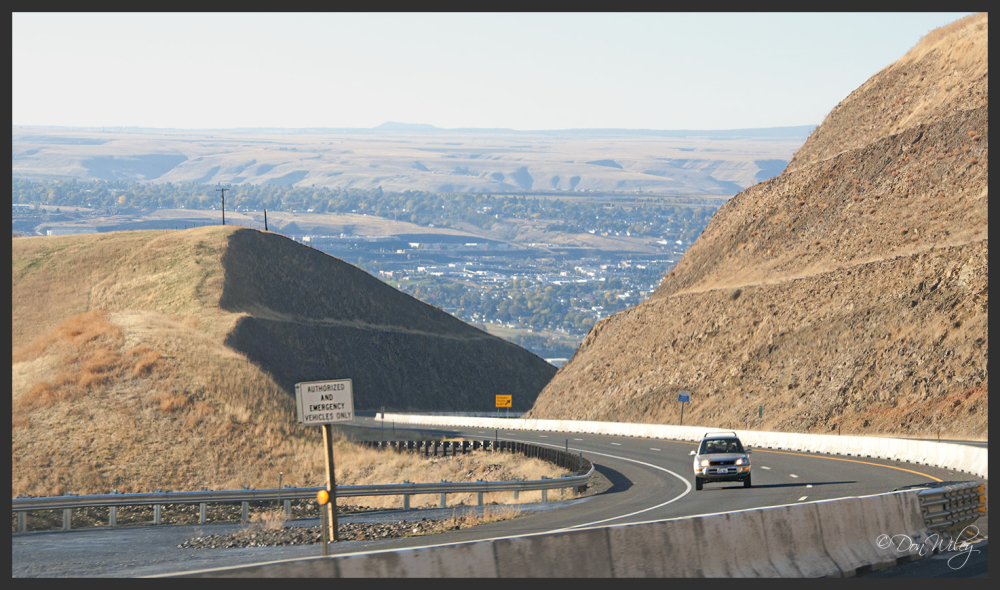
I was up there a few months ago and drove down from Spokane at night in the rain - total white knuckle down that thing.
 
I was up there a few months ago and drove down from Spokane at night in the rain - total white knuckle down that thing.

You drove down the OLD Lewiston grade at night in the rain? Or the NEW Lewiston grade?

The old one would be a little exciting at night in the rain.
 
I'm not sure, I think I was on 95 the whole time - there's another way down that hill?
 
is it the old spiral hwy on the map? that's just about straight down!


I've driven up Bogus Basin at night, in the snow but that looks way worse.
 
I'm not sure, I think I was on 95 the whole time - there's another way down that hill?

Yes. Two routes. The video is of the old route. Locals call it the Spiral Highway. Narrow, steep, curvy, numerous switchbacks. with one lane going each way. A fun ride on a good day.
http://static.panoramio.com/photos/large/39208800.jpg
39208800.jpg


725_001.jpg


You were probably on the newer route. Four lane, divided highway. Just as steep, much gentler curves. Several pull outs for runaway vehicles. Also a fun ride on a good day-just less so.


Locals don't even think twice about using the new road.
d6407fef47379a9c08cc80d71a4c7c89_giant.jpg
 
I replaced a bearing in my small utility trailer today.

Recently, the trailer was used mostly to haul my dirt bikes short distances out to further out trail heads in the national forest (the bikes are not street legal). One bearing grease cap fell off somehow, and I kept procrastinating in replacing it. Then, last week I discovered the replacement grease cap I bought, then put on a shelf in the utility closet and forgot all about it. Son of a gun! There goes my superior memory I often brag about. Darn!

So, I immediately took that out to the trailer and tried to install it. My, the wheel was wobbling badly. Dirt and sand had gotten to the roller bearing and ground it all worn. Son of a gun! I was so ashamed that I could be so negligent and foolhardy to tow the trailer like that.

The replacement bearing bought off eBay arrived yesterday, and today I made the point to mount it on immediately. I cleaned out all the metal shavings and dirt from the old bearing, and packed grease into the new rollers as best I could.

I had no tool to press out the outer race, so just replaced the rollers and the inner race, but the wheel rotation is now so smooth and silky. Still, I will remember to check the wheel movement every so often to catch any amiss.
 
...........
I had no tool to press out the outer race, so just replaced the rollers and the inner race, but the wheel rotation is now so smooth and silky. Still, I will remember to check the wheel movement every so often to catch any amiss.
I've knocked out outer races using nothing but a screw driver and hammer. The trick is to catch the edge of the outer race that sits proud of the surrounding area.

Given how bad it was, it is probably fine for now.
 
Yes, I started to do that, but when the bearing race did not budge after a few hammer taps, I stopped. I did not want to end up with a deformed and stuck bearing. And then, I still have to press in the new race. I had enough problems tapping in the new cover cap.

I could have brought the hub to a brake shop and paid to have it done, I guess. But on trying the half new part, it seemed to work OK so I just went with the half-assed job. As you said, it was a huge improvement and I am not towing this trailer across the country.

PS. I also thought of heating the hub with a propane torch to expand it and perhaps the race might just fall out, but I did not try it.
 
Last edited:
There is not much load on the trailer wheel bearings anyway. For light duty use such as a boat trailer, the bearing should be fine if the old outer race was not damaged and you keep it lubed and clean.
 
I found a pin hole leak in a copper pipe in the basement last week. The pipe doesn't go anywhere just to a shut off valve. I think because the water stayed in the pipe and didn't move it caused corrosion.

I used something called JB Weld on it..a very good epoxy, until I can have the plumber fix it properly.

Also the other day my downstairs Toilet tank bolts were corroded and leaking through. Went to Lowes and got a new kit with rubber washers and supply line for about 9 bucks and got it fixed.
 
Wife and I got home late a few days ago and found the house a chilly 58 degrees. I thought the pilot light had blown out as it has in the past. Lit it and it wouldn't stay on. Being the good boy scout that I am/was. I happened to have a spare thermocouple in my workshop. an hour later heat was back on and life is good. I think I've had the thermocouple on stand by for over 15 years. Today it was minus 12 this morning, glad to have heat today!
 
Yes, I started to do that, but when the bearing race did not budge after a few hammer taps, I stopped. I did not want to end up with a deformed and stuck bearing. And then, I still have to press in the new race. I had enough problems tapping in the new cover cap.

I could have brought the hub to a brake shop and paid to have it done, I guess. But on trying the half new part, it seemed to work OK so I just went with the half-assed job. As you said, it was a huge improvement and I am not towing this trailer across the country.

PS. I also thought of heating the hub with a propane torch to expand it and perhaps the race might just fall out, but I did not try it.

The hub will normally have two slots about 1/2" wide and across from each other exposing the back of the race really well at those two spots - makes it easier to get a drift in there and whang out the outer race. Installation of the new race is facilitated by finding a socket just a tad smaller than the OD of the race and banging away on the back of the socket using it as a drift.
 
I don't know about people's mentioning whacking, banging, and whanging. Perhaps I should post photo of the bearing cap after I managed to hammer it into place, using a wood block as a buffer: the doggone thing got all deformed and looked pretty sad. :)

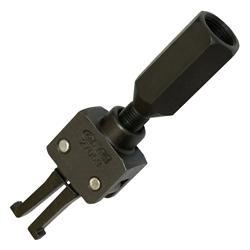
So, I did not want to create a bigger mess. If I were to do this again, I would get a bearing puller like the following photo. I already have a pulley puller set, and would not mind adding a bearing puller set to my tool kit.

oes-27059_ml.jpg
 
Status
Not open for further replies.
Back
Top Bottom