Your recent repair? 2013 - 2020

Status
Not open for further replies.
I have replaced the toilet float valves in my home over the years, and all of them are now of the following type, which is superior.

I too have the Fluid Master 400A fill valve on all toilets now. Long enough to see what kind of problems THEY can develop over time.

On one, the bowl didn't fill completely, though tank water level was fine. The metal clip that you use to attach and position the refill hose over the tank's overflow drain pipe had broken out the side of the overflow pipe, in the shape of the clip, and the refill hose was just aiming into the tank. I see they have changed the hardware for that now, probably for that reason. A new-design clip positioned further around the tube solved that.

The second problem was hard to find. A tank would not reliably fill completely, the water would suddenly turn off with the sliding float too low. But everything, including the rubber valve diaphragm, looked fine. Finally found it, the diaphragm had an extremely tiny tear in it that would show up in a fold only if you flexed it jusssst right. A new diaphragm of course fixed it. It took a lot of postulating and figuring to see how that fill valve actually works. The hydraulic concepts are much more involved that the simple plunger-pushes-down-on-seal,-stopping-water-flow of the old lever-arm type of fill valves. The 400A fluidics are ingenious, using spool valving of dissimilar cross-section dynamic cylinders. Water goes on BOTH sides of the diaphragm for it to work, but only at the proper time/position or else it doesn't. And even an extremely tiny tear means it doesn't.

But they are still more trouble-free over time than the old lever-arm type, at least in our use. We have a higher Chlorine content in our water, that used to soften/compress the simple seal in the old lever-arm type, requiring re-adjusting the lever bias screw on ones that had it, or bending the rod on ones that didn't in order to at least get some reasonable life out of the seal before having to replace it again. And even then, I was replacing seals or replacing the top of the assembly too often.
 
I wonder if your air hose & vacuum routine dislodged a grown crud plug in the evaporator drain line down to the pan by the condensor.

3 cups of boiling water flushed it just fine.:D
 
I too have the Fluid Master 400A fill valve on all toilets now. Long enough to see what kind of problems THEY can develop over time...

Only an engineer would disassemble things to see how they fail, particularly a retired engineer who has more time on hand. :D
 
DW gave her IPhone a bath recently (the old phone in the back pocket of your jeans and bathroom visit trick).

Dried it out (fully assembled) and it's funky. Some locations on the screen are not touch sensitive. So I ordered a tool kit and new screen. I will be ripping the entire phone down to the Motherboard and giving it a clean up and new screen. I'll post the results in a week or so. :D
 
Only an engineer would disassemble things to see how they fail, particularly a retired engineer who has more time on hand. :D

Or a kid, who might one day grow up to be an engineer! ;)

DW gave her IPhone a bath recently (the old phone in the back pocket of your jeans and bathroom visit trick).

Dried it out (fully assembled) and it's funky. Some locations on the screen are not touch sensitive. So I ordered a tool kit and new screen. I will be ripping the entire phone down to the Motherboard and giving it a clean up and new screen. I'll post the results in a week or so. :D

Hope this will work for you. One of the problems with these new products with their built in batteries is that you can't (easily) remove the battery when it gets soaked. Often, the real damage isn't from the water - it's from the electrolytic action of the battery voltage and the water. That action eats away at the copper traces on the PCB and other metals, creating permanent damage.

For products with a removable battery, the first step after a soak is always remove the battery, and then try to get it dried out.

-ERD50
 
Or a kid, who might one day grow up to be an engineer! ;)


Hope this will work for you. One of the problems with these new products with their built in batteries is that you can't (easily) remove the battery when it gets soaked. Often, the real damage isn't from the water - it's from the electrolytic action of the battery voltage and the water. That action eats away at the copper traces on the PCB and other metals, creating permanent damage.

For products with a removable battery, the first step after a soak is always remove the battery, and then try to get it dried out.

-ERD50

Thanks, but once you have the back cover off the Iphone, the battery is very easily removable.

The real issue is the water residue that got on the main board and connections, which is a bit more complicated to remove and clean. The battery is to replace a three year old one that is in the 4S DW is using. The phone was bought by me and the granddaughter used it until we got her a 5 model.

I'll be using DeOxit to clean the contacts, etc.

http://www.amazon.com/CAIG-DeOxit-Cleaning-Solution-Spray/dp/B0002BBV4G
 
It is wood cutting season for me. I've been cutting up trees and branches that fell on my lower property. I have 5 chains for my chainsaw and have always cycled them - bringing the dull chains in to a local shop and paying $7 each to have them sharpened. I watched a couple youtube demos on how to sharpen a saw blade - went and bought a 3/16 round file and started sharpening myself. It takes about 10 minutes to do a blade, and the results have been great! One less expense and hassle - the file cost $4
 
It is wood cutting season for me. I've been cutting up trees and branches that fell on my lower property. I have 5 chains for my chainsaw and have always cycled them - bringing the dull chains in to a local shop and paying $7 each to have them sharpened. I watched a couple youtube demos on how to sharpen a saw blade - went and bought a 3/16 round file and started sharpening myself. It takes about 10 minutes to do a blade, and the results have been great! One less expense and hassle - the file cost $4

Once you get by any hardened material on the tooth from grinding, it gets even better. I used to supervise 4 men running saws on a yard. They weren't experts, or even close. We had a filer that would grind them for us, did as good as I've ever seen with a grinder. When he left on vacation it was a disaster, his replacement would harden the teeth so badly they wouldn't cut for nothing.

The other great thing is DIY makes you more careful of 'stoning' the chain.
 
Or a kid, who might one day grow up to be an engineer! ;)

Engineers have an innate curiosity to want to know how things work. It came to my surprise that many people just didn't care. They would say "Whatever", or "I do not need to know", or "It's beyond me", etc...

Oh, but these people know how to draw, paint, play music, decorate, etc... so much better than I can. I don't get it. :)

Funny how that is. I am a pretty good engineer and mechanic (those two don't always go together). But I am terrible with colors. My DW has to set out color matched clothes for me or I just stand in the closet dumbfounded.
 
I think I am a good engineer (or at least my employers thought so and paid me accordingly), a middling mechanic (but a poor plumber), and I know a lot more mathematics than many math majors.

But my artistic skills are zero. Or my athletic abilities. I have never been on a skateboard, or skis. I was on skates once, fell on my butt and swore never again. I could not catch a ball if thrown to me.

But I could chew gums or smoke while walking, swim, and ride a bike. I think that's enough, no?
 
Or a kid, who might one day grow up to be an engineer! ;)

I didn't grow up to be an engineer but I did get yelled at for taking apart the vacuum cleaner when I was about 8. It would have been okay if I'd been able to get it back together....:LOL:

Funny how that is. I am a pretty good engineer and mechanic (those two don't always go together). But I am terrible with colors. My DW has to set out color matched clothes for me or I just stand in the closet dumbfounded.

It's even worse here, neither one of us is good with colors, but at least she is is a bit better than me. It's a clue when she says "You're wearing THAT?"

"Well, I was but I guess not."
 
When I was 14 or 15, one summer day, without anything to do, I cut apart a broken refrigerator compressor to see its innards.

It was done with a regular hacksaw, and took me an hour or two. I can still picture the motor and the little piston inside, and its oil bath for lubrication. Nowadays, a search on the Web would have satisfied the curiosity with much less work.
 
Then initiated manual defrost several times and a heat gun assist, got the ice out.

Heat gun! I didn't think of that.

The ice maker in my fridge is currently not working. It just stopped making ice. I'm thinking that there might be a clog in the supply lines, and was planning on defrosting the freezer next time I have some extra time. That heat gun might help a lot with that.

Unless anyone else has a better idea.
 
I don't know about your heat gun, but my heat gun can easily melt plastic or set things on fire. A hair dryer would be safer. The wattage is the same with both, but a hair dryer blows more volume of air, hence has a lower output temperature, and is not meant to burn.
 
I don't know about your heat gun, but my heat gun can easily melt plastic or set things on fire. A hair dryer would be safer. The wattage is the same with both, but a hair dryer blows more volume of air, hence has a lower output temperature, and is not meant to burn.

By all means! The plastics in refrigerators/freezers are made to be somewhat flexible at those temperatures so they're not quite so brittle, but that means they melt at much lower temperatures than "everyday use" plastics.
 
My heatgun has high and low settings and each can be further controlled by a pot from barely warm to melting solder if needed.
 
Heat gun! I didn't think of that.

The ice maker in my fridge is currently not working. It just stopped making ice. I'm thinking that there might be a clog in the supply lines, and was planning on defrosting the freezer next time I have some extra time. That heat gun might help a lot with that.

Unless anyone else has a better idea.

Caution with a heat gun and melting water! At the minimum, I'd make sure it was plugged into a GFI circuit that I just tested.

I've used pots of boiling water. Stick 'em in and close the door. Gotta be careful carrying pots of boiling water as well.

-ERD50
 
Should we warn this poster of the danger of running with scissors too?

Oh, [-]he's[/-] she's not using scissors. Never mind. :)
 
Heat gun! I didn't think of that.

The ice maker in my fridge is currently not working. It just stopped making ice. I'm thinking that there might be a clog in the supply lines, and was planning on defrosting the freezer next time I have some extra time. That heat gun might help a lot with that.

Unless anyone else has a better idea.

A cheap hairdryer works good for that and lots of other low temp jobs.
 
I recently defrosted my ice chest freezer. I emptied and put a small electric heater on the bottom of the chest on top of a plastic milk crate(to keep it dry). Propped the lid open about an inch top let heat out - slowly - worked great
Humidity is pretty low here in NorCal - need to defrost about every 3 years...now that my son is off at college maybe every 5 years. That kid would be in there 10 times a day looking for food to nuke :)
 
Not having a the fridge repairman's special cleaning nozzle with offset end intake. I ran 40 feet of air hose from the compressor in the garage and said to DW, kitchen will need cleaning after this. >:D

Please do post the video.... :dance:

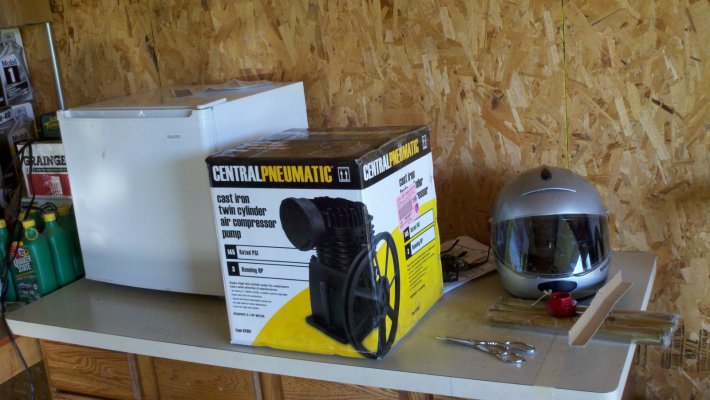
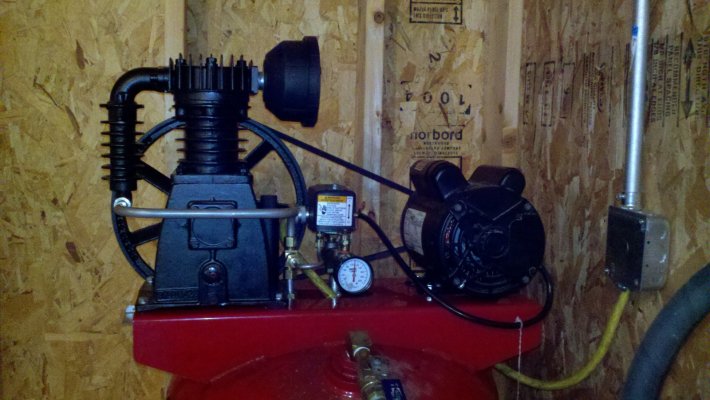
Latest repair was; my shop air compressor. When the old compressor pump croaked I dissected it and realizing the cause and effect issues were terminal, I sourced a replacement pump from Harbor Freight. Install was somewhat complicated as it was not an exact match, so drilling & tapping mounting holes, obtaining new sheave for motor, calculating length of belt needed, bending tubing to replumb compressor to tank and pressure switch, etc.

All in all a fun project, cuz it's not "work*" anymore, just playing with my toys.

(* work was really, really big compressors squeezing the heck out of stuff that was really, really bad for your health if it leaked out)
 

Attachments

  • 2014-09-17_16-11-26_120.jpg
    2014-09-17_16-11-26_120.jpg
    535.1 KB · Views: 7
  • 2014-10-14_14-00-07_224.jpg
    2014-10-14_14-00-07_224.jpg
    579 KB · Views: 8
Caution with a heat gun and melting water! At the minimum, I'd make sure it was plugged into a GFI circuit that I just tested.

I've used pots of boiling water. Stick 'em in and close the door. Gotta be careful carrying pots of boiling water as well.

-ERD50

How do you melt water:confused:;)
Just kidding.
 
I repair my garage mounted flagpole bracket after every major storm. The bracket bends very easily during the storm, so I bend it back afterward so that my flag is the proper angle to the wall - not 90° to the wall as in after the storm. But I'm now doing a major upgrade. Just ordered a 20' flagpole and dug a 3' deep x 18" diameter hole for a concrete base. I'll mount the flagpole in concrete and run electric for lighting when it gets here.
 
Status
Not open for further replies.
Back
Top Bottom