Your recent repair? 2013 - 2020

Status
Not open for further replies.
I went into the basement and heard a humming sound. It was my sewage pump, which I confirmed by unplugging it and the humming stopped.
I left it unplugged for a while, and googled for repair ideas :)
I plugged it back in and it ejected all the liquid, and kept running, which is the humming sound. So I unplugged it again.

Mine had the piggy-back type plug which the pump is plugged into. The first plug in the row is for the float switch.

After a few hours I plugged in just the pump, and it worked and stopped when I unplugged it.

So the issue seemed to be the float switch was stuck "on".

I bought a new one $19 , and then faced the horrible task of opening the sewage pit.

I poured in 1/2 gal of bleach with some water via the nearby sink hoping to sterilize whatever was in there. Then I ran the pump to empty the thing.

Then I unplugged the wires.

It is pretty easy to open, I cut around the edge to cut through all the caulking sealing it, undid the screw bolts that seal the 2 pipes in the lid.
The stack pipe was barely inside the lid, but I cut mine with a wooden saw about 1.5 feet from the lid (and later used a rubber flex join clamp to put it together).

I pulled out the stack pipe, and then undid the BOTTOM side of the 1-way valve on the discharge pipe and could then lift the entire top plate off the pipes and set it on the side.

The view was not pretty, but not as bad as I had imagined. I set a plastic blue tarp on the floor and simply lifted the short discharge pipe attached to the pump up , setting it all on the tarp (did also hold the wires).

I cut off the old float, and used the same plastic zip tie method to attach the new one to the pump. I also realized when the pump goes, I'll get a new one all set up with pipe attached and simply replace everything in the pit in 1 step.

I then lifted my repaired pump back into the hole, being careful to see the float would not get caught on anything.

I have left the lid unsealed for now, and after I know it works fine for a few days, I'll seal it shut with gobs of caulking.

I threw out the blue tarp as it had crud all over it :D
 
You win the Mike Rowe Dirty Jobs Award.

Congratulations. I think...

I went into the basement and heard a humming sound. It was my sewage pump, which I confirmed by unplugging it and the humming stopped.
I left it unplugged for a while, and googled for repair ideas :)
I plugged it back in and it ejected all the liquid, and kept running, which is the humming sound. So I unplugged it again.

Mine had the piggy-back type plug which the pump is plugged into. The first plug in the row is for the float switch.

After a few hours I plugged in just the pump, and it worked and stopped when I unplugged it.

So the issue seemed to be the float switch was stuck "on".

I bought a new one $19 , and then faced the horrible task of opening the sewage pit.

I poured in 1/2 gal of bleach with some water via the nearby sink hoping to sterilize whatever was in there. Then I ran the pump to empty the thing.

Then I unplugged the wires.

It is pretty easy to open, I cut around the edge to cut through all the caulking sealing it, undid the screw bolts that seal the 2 pipes in the lid.
The stack pipe was barely inside the lid, but I cut mine with a wooden saw about 1.5 feet from the lid (and later used a rubber flex join clamp to put it together).

I pulled out the stack pipe, and then undid the BOTTOM side of the 1-way valve on the discharge pipe and could then lift the entire top plate off the pipes and set it on the side.

The view was not pretty, but not as bad as I had imagined. I set a plastic blue tarp on the floor and simply lifted the short discharge pipe attached to the pump up , setting it all on the tarp (did also hold the wires).

I cut off the old float, and used the same plastic zip tie method to attach the new one to the pump. I also realized when the pump goes, I'll get a new one all set up with pipe attached and simply replace everything in the pit in 1 step.

I then lifted my repaired pump back into the hole, being careful to see the float would not get caught on anything.

I have left the lid unsealed for now, and after I know it works fine for a few days, I'll seal it shut with gobs of caulking.

I threw out the blue tarp as it had crud all over it :D
 
I bought a new one $19 , and then faced the horrible task of opening the sewage pit.
"Do I open that pit and face the consequences, or just burn down the house and call the insurance company? . . .choices). Double-gloved disposable nitrile gloves are your friend.

I poured in 1/2 gal of bleach with some water via the nearby sink hoping to sterilize whatever was in there. Then I ran the pump to empty the thing.
Hopefully that won't be too tough on the seals and gaskets of the pump. That can be a problem with high dose chlorine, but it sounds like it wasn't in contact very long.
 
A sewage pump repair's no big deal. I had a rock jam in mine. I put the pump in a 30 gallon trash can to test it, and my father plugged the pump into an outlet. I had no idea it'd empty that trash can of sewage water on my head in about two seconds.

I just had the dented and scratched pickup truck bed of my 2003 F250 diesel pickup repaired and painted. Now, my 124K mile truck looks like new and it's a piece of gold on the used truck retail market.
 
Replaced two broken sway bar connectors on winter beater truck. $22 for the pair + my labor of 1hr. 40 minutes of which was for hacking off the old borken rusted to hell bits.

And found 4 used Mud and Snow tires on craigslist with half tread for $140.- Only two miles from my house. Paid a tire shop for mounting on the rims and balance $ 48 cash. Ah likes a good deal!
 
For the sewage pump repair, I did wear nitrile gloves and moved slowly to not splash much "water" around.

The weird thing about this repair, is you cannot really test it until you put it totally back together, at least that was my thought unlike Bamaman :D
 
Just replaced the water shut-offs under the sink. While contorted around the disposal and drain pipes, I managed to get the wrench to slip off the tiny little flat spots the valve has for tightening it to the water supply pipe and have it cartwheel into my mouth. Thought I had chipped a tooth but only came out with split lip.
 
Replaced toilet water valve.

"Repaired" a fridge door at a rental. Seems they let containers fall behind a shelf so it was sticking out just far enough to keep the door open slightly. Makes you wonder how they managed to pass a drivers test. Which makes me extra vigilent about keeping auto and life insurance up to date!
 
98 Lincoln Signature Town car...
Small leak in air suspension, which allows car to lower when sitting for several days. Since this means the air pump runs when the suspension is active it turns on and off every few minutes. The solution that has worked for a year, is to go into the trunk, turn on the suspension switch, then turn it off when the car levels. A nuisance, but it beats the dealer alternative of replacing the suspension components at a cost of $2500, or non-air suspension alternate for $1500... The Dealer trade KBB price is $1094 for the whole car.

Still, the once in a while aggravation of opening the trunk and turning on the switch is a pain. Then... quick google solution...
Simple run of wiring the switch into the front on the dash... on and off... :facepalm: Duh...

Based on the miles we drive, s/b good for another 10 years. :dance:

Sounds good. If you do need to get it fixed at some point, there are generic components at far less than dealer replacement that will do the job just as well if not better at a fraction of the cost.

DD had a Caddy Catera with air leveling that was acting up. I was also shocked at the prices for the (non generic) components, even if I did the install on my own. After some inspecting, I found a corroded contact in the connector to the controller, mounted under the chassis (it might even be mentioned somewhere earlier in this thread!). I ended up just soldering a jumper wire around that bad contact - worked ever since (well at least until we sold it).

-ERD50
 
Rearranging the chore list after some bad luck on replacing the headliner in the Trans Am.

I was getting into the small back seat, just to look around back there, not even doing anything yet, and managed to sit down awkwardly on top of a seat belt which reached the limit of its travel and jerked on the seat belt retractor, jolting the seat belt retainer clip which held up the headliner. Retainer clip broke immediately, popping out about a quarter inch from headliner, permanently (unless fixed). PITA to fix it. Some variation of the Heisenberg principle? Watching the event changes the event? Looking at the project causes project to explode?

Am now looking for another project that won't fight back. :LOL:
 
I have a 2005 BMW 545i. It has had zero problems till this year. I had to replace gaskets and a pump--$5k. Now I have to replace the coils--$1300. Then I also did the front and rear brakes $1.5k.

I love this car and it still looks great but I'm starting to have second thoughts about holding on to it.

Sent from my SM-T237P using Early Retirement Forum mobile app
 
Rearranging the chore list after some bad luck on replacing the headliner in the Trans Am.

"A change in aggravations is as good as a vacation" (I heard this somewhere, it stuck)

I was getting into the small back seat . . .
You know better than that! That seat isn't for human occupation, it's only there to reduce the insurance rates.

Retainer clip broke immediately,
Plastic? I detest the plastic clips that are in cars now. They get brittle and break on their own, or when trying to do any service. Finding the exact replacement can be a PITA. How much could it really cost ($$ and weight) to use metal clips, or screws?

I don't enjoy replacing fabric headliners, and have never gotten a result with which I was satisfied. Like wallpapering a bathroom.
 
German cars!

Step son's 2005 Mercedes C230 Compressor (4 cylinder, supercharged).

Was having misfire problems on cylinder #4. OBDII meter indicated possible bad coil. $64 for a new ignition coil and 10 minutes t change it and all was good.;)

Also did front and rear brake job with new rotors and ceramic pads. Parts cost was $320. Stops good now.

If you are going to own one of these fine German cars, it pays to maintain them yourself. Of course, the step son can barley find the hood latch, so it's me that handles the work. At least he pays for the parts. :D
 
Step son's 2005 Mercedes C230 Compressor (4 cylinder, supercharged).

Was having misfire problems on cylinder #4. OBDII meter indicated possible bad coil. $64 for a new ignition coil and 10 minutes t change it and all was good.;) ...

You got off cheap (and easy!) - DD's Caddy Catera (actually a re-badged Opal Import) had a bad coil. Fortunately, I researched the price on-line before the independent mechanic called with a quote, or I probably would have assumed he was trying to rip me off. Forget the exact price, but it was $200-$400 for this coil, a fancy thing with 3 separate sections in the same case for a V6. Replacing was very involved, LOTS of stuff had to be removed to get to it (entire WW assembly, and much more), so I decided against DIY for that one.


Thanks, I've bookmarked it. Agree with samclem, those things are a pain.

-ERD50
 
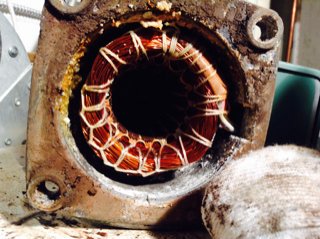
Spent 3 hours working on a Taco circulator pump yesterday - it was leaking - and I thought it was a simple O ring replacement - still leaked after replacement- so I started investigating further and found a flaw in another gasket that is part of the cartridge - I took many pictures then put some silicone in the thin part of the gasket - it doesn't leak now but the leak got into the dry sections- motor coils - so the damage is done - it could last another 5 years or 5 months

I'm hoping Taco will give me a break on a new pump - 7 years old with a 3 year warranty - we've only lived here for a year so I don't know who put it in ImageUploadedByEarly Retirement Forum1431894550.076433.jpg
 
Replacing the water heater right now. Roof will be replaced within the next month. Then repairs should be done and I can start planning fun stuff like my new bbq/smoker area. :)
 
AC work on my 99 suburban. Had a large leak. So bad, no vacuum could be pulled. Turns out the aluminium plumbing to the rear AC is prone to leak at every fastening clip along th 18' length of the two pipes. Read enough stories of Dealers wanting $1400- plus labor of around 4 hrs and up for repair.

I ordered a set of blocking plugs to Isolate the rear Evaporator. $ 50.- . Today installed the plugs, minor PITA. Checked the orifice tube, clean -good news, no junk or compressor bits floating around in the system. Rear AC has TXV, theoretically it is also clean. Pulled vacuum for 1/2 hour, then let sit for another one hour to see if it holds vacuum. It did. Added dye and refrigerant. Front AC now works. Maybe next spring I'll go for a set of replacement hoses to the rear, $300.- or so.
 
"A change in aggravations is as good as a vacation" (I heard this somewhere, it stuck)

You know better than that! That seat isn't for human occupation, it's only there to reduce the insurance rates.

Plastic? I detest the plastic clips that are in cars now. They get brittle and break on their own, or when trying to do any service. Finding the exact replacement can be a PITA. How much could it really cost ($$ and weight) to use metal clips, or screws?

I don't enjoy replacing fabric headliners, and have never gotten a result with which I was satisfied. Like wallpapering a bathroom.

LOL. I did find some replacement clips on eBay. Prices ranged from $32 brand new, down to $10 used, for one clip. Free shipping. Anyway, I think I can live with it for now, just won't look at it. Lots of cracks are already there on other plastic parts involved, too. I had much better luck repairing both flip-up headlight motors, which I thought would be a much more challenging job than the headliner !
 
I just replaced the turntable motor in our microwave. This may be an easy task for the regulars in this thread but I'm a klutz with no mechanical skills. The microwave fits a tight space and I didn't see anything close to the same dimensions, so repairing it was a big deal. :)
 
Since last week....

1. Pulled garbage disposal and removed small screw that found its way into it and jammed it up.

2. Changed oil on the 2013 Hyundai Santa Fe and ordered a Fumoto Valve and 6 OEM oil filters.

3. Service granddaughter's 2010 Ford Focus: oil and filter change, new air filter element, got windows tinted ($135 at a local tint shop). She's good for next college semester now.

4. Stepson's 2005 Mercedes C230 Compressor: New No. 4 cylinder ignition coil, replaced a 4 spark plugs, new air cleaner element, oil and filter change, replaced broken headlight assembly. (car was a mess)

5. Added HID lighting to my 2014 Passat trunk so I can see in it at night. Factory light is useless.
 
The microwave fits a tight space and I didn't see anything close to the same dimensions, so repairing it was a big deal. :)
Congrats, did you find some guidance (e.g. troubleshooting to determine if the motor itself was the trouble) and the part online? I gotta say, I'm lazy enough that I probably would have just lived without the turntable, but now I'm inspired to try the repair if ours crumps out.
 
Status
Not open for further replies.
Back
Top Bottom