Your recent repair? 2013 - 2020

Status
Not open for further replies.
Installed a new CV half-shaft onto my RV toad yesterday.

The dinghy was dragged to Alaska and back last year, on a 10,000-mile trek. On dust roads, it picked up all the sand and mud kicked up by the mothership, which found its way inside the CV joint because the boot was torn.

It should have been an easy job, but the lower ball joint was stuck and took 2 days to remove. ARGHHH! It's amazing how stubborn it was, considering that the parts had no rust, and when they finally came apart, the mating surfaces looked new.

After all the pounding, I left a lot of dents on the pickle fork, but it was the $20 Harborfreight ball joint separator that got the job done with a lot of pounding to assist.

When I pulled the CV shaft out, it came apart in 2 pieces. The innards of the joint were all chewed up. Yikes!

The car drives like new now. Will wait a while before contemplating replacing the other side, which was not damaged because the boot was intact.

The car suspension was amazingly tight, despite having 169K miles on the odometer. Both lower and upper ball joints showed no sign of wear, so I just replaced the boot that was smashed by the pickle fork. I already ordered ball joints on eBay which have not arrived. Not sure what to do with them now.
 
Last edited:
That lasted twice as long as the Paper Mate pen. It looks like there was some twisting of the UHMW-PE, not just wear. I'm going to Home Depot to look for a nylon bolt that I can file into a shaft.

BTW, UHMW-PE isn't hard to file. It was so easy that I'm thinking it could have worn out spinning in a metal hole for a couple of minutes, but I'm hoping it was a strength issue that nylon will fix.

Isn't UHMW-PE much stronger than nylon?

Interesting fix, can you post some pictures? But for the $20 part, and you already have an $8 failed attempt, maybe just buy the part?

Funny thing, I've been saving the barrels/parts of old pens, and throwing them in my "random parts" box. Every once in awhile, the plastic or metal tube is just what I need for a repair.

-ERD50


I use my smallish metal turning lathe so often for projects like this, it has become an essential shop tool.
I don't think in terms of payback $'s, it's more for the convenience and ability to complete unique repairs.
 
Isn't UHMW-PE much stronger than nylon?

Interesting fix, can you post some pictures? But for the $20 part, and you already have an $8 failed attempt, maybe just buy the part?

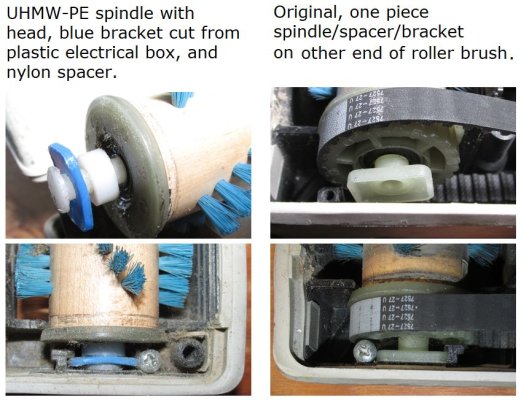
Maybe I'll open it again tomorrow and clean up the other ball bearing and take pictures of my fixed part. I fixed it tonight without trying nylon (Home Depot doesn't sell nylon bolts, at least not in my local one). UHMW-PE actually worked (It's more wear resistant and more flexible than nylon but not as strong in other ways and it looked like I needed twist resistance). I originally thought the sealed ball bearing was a bushing but then I saw a YouTube video. I cleaned and re-greased the bearing, then I made a spindle that fits tight so there's no rubbing. I had the vacuum going for about 10 minutes until the bag was full so I think it's good enough now.

So $8 plastic, $4 grease, and several hours of work saved me $8.

Oh, and $1 for spacers and $1.31 for a plastic plate for the bracket, which I ended up not needing because I had spare plastic for that. So I saved less than $6. I have spare plastic and grease though.
 
Last edited:
Fuel filter and fuel pressure regulator change on my 2002 BMW.

These Germans overthink everything on their cars. The regulator "regulates" the fuel pressure to the injectors and it is under the car and vacuum operated. Why not build that regulator into the in-tank fuel pump instead? (The vacuum hose crumbled when I touched it):facepalm:
For good reason.

The system that Ford used for many years on F-L-M cars and trucks with MFI (Multiport Fuel Injection) used a fuel rail with a shunt regulator. The fuel pump supplied fuel to one end of the rail. Each injector was fed from the rail, the output of each injector fired fuel into the intake manifold right by each intake valve. At the end of the rail was the fuel pressure regulator. As a shunt regulator, it would bleed fuel back to the tank via a return line, at a rate that would keep the rail pressure at a specific value. The goal was to keep the pressure drop across the injectors at 39 PSI at all times all conditions.

Remember that the intake manifold's vacuum varies greatly depending on the opening of the throttle butterfly in the throttle body. So the fuel pressure regulator has an internal spring that sets a basic fuel pressure, but that pressure value is modified via a rubber diaphragm that has intake vacuum on one side, the vacuum via a hose connection from intake manifold. With a set pressure drop across the injectors, the PCM varies ON time of the injectors to meet the demands. As the pressure is constant, X time ON for an injector equals Y amount of fuel delivered. And on the fuel rail was a Shrader valve, where one could easily connect a fuel pressure gauge to check pressure.

These systems were very reliable, I have had only one regulator ever fail, it became more restrictive, jacking the rail pressure way up, and the PCM cut back the injector ON time, using the Oxygen sensor output when in closed-loop mode, to set a fractional fuel-delivery multiplier in a table. So it continued to run well!

The end of the era of the shunt-regulate-fuel back-to-the-tank method was caused by tightening emissions. The shunt method would warm fuel in the tank some, since it was passing fuel through a hot engine compartment, increasing evaporative emissions.

So the next step was Returnless Fuel Systems, which PWM the electric fuel pump speed up and down. There is no return. There's also no place to check fuel pressure without disconnecting a line and inserting a tap.


Want to see a really wild BMW? get the 200x 740i-whatever that has the 5.4L V-12! Two of everything! A V-12 made from virtual melding of two in-line sixes together! And even more odd stuff, like a water-cooler alternator, etc.
 
Last edited:
....

The end of the era of the shunt-regulate-fuel back-to-the-tank method was caused by tightening emissions. The shunt method would warm fuel in the tank some, since it was passing fuel through a hot engine compartment, increasing evaporative emissions.

So the next step was Returnless Fuel Systems, which PWM the electric fuel pump speed up and down. There is no return. There's also no place to check fuel pressure without disconnecting a line and inserting a tap.....

Interesting insights. I was under the impression that some sort of return was still used in fuel systems. As you say, this would warm the gas in the tank slightly, but that would seem very minor to me - gallons of gas in the tank, versus a small amount in the line, that also would cool down as it travels back. The gas tank and lines are metal (some modern tanks may be plastic?), so will loose heat to ambient quickly.

And the positive I had always heard was it prevents vapor lock - the circulation keeps any hot spot at a more moderate temperature. I haven't really heard about vapor lock issues in modern cars.

-ERD50

My last VW diesels, six of them, had a variety of fuel pumps, return lines, injection setups, and regulators. The ALH (1999 - 2005) motors had a mechanical pump with internal regulator and a fuel return to the tank. It had very simple injectors.

My PD ("pump duce") (2006) had a system where the injectors contained the final pump (it also had an in tank pump and a camshaft driven pump that made vacuum also). This also had a fuel return to the tank.

The 2014 VW Passat TDI had a common rail setup with two engine driven fuel pumps and an in tank lift pump. The final pump was high pressure one that delivered fuel into the rail at upwards of well over 20,000 PSI. The pump had a fuel line back to the tank.

This BMW has a split gas tank (two compartments) and a siphon line on one side and a fuel pickup on the other. The siphon line is off the large fuel filter back to tank with excess fuel.

You gotta love these German cars for their complexity alone. I can't even start to explain the vacuum system on the BMW!
 

Attachments

  • vacuum-repair.jpg
    vacuum-repair.jpg
    113.1 KB · Views: 39
Well, I am fixing the cabinet doors in the bathroom... when we had it redone they put in new hinges... well, a few of the doors have become lose and are not closing properly.. seems that they drilled too big of a hole and used the wrong screws..


SOOO, using the git rot (?) that was recommended for my boat problem... have filled in the holes and will be reattaching the door tomorrow is I get the desire to do so :LOL:
 
Interesting insights. I was under the impression that some sort of return was still used in fuel systems. As you say, this would warm the gas in the tank slightly, but that would seem very minor to me - gallons of gas in the tank, versus a small amount in the line, that also would cool down as it travels back. The gas tank and lines are metal (some modern tanks may be plastic?), so will loose heat to ambient quickly.

And the positive I had always heard was it prevents vapor lock - the circulation keeps any hot spot at a more moderate temperature. I haven't really heard about vapor lock issues in modern cars.

-ERD50
Years ago when returnless was first talked about, I thought it was an overkill, decided to slip under the rear end of one of our body on frame cars after 1/2 hour or so of shutdown after a long run on a hot summer afternoon. By hand touch, the gas tank was noticeably warmer than other metal, like trunk floor or frame (I stayed away from the exhaust pipe and muffler to avoid biasing it). How much warmer, dunno. I had read back then that the drive was to reduce evaporative emissions that could overload the evaporative storage and purge systems. A returnless system, theoretically, would also tend to have less leaks, and therefore less evap system monitor failures under OBD-II.

In general, the move to fuel injection from carburetors pretty much removed vapor lock as an issue. Using the Ford shunt/return system as an example, when running, the fuel is under more than enough pressure, even with all the fuel rail and lines under the hood, to prevent gas bubbles (vapor I mean) from forming in the lines heading towards the injectors.

When the engine is shut off in hot weather, the underhood temps go way up, heat soak. To avoid vapor lock restart problems after a hot shutdown, it is important to keep the lines/rail underhood pressurized for hours to avoid vapor bubbles forming. So the fuel pump in the tank has a check valve in its output, the injectors act like shut valves, and the fuel pressure regulator closes the shunt return path at its calibrated spring pressure. Over many hours, the system slowly bleeds down, and the underhood heat is gone by then. In fact, one of the crank-no-start, or run missing badly on hot start-up tests was to verify that fuel pressure stays up for a long time after the engine is shut off. Tested by putting a fuel pressure gauge on the Shrader port on the rail.

All of my comments pertain to Gasoline vehicles. Gasoline has a much higher vapor pressure than Diesel fuel. And gas that is a 10% ethanol blend has an even higher vapor pressure!
...As I finally figured out back in the mid-1980s. Our ordered new, then a few-years-old VW made in Westmoreland PA., perfect-running 1.6L gas engine with Bosch CIS mechanical fuel injection (a mechanical analog FI system that varied fuel pressure on continuous-spraying injectors) began to start having epileptic fits on warm restarts, wonderfully timed such that going into a store for say 10-15 minutes would do it. It was the increased vapor pressure due to the newly-added alcohol that did it. I figured that one out myself, later came across an old magazine article years after we no longer had the car, that explained it. My solution then became only to buy Standard, or maybe they had renamed themselves Amoco then, gas, as they were one of the last to go to alcohol added. When it went into the fit on hot restart, it would run on 2 cylinders, and totally ignore the gas pedal. And it would keep on running in fit mode, jumping all over. Letting out the clutch in gear would kill it with a really nasty jolt. It was better just to turn it off, and restart again. And again, and again if needed, until it had consumed most of the vapor bubbles, then it ran fine.

BTW, VWs and Audis with the Bosch CIS made the characteristic "ringing sound", that if you had one, you could recognize the sound over a block away, brain would tune in to it. If I was outside, I could always tell when DW was about to arrive.

And so ends the trip down memory lane :D

...... But I'm still bummed out about that crappy Motorola alternator, and also some assembly idjit in PA that garfed up the internal-hex cap screws that held the inner CV joint to the transaxle output flange, such that I laid on a cold garage floor for two nights at 15 degrees, my breath vapor obscuring the work at hand in the light of a 75 watt bulb trouble light. As I tried to come up with a way to get it off, so I could change out the outer CV joint, that had ripped its boot, grit went in from snow, and croaked the joint.
 
Got home from shopping over the weekend and smelled the distinct odor of fried brakes. A quick walk around the car and a light touch on each of the wheels revealed a much hotter than normal left front wheel.

The culprit was a stuck left front brake caliper. Found a rebuilt caliper in stock at the local auto parts store (surprising since most carry almost no inventory anymore), swapped it out along with a new set of pads for the front, and the job was completed before the old caliper reached ambient temperature. Just in time before the next snowstorm.
 
New oil leak, bad alternator, what else?

Still working on my 2002 e46 BMW convertible "maintenance exercise" for this winter. The cooling system has been replaced ($350 in parts, my labor), and the oil filter housing gasket (seal) and fuel filter has also been replaced.

I also adjusted the parking brake. :cool:

Oh, transmission and rear differential gear oil was changed too!

I noticed a loud bearing "squeal" when the car was started with all the new work; it appears the alternator pulley bearing is about to crap out. I listened to it with my stethoscope and can hear the warmed up bearing rumbling. The squealing stops a few seconds after a cold start.

So the original alternator is on my "short list" to replace and I will hunt for the best price on a NEW (not refurbished) Bosch unit - 120 amp. Easy to change out.

Also, an additional oil leak has surfaced. This appears to be from the oil pan gasket. Ugh! This will not be a fun change out. To get the pan off, the subframe and steering rack has to be dropped down a foot or so. Looking at U-Tube videos, it's not that complicated, just a bunch of underneath time and a upper support beam for the engine to hold it up as the motor mounts are disconnected. One is leaking anyway. :(

Well, I was wondering what to do with myself for the next few weeks before it's top down weather here.
 
Well yea, but it is a BMW!

Yes, first one I have ever owned. At least it's old enough for me to work on. After 2007, they got real complicated and dealer tools were required to do anything.

If I desire more punishment, I could always upgrade to an old Mercedes.
 
An electric fan that is approaching 10 million minutes of operating time for me finally developed its first problem, a break in its power cord. I snipped out that section, reconnected the wire, and now it has started on its second 10 million minutes of service. Some electric motors seem practically indestructible.
 
An electric fan that is approaching 10 million minutes of operating time for me finally developed its first problem, a break in its power cord. I snipped out that section, reconnected the wire, and now it has started on its second 10 million minutes of service. Some electric motors seem practically indestructible.

What?? It needed a repair is less than 20 years of operation! Horrible :cool:
 
I don't know if this qualifies as a repair, but I just removed heavy calcium build-up from my pool tiles with a $30 abrasive blaster from harbor freight. I paid $850 to do this work in 2013 and the quote this year was $1350 so I decided to try to do the work myself. The results were amazing. I posted a video on YouTube to demonstrate how it was done.

 
Thanks for sharing.

I have wanted to do this on my pool for more than 10 years using Harbor Freight equipment and material, but did not know how well the process would work.
 
Thanks for sharing.

I have wanted to do this on my pool for more than 10 years using Harbor Freight equipment and material, but did not know how well the process would work.

My wife and I always consult YouTube when I have a repair problem at home or with our cars. I couldn't find a video on YouTube that documented the process in sufficient detail. I thought it would be a good idea to return the favor to the YouTube community by creating one. The best part of this was that I can re-use the material and tools for another project.
 
What?? It needed a repair is less than 20 years of operation! Horrible :cool:

I've had the fan for about 40 years. The ends of its spinning blades have travelled over 1 million miles. Appliances from the 1980s are durable beasts.
 
My wife and I always consult YouTube when I have a repair problem at home or with our cars. I couldn't find a video on YouTube that documented the process in sufficient detail. I thought it would be a good idea to return the favor to the YouTube community by creating one. The best part of this was that I can re-use the material and tools for another project.

Another thing I wonder about is whether a 2-HP compressor would provide a sufficient airflow volume for the job. And it seems to work OK for you.


Being the extra cautious type when it comes to my lung health, I would add breathing protection to avoid the possibility of inhaling the fine silica dust when blasting.

Good job on the video.
 
I don't know if this qualifies as a repair, but I just removed heavy calcium build-up from my pool tiles with a $30 abrasive blaster from harbor freight. I paid $850 to do this work in 2013 and the quote this year was $1350 so I decided to try to do the work myself. The results were amazing. I posted a video on YouTube to demonstrate how it was done. ....

Fantastic Job, and you saved so much money :flowers:
 
Being the extra cautious type when it comes to my lung health, I would add breathing protection to avoid the possibility of inhaling the fine silica dust when blasting.

Good job on the video.

Ugh! Thanks for the reminder.
 
Status
Not open for further replies.
Back
Top Bottom