Laminate Flooring/Cabinetry Install

One last post. This is a humble brag of a recent installation I did. :)

Sorry about the grab bar, that's what I was taking a picture of. In the back is the same Lifeproof you see in the previous posts. Spot the seams. Difficult? Yep, that's the point. The seams on this brand should never jump at you.
 

Attachments

  • laminatebrag.jpg
    laminatebrag.jpg
    184 KB · Views: 21
Last edited:
Excellent information!!
If I have learned one thing it is, not to go cheap and installation of correct locking is a priority. It looks simply but will need to be done without error.
 
.... I will need to have a couple spots where vinyl plank flooring meet with carpet. I will need to install an expansion joint or seam to keep the floatation on floor. Will need to see how that install is done.

Our LVP meets with tile and previously met with carpet until we replaced the carpet with more LVP. I watched the installers do it. There was a channel piece that was fastened to the floor along the tile/carpeting edge and then a T-shaped transition that then snapped into the channel piece and partially covered the carpet and the LVP. Just keep the edge of the LVP a little away from the edge of the channel to allow for expansion.

gray-oak-newage-products-vinyl-trim-12031-64_145.jpg

pb4uski, that is exactly our plan also for the future. That is the joint I was trying to find for that application and hoping there was a solution product for it.

Kind of looking forward to the project but when I look at the whole picture with cabinetry/flooring it can be overwhelming. Lol

Have to look at it as one project at a time and make it fun.
 
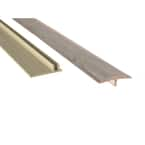
Agree with pb4uski on using the T channel. You can first place the U portion, and then when installing the LVP, you have a reference for your expansion gap.

One warning on this stuff. Many of the brands are one and done. This is especially true on the versions that use a crushable fiber on the T portion. Once you place it down, you will damage it pulling it up. You can actually say that for almost any transition strip.

I recommend cutting a few inches off (you almost always have extra) and experimenting with it before you put down the full threshold.

On this latest work I did on the youth camp, we felt it would have quite a bit of abuse so we went with the traditional aluminum transition strip. I nailed it too hard. But, hey, it is what it is for now. We're probably going to replace that carpet soon anyway.

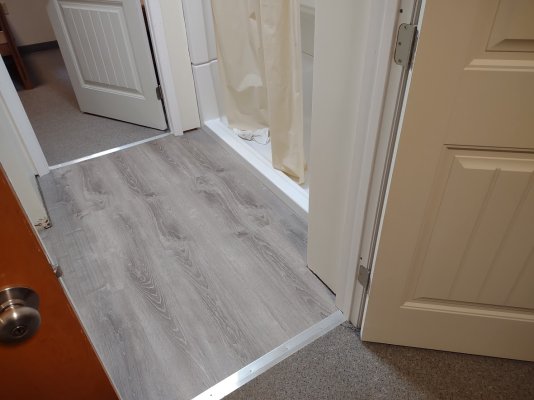
This picture is less of a humble brag as it may not be my best work (especially my cut at the door casing), but it gives you an idea what it will look like. We also accidentally lined up the knot pattern. Try to avoid that. I was focused too much on the seams and not enough on the big picture. More truth on some of my workmanship glitches. :facepalm:

Oh, another thing. This LVP transitions to a shower. We decided to leave the gap more like 3/16" and fill it with high quality silicone caulk. The small floor is going to have to expand in the other direction, although the caulk has some give. These are the trickier situations.
 

Attachments

  • transition.jpg
    transition.jpg
    153.6 KB · Views: 22
Last edited:
I agree that LifeProof is a bit tricky if you haven't done a laminate floor before. You also need to watch that you don't damage the interlocking edges as they can be delicate. The Pergo is much easier to install and maybe the "waterproof" version would be fine in a kitchen. If you do get LV from Home Depot, don't get the LifeProof knock-off that the sell for about a $1 less a sqft. I did my stairs in it and it is terrible. About transitions: they make them and they are easy to install, but > $35 buck for a piece of colored MDF? If you have a table saw it is very easy to make a transition strip and stain it. Granted it takes a bit to match the color.
 
My son bought a house in Florida and a relative told him it would take two days with his help.

One week later, it was time to go home.

We didn’t get the help we needed and gave up halfway through.

He got 3 estimates and hired the ones who had best reviews and “interviewed” them first.

They did a great job, and guided him through the custom transition where stair carpet met floor.

85% of the job is not too hard. It was the 15% fitting, spacing, transitioning to new sections (or not), time crunch that “killed” us.

I may attempt our bedroom in the future, but never an entire second floor at once 🤦*♂️. I need someone who does it often to guide me through the “gotchyas”
 
There is definitely a learning curve, but I think with all the video on how and great advice from installers experience I can work through it.

jrendt, yes, an expansion joint, could easily be made from a piece of wood to accommodate the desired wide also.
 
pb4uski, that is exactly our plan also for the future. That is the joint I was trying to find for that application and hoping there was a solution product for it.


Kind of looking forward to the project but when I look at the whole picture with cabinetry/flooring it can be overwhelming. Lol


Have to look at it as one project at a time and make it fun.
Yup... How do you eat an elephant... one bite at a time.
 
I've done some remodel. I see lots of great info in here and have a short list to add:
1) after you demo, chase any squeaks or creaks in the subfloor.
2) I was working with a less than perfect subfloor. I sized the floor with a rockhard or similar product, and sanded off the highs with a belt sander. Make flat first and any product does better. I am also a fan of thin underlayments where it makes sense.
 
I've done some remodel. I see lots of great info in here and have a short list to add:
1) after you demo, chase any squeaks or creaks in the subfloor.
I had a few squeaks in my remodel. Put several construction screws through the subfloor into the floor joists below in the squeaky areas until the squeaks went away.
2) I was working with a less than perfect subfloor. I sized the floor with a rockhard or similar product, and sanded off the highs with a belt sander. Make flat first and any product does better. I am also a fan of thin underlayments where it makes sense.
+1. The pros that did my condo did a thorough prep job of leveling with liquid floor leveler. When I did our house redo, I had 1 low area that I filled in with a few layers of roofing felt, and then put down new plywood underlayment (1/4 or 3/8 can't remember) over the whole existing underlayment, stapling with an air gun every 6".
 
I've done some remodel. I see lots of great info in here and have a short list to add:
1) after you demo, chase any squeaks or creaks in the subfloor.
2) I was working with a less than perfect subfloor. I sized the floor with a rockhard or similar product, and sanded off the highs with a belt sander. Make flat first and any product does better. I am also a fan of thin underlayments where it makes sense.
Thanks!
Yes, that could be easily forgotten. I also may do an underlayment once I get to that stage.
 
Back
Top Bottom