Finance Dave
Thinks s/he gets paid by the post
- Joined
- Mar 29, 2007
- Messages
- 1,862
If it’s a crosscut yes, if it’s a rip cut you won’t need it. I use a combo blade with the above and have no issuesAnd it helps to use an 80 tooth blade
If it’s a crosscut yes, if it’s a rip cut you won’t need it. I use a combo blade with the above and have no issuesAnd it helps to use an 80 tooth blade
I'm a hobbyist woodworker and a handyman, and here is how you deal with that.
1) Set up the tablesaw fence to cut the 1/16" off. Install a zero clearance throat insert.
2) Set your blade height to about 1/64".
3) Apply painters tape to the edge you are going to cut.
4) Install a featherboard that applies pressure downward to your thin piece of plywood...or put a weight on top.
5)Place your piece on the saw good-side-down, and make the cut....basically this "scores" the material.
6) Raise the blade to where the gullets on the blade are just above the thickness of your material.
7) Make a second cut
DONE
I have done this hundreds of times with ZERO tear out.

I prefer can lights. And they now make some flat LED ones you can use with a dimmer....you can install from below. Just make sure to get a color of light you want....measured in degrees Kelvin.I’m planning to start a second shed soon. Need to order the supplies and I’m afraid to find out how much things have gone up since last summer. Originally I was going to do a saltbox shed but I vetoed the idea. Instead I’m going to make a variation of a shed that I built before. The difference is that the entrance will be in the front with two full sized windows. I also plan to make a small shed dormer on the front. Lastly I will use cedar shingles for the upper half of the siding.
This shed will be my gardening shed. My previous shed is more of a workshop shed.
I’m also finishing up some indoor painting. My next project will be to put some light switches in our living room since you have to go in blind to turn on a light. I haven’t decided whether to put some can lights in the ceiling or to have it control an outlet for a floor lamp.
If you have experience with can lights in your living room, do you like it better than floor lighting?

I've got a home repair job that's not worth pictures, but needs to be done. We have really nice cherry cabinets in our kitchen, as well as the bathrooms and living room. They've got the concealed hinges on them. There are also these little rubber buttons that keep the doors from slamming wood on wood. The house is 13 years old. For some reason last winter every one of those little buttons went soft and sticky. No reason I can determine, we've kept the house at the same temperature and everything for the past 8 years since we became snowbirds. I'm suspecting planned obsolescence. So now we have to tug on the cabinet doors to open them. It's a minor inconvenience. But I need to scrape all the sticky debris off the doors, rub them down with Goof Off or something, and put new buttons on. Lots of door and drawers, what a PITA.
In our new house we have the self closing hinges, which are nice. But when we get used to them we come back to the other house and slam the cabinet doors for awhile before we adjust. So I think I'm going to replace the hinges with the self closing types too.
I haven't told my wife my plans yet. She thinks this is the funniest meme she's ever seen:
I've found the rubber tip disintegrates & turns into goo on door stoppers as well...but at least those are easy to replace if you catch them in time.
1. 2700 to 3000K is a color temperature similar to the warm yellow of incandescent lights.I prefer can lights. And they now make some flat LED ones you can use with a dimmer....you can install from below. Just make sure to get a color of light you want....measured in degrees Kelvin.
1. 2700 to 3000K is a color temperature similar to the warm yellow of incandescent lights.
2. Do those LED can lights have replaceable bulb elements? I'm not a believer in the last forever thing.
No, you just replace the whole cover. The LEDs are inside it. It's really simple. It's not really even a can, just a short thing that looks like one. I've been replacing old can lights with the new LEDs. Definitely an improvement. The retrofit LEDs have a wire with a standard E26 end that screws into the socket where the old bulb went, then pop the cover on and you're done. I haven't installed any new ones hardwired, but I'm pretty sure replacing them (in a decade or so) will be pretty easy too.


Have you ever had issues pouring paint out of a can, and the can gets paint in the little groove around the lid and makes a mess? Try this...
Apply painters tape in a "vee" pattern
Harley, sorry I’m late on this but try these...I've got a home repair job that's not worth pictures, but needs to be done. We have really nice cherry cabinets in our kitchen, as well as the bathrooms and living room. They've got the concealed hinges on them. There are also these little rubber buttons that keep the doors from slamming wood on wood. The house is 13 years old. For some reason last winter every one of those little buttons went soft and sticky. No reason I can determine, we've kept the house at the same temperature and everything for the past 8 years since we became snowbirds. I'm suspecting planned obsolescence. So now we have to tug on the cabinet doors to open them. It's a minor inconvenience. But I need to scrape all the sticky debris off the doors, rub them down with Goof Off or something, and put new buttons on. Lots of door and drawers, what a PITA.
In our new house we have the self closing hinges, which are nice. But when we get used to them we come back to the other house and slam the cabinet doors for awhile before we adjust. So I think I'm going to replace the hinges with the self closing types too.
I haven't told my wife my plans yet. She thinks this is the funniest meme she's ever seen:
They replace the baffle, trim ring and bulb all in one unit. Very easy. I installed these years ago (no failures yet) and my electric bill immediately went down $10 a month.
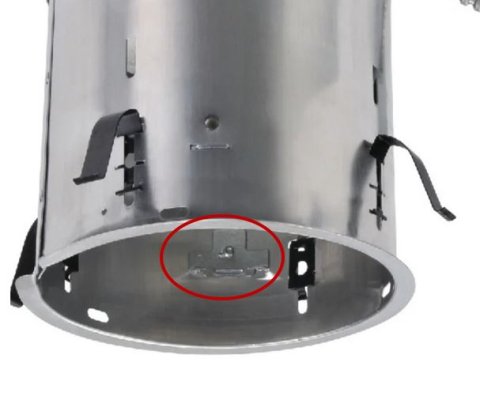
Here's a picture to harley's description.
They replace the baffle, trim ring and bulb all in one unit. Very easy. I installed these years ago (no failures yet) and my electric bill immediately went down $10 a month.
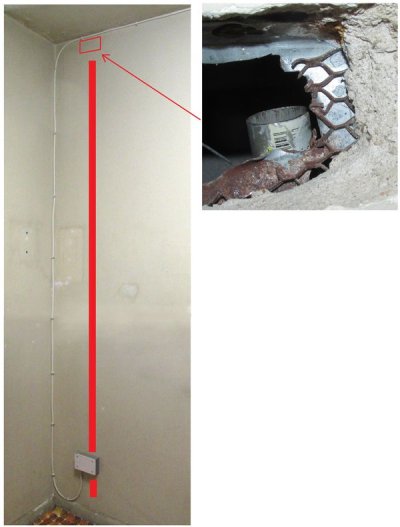
Sounds like you got a fancy size. I have the very common Halo 6 inch "old work" cans. Every trim baffle and ring I've thrown at it through the years works perfectly. You might have 8" cans. There are a lot less choices of trim for those, and the springs have to span more distance. You could also have a 6" version of a brand that doesn't have good grab points, or the grab points are damaged. It is very easy to damage the grab points in many cans. Once they are either broken off or pressed down, you have a headache on your hands.My grandson's bedroom is upstairs above my kitchen. And every time he and his buddy start roughhousing, those canned lights start popping loose--hanging by the wires.
The cans in my kitchen are large in diameter, and I've been unable to find any light inserts to fit without those spring loaded wires holding them up.