Your recent repair? 2013 - 2020

Status
Not open for further replies.
Not so much a repair, as a reset that I had no idea existed.

For whatever reason the icemaker in the GE refrigerator up and decided to quit working. While pondering the dysfunctional device, I noticed a little green LED light blinking. Hmmm... that might be a clue so I look up "GE icemaker blinking green light" and stumble across directions at (of all places!) the GE web site.

It turns out all I had to do was turn it off for 15 seconds, turn it back on, and then within 15 seconds push in on the paddle (that swings out and senses when the ice bin is full) three times. Kinda like clicking your heels and touching your nose to get back to Kansas, or something like that.

Anyway, it worked. LET THERE BE ICE!
But a sticker with those instructions on it under the light would have cost 2 cents.
 
John - I did this job years ago on my third generation Camaro Iroc Z. Please don't hack up the car by cutting an access hole. I hate seeing that. Use the time you would spend cutting a hole to do the job right.

This is a relatively straight forward job. Nothing complex, just time consuming. If you have a pneumatic impact wrench that will help. To drop the exhaust, I just disconnected the pipe to rear of the catalytic converter and removed the rest of the system in one piece, out the passenger's side up and over the right rear brake assembly. To drop the axle, it's all just removing nuts and bolts, and supporting with jack stands. I removed the clip supporting the brake line but didn't need disconnect the flexible line from the hard line.

The job isn't that bad once you drop the exhaust and rear axle. Once the axle and exhaust are dropped, and the fuel lines are disconnected, you have to snake the tank and filler tube out keeping in mind that the filler tube is rigidly attached to the tank. Be sure to remove as much gas as possible from the tank before beginning the job. Just take your time and you will be fine. One other note: This is a good time to replace the rear coil springs if they are weak (and they probably are if they are original) since they will basically just fall out once the axle is dropped. Good luck and holler if you have questions.

I hate it too. Still deciding. Apparently it's a 4 hour job in the labor book. 4 times $80 = $320. Wonder if I can really get a mechanic to do it for $320 labor.
 
I hate it too. Still deciding. Apparently it's a 4 hour job in the labor book. 4 times $80 = $320. Wonder if I can really get a mechanic to do it for $320 labor.
There comes a point in life when you say, "I will pay a professional to do it, or I will be in traction for a week".
I could have replaced my hot water heater, garbage disposal and 3 sink faucets, but I chose to pay my favorite plumber instead. I can afford it.
 
My fuel pump failed in my car. I spread the repair out over several days. The pump is inside the gas tank. I had to get the gas out of the tank to reduce the weight when removing it. I couldn't siphon it out. I finally used a inline 12 volt fuel pump attached to the fuel line at the engine. Borrowed the pump from a friend that's a bigger gear head than I am. The hardest thing was getting the dead car into the garage and on the lift. Once on the lift I found our local wildlife had chewed up the wiring near the gas tank. Didn't need a fuel pump. Didn't need to drop the tank. Spliced 3 wires and all works again. Cost about 50 cents.


Happy Days. I might've replaced the pump anyway. I did that job after getting stranded a few times with intermittent failures. I put everything back but no luck. Pump runs but no pressure. What are the odds of a brand new pump not working? Had to do it all over and checked the pressures before I put it all back. Changed the plugs at the same time and got the ignition wires crossed so it took me another few days to realized the wiring diagram I downloaded from the web was wrong.
 
Water line from the street to the house went bad under a 6 ft wide sidewalk in my rental property at the Jersey shore. 2100 to fix. My plumber in order to save me some money, left the cut out in the sidewalk for me to fix. 3x5 ft area where they put in a new water meter and meter pit. 500 pounds of concrete mix later, it looks good. Had to get rid of the tripping hazard. Good thing my son is a landscape contractor, and also works with concrete. Cost about 30 bucks for the concrete mix. Trying to find a contractor down there in the spring is difficult, no idea what the cost would have been, but a lot more
than 30 bucks.
I prepped everything before my son got there, digging out the area and hauling away the rubble. That was fun.
oldmike
 
There comes a point in life when you say, "I will pay a professional to do it, or I will be in traction for a week".
I could have replaced my hot water heater, garbage disposal and 3 sink faucets, but I chose to pay my favorite plumber instead. I can afford it.


Amen. That's where I am now too, especially with plumbing, which I've always hated.
 
Still prepping my class C motorhome for travel, which I have not used for 2 years. I started the engine every few months, even took it out for a quick drive, but there are things I do not exercise, nor need to do. Example: the TV and its antenna.

Turned on the TV. It could not receive any channel. To make a long story short, I traced the problem to the cable being broken, from the internal TV antenna junction box to the roof antenna. But where's the break?

Sadly, the break was not in an accessible spot, but at a 2' section that is embedded in the roof. Tried to see if I could pull another cable through, but there was no way due to some obstruction inside the roof structure.

I was a bit mad. How could the cable break where there's no motion to flex the cable? They must have installed the cable with a stress or a kink. Bastard!

So, I had to make another cable run, and part of it was exposed and not as clean looking when concealed inside the roof.

By the way, I originally suspected corrosion problem inside the antenna itself, opened it and found there was an amplifier built inside. The board is about the size of a palm, and naked, meaning not encapsulated in any plastic material. It was very dirty from the dirt and rain that got inside, and amazingly still worked despite signs of corrosion of the PCB traces.
 
I miss posted this in the "What did you do today" thread. It should'a been here.
I replaced the condensate drip pan under my A/C evaporator coil.
 
Happy Days. I might've replaced the pump anyway. I did that job after getting stranded a few times with intermittent failures. I put everything back but no luck. Pump runs but no pressure. What are the odds of a brand new pump not working? Had to do it all over and checked the pressures before I put it all back. Changed the plugs at the same time and got the ignition wires crossed so it took me another few days to realized the wiring diagram I downloaded from the web was wrong.

On a 86 Buick fuel pressure was leaking down causing difficulty starting. I paid a local shop to replace the pump. Still had the problem. Turns out there was some inline pulsation damper inside the tank that was leaking.

On a 1984 Corvette with low fuel pressure I bought a cheap eBay fuel pump, but it turn out to be a deteriorated hose coupling to the pump inside the tank. Left the old pump in place.
 
Not a repair but an upgrade...

Cell phone signal at our house is almost non-existent. The signal level for the two major carriers is approximately -110dBm which means dropped calls are commonplace.

I installed a weBoost cell phone signal booster and it improved the signal strength to -100dBm. That’s still a very low signal but at least it’s tolerable.

IMG_7360.JPG
Product package


IMG_7356.JPG
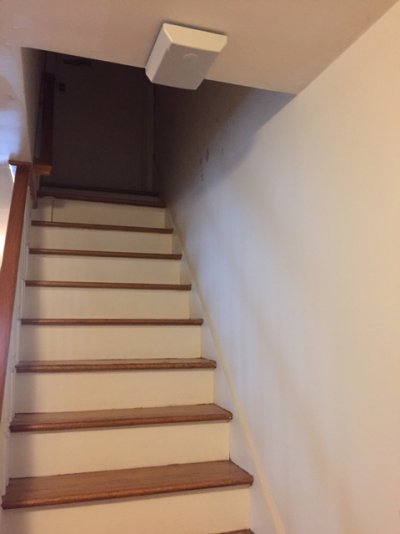
Indoor antenna in the hallway near the stairs to the attic.


IMG_7359.JPG
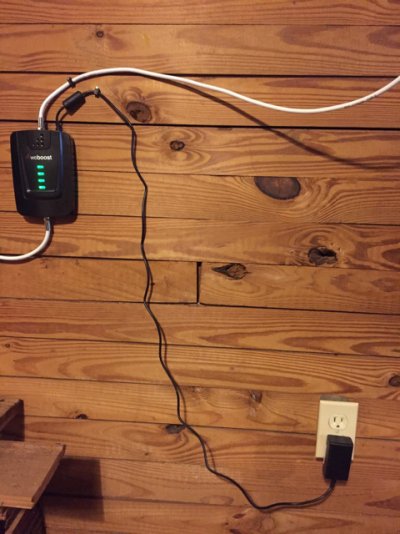
The amplifier in the attic.

I did’t take a picture of the exterior antenna. I put the outdoor antenna on a pole and pointed it toward the strongest signal.

One of the reasons for our poor signal is we are nearly the same distance from three separate cell phone towers meaning we are on the fringe of all the towers.
 
Amen. That's where I am now too, especially with plumbing, which I've always hated.

Unless it's Memorial Day weekend, and your kitchen sink gets backed up. All the plumbers either were not working or wanted 450 bucks to come out and snake the line. DH has a manual "snake" and once he got the cleanout cap off (rusted and painted shut-it was the worst part of the job) he managed to poke a hole in the clog and got things flowing again. He too hates plumbing, but was rather pleased with himself when he had success.:dance:
 
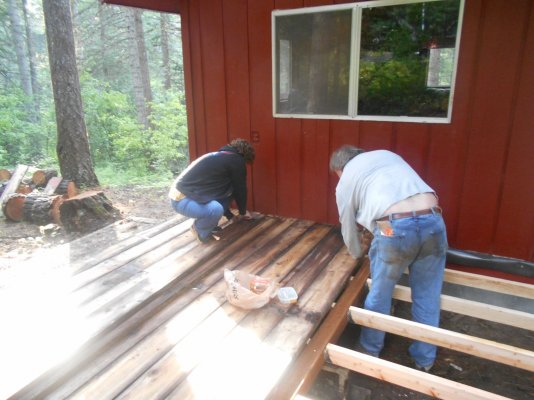
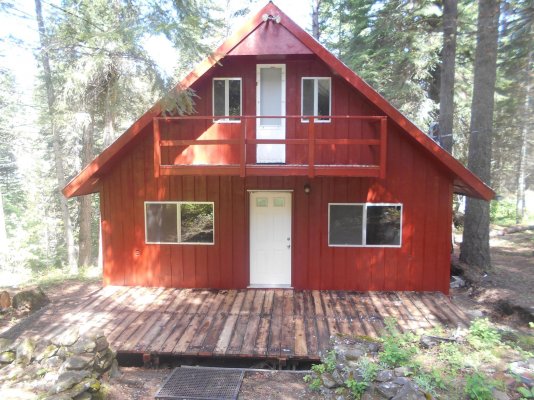
Rebuilt substructure of deck on cabin. Deck is 10' by 24'. Saved about $1600 by reusing the 10' cedar planks.
 

Attachments

  • 33780713_10211514993224625_5128862606999683072_n.jpg
    33780713_10211514993224625_5128862606999683072_n.jpg
    511.5 KB · Views: 43
  • 33782061_10211514993664636_4225717910493986816_n.jpg
    33782061_10211514993664636_4225717910493986816_n.jpg
    771.3 KB · Views: 46
Found the secret to easy trimmer line feeding!

After years, no decades, of frustration with string trimmers hanging up on the the trimmer string, I found the solution to this problem!

Dry lube. I started using "Blaster" dry lube on my string spool and various cam feed parts. Just spray the stuff on liberally when winding the spool. Spray the spool and all the various parts that allow the feeding. Done.

It is a miracle! Why didn't I think of this before? I don't recall the instructions on the various brands (yes I've tried at least 4 brands of trimmer) suggesting this. But, I tell you, it works.
 

Attachments

  • blaster.PNG
    blaster.PNG
    71.1 KB · Views: 198
Replaced the carburetor on my old Club Car Golf Cart that we use mostly to pull a garden cart around the property. Car would crank but not fire and was dumping fuel into the crankcase, so I surmised a stuck open float needle valve in the carb. A new carb from Amazon was about half the price of a rebuild kit, and delivered in two days with Prime. Replacement went pretty smoothly, only dropped one spring that took about 15 minutes to find. Also burned my wrist :mad:pretty good on the drag light, but all in all a pretty easy fix.
 
.............. A new carb from Amazon was about half the price of a rebuild kit, and delivered in two days with Prime. ...........
I've noticed that as the ethanol gas has been killing small engine carburetors like flies, the Chinese have jumped into the carburetor business and one can buy a new carburetor for peanuts. I recently bought a carb for a Mantis rototiller complete with new fuel lines, pick up head / filter and extra primer bulbs for ten bucks. Started right up and runs great.
 
Replaced the carburetor on my old Club Car Golf Cart that we use mostly to pull a garden cart around the property. Car would crank but not fire and was dumping fuel into the crankcase, so I surmised a stuck open float needle valve in the carb. A new carb from Amazon was about half the price of a rebuild kit, and delivered in two days with Prime. Replacement went pretty smoothly, only dropped one spring that took about 15 minutes to find. Also burned my wrist :mad:pretty good on the drag light, but all in all a pretty easy fix.
Nice work!

It may be time to invest in a LED bulb for your drag light. Not only the LED bulb runs much cooler, but the bulb won't need replacing when you actually drop the light. (don't ask :facepalm:)
 
Not a repair, but... nice big (circa 2000?) 25 inch TV has great picture when working, even sharper than the flatscreens I've seen, but annoyingly flickers / gets horizontal white line for 10 minutes when warming up. After warmup, all is well generally. Hoooked up a spare (even older) 20 inch TV that does not flicker, tried it out. Got all my cable channels! Yay. Then tried DVD. DVD played fine for an hour, then picture went blurry and sound remained. On the 25 inch TV, when that happened I would just change from channel 3 to 4, and the picture would clear up. Tried that trick on the spare 20 inch TV (by rotating old fashioned click knob) from 3 to 4, same blurry picture. (Sigh....)
 
Not a repair, but... nice big (circa 2000?) 25 inch TV has great picture when working, even sharper than the flatscreens I've seen, but annoyingly flickers / gets horizontal white line for 10 minutes when warming up. After warmup, all is well generally. Hoooked up a spare (even older) 20 inch TV that does not flicker, tried it out. Got all my cable channels! Yay. Then tried DVD. DVD played fine for an hour, then picture went blurry and sound remained. On the 25 inch TV, when that happened I would just change from channel 3 to 4, and the picture would clear up. Tried that trick on the spare 20 inch TV (by rotating old fashioned click knob) from 3 to 4, same blurry picture. (Sigh....)

Obviously you have not seen the new 4K flat screen TV's.

Compare a Blue Ray disk, it will be easier to see the difference, as DVD is simply a lot less sharp than blue ray.
 
Not a repair, but... nice big (circa 2000?) 25 inch TV has great picture when working, even sharper than the flatscreens I've seen, but annoyingly flickers / gets horizontal white line for 10 minutes when warming up. After warmup, all is well generally. Hoooked up a spare (even older) 20 inch TV that does not flicker, tried it out. Got all my cable channels! Yay. Then tried DVD. DVD played fine for an hour, then picture went blurry and sound remained. On the 25 inch TV, when that happened I would just change from channel 3 to 4, and the picture would clear up. Tried that trick on the spare 20 inch TV (by rotating old fashioned click knob) from 3 to 4, same blurry picture. (Sigh....)


I would not place a 25 inch TV in the 'big' category anymore... I have a 65, a 45 and DW has a 35 on the wall in her room to watch instead of her laptop screen...
 
I would not place a 25 inch TV in the 'big' category anymore... I have a 65, a 45 and DW has a 35 on the wall in her room to watch instead of her laptop screen...

omg....lol...Whenever I hook up one of my smaller TV's ( 20 inch diagonal) I think it's fine for about a day, then I want the 'big' TV back. Don't want anything bigger than 25 inch though.
 
Neighbors Oak tree crocked and keeled over and took out about 15 foot of fence, 10 foot of gutter, and cracked some sheathing under the singles.

In the process of sawing up, clean up, and insurance adjustment.

heh heh heh - fence was forty years old so DW found a hog wire and wood design on the internet to replace. :facepalm: ;)
 
I started replacing the faucet and drains in our bathrooms with ones that have higher spouts. Our old builder grade ones are so short we can't fill the dog's bowl with water and then get them out from under the spout without dumping out half the water. Taking off the old faucet and putting the new one on took about 45 minutes. No big deal. But taking the old drain out was immensely difficult. Just had to unscrew a nut from under the pedestal sink, but the original plumber had cross threaded it. Luckily I have a small channel lock, since there was no room for anything bigger. But lying on my back and twisting up under the pedestal it took me over an hour and a half just to muscle that nut off. PITA, but typical for a plumbing job. There's always some issue. Anyway, I got it finished, and it looks great. Tomorrow I'm going to try to knock off the other 5. Only one more pedestal, so hopefully it will go more easily.
 

Attachments

  • spot-defense-brushed-nickel-pfister-centerset-bathroom-sink-faucets-lf-048-lrgs-64_145.jpg
    spot-defense-brushed-nickel-pfister-centerset-bathroom-sink-faucets-lf-048-lrgs-64_145.jpg
    2.5 KB · Views: 206
But taking the old drain out was immensely difficult. Just had to unscrew a nut from under the pedestal sink, but the original plumber had cross threaded it. Luckily I have a small channel lock, since there was no room for anything bigger. But lying on my back and twisting up under the pedestal it took me over an hour and a half just to muscle that nut off. PITA, but typical for a plumbing job.

You have more patience than I do. I would have used either a small angle grinder, or a Dremel tool if the space was tight, and ground a slot or two in the nut and have it off in about 5 minutes.
 
You have more patience than I do. I would have used either a small angle grinder, or a Dremel tool if the space was tight, and ground a slot or two in the nut and have it off in about 5 minutes.

I'm in our third home without access to most of my tools. Otherwise I'd be right there with you.
 
Status
Not open for further replies.
Back
Top Bottom