You are using an out of date browser. It may not display this or other websites correctly.
You should upgrade or use an alternative browser.
You should upgrade or use an alternative browser.
Your recent repair? 2013 - 2020
- Thread starter Donzo
- Start date
- Status
- Not open for further replies.

Freedom56
Thinks s/he gets paid by the post
I did acid wash on my pool before, after watching it done the 1st time. The pool looked superb after the job. I don't remember how many acid washes I did after that, but the pool had to be resurfaced when the plaster became pitted. Perhaps it was after the 4th time.
I have not done an acid wash on the new plaster since it was done more than 10 years ago, and it has a lot of stain now. I think I will try sanding it when I empty the pool for the tile sandblasting. It may not look as good as acid washing, but should cause much less damage.
Depending on the type of stain, muriatic won't help. i found that some stains require absorbic acid (vitamin C) to remove. In any case, my plaster was in good shape except for a few stains which I managed to remove with absorbic acid.
Freedom56
Thinks s/he gets paid by the post
Beautiful pool, nice work! When's the pool party?
Thanks for paying it fwd. A good youtube video is worth its price.
Thanks.... The pool was built in 2005 and I did the design. Our yard was geometric and when we went for quotes, most came back with kidney shaped pools that really didn't appeal to us. We wanted something different and I wanted a pool where I could swim laps. Plus there was no basis to compare quotes. So I sketched the design you see with Visio and we sent it out for quotes.
I finished re-grouting the tiles last week and cleaning up the plaster. It took 45 hours to refill this pool. I added 12 bags of salt, few pounds of cyanuric, 48oz of phosfree, and baking soda, and replaced my salt cell. The water is balanced now and the pool looks great. I'm testing the water regularly to make sure things are stable. The pool parties will start after we return from our 2 month trip Europe.
Freedom56
Thinks s/he gets paid by the post
kgtest, Many Thanks for sharing this calcium cleaning method for swimming pools. A quick question, if you just take the water down a few inches below the calcium line per your suggestion without emptying the pool, how do you recover or remove the glass beads from the bottom of the pool? Would they block up or possibly damage the filter/pump or in ground cleaning system?
Peter
You can recover the beads with an external vacuum (battery powered) or you can empty the pool and sweep up the media. In my case, I started with the pool below the tile line and emptied the pool while I was bead blasting. After the pool was empty, I swept up the beads and did the touch up cleaning. I had a two day weather window to do this job otherwise I would have emptied the pool completely before starting. The people I hired in the past did it the same way I did as they are on a time schedule.
John Galt III
Thinks s/he gets paid by the post
- Joined
- Oct 19, 2008
- Messages
- 2,800
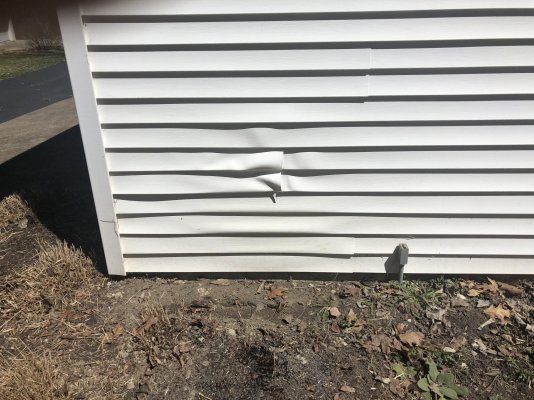
Just a rant-like update. I got a hose up on the second story deck, and sprayed water all over and around the window above the french door. A couple minutes of spraying each time, and sprayed it 3 different times, about 5 minutes apart. This produced no leaking at the leak spot, which I guess is a good thing. Desperate to actually cause a leak, I sprayed water directly into a rotted area of the door, where water has entered the house during north wind rain. Guess what, no water came into the house, even when I sprayed it right into the rotted area (There is actually a hole there that can let water in). Well, at least it's more data for the equation. I then sprayed the entire left side of the door (there are 2 separate panes, one non-moving on the left and the actual door on the right). Did this about a minute at a time, three times. Again, no water came in at the leak spot. Seems like good news in a way, but doesn't identify how water is getting in during rain. I will have to wait until I get a decent North wind on a dry day, and spray it again.
Sunset
Give me a museum and I'll fill it. (Picasso) Give me a forum ...
Water leaks can be tricky.
Any chance it's really a roof leak and the water is running down inside the wall until it comes out at the joint to the window ?
Any chance it's really a roof leak and the water is running down inside the wall until it comes out at the joint to the window ?
Ronstar
Moderator Emeritus
John Galt III
Thinks s/he gets paid by the post
- Joined
- Oct 19, 2008
- Messages
- 2,800
Water leaks can be tricky.
Any chance it's really a roof leak and the water is running down inside the wall until it comes out at the joint to the window ?
Yes, it's possible, I guess. Roof is only about 5 years old. It only leaks when there is a North wind, and I guess a North wind could force the water under the shingles into the part of the roof that leaks. No sign of water damage on the upper floor (above the french door) window or ceiling or wall, though.
Mr._Graybeard
Thinks s/he gets paid by the post
- Joined
- Apr 18, 2011
- Messages
- 2,979
IMO, flashing is a prime suspect when a newish roof is leaking.
always_learning
Recycles dryer sheets
- Joined
- Feb 2, 2017
- Messages
- 267
Just a rant-like update. I got a hose up on the second story deck, and sprayed water all over and around the window above the french door. A couple minutes of spraying each time, and sprayed it 3 different times, about 5 minutes apart. This produced no leaking at the leak spot, which I guess is a good thing. Desperate to actually cause a leak, I sprayed water directly into a rotted area of the door, where water has entered the house during north wind rain. Guess what, no water came into the house, even when I sprayed it right into the rotted area (There is actually a hole there that can let water in). Well, at least it's more data for the equation. I then sprayed the entire left side of the door (there are 2 separate panes, one non-moving on the left and the actual door on the right). Did this about a minute at a time, three times. Again, no water came in at the leak spot. Seems like good news in a way, but doesn't identify how water is getting in during rain. I will have to wait until I get a decent North wind on a dry day, and spray it again.
Ugh. I was so hoping you had solved the problem! We have had buckets of rain so far this year and I was just thinking about your puzzle the other day.
Yes, it's possible, I guess. Roof is only about 5 years old. It only leaks when there is a North wind, and I guess a North wind could force the water under the shingles into the part of the roof that leaks. No sign of water damage on the upper floor (above the french door) window or ceiling or wall, though.
Is there anything to the side of the French doors, then? Another window? Maybe the north wind is somehow causing the rain to get in and go sideways along the top of the sliders and down? Sort of like if the rain found a channel that it follows?
IMO, flashing is a prime suspect when a newish roof is leaking.
Yeah. That and those vent pipes for bathroom fans. I actually just saw seals for those in Home Depot the other day. I never know those were a thing.
Our other house had *five* layers of flashing around the chimney. We never knew it until we had the roof replaced and they mentioned it and only used one. Turned out water came in and the leak appeared in the room downstairs and one room over from the fireplace.
 The roofers put another layer of flashing and all was well.
 So, what's on your roof? Anything that might be causing the leak up there? I can't remember if you mentioned it ... did the leak start before or after the roof was redone?
John Galt III
Thinks s/he gets paid by the post
- Joined
- Oct 19, 2008
- Messages
- 2,800
Hi guys. Answers to questions: I noticed the leak 5 years after the roof was done. They removed a round vent on the roof by cutting out a rectangle and replacing with plywood, then roofing over it. If I wanted to contort myself and get up into the attic I could give it a look. Maybe it started leaking there. But of course it could be leaking between the shingles and the plywood in which case I might never see the water. I noticed yesterday that the top corners of the window above the door have something sticking out, probably a sealing bead. Maybe birds have been pulling it out. The identical townhouse next door also has the same thing, but the one next to it does not. I could check that out by leaning out the window, maybe. Other than the window, there's nothing but aluminum siding around the door, with caulking, except for the wooden deck itself, on the bottom. Got some rain last night on the North side, and got my flashlight out to check on the inside of the house, for water getting in, on second floor (same floor as french door). Found moisture in a 2 inch area on the floorboard near the rotted area. But the wood above the moisture was dry. So the water is seeping in sideways, or wicking up from below. So many variables! So many pieces of wood and metal coming together at that corner. Another variable is that I had a guy do some work on the deck a few years before the leak started. I noticed he nailed some support wood onto the existing wood below the deck, and the nails may have been long enough to pierce the aluminum siding (or whatever is there) behind it. But those pierce holes would be below the leak, so that doesn't seem to be the cause. Maybe the deck is pulling away from the house and breaching a seal of some kind. I wish I had an x-ray tool to show where the water is getting in, and where it is going. edit to add: I think I have a vent for bathroom exhaust fan, will have to check what side of roof it is on.
Last edited:
John Galt III
Thinks s/he gets paid by the post
- Joined
- Oct 19, 2008
- Messages
- 2,800
Another ongoing project: I'm now thinking of using some plastic edging to corral / dam the water in my front yard, during rainfall, to force it onto the sidewalk and thereby onto the driveway apron and into the road. In keeping with my incrementalist approach to this project, first I will add another 6 foot extension to the downspout. It's taking a lot of time, waiting for big rainstorms , to see where the water is flowing. Finally got a big storm today, and got a lot of data. Onward to victory.
After 2.5 days on my hands and knees, I'm about 25% through the process of stripping the old sealer off 550 sf of saltillo tile. It had reached the point where it was impossible to clean (dirt was embedded in the sealer). I finally have a routine that works reliably but this is really a slow and mind-numbing process. Not to mention that my knees are suffering.
I'm using the original Klean Strip stripper that contains Methylene Chloride (no longer sold at Home Depot and Lowes for safety reasons). But I have to wear a respirator and special gloves. Ugh. DW refuses to help.
I'm an avid DIYer. But this is a job I would have happily hired out. But I doubt anyone would do it as thoroughly as me. Plus, the quotes I got were in the range of $10-15 per tile. That's $5.5K - $8.3K. Looks like it's going to take 8-10 days of hard labor (just for the stripping). We still have to do some repairs and then reseal with 5 or 6 coats.
Oh well... enough procrastinating on ER.org and back to work.
Start next week getting quotes on seamless gutters for my house and barn . I DIY the Home Depot gutters before and they ended up being trash . After that getting quotes for stone veneer around our house . So far not as bad as I thought it would be . house will look old Texas.
aja8888
Moderator Emeritus
Yesterday, I replaced the in-tank fuel pump on our 2013 Hyundai Santa Fe. It was not holding fuel rail pressure causing the line to empty back into the fuel tank when the engine was shut off (bad check valve in the pump, I presumed).
I bought a new Delphi pump at Rock Auto for $280.00 and pulled the back seat to replace the pump. The seat was a *Bitch* to get out as it was clumsy and weighed about 75 pounds, but I succeed I'm sure it would have been easier with a second person's help, but no one was around.
It took about an hour to get the pump out and the new one in due to a tightly fitting locking ring that didn't care to lock without some extra force.
All is good now and the fuel rail stays pressurized making for quick crank starts rather than long drawn out starter spinning to allow the pump to fill up the fuel rail.
Oh, the car just turned 90,000 and that has been the only repair since new.
Last edited:
Sunset
Give me a museum and I'll fill it. (Picasso) Give me a forum ...
Hi guys. Answers to questions: I noticed the leak 5 years after the roof was done. They removed a round vent on the roof by cutting out a rectangle and replacing with plywood, then roofing over it. If I wanted to contort myself and get up into the attic I could give it a look. Maybe it started leaking there. But of course it could be leaking between the shingles and the plywood in which case I might never see the water. I noticed yesterday that the top corners of the window above the door have something sticking out, probably a sealing bead. Maybe birds have been pulling it out. The identical townhouse next door also has the same thing, but the one next to it does not. I could check that out by leaning out the window, maybe. Other than the window, there's nothing but aluminum siding around the door, with caulking, except for the wooden deck itself, on the bottom. Got some rain last night on the North side, and got my flashlight out to check on the inside of the house, for water getting in, on second floor (same floor as french door). Found moisture in a 2 inch area on the floorboard near the rotted area. But the wood above the moisture was dry. So the water is seeping in sideways, or wicking up from below. So many variables! So many pieces of wood and metal coming together at that corner. Another variable is that I had a guy do some work on the deck a few years before the leak started. I noticed he nailed some support wood onto the existing wood below the deck, and the nails may have been long enough to pierce the aluminum siding (or whatever is there) behind it. But those pierce holes would be below the leak, so that doesn't seem to be the cause. Maybe the deck is pulling away from the house and breaching a seal of some kind. I wish I had an x-ray tool to show where the water is getting in, and where it is going. edit to add: I think I have a vent for bathroom exhaust fan, will have to check what side of roof it is on.
You reminded me.
I once had a leak on a new house , water showing at the door on the floor.
Turned out it was water hitting the step, splashing up and hitting under the door jamb (the part you step on when coming in the door) , a careful look under and up showed the metal flashing was not caulked there, so water could hit the crack/edge and go inside.
Once I caulked it , the water stopped coming in.
John Galt III
Thinks s/he gets paid by the post
- Joined
- Oct 19, 2008
- Messages
- 2,800
Yesterday, I replaced the in-tank fuel pump on our 2013 Hyundai Santa Fe. It was not holding fuel rail pressure causing the line to empty back into the fuel tank when the engine was shut off (bad check valve in the pump, I presumed).
I bought a new Delphi pump at Rock Auto for $280.00 and pulled the back seat to replace the pump. The seat was a *Bitch* to get out as it was clumsy and weighed about 75 pounds, but I succeed I'm sure it would have been easier with a second person's help, but no one was around.
It took about an hour to get the pump out and the new one in due to a tightly fitting locking ring that didn't care to lock without some extra force.
All is good now and the fuel rail stays pressurized making for quick crank starts rather than long drawn out starter spinning to allow the pump to fill up the fuel rail.
Oh, the car just turned 90,000 and that has been the only repair since new.
I enjoyed your description of the work. Impressive!
Mower repair
My mower wouldn't start after its winter hibernation. It had run fine last year. I suspected stale fuel and a gummed up carb (I added the Stabil later than I should have. Ethanol). But I pulled the plug and it was wet with gas, so it was getting fuel. Hmmm. I found there was no spark. After pulling off the plastic cowl and tank to take a look at things, it seemed possible the kill wire from the magneto coil might be shorting out where it rubbed against the sharp corner of that coil. Yep, that was it. It started on the first pull. Some heat-shrink tubing on it now and I should be good for a long time.
It's a Honda engine on a Husqvarna mower, 2 years old now. I spent extra to get the Honda, I'm a little disappointed in the sloppy routing of this wire that led to the problem.
My mower wouldn't start after its winter hibernation. It had run fine last year. I suspected stale fuel and a gummed up carb (I added the Stabil later than I should have. Ethanol
). But I pulled the plug and it was wet with gas, so it was getting fuel. Hmmm. I found there was no spark. After pulling off the plastic cowl and tank to take a look at things, it seemed possible the kill wire from the magneto coil might be shorting out where it rubbed against the sharp corner of that coil. Yep, that was it. It started on the first pull. Some heat-shrink tubing on it now and I should be good for a long time.It's a Honda engine on a Husqvarna mower, 2 years old now. I spent extra to get the Honda, I'm a little disappointed in the sloppy routing of this wire that led to the problem.
Last edited:
John Galt III
Thinks s/he gets paid by the post
- Joined
- Oct 19, 2008
- Messages
- 2,800
Update on routing rainwater off my lawn and into street: I created a small earthen dam in the front yard corner near the sidewalk. During the last rain, the water pooled there, as expected, and rose right up to the sidewalk level, but did not flow over the sidewalk. I was hoping it would flow over the sidewalk. It looked like the water was oozing out around the other end of the earthen dam, and keeping the level at the sidewalk. Or maybe the water was oozing down under the edge of the sidewalk as soon as it reached that level. Ugh. So... I extended the earthen dam a few feet, and hope it will raise the pond level enough to get the water flowing over the sidewalk.
I couldn't agree more. Fixing something others would toss is very rewarding. Over the years, fixing instead of tossing and buying another likely advanced my FIRE date by several years.
Last item repaired, 25 year old RUUD air conditioner compressor power contactor switch. Last year, had a HVAC technician do an evaluation. Freon pressure right on the mark. The tech suggested PM the power contactor. The original looked like it had begun to arc and that spells problems in the future. Arcing can result in greater contact resistance and as contact resistance increases so does arcing. A death spiral that ends usually on the hottest day of the year.
Last item repaired, 25 year old RUUD air conditioner compressor power contactor switch. Last year, had a HVAC technician do an evaluation. Freon pressure right on the mark. The tech suggested PM the power contactor. The original looked like it had begun to arc and that spells problems in the future. Arcing can result in greater contact resistance and as contact resistance increases so does arcing. A death spiral that ends usually on the hottest day of the year.
Texas Proud
Give me a museum and I'll fill it. (Picasso) Give me a forum ...
- Joined
- May 16, 2005
- Messages
- 17,268
So today I had to take out the ice maker as somehow the ice became a big block and the arms could not push it out... watched a youtube video and it was easy peesey.... also adjusted the water level down a bit so hopefully will not happen again...
THEN finally went out to work on sprinkler system which DW has been nagging on me for months... we did not need it as there was rain happening all the time... BUT, two heads popped off and another one was a broken rubber pipe... this was in addition to what I needed to do before... I hate the sprinkler system and all DW keeps saying to to pay someone
THEN finally went out to work on sprinkler system which DW has been nagging on me for months... we did not need it as there was rain happening all the time... BUT, two heads popped off and another one was a broken rubber pipe... this was in addition to what I needed to do before... I hate the sprinkler system and all DW keeps saying to to pay someone
Successfully replaced an insulated glass unit (IGU) in the living room that had been lightly fogged for a couple of years. In this thread about fogged windows member Sunset pointed out a source for IGUs and I chose to order from them since that site had the most detail and was competitively priced. It was also cheaper than some kits that purport to fix the old window. It wasn't dirt cheap ($220 with ground shipping) but it was a lot cheaper than having a whole new window installed. I had some reservations about ordering glass from a company in Washington state to a location in West Virginia but it did arrive well packed and unscathed.
I took more than the advertised 20 minutes or so to do the replacement because I'd never done it before and was at the bottom of the learning curve so took my time, but I'm sure the next one will go about that time.
One thing I didn't do and in hindsight wish I had, was to call around to some local glass companies and see what their prices would be, and if they can fix the old one, which is probably the same size as several other windows in the house. If they cost less, then I simply "chalk it up to tuition" as my Dad used to put it. So I'll make those calls on Tuesday after the holiday.
euro
Thinks s/he gets paid by the post
- Joined
- Oct 4, 2015
- Messages
- 2,338
Just replaced the rubber boot on my Kenmore front loader. Required what seemed like too much disassembly to get to the spring braces but I got it done eventually. I had been trying to avoid the work but the old seal started smelling so bad that it started to impact the clothes (yuck. ). No amount of cleaning/bleaching helped, so DW drew the line for me..... Other choice: replace washer...
). No amount of cleaning/bleaching helped, so DW drew the line for me..... Other choice: replace washer...Dash man
Give me a museum and I'll fill it. (Picasso) Give me a forum ...
Had my driveway repaved. It was badly cracked and crumbling in places and had a previous patch job that didn’t hold up well. Looks brand new! It was way beyond my capabilities, so I obviously paid someone to do it.
2008 Mini Cooper Clubman S, well know issues with the cooling system (tstat, water pipe, and pump, ) and oil lines to the turbo and oil cooler. Replaced them all around 58k miles. Dam if replacement tstat didn’t in the exact same place at 92k miles less than 4 years later. New unit from Autozone and coolant (about $135) & 4 hours of my time, saved me paying $1250 at the dealer or “only” $950 at the independent garage.
- Status
- Not open for further replies.
Similar threads
- Replies
- 29
- Views
- 5K
- Replies
- 8
- Views
- 2K