Your recent repair? 2013 - 2020

Status
Not open for further replies.
After having our HVAC replaced this year due to age and recent frequent & expensive repairs, then a week later having the hot water heater fail, we decided the only thing left in the basement that could die was the sump pump, and that's not something I care to have fail as that usually happens when you need it most.

We'd had a battery back-up for the old sump pump, but now have a WATER back-up which doesn't require a battery. Seems too good to be true, but it's 'powered' by centrifugal force. Even if the power goes out, we're good.

Read on: https://www.familyhandyman.com/basement/using-a-water-powered-backup-sump-pump/
 
Your recent repair?

My recent repair was an ill-fated (similar to the infamous “two hour cruise” on Gilligans Island) attempt to repair my Mavic Pro (photo/video drone). I apparently damaged the gimbal following a softish (IMHO) collision resulting from flying backwards into a bush (MTS -collision-avoidance features work only for what’s in FRONT). After endlessly youtubing for repair instructions which were mostly narrated by guys with thick Russian accents who quickly skipped over the most delicate and difficult part of the repair, I decided to proceed.

DH and I made quite the project out of the whole thing ordering a variety of spare parts, making numerous attempts to handle parts the size of a grain of sand, designating a portion of the dining room table for the event. The highlight was fashioning a protective cover for the work n process to prevent the cat from patting pieces over the edge.

But all the kings horses and all the kings men could not put the Mavic Pro together again. Mercifully, there are companies specializing in drone repair and for what now appeared a reasonable fee[emoji4]
 
Last edited:
..........We'd had a battery back-up for the old sump pump, but now have a WATER back-up which doesn't require a battery. Seems too good to be true, but it's 'powered' by centrifugal force. Even if the power goes out, we're good.

Read on: https://www.familyhandyman.com/basement/using-a-water-powered-backup-sump-pump/
The concept has been around for many years. It uses the Venturi Effect, there's nothing centrifugal about it. I looked at the concept decades ago to decide on a backup sump pump if AC power fails. Went with a battery backup pump instead. The Venturi Effect as a "pump" has a weak link. If the output line is too long, gets restricted, freezes, whatever, then the "powering" water dumps into the sump pit, flooding the area even worse. And it keeps on dumping water line water, because it thinks it's working still.

I have used a venturi fitting with garden hose to remove water from holes, but even there had to be real careful, can't elevate output line, can't have output line very long at all, etc. But at least there I could see that the water in the hole was coming up faster, instead of going down!

The efficiency factor of a venturi "pump" is directly affected by the output line issues I mentioned. It can work, and be just over 1:1 due to restriction, and appear to work.

The concept also dumps a lot of water outside, it needs to drain fast away from house, as the sum-total water output over time will be a lot more than an electrical pump just transferring sump water!

I'm not saying it won't work... just be careful and watch it.

Our long-term "solution" :) to sump pumps was to move >1k miles to a house on slab, no basements, no sump pumps, no flooding worries. But I DID miss having a basement for a while, particularly the one in the house we built!
 
Last edited:
The 40 year old Magic Chef bit the dust. It's hard to believe standard double oven standard sizes changed over 40 years.

We went with a Whirlpool 24 wide x 46 high. Had to have cabinet makers come in and modify the opening and redo the small cabinets below.

I hated spending the money but we love the new oven.View attachment 31810View attachment 31811
It certainly is a visual upgrade!
 
Just replaced the fill valve in the toilet tank. I bought the replacement valve from HomeDepot, but procrastinated for a couple of days because I hated plumbing repair jobs.

The job took 15 minutes, much faster than any earlier valve replacement I ever did in my life. And there was no leak, even with tightening everything by hand as it should be done.

Why am I so lucky this time? Or is it that they finally know how to make gaskets that work?
 
Last edited:
Just replaced the fill valve in the toilet tank. I bought the replacement valve from HomeDepot, but procrastinated for a couple of days because I hated plumbing repair jobs.

The job took 15 minutes, much faster than any earlier valve replacement I ever did in my life. And there was no leak, even with tightening everything by hand as it should be done.

Why am I so lucky this time? Or is it that they finally know how to make gaskets that work?

With fill valves, I always go with the Fluidmaster, and if I ever have trouble, I reuse the existing stem that is already installed. There is a plastic ring that slides up and down, so I slide the ring up to be able to remove the upper portion, replace, then slide the ring back in place and reconnect the hose going into the flush valve. Less than a three minute fix.

My plumbing repair involved a plumber for the first time ever. In the basement of a rental, my 4" cast iron stack developed a small leak on the floor. The 40' stack went up to the roof, with a tub,commode and sink feeding it on the second floor. While I felt I could do the repairs handily, I feared the stack breaking loose and 40" of cast iron falling down and killing me. I received two quotes, $820, and $420 from two local pluming firms, but I had to do the excavation work in the floor. I cut the concrete floor with a angle cutter, broke the 18x24 slab with a hammer, and used a small shovel and a garden trowel to clean around the pipe, took about 2 hours. The $420 plumber showed up yesterday at 8:30 AM, and was gone by 10:15 AM with my assist, using about $30 of pipe and parts. My fears were greatly imagined, as there were no issues whatsoever. I'm glad I got two quotes, and didn't hire the $820 firm. I would have rather spent the $350 overage on grapes, but it was good insurance paid for a potentially problematic issue.
 
Last edited:
... The $420 plumber showed up yesterday at 8:30 AM, and was gone by 10:15 AM with my assist, using about $30 of pipe and parts...

Wow. Plumbers make good money, better than doctors do.
 
Did a clothes dryer "repair" today.

Dryer had been making some squeaks, but not very loud, figured it was not the front glide-bearings that I replaced in 2007 (replaced belt then too), as I recall those being very loud when they wore through.

Opened it up today, the glides looked pretty good, one of the back drum wheels seemed to turn a bit stiff and made a bit of noise when I turned by hand. Took them both apart, cleaned them up and added some motor oil. They had what seems to be a fiber washer between the C-ring and the wheel, one of them broke, so I just drilled a 1/2” hole in some thin sheet metal, and cut it with a tin snips to fit.

Tricky to get belt on, blind operation, but I got it after a few tries. Looks like you could pull the dryer out and get to it through the air inlet panel too.

Other than that and the 2007 belt and glide bearings, I recall that I replaced the electric heater element along the way, easy fix. Oh, and one time the timer buzzer got stuck on. I hit it with my fist, it turned off, and it's worked ever since! 33 years old now.

It is the 'mate' to this now 33 year old washer:

http://www.early-retirement.org/forums/f27/crazy-to-try-to-fix-a-27-yo-wash-machine-67469.html

-ERD50
 
Had a glass insert in an entry door lose its seal. A pair of doors so replaced both inserts with a pair that had internal blinds. Pretty straight forward. Look very good and nice to have the blinds inside as the external ones rattled alot when door used and bumped quite a bit.
 
Bose Acoustimass 10 surround sound speaker system. The banana plug from a rear speaker coming into the main module snapped off, and I couldn't get the plug out so it wasn't a simple matter of swapping out the cable or end. Couldn't get it out with tweezers or anything else, and even with removing the panel I couldn't get at it from the inside. So I started drilling, and managed to get enough out and pull back on the drill to yank the pin out.

Next I put in a new banana plug on the end of the wire since that plug was broken. But it didn't work. Problem isolation to the jack or the plug was greatly complicated when the other plug stopped working, while swapping around the two rear cables. Finally I got the new plug to work in the drilled out jack by positioning it carefully, but the other combo, which was untouched except for unplugging it a few times, still wasn't working. So I replaced that banana plug, and now all is working. I'm fearful that just a little bump will disconnect it, but it sits behind the entertainment center so hopefully that won't happen.
 
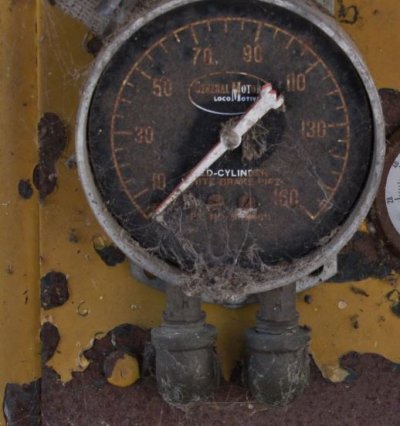
Working on the 23 ton switcher, I had to replace the old damaged air gauge with a new one. When I removed it from the panel, I noticed there were 2 90 degree elbows close together. (see picture).
I wondered how they got them on, and took the gauge to a shop where the 2 men there could not figure it out either.
I took the gauge home, and sat on my patio looking at it. I KNEW there had to be a way, so I rotated one of the elbows 90 degrees to the outside, and it gave enough clearance to rotate the other one! I got them both off and installed them on the replacement gauge Success!
 

Attachments

  • Capture4.JPG
    Capture4.JPG
    52.6 KB · Views: 23
.... I'm fearful that just a little bump will disconnect it, but it sits behind the entertainment center so hopefully that won't happen.

Maybe hot glue a couple wood blocks to the back, to act as bumpers, so they keep any bumps away from the connectors? Hot glue hold pretty well, but is pretty easy to remove if needed (IIRC, Iso-Propyl Alcohol will break the seal almost immediately).

Working on the 23 ton switcher, I had to replace the old damaged air gauge with a new one. When I removed it from the panel, I noticed there were 2 90 degree elbows close together. (see picture).
I wondered how they got them on, and took the gauge to a shop where the 2 men there could not figure it out either.
I took the gauge home, and sat on my patio looking at it. I KNEW there had to be a way, so I rotated one of the elbows 90 degrees to the outside, and it gave enough clearance to rotate the other one! I got them both off and installed them on the replacement gauge Success!

Took me a bit to follow, but now I see. The elbow 'shows' the surface that curves away to the other elbow when turned 90° from the other. For a minute, I thought it was one of those "impossible dovetail" tricks or something! ;)

Looking forward to the next Switcher update. BTW, I manage to catch the historic "Big Boy" steam engine #4014 going through a suburb of Chicago. Took quite an effort on my part because I left late, and had to keep trying to catch it down the line while trying to follow updates on twitter( #up4014 ) and the UP site (but that's another story, maybe for another post if I feel up to it). I finally caught up about a minute before it entered a crossing where people had gathered, I could see the smoke/steam (it's converted from coal to oil) - no place to park, so I just double parked with flashers on since I would still be within 50' of my car and only a way for a minute or so (train was not stopping).

We will be in south/west 'burbs for a wedding and visiting one of the kids, their spouse and our grand-kid, so we might stop to see it on display in West Chicago on Sunday.

https://www.up.com/forms/steam-trace.cfm
https://www.up.com/heritage/steam/schedule/index.htm
https://www.up.com/heritage/steam/4014/

-ERD50
 
Last edited:
The electric in-tank fuel pump started going out on my ‘02 Chevy S10 pickup with 120k miles. I got two quotes for $975-$1200 which includes -$400 for parts. SOP is to replace everything in the tank (pump, fuel level sending unit, tank pressure sensor, etc. An OEM kit with the pump and soft parts is available online for < $35 including shipping! I checked YouTube and learned I could do the job by raising the bed without dropping the tank. The only issue was 100’F heat index while lying on my blacktop driveway. I just worked an hour or so in the early morning for a few days. It was about 5 hrs labor for me so that’s > $180/hr for my time.
 
The electric in-tank fuel pump started going out on my ‘02 Chevy S10 pickup with 120k miles. I got two quotes for $975-$1200 which includes -$400 for parts. SOP is to replace everything in the tank (pump, fuel level sending unit, tank pressure sensor, etc. An OEM kit with the pump and soft parts is available online for < $35 including shipping! I checked YouTube and learned I could do the job by raising the bed without dropping the tank. The only issue was 100’F heat index while lying on my blacktop driveway. I just worked an hour or so in the early morning for a few days. It was about 5 hrs labor for me so that’s > $180/hr for my time.

More power to you. For me, if gasoline and electric are involved, I am outta here. :D

But, in fairness, I was never much of a Grease Monkey (is that term allowed?) in my early days, let alone now.
 
The electric in-tank fuel pump started going out on my ‘02 Chevy S10 pickup with 120k miles. I got two quotes for $975-$1200 which includes -$400 for parts. SOP is to replace everything in the tank (pump, fuel level sending unit, tank pressure sensor, etc. An OEM kit with the pump and soft parts is available online for < $35 including shipping! I checked YouTube and learned I could do the job by raising the bed without dropping the tank. The only issue was 100’F heat index while lying on my blacktop driveway. I just worked an hour or so in the early morning for a few days. It was about 5 hrs labor for me so that’s > $180/hr for my time.

Nice job!;)

I just changed the fuel pump in our 2013 Hyundai Santa Fe in April. Now manufacturer's install a hatch under the rear seat to access the tank-mounted pump. It took me longer to pull the back seat out than it took to R&R the OEM $350 pump. BTW, dealer wanted 1250.00 for that two hour job.:rolleyes:
 
The electric in-tank fuel pump started going out on my ‘02 Chevy S10 pickup with 120k miles ... The only issue was 100’F heat index while lying on my blacktop driveway. I just worked an hour or so in the early morning for a few days. It was about 5 hrs labor for me so that’s > $180/hr for my time.

Nice work. I'm getting older, you lost me at "100’F heat index while lying on my blacktop driveway"! And 5 hours over a few days.

I changed the oil and spark plug on my lawn tractor. I waited for a break in our recent heat wave.

Yes, I'm getting to be a wimp :(

-ERD50
 
Last time I replaced an in-tank fuel pump it ran for 45 seconds and quit. I only knew for sure because I had installed a pressure gage to diagnose the issue. Rockauto replaced the part with no questions asked and I dropped the tank a second time. I tested it throughly before putting it all back together.
 
I just spent $40 on 2 qts of brake fluid, and two 4' long sections of flared/fitted brake lines for our diesel excursion. The old line had a rust pin hole in it, and leaked a big puddle (luckily didn't happen while driving down the interstate towing our travel trailer).

My son, and I fixed this on Tuesday, ironically the same day that a secretary from work had the same problem with her car in the parking lot. She had AAA, and had it towed to Midas, where i'm sure, she dropped close to $1000 before they would let her drive home.
 
MIL's Toyota Corolla was shedding one of its body side moldings. I removed the molding and took off the original double stick tape. Then used automotive goof off to get rid of the adhesive residue and applied new side molding double stick tape to the molding and pressed it back on the car door.

I used a hair dryer on hot to help get the old molding off, and the heat of the day helped as well.
 
Another grease monkey in the club

Auto mechanics is officially a hobby since I can now claim being retired. A window shaker and a box fan in my garage keeps things cool.

Two weeks ago replaced the front sway bar and links on my 07 S550 MB. Since the wheels were already off, replaced the front calipers, pads and changed the brake fluid. (Had previously changed the control and thrust arms and am now finished with suspension refreshment at 103,000 miles).

Last weekend, DD came home with a knock sensor code and overheating engine on her 04 RX330 Lexus. Had to remove the intake manifold on this tightly packed transverse engine to see the sensor - turns out a mechanical flange at the top of the engine was leaking coolant onto the sensor. Resealed the valley plate, changed sensor harness, spark plugs, PCV valve and air filter since they were all exposed. First time quality, with exception of a fuel injector connector that I had to replace for nine bucks. Labor savings for her - $1500.

The ABS light was locked on indicating the antilock brake system was inoperative. I have an Autel MaxiDas scanner that coupled with the intraweb gave me a simple procedure of resetting the steering wheel sensors. - This 60 second procedure fixed this problem yesterday that had been present for who knows how long.

Told her to leave me the car for another week so I can do a timing belt / water pump replacement, and change the voltage regulator/alternator on her 183,000 mile ride.
 
Maybe hot glue a couple wood blocks to the back, to act as bumpers, so they keep any bumps away from the connectors? Hot glue hold pretty well, but is pretty easy to remove if needed (IIRC, Iso-Propyl Alcohol will break the seal almost immediately).


Took me a bit to follow, but now I see. The elbow 'shows' the surface that curves away to the other elbow when turned 90° from the other. For a minute, I thought it was one of those "impossible dovetail" tricks or something! ;)

Looking forward to the next Switcher update. BTW, I manage to catch the historic "Big Boy" steam engine #4014 going through a suburb of Chicago. Took quite an effort on my part because I left late, and had to keep trying to catch it down the line while trying to follow updates on twitter( #up4014 ) and the UP site (but that's another story, maybe for another post if I feel up to it). I finally caught up about a minute before it entered a crossing where people had gathered, I could see the smoke/steam (it's converted from coal to oil) - no place to park, so I just double parked with flashers on since I would still be within 50' of my car and only a way for a minute or so (train was not stopping).

We will be in south/west 'burbs for a wedding and visiting one of the kids, their spouse and our grand-kid, so we might stop to see it on display in West Chicago on Sunday.

https://www.up.com/forms/steam-trace.cfm
https://www.up.com/heritage/steam/schedule/index.htm
https://www.up.com/heritage/steam/4014/

-ERD50

Thanks for the links! I'm a train nut - I'll try to get some photos of "Big Boy" on the move Tues am.
 
The electric in-tank fuel pump started going out on my ‘02 Chevy S10 pickup with 120k miles. I got two quotes for $975-$1200 which includes -$400 for parts. SOP is to replace everything in the tank (pump, fuel level sending unit, tank pressure sensor, etc. An OEM kit with the pump and soft parts is available online for < $35 including shipping! I checked YouTube and learned I could do the job by raising the bed without dropping the tank. The only issue was 100’F heat index while lying on my blacktop driveway. I just worked an hour or so in the early morning for a few days. It was about 5 hrs labor for me so that’s > $180/hr for my time.

Way to go, jazz4cash !! I decided to let the mechanics change my in-tank fuel pump, since the job was supposed to be a PITA on my 88 GTA. $535. They charged me $60 for the pump and the rest was labor ! Maybe this a blow-that-dough event for me, lol... Anyway, $535 is a lot lower than the price they quoted you, so I don't feel so bad.
 
Thanks for the links! I'm a train nut - I'll try to get some photos of "Big Boy" on the move Tues am.

I'm not up to the level of train nut or geek, but have a pretty deep interest. And this being the LARGEST steam locomotive EVER built, and the ONLY operational one, well that's something. A 4-8-8-4, with articulated drive train (not the body/boiler - that's one section) to take the curves.

I got a decent video as it went through Elmhurst, it was moving fairly slowly (not a crawl though). I made a point of just pointing the phone, but watching un-aided, as I hate missing the actual event while fiddling with the camera. So I got the best of both, the experience, and a decent video/sound ( those whistles have all that steam whisshhhing sound to them!).

The best videos I have seen so far, are the ones of it starting up. Catch that if you can. The slow chug-chug-chug, and the steam goes through some changes/venting or something as it accelerates, not sure what that is about.

If I have a moment, I'll start a thread on this. Though it is moving out of the Chicago area, it will be traveling west back to Cheyenne on Aug 8, and is here till Tuesday AM.

(update) - Here's a separate thread on the train:

http://www.early-retirement.org/for...traveling-the-mid-west-98908.html#post2272973


-ERD50
 
Last edited:
Was washing a shirt in the bathroom sink and thought a hard piece of broken plastic part might have gone down the drain. Removed trap to make sure. Good, nothing in trap except lots of shaving stubble. Cleaned it out, reassembled trap (all plastic parts). Dripping. Tighten it up some more. Still dripping. Take it all apart again. Notice one of the washers is broken! Find new washer at Home Depot $1.86. Home Depot worker very helpful, knew exactly which one I needed. Install. Leak stops at that gasket, but starts at another gasket farther downstream. Tighten it up. Won't go any tighter. Had very slow leak, but I just kept an eye on it and put a bucket under it. Next day leak stopped, even with water running. Bucket still under it just in case. I'm calling it a success. lol.
 
Was washing a shirt in the bathroom sink and thought a hard piece of broken plastic part might have gone down the drain. Removed trap to make sure. Good, nothing in trap except lots of shaving stubble. Cleaned it out, reassembled trap (all plastic parts). Dripping. Tighten it up some more. Still dripping. Take it all apart again. Notice one of the washers is broken! Find new washer at Home Depot $1.86. Home Depot worker very helpful, knew exactly which one I needed. Install. Leak stops at that gasket, but starts at another gasket farther downstream. Tighten it up. Won't go any tighter. Had very slow leak, but I just kept an eye on it and put a bucket under it. Next day leak stopped, even with water running. Bucket still under it just in case. I'm calling it a success. lol.

Yep, I find this is a common occurrence with plastic drains! I usually put some paper towel around the connections for a week and then check to see if they are dry. :cool:
 
Status
Not open for further replies.
Back
Top Bottom