Your recent repair? 2013 - 2020

Status
Not open for further replies.
Funny but I looked at those offset flanges recently and decided against them. Moved into a house recently and the main floor toilet is now an 11" rough in because of an added marble tile on the wall. Toilets mostly come in 12"(90% of them) or 10" rough ins (there are other weird sizes).

The 10" are mostly special order and more expensive. I thought the offset flange could fix the problem but didn't like the look for the same reason as other posters. I don't want to be constricting that particular drain....

Perhaps the OP could give us some feedback after "using" it for a while... :eek:)
 
Lots of things can cause water to pool over time. Have you had any trees or shrubs removed in those areas? It takes years for any remaining roots to rot and the soil to fill in where the roots were. Soil wasn't tamped around the house when it was built? Water sitting in the same spot over time can depress the soil. Drought can cause some soils to shrink. Earthquakes? Sink holes? Sometimes it's just a matter of bringing in fill soil and grade it to flow the rainwater away from the foundation. It wouldn't take much soil.

Splitwdw, Thanks for the reply. No tress, shrubs removed. I don't know if they tamped the soil down near the foundation. One very mild half-second earthquake years ago. Yes, some droughts. Maybe it's soil compaction. Maybe I need to roll a hole-punching tank over the lawn. The area that floods in the back yard next to the house is just grass. The side that floods has big azaleas and rhododendron bushes. My contraption I hooked up to the side yard downspout is working as planned. I have one elephant trunk directing any *large* flow of water into the front yard. Some water leaks out from the elbow connection near the bottom of the spout into the usual spot, which had been causing the pooling, and it takes a fairly heavy rainfall to get the water up high enough in the elephant trunk, to flow out and into the front yard. But I have seen water coming out of the end of it, if rain is heavy enough. There is a little trench that has formed over the years right up against the slab, about 3 inches deep and a foot wide and the water fills it up and works its way down toward the heat pump. Filling in near the foundation there is definitely worth a shot. But.... eyeballing my yard, it looks like I'd have to rely on the side lawn absorbing all the water, and not rising up over the newly added soil near the slab. Been scoping out the other townhomes in my complex. 90 percent of them having better grading as far as water flowing away from the house. My yard slopes gently into my foundation, not away from it, unfortunately. Why it didn't have pooling from day 1 I don't know. May end up with big ugly hose taking water from downspout into front yard, and put in a few feet of *garden edging* right behind the outflowing end of the trunk to prevent the emerging water from flowing backwards towards house. Some other townhomes are doing that. For now, will wait for another rainfall greater than one inch to see what happens with current setup. It's OK, I need something to do with all my retiree time, lol....
 
I've always been kind of amazed by wax rings - it seems like a 16th Century solution that just never dies, though it seems to mostly work..
Another famous 16th century plumbing fix is string. Packing string.

Customer: "You used string to fix me leaky faucet?"

Plumber: "Yep. And it will last longer than your new el cheapo faucet you can buy at Big Box."
 
Brake job today

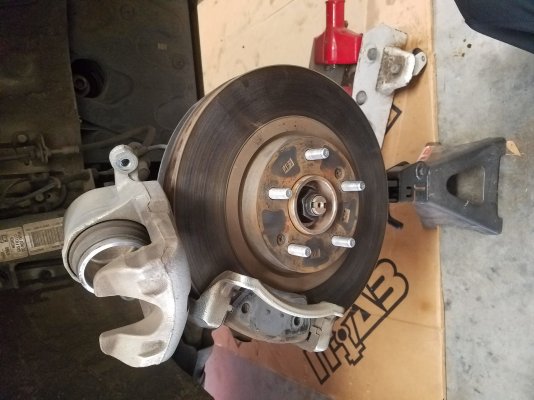
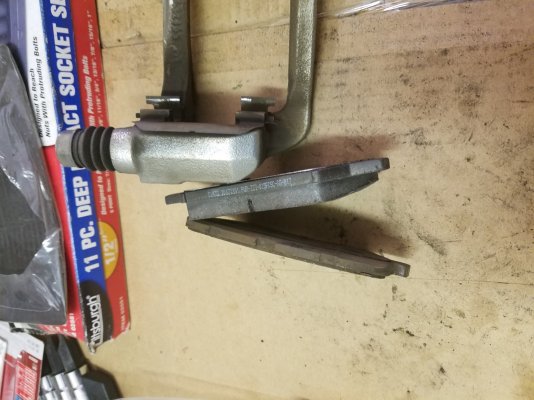
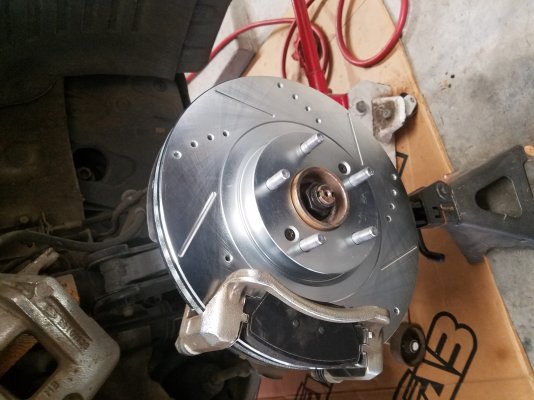
Our 2013 Hyundai Santa Fe is at 83,500 miles and the front brakes are about done. Going down steep inclines I could feel the brake fade and I just know they were getting hot as hell. So I bought upgraded rotors and ceramic pads.

Did the deed this morning:

20181202_120544.jpg

old brake and rotor

20181202_121944.jpg

Thin pads!

20181202_123352.jpg

New stuff

(there is nothing like air tools t make a job go quick!)
 
Thanks - saw that trick on a you tube video. Unfortunately my new baseboard trim is taller and the top would have been even with the center of the escutcheon - so I needed a work around,. This worked out nicely.


To make the flex hose seem to "disappear" against a white wall, I wrapped mine by winding/fastening a fairly thin strip of white plastic material around the hose. Looks less ugly :)
 
"Repairing" my landscape

I needed some trees and shrubs removed as part of a landscape renovation. I got some quotes and the total was about $5500 for that an new shrubs etc.

I could have just said "yes" and then posted this on "blow that dough". Instead, I found a couple of cheaper guys to do just the tree work and stump grind (including removing 3 upright hollies which had gotten too large and were a bear to trip). I spent $1000 total on trees removal and stump grinding.

Then I went and grabbed a couple of new Chesapeake hollies and planted them where 2 of the 3 old hollies were. In doing so, I also transplanted 4 of what appear to be native pines or junipers that "volunteered" in my front bed. I moved these to my wooded back yard and planted then among the native trees. We prize these for privacy in winter. The hollies with a bag of leaf grow and some mulch were $70.

Then for the rest, I hired a young guy I know who works in construction. We worked side by side a full Saturday on tree trimming, shrub trimming, digging out old shrubs (his back not mine!) mulch etc. He is very happy to earn $20 and hour, so I paid him $160.

Total spent: $1230. I will probably spend another $500 in the spring adding a specimen and a few more shrubs when selection is better. But it is a far cry from $5500 and my satisfaction is a lot higher for sure.
 
I have deck in my back yard that is attached to the second story and is also supported by 2 vertical wooden posts that go into the ground below it. It's 30 years old. I noticed that around each post the ground had sunken about 2 inches. All 4 sides of each post. Hmmmm. So I filled those 2 inch low spots in, with some soil from the garden. Don't want to let any extra water down around the posts.
 
I have deck in my back yard that is attached to the second story and is also supported by 2 vertical wooden posts that go into the ground below it. It's 30 years old. I noticed that around each post the ground had sunken about 2 inches. All 4 sides of each post. Hmmmm. So I filled those 2 inch low spots in, with some soil from the garden. Don't want to let any extra water down around the posts.


If I had a 30 year-old second story deck that had its major support posts sinking into the ground, at a minimum, I would be looking at replacing those support posts and the footings that support them. Having a collapse of a second story deck would not be a pretty thing. Filling in the holes with a little soil is not going to help much in my opinion.
 
I have deck in my back yard that is attached to the second story and is also supported by 2 vertical wooden posts that go into the ground below it. It's 30 years old. I noticed that around each post the ground had sunken about 2 inches. All 4 sides of each post. Hmmmm. So I filled those 2 inch low spots in, with some soil from the garden. Don't want to let any extra water down around the posts.
If you live where it gets cold, it is more likely that frost heaving popped the footings up.
 
When we had our annual furnace check in this year, the tech informed us that water was not flowing to the humidifier. He said it was likely a problem with the saddle valve that was used to tap into the copper water line when the humidifier was installed about ten years ago. He offered to fix it for $300, or said we could call a plumber. We opted to “call a plumber”.

It was a DIY project for us. Cut out the section of pipe and replace it with a shut-off valve for the main pipe and a T joint leading to a shut off valve for the 1/4” supply to the humidifier. DH did the bulk of the work. My contribution was advising him to get the new parts assembled as a unit before cutting the existing pipe, and of course holding said unit in place while he sweated it on.

It works, and we now have nicely humidifier air flowing.

Good job.

Here In IL Chicago area , the saddle valves are no longer allowed.
 
I have a Pioneer Turntable, P15-D-II from 1975. Needed a new belt in 2000, but that was an easy fix, and I had no problem getting a new belt online. The past few years, I've been digitizing some of my old records, and started it up a few days ago to play a record that I wanted to hear, but probably won't bother to digitize.

No go. There was no 'turn' in 'turntable'. Thought I might have unplugged it, but no.

So I got it on the workbench yesterday. I though the platter just lifted off, that's what I recall when I replaced the belt - easy, no tools required. Checked youtube, and it is supposed to lift off, but the guy said it sometimes takes some DW-40 on these old ones. That did it!

Fortunately, this model seems to be a kind of a classic among the higher end consumer grade (or lower end 'audiophile'?), so there is lots of info on it, lots of people buying them at garage sales and restoring them.

So nothing obvious - next I loosen the hold downs and lift the table up, and I hear some stuff fall out. Hmmm. OK, not so bad. There is a switch that turns the motor on when the arm is moved towards the record (and OFF when the end of the record is hit, and the arm is lifted). That switch is held in a plastic piece, and the plastic screws holding into threaded holes in the base are broken. The screws can't protrude through or they interfere with the moving parts on top.

I cn't find any screws to match the metric diameter and fine pitch, so I decide to cut two aluminum nails to align it, and just hot glue it all together. Yep, ugly as sin, but I just wanted to get it done rather than make a trip to the hardware store, and they may not have them either. The hot glue can always be peeled off if I need to do it right later.

But it works! I have a Shure V-15 cartridge, so it sounds nice!

-ERD50
 
Today was a day with 3 minor victories. 2 were RTFM problems.
1, DW ordered a folding Bluetooth keyboard for our travels. I thought I followed the instructions, but could not get it to pair with my phone. In looking at the keyboard, I noticed a Bluetooth symbol on the C key. Went back to the little pamphlet, and right after you select the type of device, you have to hit Fn and C. Problem one solved.


2. I use Earthlink for my e-mail on my phone. I had it set up according to their instructions, and could receive e-mails but could not reply. I set up a chat with Earthlink, and learned that besides setting up the SMTP address and port, there were additional things to be done. Followed the instructions, and problem solved.


3. Could not find how to create an e-mail on my phone. RTFM time for the phone. At the bottom of the received e-mails the is a "+" sign. I touched it and it opened the outgoing message. window. Problem solved
 
Thanks - saw that trick on a you tube video. Unfortunately my new baseboard trim is taller and the top would have been even with the center of the escutcheon - so I needed a work around,. This worked out nicely.

To make the flex hose seem to "disappear" against a white wall, I wrapped mine by winding/fastening a fairly thin strip of white plastic material around the hose. Looks less ugly :)

Or you could buy a white one ??

Yes, but I think that the white ones are plastic and not metal like the chrome ones. I think that the white plastic ones are more prone to leaks than the chrome ones.

+1 on the metal-braided hoses.

To camouflage it, why not use white spray paint (doing it outdoor, and before installing it), although I am never picky enough to be bothered by the hose.
 
If I had a 30 year-old second story deck that had its major support posts sinking into the ground, at a minimum, I would be looking at replacing those support posts and the footings that support them. Having a collapse of a second story deck would not be a pretty thing. Filling in the holes with a little soil is not going to help much in my opinion.

The posts aren't sinking. It's the *ground* around the posts that is sinking.
 
Bathroom remodel

Just completed a bathroom remodel.
Our friend had a partial bathroom remodel and it cost 11K. It was one of those 1 day jobs, rip out the tub/shower and tear that area down to the studs. Then put up one of those 3 piece tub kits.


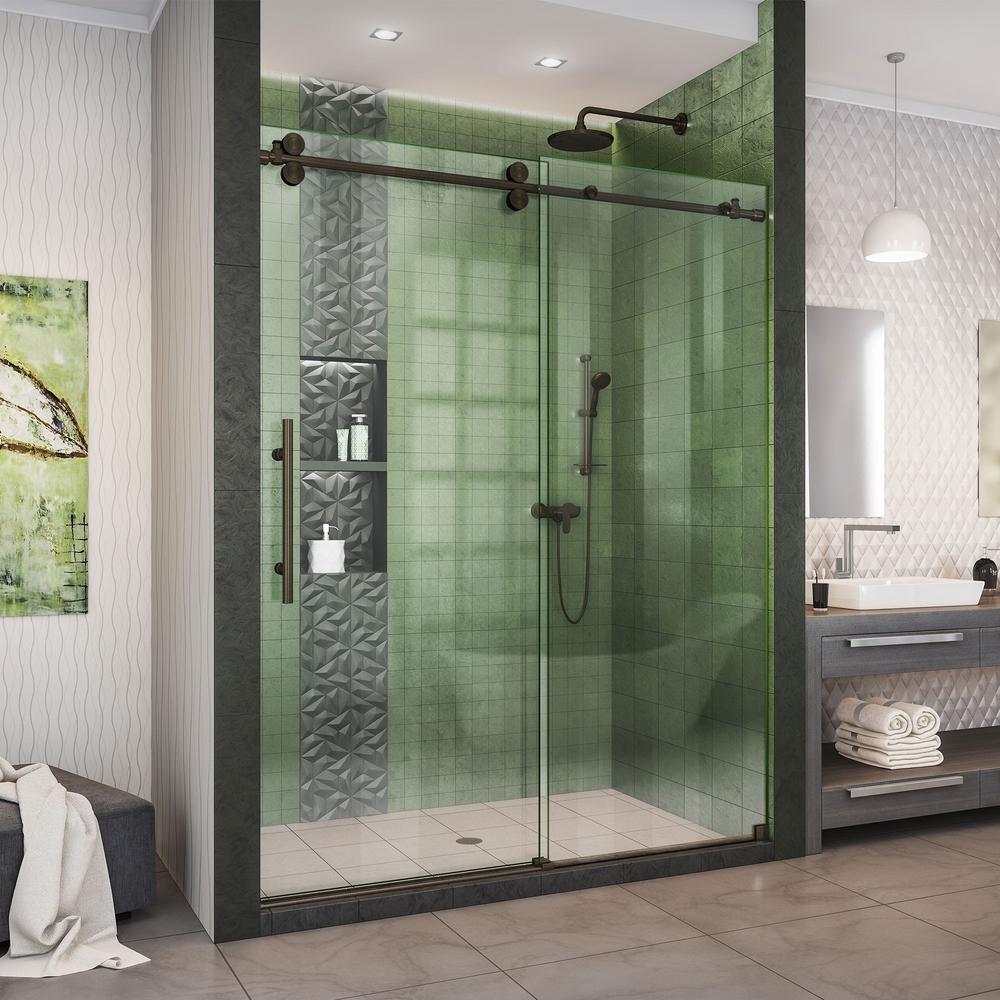
We spent about 2 months on our remodel, most of it was waiting on pieces. Did basically the same thing with the tub area but also pulled out the vanity. Replaced the tub with a shower ,Enigma-XO 56-60 in. W x 76 in. H Fully Frameless Sliding Shower Door in Oil Rubbed Bronze (like this)
dreamline-alcove-shower-doors-shdr-61607620-06-64_1000.jpg
. Also added a nice vanity, (like this)

day-3-_12-of-24_a.jpg


Had the floor and shower tiled and put in a new toilet. All this for under 8k. On to the next project, need to remove 4 fruit trees and design the back yard.
 
Last night about 10PM noticed the sump pump running a long time.
Quick check, the float switch failed in closed mode. Not a good time to find a hardware store of any kind open. I had to invent and make a float switch.


Using a light bulb, a socket, some aluminium tubing, epoxy, a hastily made bracket for a leaf switch, along with bag ties and paper clips. I assembled a float valve. Took about an hour for brain work and the scrounging then the process of assembly. Some more time to mount it on the sump pump's lid. Sometimes it comes handy to have a good collection of stuff. Lightbulb? yeah that is the float!

It works.


The other project was Check engine light on the suburban. Open EGR valve and intermittent throttle position sensor. Remove EGR valve spray crud cutter to clean plunger, re-mount. Diconnect connectors of Throttle valve sensor and idle motor, spray with contact cleaner, plug back in. Allis well.
 
Last edited:
Got a "no heat" call from a tenant. Gathered tools and supplies and headed over to check out the 43 year old boiler, not knowing what I'd find.

Reset the switch on the oil burner and got the old 60 Hz hum from the motor. Quickly turned off the power, pulled back the transformer, spun the fan, sure enough, the electric motor was much harder to turn than it should have been.

Pulled off the motor, replaced the motor and coupling, fired it back up and good for another 43 years, lol.
 
Last edited:
Last night about 10PM noticed the sump pump running a long time.
Quick check, the float switch failed in closed mode. Not a good time to find a hardware store of any kind open. I had to invent and make a float switch.


Using a light bulb, a socket, some aluminium tubing, epoxy, a hastily made bracket for a leaf switch, along with bag ties and paper clips. I assembled a float valve. Took about an hour for brain work and the scrounging then the process of assembly. Some more time to mount it on the sump pump's lid. Sometimes it comes handy to have a good collection of stuff. Lightbulb? yeah that is the float!

It works.


The other project was Check engine light on the suburban. Open EGR valve and intermittent throttle position sensor. Remove EGR valve spray crud cutter to clean plunger, re-mount. Diconnect connectors of Throttle valve sensor and idle motor, spray with contact cleaner, plug back in. Allis well.

Got a photo of your float switch..... Would be neat to see..
 
Update on pooling water around my heat pump: I have now added 9 feet of extension pipe to the problem downspout, and routed the outflow to the front yard where it seems to now be going somewhere other than around the heat pump! Yay. Much less water accumulating around heat pump during last rainfall. Knocking on wood.
 
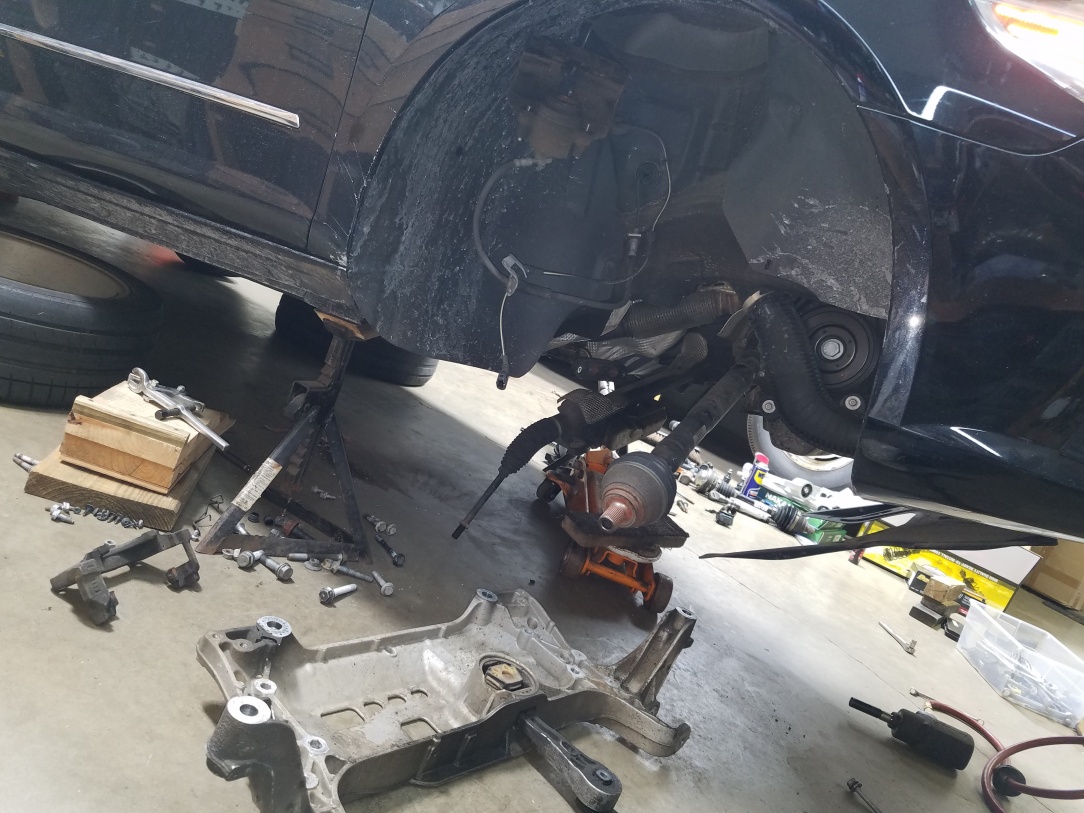
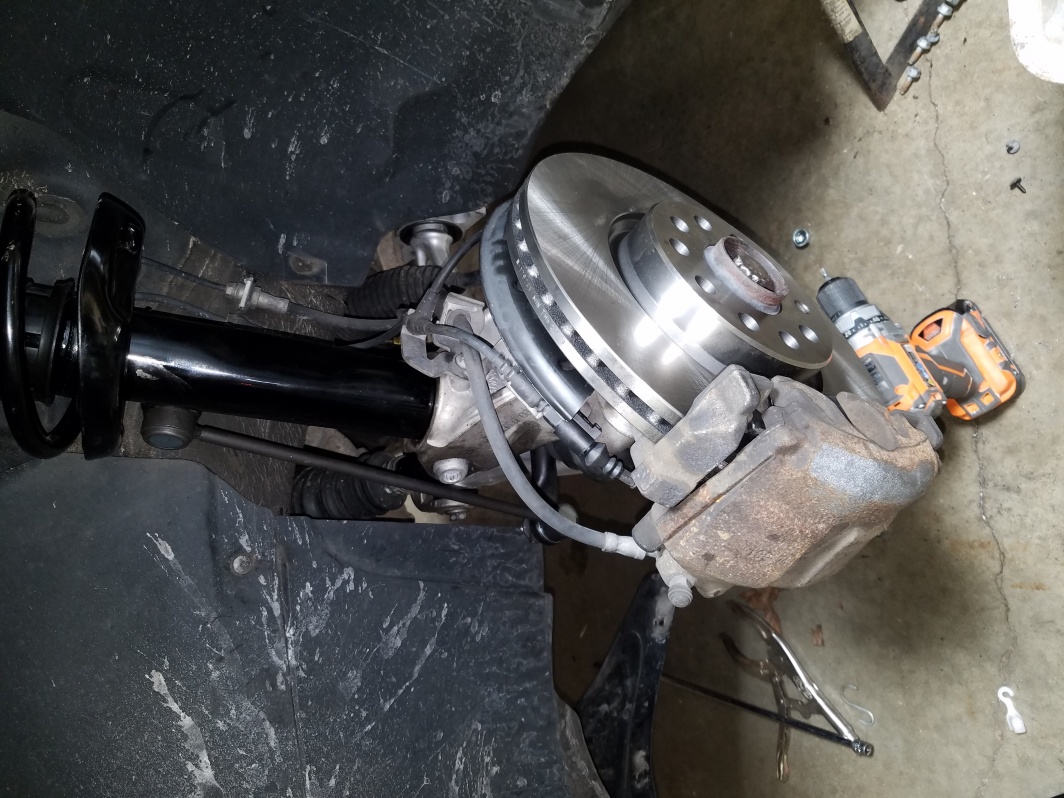
COMPLETELY rebuilt the entire front end of my 2012 VW CC. Took 3 days, but really only worked on it 2-4 hrs a day each of those days. Ended up dropping the subframe to replace the swaybar bushings. Complete pre-assembled struts and control arms with bushings are cost effective compared to buying all of the individual parts. Did brakes too. Had an alignment done and at 116k miles it rides like new now. Cost me $500, would have been $1200-$1500 to have a shop do it...


28343-albums230-picture1757.jpg


28343-albums230-picture1758.jpg
 
In case no one has told you, Volkswagens are very strange mechanically. You're lucky you didn't have to buy some special VW tools to do the job. And there are few mechanics that know anything about modern VW's or their premium sister cars, Audi's.

There are so many people on here that show ingenuity. It's something lacking in society today.

So many people pay small fortunes to tile masons to rebuild their bathrooms and showers. I tiled my last house's bathroom with $.58 per square foot ceramic tile, and the whole job just cost me $135. It was that bathroom and fresh paint that got us list price and a 2 week sale.

I did paint that dark brown 26' x 48' man-cave last week (with a 10' ceiling), and it was a 4 gallon paint job including the very tall stair well. Once you get moving, it's not especially hard work to paint inside a house.
 
Status
Not open for further replies.
Back
Top Bottom