DIY kitchen backsplash

cbo111

Full time employment: Posting here.
Joined
May 20, 2014
Messages
979
So.......after reviewing numerous youtubes for doing a tile kitchen backsplash, I consider myself an electronic expert. DW and I plan to attempt this as our first foray in the tile installation game. We are leaning toward glass subway tiles. We figure worst case scenario is we completely screw it up and have to hire a pro to fix.
Seriously, it does not look too complicated and we are somewhat handy. Anyone out there tackled this home improvement challenge and have any useful tips?
 
Tiling is not that hard. Prep is key and being fastidious doesn't hurt.. :D

With glass tiles, you want to make sure and get a thinset that is the right color since it will show through. Ask at your home store. I believe most people go with white. Your grout color is more a personal choice.

Do your layout first and figure out how to get around any obstacles (outlets, pipes, etc..) and figure out which courses should start full or half tile. Make sure the drywall is in good shape and very clean (use a TSP wash if the wall has grease buildup in the kitchen)

Don't do to much at once or mix up to much thinset or grout. If you don't have the tools already, buy good quality ones. Cheap tile saws, for instance, suck.

You'll have to clean the grout haze a couple times. Maybe three times if you are an over enthusiastic newbie... :LOL:

Have fun. It isn't hard and it can be fixed pretty easy.
 
Tilework is not at all difficult for most handymen. The layout is the main concern to minimize tile cutting.
I prefer using porcelain tiles for backsplashes over glass. Porcelain is very hard, but it cuts much smoother--where glass can chip off. I agree with Koogie about using white thinset on glass tiles. Fortunately, backsplashes don't require very much tile as there's not usually that many square feet underneath kitchen cabinets--not expensive.

I installed a new ceramic tile floor in our last house (2 yrs. ago), and it was so clean and nice that it sold our house for us. Little did the buyers know the flooring cost $.58 a square feet and the whole job only cost $135 including Wonderboard underlayment. Good luck!
 
^ Koogie has some good advice. You should use a wet saw. I had access to one, but you can rent one from tile and big box stores. They have special glass tile blades for glass tile. And cut the glass tile very slowly. It heats up and breaks if you advance the tile too fast into the wet saw. I also bought a glass tile breaker that scores and snaps glass tile. I only used it on mosaic, but I assume that it I would work on subway tile also. It would work wherever you need to cut in one direction, but a wet saw makes quick work where you need to cut 2 sides.

The tile manufacturer should have recommendations for type of thinset and grout. Only mix as much as you can use in about 15 minutes. Or better yet, you may find a premixed thinset and/ or grout that works. Don’t put on too much thinset. I think I used a 3/16” v notch trowel on the glass mosaic backsplash. Again the tile instructions may specify trowel size. You don’t want thinset oozing between the tiles that needs to be cleaned out before it sets up. And you probably should back butter any small tiles a little just to make sure you get thinset coverage.

And grout a little at a time, making sure that you wipe the grout perpendicular to the grout joints so you don’t remove grout. And make sure that you caulk the joints between tile and countertops and cabinets, and at wall corners.

It’s easy once you get started!
 
Sometimes you need a pro.

Sometimes you need a pro.
We did.
3968_Vrain_20171019_11%20KitchenSouthCabinetLighting01.jpg

Two days, 3 people, $1400 USD. Worth every dollar.
Note all the tiny triangular pieces.
 
Last edited:
So.......after reviewing numerous youtubes for doing a tile kitchen backsplash, I consider myself an electronic expert. DW and I plan to attempt this as our first foray in the tile installation game. We are leaning toward glass subway tiles. We figure worst case scenario is we completely screw it up and have to hire a pro to fix.
Seriously, it does not look too complicated and we are somewhat handy. Anyone out there tackled this home improvement challenge and have any useful tips?

Okay I'm an electronics expert as well (software also), and I do a lot of work around the house. Installing glass tile back splash is extremely easy. They even have a combination adhesive and grout for these types of tiles now in multiple colors to match your tiles which makes the job even easier.

We had a niche in the den that was designed to hold those large projection TVs flush against the wall. The house was built in 1995 so those TVs were popular back then. We decided to build storage cabinets into the existing niche and add shelves to hold the electronics for the wall mounted TV and sound system. We decided to tile the back with glass and metal tiles. See attached photos. The tiles took about 1 hour to install. It was just 12 sq. ft. of tiles.

Use a wet saw to cut your tiles. Glass tiles cut like butter. I have a small MK-Diamond wet saw that I bought on Ebay for about $90 a long time ago. You can rent one from Home Depot.
 

Attachments

  • IMG_6865.jpg
    IMG_6865.jpg
    433.7 KB · Views: 7
  • IMG_6867.jpg
    IMG_6867.jpg
    518.7 KB · Views: 9
  • IMG_6955.jpg
    IMG_6955.jpg
    388.5 KB · Views: 8
Last edited:
Attached are some photos of some other tile work I did in our primary home. The master bathroom in our home came with white tiles throughout which was difficult to maintain. We decided to re-model. I hired someone to do the demolition and did a design with granite and travertine tiles. I hired someone to measure cut and install the granite and I installed all the tiles, repaired where we damaged the walls and had company install a frameless shower door. My wife and I did the faux painting. This was one of the more difficult jobs we did on our own.
 

Attachments

  • IMG_0463.jpg
    IMG_0463.jpg
    463.3 KB · Views: 8
  • IMG_0470.jpg
    IMG_0470.jpg
    441.2 KB · Views: 7
  • IMG_0569.jpg
    IMG_0569.jpg
    451.8 KB · Views: 11
  • IMG_0571.jpg
    IMG_0571.jpg
    523.7 KB · Views: 5
  • IMG_0573.jpg
    IMG_0573.jpg
    569.9 KB · Views: 6
I have a close friend that was a prolific tile contractor--second generation. He has done just about every commercial job in our area.
For regular tile work, he quit using his big wet tile saws. He switched over to 4 1/2 inch hand held grinders with diamond blades. They take some getting used to, but are substantially faster than cutting with stationary wet saws.
The grinders go where ever you are on the job where walking back and forth to a big saw is too physical and very slow when you're having to cut dozens and dozens of tiles. Many of the cuts are under baseboard and quarter round anyway on floors.
 
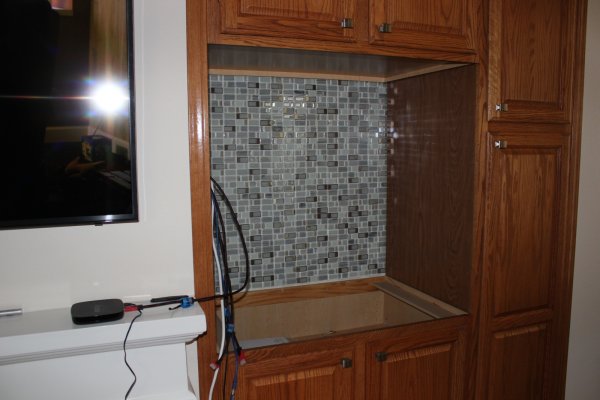
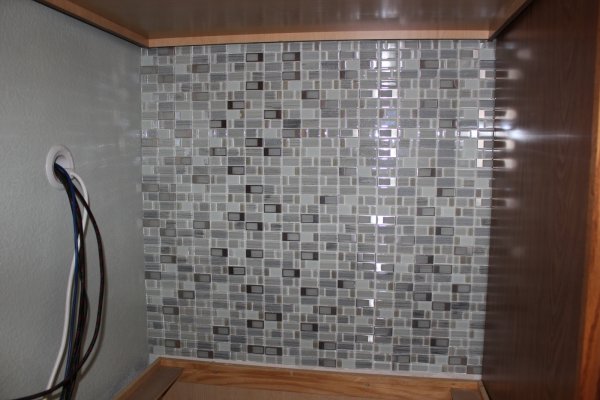
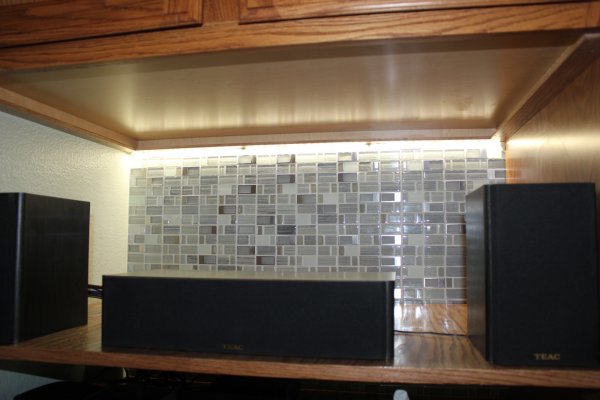
For a kitchen backsplash that extends behind a cooktop, big glossy tiles with minimal grout line width, like 1/8", makes cleaning a lot easier. Behind a cooktop, even with a good vent hood overhead that vents directly to outside, stuff is still going to spit and grease condense on the surface. Grout is a lot harder to clean than a glossy surface. Narrow grout lines means using unsanded grout, which I find is trickier on estimating setup time till wipe than sanded grout.

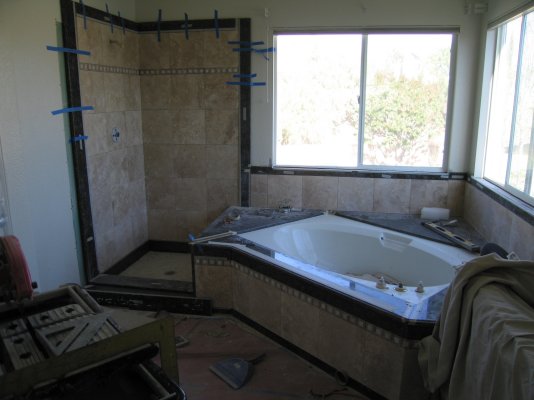
A few years ago it was the rage around here to make kitchen backsplashes out of little rectangles or other cut shapes of... can ya believe it... Travertine! Travertine, with all its natural holes and pockets, behind a cooktop! DW and I wondered how much ground beef those pockets would collect. Plus with small tile bits, all the grout lines, the total surface area in grout per square foot! On the other hand, a wall with small dull pocketed tiles like Travertine probably won't show a poor tile installation job (lippage, in-out-in-out like noisy road pavement, etc.) like glossy tiles will.
A good glossy tile job will look nice, and forever be easy to clean.

It's inevitable when laying tile that you will get some mortar sticking up too far between some tiles here and there. I have small pieces of thin cardboard, like 3" long by 1/2" wide, cut to size and pre-folded into a U around an object about the grout line width. For 1/4" wide grout line, a pencil works good. Narrower, a solid wire or whatever. I use them as a scoop, then throw out each one. Its quick and doesn't smear the the tiles with the mortar as it removes it.

Back Buttering - I ALWAYS back-butter tiles as the last step before placing a tile. When buttering, I really "burn it in", a thin layer all over the whole tile with the non-notched edge of a trowel. I have the tile laying upside-down when I do this, not holding it in the air by hand. So I can really burn it in to get maximum adhesion of the mortar to tile.

Grouting - The bigger the tile, the less grout cleanup you should have to do. I have never smeared grout all over bigger tiles with the float. Just near the edges of the tiles.

Oh one last thing - SAFETY! - Wear safety goggles when cutting tiles. I don't care if some tile setters that didn't graduate high school don't wear them. Even hands can get nailed pretty good with little sharp shards of porcelain tile when cutting with a diamond wet tile saw. I have a sprinkling can nearby to wash the tiny shards off my hands and the just-cut tile. And yes, I always cut tile outside.
 
Last edited:
Back
Top Bottom