Your recent repair? 2013 - 2020

Status
Not open for further replies.
The tire pressure was 5psi below recommended for the 4 tires. That car was at the dealership for a routine service a few weeks ago so they must have adjusted the tire pressure lower but I have no idea why.

I've had the same thing happen, it is because I set the tire pressures when the tires are stone cold, first thing in the morning. On the rare occasions it goes to a dealer and they set the pressures, they set it to the cold pressures, but the tires are warm or even hot from the half-hour drive there. Then they cool down and the pressures are low. So I ask them to not change the tire pressures but I check anyway the next morning.
 
I've had the same thing happen, it is because I set the tire pressures when the tires are stone cold, first thing in the morning. On the rare occasions it goes to a dealer and they set the pressures, they set it to the cold pressures, but the tires are warm or even hot from the half-hour drive there. Then they cool down and the pressures are low. So I ask them to not change the tire pressures but I check anyway the next morning.

Makes sense. I’ll ask them to leave the tire pressure alone next time.
 
I replaced a toilet seat in the guest bathroom. Used YouTube to guide me.
 
We just finished putting new slings on our deck furniture.

When he pulled it out of the shed this Spring, DH noticed that the fabrics was fragile due to age and sun exposure. I confirmed that in early May when I shifted my weight while sitting in one of the chairs and busted right through. Thank goodness it was me and not one of our guests; we all had a good laugh at my expense.

The set is from Lowes, at least ten years old. We certainly got our money’s worth. But the frames are still in very good shape so it seemed a waste to just throw them out. A local shop wanted $80 each to repair. For that amount of money I’d just buy new. So I did some searching on YouTube and gained confidence, then found the right fabric online.

We bought Sunbrella outdoor fabric, 60’ of new spline, and outdoor thread. Total cost of materials was less than $100. I used my sewing skills to put together the new seats and backs while DH worked on tearing the old stuff off. After some trial and error we found a good technique to get everything back together.

Very nice job !!
 
We just finished putting new slings on our deck furniture.

When he pulled it out of the shed this Spring, DH noticed that the fabrics was fragile due to age and sun exposure. I confirmed that in early May when I shifted my weight while sitting in one of the chairs and busted right through. Thank goodness it was me and not one of our guests; we all had a good laugh at my expense.

The set is from Lowes, at least ten years old. We certainly got our money’s worth. But the frames are still in very good shape so it seemed a waste to just throw them out. A local shop wanted $80 each to repair. For that amount of money I’d just buy new. So I did some searching on YouTube and gained confidence, then found the right fabric online.

We bought Sunbrella outdoor fabric, 60’ of new spline, and outdoor thread. Total cost of materials was less than $100. I used my sewing skills to put together the new seats and backs while DH worked on tearing the old stuff off. After some trial and error we found a good technique to get everything back together.

Very nice! Nothing like teamwork!
 
A few weeks ago the dryer stopped, unloaded it and after folding looked inside for stuff like socks. None were found, but found a crack in the drum maybe a 1/2" near the front edge.


Hmmm, service call, labor, parts, probably $300.- or thereabouts.


Brain storm, how about some two part epoxy. At the minimum it will postpone the inevitable. Mixed up some of the stuff, applied it liberally to the crack and beyond, setting the drum so the crack was the at the lowest point.


Let it set overnight. Have run it a dozen or so times since, it is holding up, the crack has not progressed. A bit of a thump at every rotation, but not too loud. Thus it is now an experiment. How long will it hold?

IIRC epoxy starts getting soft at around 175 degrees F. Might start sticking to your "stuff". Keep an eye on it.
 
IIRC epoxy starts getting soft at around 175 degrees F. Might start sticking to your "stuff". Keep an eye on it.
Yes, epoxy has a "transition temperature" at which it loses a lot of strength. It varies considerably according to the epoxy formulation, but I would guess it is fairly low for household epoxies. The good news is that it shouldn't get sticky again, just weak.


Let it set overnight. Have run it a dozen or so times since, it is holding up, the crack has not progressed. A bit of a thump at every rotation, but not too loud. Thus it is now an experiment. How long will it hold?
Was the crack of a type that you could "stop drill" the two ends? Drilling a generous hole in each end of the crack spreads the tension forces around and can be a good way of stopping the progression of the crack. This might be a good addition to your epoxy cure.
 
Yes, epoxy has a "transition temperature" at which it loses a lot of strength. It varies considerably according to the epoxy formulation, but I would guess it is fairly low for household epoxies. The good news is that it shouldn't get sticky again, just weak.


Was the crack of a type that you could "stop drill" the two ends? Drilling a generous hole in each end of the crack spreads the tension forces around and can be a good way of stopping the progression of the crack. This might be a good addition to your epoxy cure.


Yes it can be stop drilled on one end, the other end is under the front seal, might be able to get to it. Good idea on the stop hole. Soon as I "get round to it" will drill. The drum is thin stainless steel, will need to get the rght drill bit. So far the epoxy is holding just fine. None transferred to clothing or underwear:LOL: I even ran several steam cycles, the stuff is holding up well.


So far the experiment is good.
 
Last edited:
This morning I ordered and picked up my capacitor for the A/C at Grainger, it's nice that they have local stores to pick from, rather than waiting for delivery.

Plugged it in and now we have A/C :D , bringing down the house temp from 85 :D
 
This morning I ordered and picked up my capacitor for the A/C at Grainger, it's nice that they have local stores to pick from, rather than waiting for delivery.

Plugged it in and now we have A/C :D , bringing down the house temp from 85 :D

Congrats! From someone who once spent the whole month of July in Alabama without air conditioning (waiting for a replacement fan), I understand your excitement...
 
I've had the same thing happen, it is because I set the tire pressures when the tires are stone cold, first thing in the morning. On the rare occasions it goes to a dealer and they set the pressures, they set it to the cold pressures, but the tires are warm or even hot from the half-hour drive there. Then they cool down and the pressures are low. So I ask them to not change the tire pressures but I check anyway the next morning.


I was going to say the same. Just happened to me the other day. I went through the dealer's drive thru quick lube and there was a new guy there. When they hire a new guy without much experience, guess where they start him out? When he finished I must've been feeling grumpy and I challenged him " Did you check the tire pressures? Are they OK?" I don't actually think he did because he turned the key on and pulled up the TPS display showing the pressure on each tire. Then he surprised me by placing his hand on the tire tread and said "Yeah, the pressures are about 5 lbs high but your tires are warm so that's about right." I had actually forgot I had that data in the dash display. I guess this guy was trained.
 
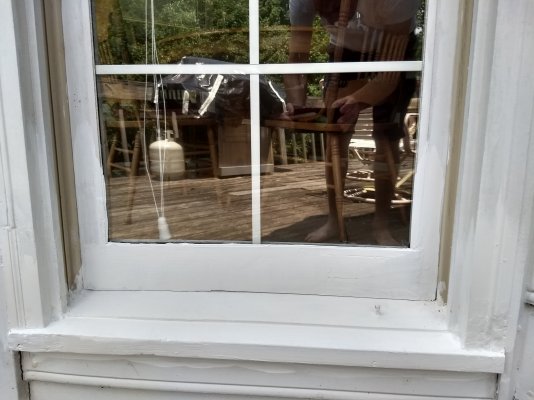
Here's a "before" picture of a rotted window that I posted in the 'Home Improvement' thread:
I'm just made a little discovery.
attachment.php


I've fixed (with Bondo) a few smaller rot problems, but I'm window shopping now. And I don't mean looking without buying.

When I researched replacement windows, they all go into existing frames. Since they didn't have the sill and didn't have the side jamb, that's two things that would have needed to be Bondo'd anyway. If I had to Bondo those two, I figured I'd Bondo the sash too.

I didn't take pictures during...just a before and after. My technique included making a few "forms" out of 1/8 luan strips, hot glued in place, and lining them with parchment paper. Then glopping in Bondo. For most of the volume, I cut scraps of Styrofoam siding, crammed those in, and slathered Bondo on top. It was a mess and took quite a few hours, but I got it to "good enough".
 

Attachments

  • IMG_20180703_123633274_HDR.jpg
    IMG_20180703_123633274_HDR.jpg
    485.1 KB · Views: 34
Here's a "before" picture of a rotted window that I posted in the 'Home Improvement' thread:


When I researched replacement windows, they all go into existing frames. Since they didn't have the sill and didn't have the side jamb, that's two things that would have needed to be Bondo'd anyway. If I had to Bondo those two, I figured I'd Bondo the sash too.

I didn't take pictures during...just a before and after. My technique included making a few "forms" out of 1/8 luan strips, hot glued in place, and lining them with parchment paper. Then glopping in Bondo. For most of the volume, I cut scraps of Styrofoam siding, crammed those in, and slathered Bondo on top. It was a mess and took quite a few hours, but I got it to "good enough".


Why not just replace the wood? Where I had rot I had them remove the old window and siding, put in new 2x4s for the windows, new windows and then new siding and trim...
 
Here's a "before" picture of a rotted window that I posted in the 'Home Improvement' thread:


When I researched replacement windows, they all go into existing frames. Since they didn't have the sill and didn't have the side jamb, that's two things that would have needed to be Bondo'd anyway. If I had to Bondo those two, I figured I'd Bondo the sash too.

I didn't take pictures during...just a before and after. My technique included making a few "forms" out of 1/8 luan strips, hot glued in place, and lining them with parchment paper. Then glopping in Bondo. For most of the volume, I cut scraps of Styrofoam siding, crammed those in, and slathered Bondo on top. It was a mess and took quite a few hours, but I got it to "good enough".

Yep! Good enough and a 10 footer!:D
 
Speaking of tire pressure, can anyone recommend a good tire pressure gauge ?

Everyone I have ever owned has been garbage. I tried to put a little air in my Rav4 tires tonight using my air compressor and the craptastical gauge I keep in the glove compartment first registered 75 PSI and then 10 PSI... helpful.

RANT: We can put Roadsters in space but we still have damn Schrader valves on our tires... hate them.
I have a qeeph round tire pressure gauge with about a 2 inch dial for the pressure reading which is far better than the stick model. Also includes a knob to release pressure. It is on Amazon. Bigger than the stick models but far more accurate (goes to 60 psi so no good for bicycles however)
 
I have a qeeph round tire pressure gauge with about a 2 inch dial for the pressure reading which is far better than the stick model.

Thanks. I note they also have a 100PSI model.
 
Why not just replace the wood? Where I had rot I had them remove the old window and siding, put in new 2x4s for the windows, new windows and then new siding and trim...
To replace wood would have required messy and extensive disassembly of a window not designed for disassembly. I did scab on a bit of brick moulding, but doing the same for the side jamb would have meant taking the sashes out (a big mess in the kitchen because these are old school windows). I have replaced a rotted sill before, and getting the old one out involved removing and replacing interior trim. But here, I got out without doing anything inside, and spending only $26 on a can of Bondo (and I used less than half the can).
 
Hoping for a non-repair. Very hot her these past couple days. The air conditioner is putting off a musty odor. I was going to try to clean it myself, but when I opened up the unit, the A-frame coil looked fine and I did not feel good about spraying it because the drip pan would not catch all the dripping from the cleaning and I didn’t want to make matters worse.

Then, yesterday, the air was not able to keep up with the heat. It was about 95 outside and I had my temp set at 76. During the hot part of the day, the house was only getting to 80. So the air, wasn’t cutting it. I don’t know if that was too much to ask of it, but the company will be here Wednesday to look at it. Wish me luck.

Well, not good news. The guy came out and said the unit was too old to bother working on. I’m sure I could fix it, but I agreed and he gave me a quote. Unfortunately, the quote floored me ($5,500) for a 3 ton unit seer 16. I have no way of knowing yet if that’s a good deal, but at the time, I didn’t much care because the unit was still working well enough.

Until today. Unit totally stopped working. Now I need to get it replaced which will require getting quotes. I hate that process but $5,500 for AC just seems like too much money. I was thinking more like $2K to $3K. We’ll see what I can find out tomorrow.


Are you in a situation where you could go buy 2 or 3 window AC units to give you some time? It might be worth considering. Smaller ones (get units that require 110VAC max so you can plug them in anywhere) cost a couple hundred each, so maybe $600 out of pocket. It won't take 90 minutes to put them all in. You could easily save their cost by getting a week or so to get some quotes or maybe even get your present unit fixed, if it is worthwhile. You can sell the units on Craigslist or put 'em in the garage for another crisis.
 
Just had a Trane 3.5 ton XR16 installed including air handler for $6,100. I also didn't realize the cost these days. I shopped around and those prices were somewhat consistent. It was an all in price with 10-year warranty. Oh well not a lot of choice when A/C breaks in Florida. The coil failed on the old one and would have cost around $1,800 to fix. Went new rather than have new coil/old machine/no warranty scenario to avoid the death from a thousand cuts scenario in the future.
 
Are you in a situation where you could go buy 2 or 3 window AC units to give you some time? It might be worth considering. Smaller ones (get units that require 110VAC max so you can plug them in anywhere) cost a couple hundred each, so maybe $600 out of pocket. It won't take 90 minutes to put them all in. You could easily save their cost by getting a week or so to get some quotes or maybe even get your present unit fixed, if it is worthwhile. You can sell the units on Craigslist or put 'em in the garage for another crisis.

Thankfully, it's not that hot in Michigan right now. Most important is that we're experiencing night time cooling into the 60's. I'll be fine until I can get it fixed. The one silver lining to this is very relevant to this board - it is a lot easier to deal with this while not working. If I get a bad night's sleep from the heat, no big deal. I'll take a nap. If it get to where I were to need a brake, I go have lunch and chill for an hour or so. But the best part is that while it hurts, it's not a critical blow to the budget for the year. Nice to be FI and RE'd.
 
Thankfully, it's not that hot in Michigan right now. Most important is that we're experiencing night time cooling into the 60's. I'll be fine until I can get it fixed. The one silver lining to this is very relevant to this board - it is a lot easier to deal with this while not working. If I get a bad night's sleep from the heat, no big deal. I'll take a nap. If it get to where I were to need a brake, I go have lunch and chill for an hour or so. But the best part is that while it hurts, it's not a critical blow to the budget for the year. Nice to be FI and RE'd.

My AC is on its last legs, I'm hoping to make it through this summer.
My Nephew on wife's side is in the HVAC trade so I should get the units at cost which he will install. I'll pay him and on his way out he slips what I give him back to my wife. I pay him because I think he deserves it and he just won't take from us. Oh well I try.
 
Status
Not open for further replies.
Back
Top Bottom