Samclem has clearly fixed way too many sprinklers and knows all the tricks. A nice addition to the Shopvac is excavating with the solid-stream spray of a garden hose. Unbelievably messy but you can stand back and hit the surrounding dirt with the water without worrying about accidentally crushing more PVC with a root digger or a trowel.
Good luck with the magic putty. I've used epoxy around a leaking solder joint but it took several applications and then the slow drip didn't stop for several more weeks.
You might be able to get away with patching a hairline crack using JB Weld or RTV. It'll certainly look pretty-- but every time the sprinklers come on, the water hammer in the piping will flex the repair a little bit and eventually break through again.
Two inches may be too big a break for this next idea, but you can buy a clamp-on PVC pipe sleeve. Unfortunately I think it's only 3-4 inches long. It's two half-pipes with interlocking joints. You slather PVC cement liberally on the broken pipe, slide one piece of half-pipe down one side and rotate it underneath, slather more PVC cement on the broken pipe, lay the second piece on top, and clamp them together until the glue sets. The problem is having the clearance to slather the broken pipe, to manipulate the half-pipes, and to clamp the assembled result. Another problem is making sure that you got all the shards of the broken PVC out of the pipe. You can flush out dirt & small gravel, but PVC shards don't go around bends very well and will eventually block up the flow again.
What's the concrete thing? Can you dig it out or cut away around the broken pipe with a cold chisel? If all else fails then you're going to be thinking that a cold chisel and a five-pound sledge isn't so bad after all. Unless, of course, that's a septic-tank cover.
You can get the PVC cut started with a fine-toothed pointy drywall saw or, if you're really lucky, a Dremel tool. If you're Vegas-jackpot lucky then you might be able to slide a jigsaw blade in there. Once you get a quarter-inch of room then you can follow up with a frameless hacksaw-- one that has the blade sticking out in front of the handle. You know, the kind where the extended blade breaks off the minute it touches the dirt on the other side of the cut. Have a spare blade or two on hand. Another option is a tiny PVC saw that's formed into a handle out of quarter-inch metal rod with an even tinier hacksaw blade across its gap. The hacksaw blade looks like a piece of wire with teeth on one side. It's hard to hold and the quarter-inch metal tends to bang into the dirt and get stuck.
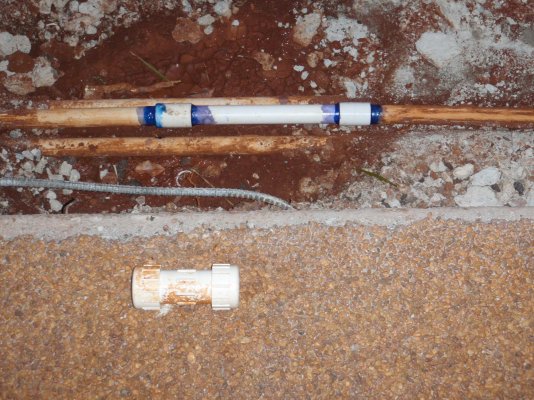
The slipjoint that Samclem mentions glues onto one end of the piping. You then apply glue to the other side, expand the other end, and glue that second joint. The challenge with this piece of PVC is that the slip joint in the middle (with its o-ring) may require you to screw down a cap to get the o-ring to seal tightly. (Don't break the PVC joints you just glued!!) A Ford wrench or a pair of vise grips can help grab onto the cap but it's a challenge to get it tight enough. And then the water hammer will flex this joint, too, so you have to leave the excavation open for a couple weeks and keep re-tightening the cap until it's finally seated.
I wouldn't recommend the double-ended version of the slip joint (see the photo below). They're very hard to position. Even if you get the cap on one end tight you'll almost never get the cap on the other end tight enough. Both ends have enough remaining flex that the water hammer shakes them loose, no matter how many times you re-tighten them.
If the adjacent pipe and the concrete give you an inch on each side of the broken pipe then you could try a PVC union. After you glue everything together then the two faces of the union will butt up against each other (including an o-ring) for you to screw down the coupler. (Provided, of course, that you remembered to slide the coupler onto the PVC pipe in the correct orientation before you glued in the two faces of the union.) The challenge with this connector is the same as the slip joint-- being able to tighten the coupler with a wrench or vice grips. Without torquing and breaking the PVC joints that you just glued.
If THAT doesn't work (I don't want to get into how I learned all of this) then try excavating the PVC pipe for three or four feet on both sides. (Hopefully you have enough room for this.) Now you'll have plenty of flex on the broken ends. Wedge them up out of the hole (using a root digger or a short piece of PVC jammed across the pipe and lifting from underneath), cut the ends square and clean them up, lay them back down in the hole, and carefully measure the gap. Cut your repair PVC a half-inch shorter than the gap. Glue one end of the repair pipe on to one of the excavated pipes with a butt joint and seat it firmly, which should leave you a gap of about 3/8" at the other end. Raise the end of the other pipe out of the trench and glue on another butt joint, seating it firmly also. If you've got everything seated tightly (and the PVC joints didn't push apart before the cement set) then when you lay everything back down into the trench your repair pipe will overlap that second butt joint by about half an inch... barely enough to seal the leak. Now lift the repair pipe out of the trench and carefully file 1/8" off the lower half of the exposed pipe. You're trying to turn the end from a squared-off joint to one that's been filed down slightly on the bottom. Take it easy-- it's better to go 3/32" than it would be to go 3/16".
This next step takes patience and confidence. When I said "three or four feet on both sides", that's where you get the necessary flex. Coat the butt joint and the last end of the repair pipe liberally with PVC cement, lift both ends of pipe out of the trench, and rest the repair gently against the butt joint. Note that you've neatly filed off the lip of the repair pipe which would normally interfere with the next step. Then try to torque both pieces of pipe to align with each other as you lower them slowly back into the trench. You have about 30 seconds before the PVC cement starts to set up-- "plenty of time". You'll feel the repair pipe pop into the butt joint and slide home. Once you have the pipe back in the trench, liberally goop more PVC cement onto the joints (PVC cement is cheaper than the alternative) and let it all set up for 24 hours.
As TromboneAl says, we want photos...
 )
) thanks for the suggestion