Your recent repair? 2013 - 2020

Status
Not open for further replies.
Our problem is that we are on well water. If we don't put some bleach in the tank, within a few months we have algae growing in the tank. My DH is in charge of this and he uses the bleach and replaces the tank parts when they go bad because of the bleach. I keep my opinions to myself, but he doesn't read my posts.
 
A few weeks ago the broil element in my 30+ yr old Kenmore electric wall oven died. Not a difficult repair; the real challenge was finding the replacement part at a reasonable price. Most places I searched indicated that the part was no longer available. The few I found that had them wanted a ridiculous price. Finally, I was able to locate one at an online appliance parts seller that was asking a fair price, though I was skeptical about their service based on their reviews. I took a chance and while there were a few hiccups along the way, I received the replacement element today and it is now installed and working fine. Good for another 30 years:dance:
 
Our problem is that we are on well water. If we don't put some bleach in the tank, within a few months we have algae growing in the tank. My DH is in charge of this and he uses the bleach and replaces the tank parts when they go bad because of the bleach. I keep my opinions to myself, but he doesn't read my posts.


Can't you use an algecide that is used for outdoor fountains?
 
I have the braided lines all over our house for the toilets and sinks. They work great with no problems. However, I have had corrosion issues with the larger braided hoses for water heater hookups. I switched to stainless flex hoses for those.

Speaking of corrosion, I noticed big blobs of rust on both of the tank bolts I replaced only 5 years ago. I used the silver (galvanized?) ones from Lowes. Next time I'll get brass bolts, which don't rust.
 
Our problem is that we are on well water. If we don't put some bleach in the tank, within a few months we have algae growing in the tank. My DH is in charge of this and he uses the bleach and replaces the tank parts when they go bad because of the bleach. I keep my opinions to myself, but he doesn't read my posts.

Hmm.. I've never seen mold grow in a toilet tank.

Is this a toilet that doesn't get used much? Otherwise I would think the fresh water coming a few times a day would prevent mold growth.

Maybe you could try vinegar, hydrogen peroxide, or baking soda instead of bleach? A quick Google search turned up this page on mold removal:

https://moldpedia.com/mold-removal
 
Our Pool pump died unceremoniously yesterday at about 11am. I checked all the usual, breaker voltage, external wiring, etc., they were all good. Obviously some surgery was needed.

First thing was to remove the back motor cover, a simple task with 2 screws.

Once the cover had been removed, voltage (220v) was checked again at the pump, and the motor spindle, it can easily be accessed now to see if it has siezed. In this case the spindle rotated freely with no binding and thus eliminated any siezed bearings or other obstructions.

OK, now as the motor was still connected to the pump housing, and the pump is plumbed into the system, access was limited, so it must be removed and taken to the workbench for additional diagnostics and repair. To do this one can unbolt the motor from the pump housing and remove the motor, or remove the whole pump to perform the surgery on the workbench.

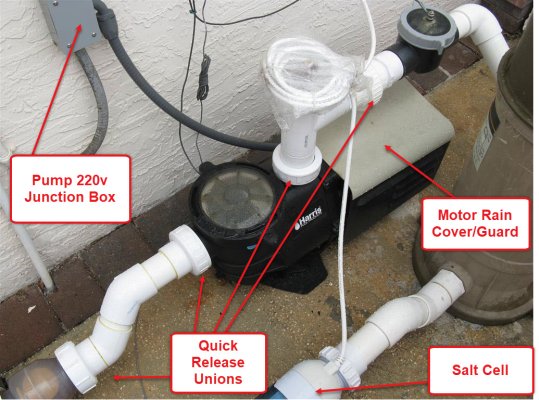
We have a salt water pool and live ~1 mile from the beach, so we suffer from anything salt/beach, salty air, salty water, sand etc. As I had replaced the pump last year, I plumbed the system to include quick release unions (See Pic), so the pump could be removed relatively easily.

Once the pump was on the bench, and the motor internals beneath the cover could be seen and access easily, it was clear to see the starter winding where it attached to the start capacitor was discolored. The wire could easily be pulled off the connector.

I removed the capacitor, and the 3 terminal wires checking the others for similar deficiencies. The other 2 were good.

I stripped back the offending wire and applied some flux and solder to get it well tinned. The connector it self was a little burnt, but with some cleaning, a wire brush, and some flux was easily tinned also. I re-attached the wire, crimped it in place (They were originally crimped), and soldered it securely to the connector to be sure it would not fail again soon.

Upon inspection, I checked the start capacitor and noticed the post was a little discolored also, and opted to replace it. It is a $10 part, I had one spare from a previous motor replacement, I like to keep parts if they are good.

Once re-assembled, I tested the pump on the bench by switching it to 110v operation, :dance: it worked. I made an assumption that it would work back in it's place at 220v, so I switched it back to 220v and replaced the rear cover.

Once installed it worked fine as it did before. The key to this was the original installation using the quick connect unions, I highly recommend them. See the pic of the pump in it's service position.

The moral of this story is that it always pays to check something yourself if you have some basic electrical skills and a Voltmeter. If I had hired a service person, for sure they would have just changed the motor at best, or at worse the complete pump. I did the fix for $10 vs ~$300 + Labour.
 

Attachments

  • IMG_9450 (Medium).JPG
    IMG_9450 (Medium).JPG
    189 KB · Views: 23
Yes good on the pool pump. The quick releases are a definite plus. I redid mine a few years ago and bring both the pool and spa pumps in for the winter when I close them. Always a chore each spring to get everything open and up and running again. Looking forward to downsizing to no pool or an indoor one that someone else looks after.
 
Did some pre-Christmas tasks. Took one of the gas fireplaces apart. Cleaned the glass. Took the logs out and vacuumed out all of the corrosion. Sanded down the oxidation on the sparker which was not working as well as it should. Put it all back together and looks like new and starts instantly as it should.

Re-grouted some cracked areas in the slate floors in the kitchen and entrance ways. Changed a door knob that had been bugging me for over a year.

Removed the guinea pig house from the sunroom - the last of the children's zoo finally expired. This was the Dorian Gray of guinea pigs! Outlived it's flat mate by 5 years.

Chopped some firewood and topped it off by barbequing some steaks. Has been unseasonably warm the last few days so picked some up at Costco. Delicious.
 
I don't know if it qualifies as a repair, but I replaced the bowl on our food processor yesterday. We received a West Bend 6500 processor as a wedding gift over 33 years ago. We don't use it a lot, but I have really liked the small size and it still works great. Unfortunately, the little tabs broke that hold the plastic bowl to the food processor. Figuring it was a long shot, I searched to see if I could find a replacement bowl for our 33 year old processor. New ones are no longer available, of course, but was surprised to find several used ones on Ebay. I picked one and it arrived a few days later. It was sold as used, but it looks brand new and fits our processor perfectly. Super simple repair, but I am thrilled we can keep using our little food processor.
 
My last repair was on the washer, it went of balance on spin. After googling,
I found the suspension springs are often the problem. But I found one tech say, before you order the springs, make sure the basket is not froze to the shaft. Mine was and it took a lot blows on the end of a 4x4 to get it off. Once it was off I cleaned it up and reinstalled it and it floated as it was supposed to. During the third load it went unbalanced again, ie, we got two loads before it malfunctioned again. I ordered the springs and installed them, it has been working great ever since. Now I do an occasional check on the the basket to make sure it slides up and down on the shaft.


I admittedly overloaded our paper shredder and it died. I opened it up cleaned all the paper out, checked the fuse, checked all the diodes and transistors, visually inspected the caps and the pcb soldering. All looked correct except for one component lead that did not get cut short. It was laying over on two other soldered leads, but didn't look like it arced, but it looked like it could have caused a problem. I cut it off, and plugged it in. The green light came on! So I reassemble it and it works fine. I don't really know what fixed it.


On our side by side fridge/freezer the freezer was icing up, I found the defrost heater had went open, I replaced it and it is fine. Also on the ice maker there was a steel pin that fell out so the cork screw would not rotate. Luckily I found the pin and drove it back in. I had to replace the solenoid operated valve to get water in the door to work. The fridge is almost 25 years old, wonder him many more years it has.


I had to replace the high heat thermostat on the dryer, it went open and caused no heat in the dryer. Also replaced a broken belt on the drum years ago.
I sound busy, no, these were over many years.
 
Wifey told me our washing machine had a drip inside the tub. It was slowly filling with water. I took a few minutes on YouTube to help find out what the problem might be. Ordered a water inlet valve. Installed it along with some new hoses. All seems right with the universe again. :dance:
 
My $100 El Cheapo 3-burner grill that I bought a couple of years ago began having a problem with one end of one of the sheet metal burner covers falling down on top of the burner when the grill heated up. Rather than take the hint and break down and buy a new grill I decided to repair it since everything else still works.

The burner covers are held in place at one end by tabs on the covers going into slots on one side. No problem with that end. On the other end of the covers they're held up just by indentations stamped in the side of the grill case. So I drilled a few 1/8" holes just below the indentations and put pop rivets in. They extend far enough to hold up the burner covers. I did wonder if it would get hot enough in there to melt the aluminum rivets and it seems that the melting point of aluminum is a bit over 1,200° F and since the grill temperature gauge only goes to 800° I figured I'm good. If not, I'll replace the melted rivets with steel screws. Or go hog wild and spring for steel rivets.

One of my burner plates (whatever they are called, an angled piece of stainless steel that goes over the burners) had burned/rusted through, and I bridged it with some 1/8" aluminum angle stock. Later, I had a very interesting, shiny paperweight on the bottom of my grill!

So direct in the frames gets over 1200F, but I don't think the sides get near that. I think you'll be good. In fact, I lined the sides of mine with some other aluminum scrap I had, only used it a few times, but I think that will hold up. Need to spring for new SS burner plates for the parts in direct flame.

-ERD50.

That is funny.

When mine burned/rusted out, I took some scrap metal, including a big metal coffee can and shaped them so they would fit in.
It was so cheap, I can afford to do it again if needed :LOL:
 
So we got back from a trip, stuck overnight in Charlotte due to Ohare airport closing.
We had known it would probably close as they frequently do in a big storm and had toyed with the idea of grabbing a short cruise to wait out the storm. But no cruise was cheap and appealing enough to overcome the "change flight" issue it would cause.

Lucky for us we got back when we did, as the house was really cold inside, the batteries on the programable thermostat had run down (after about 10 years).
There was a tiny message at the bottom of the display saying "battery low".

The house temp was 43 F. and it was a bitter cold coming that night.
I put new batteries (2 AA) in and the furnace turned on and has been running fine all week :D

I didn't even know/remember there were batteries in those things..

That shouldn't have been problem. The batteries are only for backup during power outages. If you had power the thermostat should have continued working, even if the batteries were dead. At least, that's been my experience.
 
My previous thermostats had a battery warning. If you had a non-functioning thermostat, nothing would come on.

My current thermostat gets power from HVAC. No batteries required.
 
That shouldn't have been problem. The batteries are only for backup during power outages. If you had power the thermostat should have continued working, even if the batteries were dead. At least, that's been my experience.

We had power, and none of the devices sensitive to a power outage were blinking, so we had power they whole time we were away.

Yet the furnace was off, and the house was cold, and when I replaced the batteries and snapped the thermostat back on to it's backing, the furnace turned on.

I think it's a terrible design for my thermostat, that a dead battery means a dead furnace (probably a/c as well).
 
While we were away, I checked on 2 camera's I had installed to see how they worked.
They were impressive, and would send me alerts via email if they heard something (like the phone ringing) or saw motion (like the snow plow going by at 5am with flashing lights, or another light on timer turning on/off).

They only cost me $20 each (on sale), so I'm thinking I need another just to point at the thermostat to see the house temp.
 
That shouldn't have been problem. The batteries are only for backup during power outages. If you had power the thermostat should have continued working, even if the batteries were dead. At least, that's been my experience.

I guess the issue is that the furnace doesn't receive a signal to turn on (or off) if the thermostat display isn't working.
 
I guess the issue is that the furnace doesn't receive a signal to turn on (or off) if the thermostat display isn't working.

Mine are newer so maybe there's a difference. But if they lose internet connectivity they keep doing whatever the schedule programmed into the thermostat says. And yes, if the thermostat isn't working, the system probably won't work. But having that all tied to a battery is crazy design, and not anything I've ever heard of. The thermostat gets power from the wires, and the battery is there to maintain the programming/time in case of a power outage. If that's really the way that particular thermostat works, I'd replace it toot sweet.

I guess there might be wiring situations where there's no power coming in, similar to my recent "no neutral wire" electrical issue. If that's the case I'd put that battery on my yearly schedule to replace, just like my smoke detector batteries. That's the yearly schedule that I do every couple or so years.
 
I replaced my 7 day programmable heat/cool battery backed up thermostat with a good old fashioned Honeywell round dial manual one because I got tired of reprogramming it.

I turn it down before bed and I turn it up when I wake. I turn it way low when I vacation.
 
I've only had mine (4 of them at two houses) for 3 years or so, but I've never had to reprogram them unless I changed my preferences. We've had power outages, but that's what the battery is for.

Doing it manually is pretty simple, but I like automation. I've got programmable thermostats, and timers on many of my lights. Also on my router and cameras, just to make them reboot automatically when I'm away. I leave the timers active whether I'm there or not. Somewhat for security, but also largely through laziness. Laziness and automation worked well for me during my career, and it's carrying over well as a FIREee.
 
Status
Not open for further replies.
Back
Top Bottom