Building a house, how small is too small?

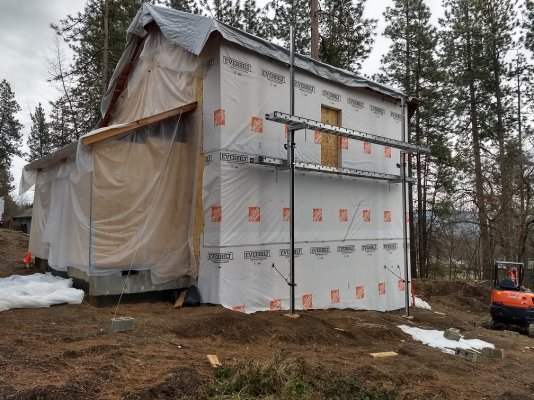
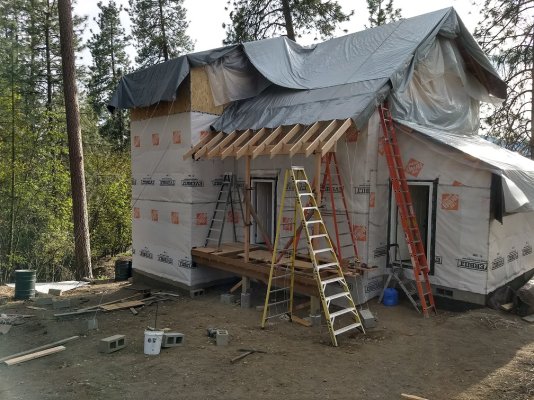
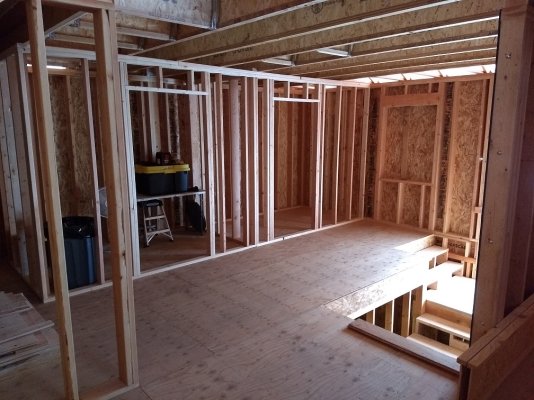
Around here they usually put up the framing and then the OSB on the upright framing.

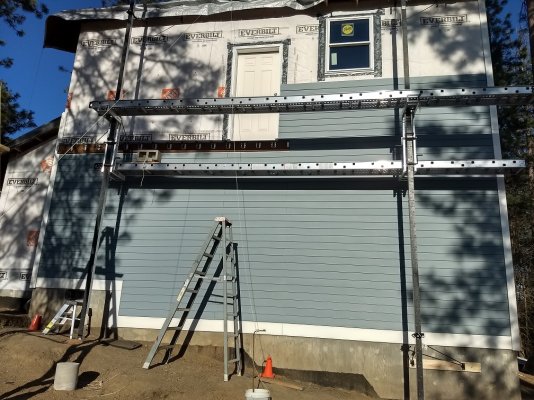
Too late now, but if you were spray foaming I would have recommended that you frame a 2x4 wall, then put 3/4" strapping perpendicular to the studs, put the walls up and then OSB on top of the strapping. Then when you sprayfoam, the foam oozes behind the studs... so thremal bridging is only where the studs intersect with the strapping. IMO easier and cheaper than adding a 3/4" layer of foamboard to the wall studs under the OSB.
 
It seems actually safer and easier to put the OSB on the 2x6 walls while they are square/flat on the subfloor instead of two slightly older people trying to wrangle them on ladders one or two stories up on the outside of the house.
 
Heh, that is for cleanout (I think it will never be used because I think the drain pipe will never have water in it based on what I noticed in the trenches during the 1" per day rainfall we had earlier this year). The stand pipe will be cut off closer to the ground and capped, but maybe would allow you to snake something into the footing drain system to removed a stoppage. I was actually thinking of making a little robot that crawled inside the pipe if it came to that. :)
This an opening for my plumbing story.
We had been in our 30 year old home for about 5 years. The bathtubs were draining slow and I had tried chemical drain cleaners and the problem didn't get any better. I had resolved to did a big hole in the yard, cut the pipe and install a cleanout so I could run an auger through to clean out the drain pipe. I waited until the week end, prepared for an aching back, I started digging and on the third shovel of dirt, I HIT A CLEAN OUT! I was elated, I had no idea that there even was a clean out. I cannot relate the joy I felt when I hit that clean out.

I went and rented an auger and ran it both directions and my problem was solved. It's now 20 years later and I think I'm getting close to doing the auger bit again, but that clean out has been clearly marked for the last 20 years.
 
We got up the first couple of walls yesterday. After scratching our heads a bit over the weight of a 16 foot long 2x6 wall that was sheathed in OSB (must be something like 400 to 500 pounds) we tried out these things called wall jacks. They climb a 2x4 as you pump the handle so you can use two of them to lift a wall. It is still scary but not quite as "here, hold my beer" as other methods I guess. We used a safety strap and stops to keep the wall from being able to keep going over, and we braced it well after it was vertical while we made final adjustments.

Awesome, it will all change quickly now!

We built our walls in 8 foot sections so my wife and I could lift them ourselves. Like you, we framed and sheathed the walls before lifting. It's easier to nail, easier to square up, and keeps things from moving around while lifting.

We did struggle with a few of our interior walls. They weren't sheathed, but were 2x6 walls, 14 feet high, filled with headers and inset diagonal bracing. Those were heavy and we struggled to get them up, but we pushed through and got them vertical.
 
Winter is over, back to building. We actually did a bit of building during the winter on the house between snow melts. We have been alternating between putting on the back siding and building the front deck depending on wind/rain. Soon the tarps will go away and we can finish the dormers and actually shingle the roof. The mansard roof tower will be the last thing we build as it is very complicated. Before winter we built a temporary shed roof on the tower but it will be about 10 feet higher than that with the short walls and steep mansard roof.

The alumapole pump scaffold system we are using is awesome. We can work 20 feet in the air without being on a ladder. We do use safety harness though.
 

Attachments

  • house3.jpg
    house3.jpg
    1.4 MB · Views: 77
  • house4.jpg
    house4.jpg
    1.3 MB · Views: 75
  • house5.jpg
    house5.jpg
    1.4 MB · Views: 76
Nice progress. Watch out for that first step out the door:LOL:How many sq ft did you end up with
 
Coming along nicely!! I miss building project like that and always crave to build or create something.

My chance might come to do some building, if I can get a deal done on some land I'm trying to purchase.

Outstanding, please keep us posted on your build.
 
Nice progress. Watch out for that first step out the door:LOL:How many sq ft did you end up with

Hah, yes it is quite the drop out the back door :)

We are starting on the back deck this week, you can see I have already installed the ledger board up there with Simpson brackets ready to go and have 12 inch pillars poured 36 inches deep with 24" bigfoot bases. The back deck will rest on three pressure treated 6x6 poles that are about 13 feet long. It is WAY up there! Should make for a nice view of the mountains when sitting out there.

The house is right at 1400 sq-ft.

This is the indoor stairs with a door at the landing that leads to the back deck. I managed to snag select grade 2x material to make the stairs but they will be covered with hardwood eventually.

Retirement is hard work!
 

Attachments

  • house2.jpg
    house2.jpg
    1.2 MB · Views: 66
  • house1.jpg
    house1.jpg
    1.3 MB · Views: 65
Last edited:
Looking good. We finished renovation of our 2400 sqft house and moved in two months ago.
 
That is looking really nice! I scan through here to get details on the lot is that really only a quarter acre? It looks really nice with the trees that are there.
Craftsman style built-ins will give you more room.
It is something to think about when you're limiting your space to look at each volume as a potential usable unit.
 
Last edited:
This is the indoor stairs with a door at the landing that leads to the back deck. I managed to snag select grade 2x material to make the stairs but they will be covered with hardwood eventually.

Adding blocking between the studs on the stair wall(s) makes it easier to attach the railing.
 
Yes what he said above. Also be sure to put ADA height blocking in the entire bathroom if you can, that way if you want to add an ADA handrail anywhere it's super simple.
We did that with both our bathroom remodels. It's just a few bucks of 2x6 and a handful of screws but it's priceless later to be able to just throw something up against the wall That's strong.
 
Thanks. It is a good idea on the blocking for the railings on the stairs. Most likely my wanna-be architect wife has already planned that but I will keep it in mind in case she missed it. I am pretty much the grunt labor, cut this board to length, nail here. :D

But really, there is some fun in the project at times with problem solving. It reminds me somewhat of playing puzzle games. Example: We chose to make the double 2x10, 17 foot long beam for the front porch on the flatbed trailer so we could do the 16D nailing schedule (and after that even used Simpson Timber screws too lol. We put a piece of 1/2" marine ply in-between the sandwich to make the overall width 3.5" which matches the 4x4 posts of the porch above the deck floor (nice 9 ply stuff I had on hand from another project). Anyway, all of this made for a pretty heavy item for two old people to hoist 13 feet in the air. My wife had the idea to screw a 2x6 into the side of the tower sticking out a couple of feet and we leaned the beam against that so we were both able to lift the other end up in the air. It worked like a charm and was probably safer than my idea of using the excavator :D
 
Put on some Fiberon composite decking on the front porch.

Such a PAIN to install, or at least to install to our standards, which included lasers and straight edges to get everything perfect. You have to drill first with a 7/32 drill bit about 0.4" deep then you drill through with a 1/8" drill bit, then you set a cordless drill to the highest speed setting and power down on the special Fiberon screws without slowing down such that they sink in enough where you can put in the matching plugs. It does look very nice when done but I can't see a contractor using this stuff. It was taking us about 30 minutes per board!

The stairs there are just temporary.
 

Attachments

  • porch.jpg
    porch.jpg
    1.3 MB · Views: 95
Looking really wonderful. Terrific that you are posting the photos.

Did you rent or buy the alumapole pump scaffold system ?

We bought it. OMG if we were renting it we would be broke as slow as we work. I can't say enough good things about it though....you just pump yourself up and down 20 feet in a few seconds.
 
Almost done with the back side of the house siding. We pre-painted the siding before installing it and are handling it with pretty good care in effort to not have to paint the house after installation. We also pre-painted the trim.

I think Monday we take down the scaffolding and start on the back deck (you can see we have installed the ledger board and Simpson hangers already). After *that* we can put Titanium 50 underlayment, ice barrier, and shingles on the roof. Except the tower, which is yet unfinished and will be after we finish the main roof because it is complicated as hell.

I want to go back to w*rk. Retirement is hard.
 

Attachments

  • backhouse.jpg
    backhouse.jpg
    1.4 MB · Views: 93
Very nice! Retirement can be exhausting but a fun exhausting! Please keep us posted on the home build.
 
About the composite decking...you didn't use the hidden fasteners? The edges need face fasteners, but if you buy the grooved boards, the hidden fasteners manage the field. I wonder if that would be any faster.
 
I like the color and it's looking pretty sharp.

Are you going to hire out the roofing, and will there be any metal roofing on any part ?

I like to avoid painting houses, something I did in my younger years. So I'm wondering is there something special about the siding you picked even though you will have to paint it in 15->20 yrs ?
 
Back
Top Bottom