Your recent repair? 2013 - 2020

Status
Not open for further replies.
Some of the members are pretty young though. The best part about this forum for DIY advice is the large membership. I think it compares well to responses I'd get on doityourself.com.
 
Originally Posted by ERD50 View Post
The amps that the A/C draws has almost nothing to do with the amp rating of that capacitor. It's only part of the circuit.
It's a part that runs practically everything aside from the display. Seems it would be touched by the amps that the AC draws at some point. How much of it is stored and discharged is the question. I believe everyone who says it's not deadly but I think you're all right the way people who listen to "the word on the street" are often right. I try not to get life or death information from such sources.

Boho, you have no idea what you are talking about. That bold makes no sense at all. Why do you say things with certainty, in areas where you have no knowledge?

The start/run capacitor for the fan motor does not "run practically everything aside from the display". That's non-sense. The main current draw in a A/C is the compressor motor.

Regardless, a run/start capacitor doesn't even "run" the motor, it only sees a portion of the motor current, to provide the needed phase shift during the start/run period.

I'll stop here, this is degrading the useful knowledge in this thread. If you want to learn electronics, there are sources for that. In the mean time, stop pretending you know what you are talking about, and stop challenging people who have 45+ years experience and some accreditation and accomplishments in the field.

-ERD50
 
The start/run capacitor for the fan motor

I think you've mentioned before that the fan motor capacitor is separate from the compressor capacitor, and it sounds like you're saying it again. I read "In many cases, compressors and the condenser fan motor share a dual capacitor." I was under the impression that's what my AC has. All I know about you is you were in manufacturing somehow, then you tell me ACs have two different capacitors. I'm not going to be messing with AC capacitors solely based on what you tell me.

https://highperformancehvac.com/run-start-capacitors-hvac-motors-1/

A motor AC run capacitor (or start capacitor) can cause serious injury or worse

The start/run capacitor for the fan motor does not "run practically everything aside from the display". That's non-sense. The main current draw in a A/C is the compressor motor.

Well, it starts the compressor and the fan (the dual type), right? I've heard it takes more power to start up.
 
Well just to continue this horse flogging, run capacitors are across the motor windings, this discharges the cap almost immediately at shut off.
Not true of start capacitors.
See motor/cap circled in red.
 

Attachments

  • Air Cond, Fan and  Comp Caps.jpg
    Air Cond, Fan and Comp Caps.jpg
    65.6 KB · Views: 18
I think you've mentioned before that the fan motor capacitor is separate from the compressor capacitor, and it sounds like you're saying it again. I read "In many cases, compressors and the condenser fan motor share a dual capacitor." I was under the impression that's what my AC has. All I know about you is you were in manufacturing somehow, then you tell me ACs have two different capacitors. I'm not going to be messing with AC capacitors solely based on what you tell me.

https://highperformancehvac.com/run-start-capacitors-hvac-motors-1/


Well, it starts the compressor and the fan (the dual type), right? I've heard it takes more power to start up.

You could have any number of electrical and physical arrangements for the capacitors for the fan and/or compressor, it just depends on the particular design. But that's not my point.

My point is you keep making statements and assumptions that have no basis in anything. The nameplate rating on a unit does not mean that any particular component in the unit will be handling that current. As I said, it could be far less, it could be far more. It depends.

If you got the right capacitor for the model, you should be OK. Trying to apply a warped sense of electronics to the problem won't get you any where.

It's repaired, let's move on.

-ERD50
 
One note of caution - keep away from LCD/LED displays.
In this instance, the motherboard was completely removed form the case.
I learned this the hard/easy way. I put the treadmill I got from FIL on Craigslist and couldn't find batteries, so said "timer might not work". Lots of people contacted me anyway (closed gyms, and all). But the deoxit thing...I found batteries and got the timer working by spraying the corroded battery terminals. The LCD was flakey even before; pressing on it mad it darker (visible) or lighter (invisible). Then, when the guy came to look, the LCD didn't show anything. I suspect the Deoxit made it's way to the LCD connection. But it wasn't "the hard way" completely because he still paid full asking price :)
 
Headliner repair

The cloth that covers the headliner in my car suddenly fell away. One day, perfect, the next, I couldn't see out the rear view mirror. Pulling the hardware (lights, visors, etc) was easy and obvious. Getting the panel out of the car required bending the panel. At the time, I had not checked YouTube, but wrangled it out. Then I cleaned off the degraded foam. Only then did I go inside, find a video, and see if I "did it right", hehehe!


I ordered new cloth and glue. Kinda steep at $70 (delivered), but went with the one with the couple hundred mostly positive reviews (I'd like to not revisit the problem).
 

Attachments

  • IMG_20200713_102152136.jpg
    IMG_20200713_102152136.jpg
    997.8 KB · Views: 39
  • IMG_20200713_110920360.jpg
    IMG_20200713_110920360.jpg
    599 KB · Views: 38
You thought I was done with my AC, didn't you? Well, I'm considering how to cover the back which sticks out past the sleeve on the terrace. IIRC, the original AC (early 1970s) was built somewhat like a window AC, with a covered back, so it went past the sleeve without looking too weird or being too exposed and the fins did their job of directing the air properly. This "new" 14 year old one is made to be used with a proper through-the-wall sleeve (I think the instructions said it "must" be used with one). From what I've heard a few years ago, there's like one person in my large building who has a proper sleeve for their AC and everyone else leaves the back cover off and lets it stick out. I'm not sure if the backs of their ACs look like mine.

So, I can buy a proper size sleeve and grind down the brick so it fits, like contractors did when they replaced all but the terrace sleeves for the whole building. If I do that I see myself getting in trouble for the dust, or else asking for permission and being told to hire a contractor (I live in a co-op). I could chisel off a layer of bricks and build it back up a bit with some kind of mortar, avoiding grinding. Or I can rig up a way to extend the current sleeve, dealing with the fact that I wouldn't be able to benefit from more vertical room that would help me tilt the AC properly.

For the last 14 years, I somehow had it barely tilted well enough so that it didn't leak in, at least not that I could tell, even with the rear cover on. It stuck in too much but I dealt with it. After I fixed it and put it back with the back cover on, it was noticeably leaking in (and out) significantly, which is why I'm letting it stick out, uncovered. I THINK it's tilted better this way, though there's no water dripping from either side now so it's hard to tell.

Anyway, I'm working on rigging something up for now. I don't want to knock something into the fins.
 

Attachments

  • terrace-view.jpg
    terrace-view.jpg
    585.8 KB · Views: 34
Speaking of air conditioners, and I'm not sure this counts as a repair but it saved me money, my upstairs AC unit decided to blow 86 degree hot air into my bedrooms last night. Halfway up the stairs to the bedrooms I got a clue real quick when I hit that wall of hot Atlanta summertime air.

I had to change the start/run Cap in this unit last summer so didn't know what to expect. Going outside I found the compressor fan running but wasn't sure if the compressor was for sure. Turned off the entire system for five minutes, turned it back on and it started flowing with cool, sweet air. I had already arranged for a repair call for this evening (soonest available) but I can't ever seem to stop myself from putzing around when something fails. Cancelled the repair call today a few hours before the service window I was given as the AC has been fine since the reset last night. Hope I don't regret that later.

We had a number of power dumps yesterday of such short duration some of my clocks blanked and some did not. I'm thinking the compressor shut down during one of those episodes.
 
We had a number of power dumps yesterday of such short duration some of my clocks blanked and some did not. I'm thinking the compressor shut down during one of those episodes.

That could be it, if the overload switch didn't reset after one of the power outages. If it does that again though, pull the front screen and air filter off and look for icing on the evaporator. If it's iced up, that A/C is a goner unless it's within the normal five-year warranty window for the sealed system. An iced-up evaporator on a window A/C is a strong indication of a sealed system leak, although some other unusual circumstances can cause it.
 
That could be it, if the overload switch didn't reset after one of the power outages. If it does that again though, pull the front screen and air filter off and look for icing on the evaporator. If it's iced up, that A/C is a goner unless it's within the normal five-year warranty window for the sealed system. An iced-up evaporator on a window A/C is a strong indication of a sealed system leak, although some other unusual circumstances can cause it.

Both of mine are honest to goodness split systems, one for the upstairs and one for the downstairs. This was my newer 10 year old system located in the attic. The downstairs unit is 29.5 years old and I have learned a lot of repairs with that system but it just keeps on chugging away. Upstairs is always a challenge as it was last night.
 
My old Sony dual cassette tape deck tc-w320 won't come on when I push in the power button. Ugh. A quick search makes me think and hope it's a fuse. Will have to take it apart and look. Another problem it has is that one of the tape doors is stuck closed with a tape inside, can't eject it.
 
My old Sony dual cassette tape deck tc-w320 won't come on when I push in the power button. Ugh. A quick search makes me think and hope it's a fuse. Will have to take it apart and look. Another problem it has is that one of the tape doors is stuck closed with a tape inside, can't eject it.
First thing I thought of, is the Eject button a mechanical eject, or is it really a switch for an electrical eject? If electrical, it won't work if there's no power.

Quick search:
https://www.manualslib.com/manual/241634/Sony-Tc-W320.html?page=15#manual

See the last page, Troubleshooting Guide, second symptom: The eject button does not function. Bingo!
 
Well just to continue this horse flogging, run capacitors are across the motor windings, this discharges the cap almost immediately at shut off.
Not true of start capacitors.
See motor/cap circled in red.


The cap you circled in read is not only the 'run' capacitor, it is the 'start' capacitor. They are the same thing.

Look at the motor windings. There are 3 connections labeled R, S and C. R is Run. S is start and C is common. One winding is between R and C or run and common. This is the run winding of the motor. Then there's the winding between the S and the C connector. This is the start winding. The same voltage that feeds the R or run terminal also feeds the S or start terminal but through the cap. The cap is a booster, like a battery, to kick start the inductive load of the start winding which boosts the run winding.


You could be right, but, a start capacitor is usually disconected after the motor starts. Also, it is labeled "RUN".


Why Must a Start Capacitor Must Drop from the Circuit After the Motor Starts?

To avoid burning out the motor windings or the capacitor itself, the huge current delivered by the start capacitor has to be turned off once the electric motor is running.


"There are two reasons the start capacitor can’t stay in the circuit full time.
1. The start winding of the compressor can’t carry such a heavy current continuously without overheating and burning out.
2. The start capacitors are made very compact and would overheat in a short while because they aren’t big enough to dissipate heat as rapidly as it’s generated."

https://inspectapedia.com/electric/Start_Capacitor_Operation.php


The capacitor causes a large phase shift between the start and the main windings resulting in more torque to start the motor.
https://www.brighthubengineering.co...n-about-capacitor-start-induction-run-motors/
 
First thing I thought of, is the Eject button a mechanical eject, or is it really a switch for an electrical eject? If electrical, it won't work if there's no power.

Quick search:
https://www.manualslib.com/manual/241634/Sony-Tc-W320.html?page=15#manual

See the last page, Troubleshooting Guide, second symptom: The eject button does not function. Bingo!

Telly, thanks for the link. I was able to read it. The eject function is mechanical. It used to eject even with power off. In fact it ejected with power off just 2 hours ago. Then I bought 2 new fuses and put them in, turned on the machine, and now both tape doors are stuck closed, with cassettes inside, and won't eject!! Or play, or do anything. I should have removed the tape from the door that was still working, before I started fixing it. Now I know the replacement fuses have not immediately blown, which is good news, but it looks like there is some kind of a rubber belt problem going on, according to the internet wisdom. When I power on the deck, both motors make noise , trying to do something 3 times in a row, then everything comes to a halt until I push any button, then it tries something 3 times in a row again. I can see one of the belts looks very stretched and soft. Will have to see what youtube has to say about it. I think you can buy the 4 rubber belts it needs for $9 total, but it is a PITA to replace them.
 
You could be right, but, a start capacitor is usually disconected after the motor starts. Also, it is labeled "RUN".


Why Must a Start Capacitor Must Drop from the Circuit After the Motor Starts?

To avoid burning out the motor windings or the capacitor itself, the huge current delivered by the start capacitor has to be turned off once the electric motor is running.


"There are two reasons the start capacitor can’t stay in the circuit full time.
1. The start winding of the compressor can’t carry such a heavy current continuously without overheating and burning out.
2. The start capacitors are made very compact and would overheat in a short while because they aren’t big enough to dissipate heat as rapidly as it’s generated."

https://inspectapedia.com/electric/Start_Capacitor_Operation.php


The capacitor causes a large phase shift between the start and the main windings resulting in more torque to start the motor.
https://www.brighthubengineering.co...n-about-capacitor-start-induction-run-motors/


Notice the 'start/run' capacitor is not across the motor winding, it's got it's own start winding. Therefore it doesn't drop out upon start up. Aftermarket hard start capacitors come with a relay attached that will drop it out however.

If the motor didn't have a start winding, then maybe the capacitor would need to drop out, but I've never seen one on a schematic that way.
 
I guess we are into semantics.
The schematic I posted calls them run capacitors. They are in the circuit while it is running. My definition of a start capacitor is a capacitor put in the motor circuit to start it. Called a start capacitor.

Note PSC motors do have an always connected capacitor and a start winding, but those aren't used as compressor motors, but are used as fan motors. As far as I have found.


Note 2nd and 3rd schematic drawings.
https://www.brighthubengineering.co...n-about-capacitor-start-induction-run-motors/


The point of my original schematic post was to show that there would be no charge on a run capacitor.
 
Along the electrical repair theme, DW informed me the vacuum beater bar motor was not working. The way it is designed, a small electric motor drives the beater bar, when both a switch on top (beater on or off for smooth floors or carpet) and a position switch that is normally closed to start the beater bar motor when the top is tilted back. That position switch is what was not working. So I just removed the switch out of the circuit so it is permanently closed (connected all the time). Now the beater bar still works when the top switch is engaged. Sure the beater bar will be rotating when vacuum is in the upright position, but so what. It is fixed for one small crimp connector and about 30 minutes of time, most of which was figuring out how to get it apart to access that position switch. Sorry no pics.
 
DW wanted a new kitchen faucet and I bought a new one and installed it in about 10 minutes. Ha, ha, ha.

Actually the problems first started when I went to shut off the feed valves. Both started dripping at the stem and when I removed the faucet line I found the valves were not shutting off, either. With water spraying under the cabinet, I was trying to catch it in a bucket as I called for DW to shut off the water at the main valve. That crisis averted, I decided to go to the big box store and buy new valves. Of course they were a bastard brand attached to a 1/2" copper stub with a plastic ferrule and I couldn't find a direct replacement yet was leery of doing anything that might expand my plumbing problems. I decided to take the old shut off valves apart and see if I could just install a new O ring, which amazingly, I did, and even more amazingly, they don't leak. So all in, a couple of hours, two trips to Covid infested big box stores and a couple hundred bucks for the faucet.
 
I'm mostly writing to make others aware of the superglue.baking soda trick.

Yesterday, my son pulled our van door closed and the armrest/doorpull came off in his hand. It broke in 6 places, mostly at the clip holders and screw holes. A few of the small broken pieces were missing, but we recover maybe 5 of the 9 pieces.
We started by super gluing the the pieces we had back into position. Then add more super glue in supporting places and sprinkle baking soda on top. I did this many time to make a thicker, stronger support across the cracks. For the missing pieces I just kept repeating, glue, baking soda, over and over until the void was filled. The combination dries hard as a rock, so if you need flexibility, you need to get it elsewhere.

I put the baking soda on a creased sheet of paper so I could dump a large amount on the glue, then just tap it off back onto the creased sheet for reuse. I recommend a thin superglue, it just works better.

There are lots of Youtube videos on this, here are a few.
Here's video to learn from his mistake.
The superglue/baking soda reaction is very quick, it is also exothermic, but localized, so cools quickly.

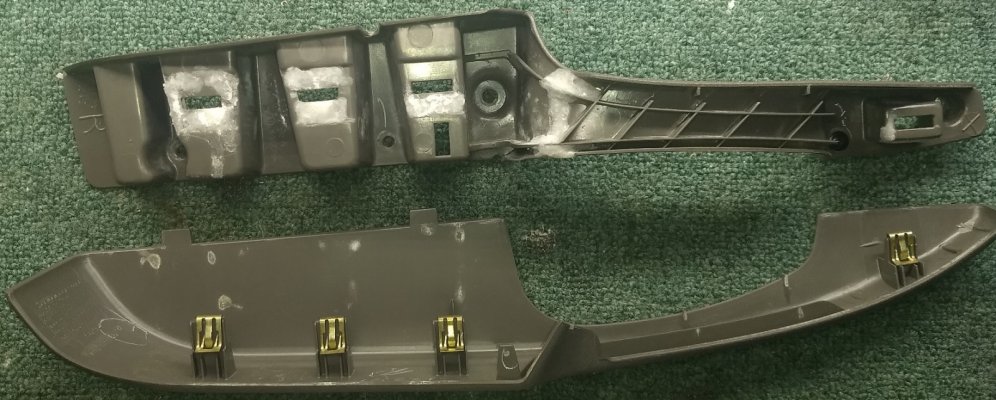
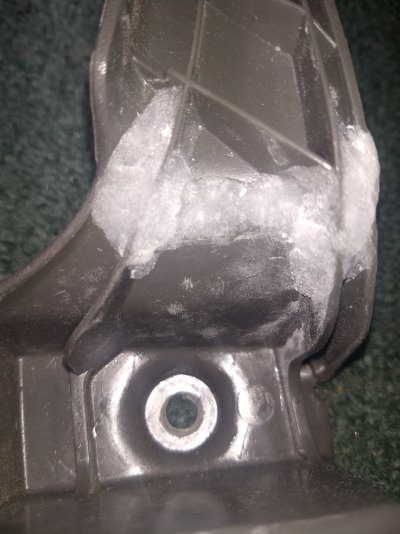
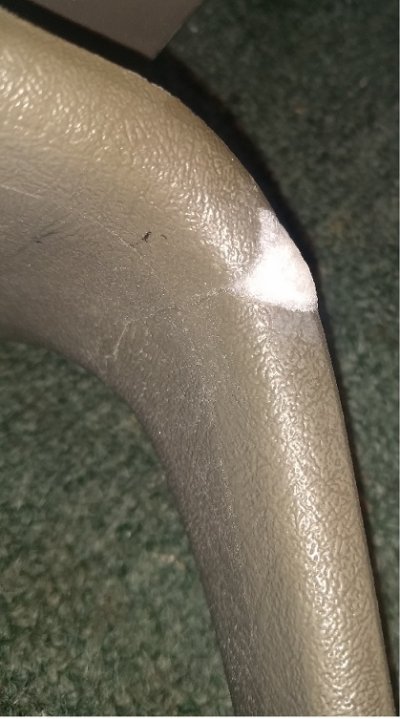
Some pictures to show some of the repair, all but the small white triangle are internal and can't be seen when assembled. The 1st pic shows the whole arm rest with some of the repairs the rectangular holes where broken out in pieces, and the repair in the middle is where arm rest was cracked into two pieces. The 2nd pic shows the repair of that crack and the 3rd pic is the otherside of that repaired crack with a fill in for a missing piece.
Hope that helps your next repair.
 

Attachments

  • Door Arm Rest.jpg
    Door Arm Rest.jpg
    444.8 KB · Views: 32
  • Door Arm Rest 2.jpg
    Door Arm Rest 2.jpg
    1.1 MB · Views: 29
  • Door Arm Rest 3.jpg
    Door Arm Rest 3.jpg
    104.9 KB · Views: 26
I'm mostly writing to make others aware of the superglue.baking soda trick.

Yesterday, my son pulled our van door closed and the armrest/doorpull came off in his hand. It broke in 6 places, mostly at the clip holders and screw holes. A few of the small broken pieces were missing, but we recover maybe 5 of the 9 pieces.
We started by super gluing the the pieces we had back into position. Then add more super glue in supporting places and sprinkle baking soda on top. I did this many time to make a thicker, stronger support across the cracks. For the missing pieces I just kept repeating, glue, baking soda, over and over until the void was filled. The combination dries hard as a rock, so if you need flexibility, you need to get it elsewhere.


Let us know if the repair proves to be durable.
In my experience, plastics are notoriously difficult WRT bond strength. For structural/sealing repairs best results are usually achieved with heat or chemical welding techniques - e.g ABS/PVC cement. Good luck!
 
Two part superglues are now available in big box stores for notoriously difficult plastics. And superglue/accelerator/more superglue, etc., to build a thick coat of superglue that cures, may be better than the baking soda technique.
 
I'm mostly writing to make others aware of the superglue.baking soda trick.

Yesterday, my son pulled our van door closed and the armrest/doorpull came off in his hand. It broke in 6 places, mostly at the clip holders and screw holes. A few of the small broken pieces were missing, but we recover maybe 5 of the 9 pieces.
...
Hope that helps your next repair.

Really interesting and useful trick with superglue.

Hope it holds on the car part.

Normally for a car part, I either buy a part online (camry door handle) , or visit a car junkyard.

How old is the van ?
 
Two part superglues are now available in big box stores for notoriously difficult plastics. And superglue/accelerator/more superglue, etc., to build a thick coat of superglue that cures, may be better than the baking soda technique.


Unless the glue contains some type of solvent that softens and penetrates the target plastic to allow chemical crosslinking of the bond, I doubt good results can be achieved in a structuraly demanding application.
 
Status
Not open for further replies.
Back
Top Bottom