Your recent repair? 2013 - 2020

Status
Not open for further replies.
Neighbor bought two Fluorescent style LED lights for his shop. One of them was very dim. He gave it to me. I opened it and found a solder connection to a capacitor did not make a good connection. I repaired it and it's better than new!
 
^ Nice fix! Was the issue visible or did you detect it by other than visual means?
 
Not exactly a repair but we upgraded the table in our Class B motorhome...
 

Attachments

  • 3.JPG
    3.JPG
    78.2 KB · Views: 26
  • 4.JPG
    4.JPG
    56.8 KB · Views: 27
  • 5.JPG
    5.JPG
    114.6 KB · Views: 27
  • 6.JPG
    6.JPG
    92.3 KB · Views: 27
  • 7.JPG
    7.JPG
    86.1 KB · Views: 27
  • 8.JPG
    8.JPG
    129.1 KB · Views: 25
Had a loud intermittent screeching sound coming from my left front wheel. Third time this has happened. Apparently this is not uncommon with Subarus. First time, took it to my mechanic and he showed me a nut that had gotten between the rotor and shield. Second time I read that you can often get rid of it driving in reversed with brakes on, and it worked.

Yesterday that did not work, and I couldn't get it out by reaching through the spokes and moving the dust shield. I had to take the wheel off, and with a flashlight I could see a tiny pebble wedged in there. Used a long straight screw driver to poke it out. Lot of work, but at least I got it.
 
Not exactly a repair but we upgraded the table in our Class B motorhome...
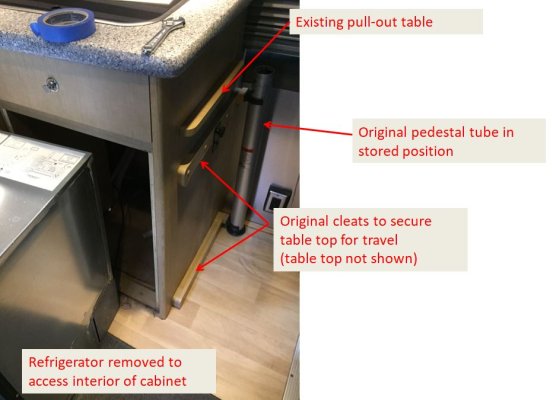
I installed the same Lagun table leg in my Casita trailer. It is a real quality piece of hardware and very versatile.
 
^ Nice fix! Was the issue visible or did you detect it by other than visual means?


I leaned the light fixture up against a cabinet, it later slid and fell on the floor. After that it didn't work at all. After I disassembled it and started looking at the board, it was more complicated than I expected, 4 surface mount ICs, many other smds and two regular through hole parts, but soldered to one side.
I had no schematic, so about all I could do is test the two through hole parts, As I went to pull off one of the caps, it came off to easy, and I figured that was the problem. I suspect if my eyes were 35 years old again, I might have been able to see the problem, but I didn't. That was one of the lessons I learned in the first year or two of my electronics repair career, visual inspection first! That finds a lot of problems.
I used the repaired light to replace an older flourescent light on my bench, the old light had a switch mounted to it, the new one has no power switch, so I also mounted a switch in the bench. Now if I can just stop reaching up for that switch on the old light! The new light is so much brighter and much welcomed.
 

Attachments

  • New switch.jpg
    New switch.jpg
    1 MB · Views: 25
Repaired the bracket I broke on my bandsaw table.
The shiny screw does most of the holding, but I also ground some slots on both sides, then cut sewing pins and epoxied them into the slots to add more strength.
 

Attachments

  • Bandsaw repair 2.jpg
    Bandsaw repair 2.jpg
    1 MB · Views: 22
  • Bandsaw repair 1.jpg
    Bandsaw repair 1.jpg
    986.1 KB · Views: 21
Not exactly a repair but we upgraded the table in our Class B motorhome...
I like how you elucidated your thought process getting to the result.

As I went to pull off one of the caps, it came off to easy, and I figured that was the problem. .
I always take apart broken stuff. You might see something, even with less than perfect close-up vision.
 
DW's Android phone threw a SIM card error code and could not send/receive calls or texts. All other functions worked normally. On the chance the SIM card was faulty, a new card ($1 at Target) was installed and activated. No luck, the phone rep said she needed to buy a new phone.
With nothing to lose, I went in to investigate. Stripping down to the motherboard, I noticed a few small areas with signs of corrosion, and a salty residue around the perimeter. The SIM/micro SD slot area was covered with a soldered metal shield. So I sprayed the entire MB down with Caig Deoxit, scrubbed thoroughly with a toothbrush and let sit for 5-10 minutes. Then flushed with isopropyl alcohol, blew off with low pressure air and polished with a cotton rag.
After reassembly, the test.........it works!
DW was reminded to put the phone in a plastic vapor barrier when carried next to a sweaty body. ;)
 
That's a good share on the deoxit technique. Even though the components are too small to see, it's nice to know there's still something to try.
 
That's a good share on the deoxit technique. Even though the components are too small to see, it's nice to know there's still something to try.


One note of caution - keep away from LCD/LED displays.
In this instance, the motherboard was completely removed form the case.
 
Last edited:
I been baby sitting wife's car the head gasket is leaking to the outside of engine, not a lot. I had plan to buy her a new one (her 1 st new new car) but since Covid started very little driving and buying a car just to sit in the garage makes no sense to us. I took the inner parts of the thermostat and so far the leak is greatly reduce if all goes well on the fall I can install a much lower temperature thermostat, 160 Vs 190F.


The other plan will be to just replace the head gasket at some point but probabbly not this year.
 
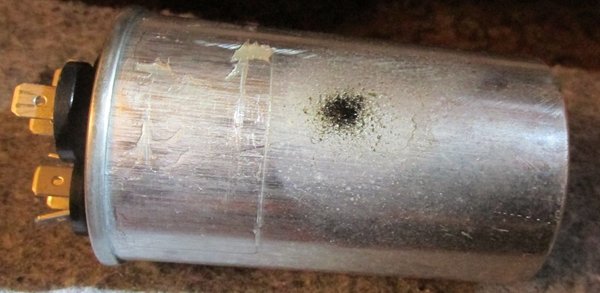
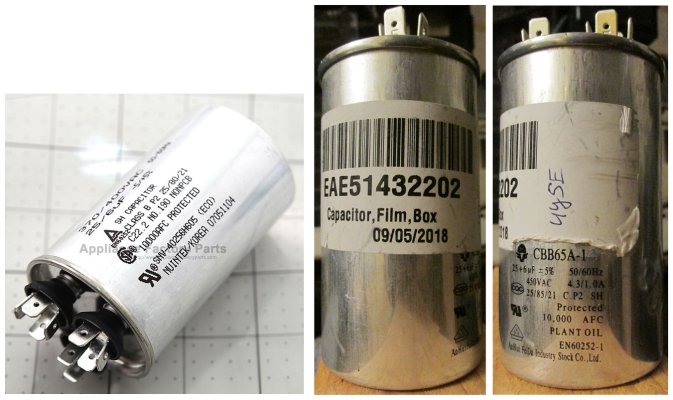
I finally replaced the AC capacitor and it works. The old one seemed to have an oil leak (pictured).

I absolutely needed the insulated handle pliers because of how hard it was to connect the common to the herm terminals with the wires in the way. I wasn't sure I made contact until I pulled the wires off to get better access. The pliers are Teflon coated and I wanted something more conductive. I used a piece of metal from a hanging file folder, bent to help bridge the common and herm. Its flatness made it easy to hold with the pliers. I think there are pros who don't even short the capacitor before unplugging it, but I think most do, and I bet many use an insulated handle tool to unplug the wires.

I used an old EMF sensor. Without a spark or pop I at least wanted to see the sensor light up. I did see a quick flash a couple of times but I don't like that I had to hold a button down the whole time and it's not even a snap action switch. And I want a tone so I don't have to look at it. I'd consider getting a better one if I did this again.

I was disappointed that I didn't receive the brand capacitor that was in the photo on the site I ordered from, which would have been the same brand of my original capacitor. The replacement ended up having vegetable oil. I think I read that mineral oil is better. I also could have saved a little money if I ordered the vegetable oil one elsewhere else.

I was also disappointed that a data sheet didn't come with it to give me an amp rating. It's charged by an AC with deadly amperage. It's not comforting that everyone just "knows" the capacitor isn't deadly without a rating or test.
 

Attachments

  • capacitor-replacement-tools.jpg
    capacitor-replacement-tools.jpg
    392.7 KB · Views: 21
  • capacitor-oil-leak.jpg
    capacitor-oil-leak.jpg
    142.5 KB · Views: 19
...
I was also disappointed that a data sheet didn't come with it to give me an amp rating. It's charged by an AC with deadly amperage. It's not comforting that everyone just "knows" the capacitor isn't deadly without a rating or test.

Well, how did you determine it was the right cap for this application? Was it based on the model number? If so, a reputable source would only be selling a properly spec'd part.

A capacitor like that would typically have the capacitance value/s (in uF) and the working (or max) voltage on the label. Beyond that, you are dealing with things like ESR, max amps, power dissipation (which are all related).

Bottom line is, if the cap is the correct uF and voltage, and is spec'd to be used on a motor of X horsepower, all those other ratings will fall in line.

The amps that the A/C draws has almost nothing to do with the amp rating of that capacitor. It's only part of the circuit.

Fun fact to scare the begeezuz out of you - did you know that depending on how a capacitor is arranged in a circuit, it could deliver thousands, or even millions of times more current (for a short time) than the amp rating on the device? That's what caps can do - they can store energy in small amounts delivered over a long time, and can deliver that energy in a very large amount over a very short time. But that doesn't necessarily make them dangerous, there's more to it than that.

Theoretical example (ignoring ESR and other losses): Charge a cap with 1 micro-amp (not enough to be dangerous) for 1000 seconds. It can now deliver 1000 Amps for 1 micro-second.

Glad it's working!

-ERD50
 
Last edited:
Well, how did you determine it was the right cap for this application? Was it based on the model number? If so, a reputable source would only be selling a properly spec'd part.

A capacitor like that would typically have the capacitance value/s (in uF) and the working (or max) voltage on the label. Beyond that, you are dealing with things like ESR, max amps, power dissipation (which are all related).

Bottom line is, if the cap is the correct uF and voltage, and is spec'd to be used on a motor of X horsepower, all those other ratings will fall in line.

The amps that the A/C draws has almost nothing to do with the amp rating of that capacitor. It's only part of the circuit.

Fun fact to scare the begeezuz out of you - did you know that depending on how a capacitor is arranged in a circuit, it could deliver thousands, or even millions of times more current (for a short time) than the amp rating on the device? That's what caps can do - they can store energy in small amounts delivered over a long time, and can deliver that energy in a very large amount over a very short time. But that doesn't necessarily make them dangerous, there's more to it than that.

Theoretical example (ignoring ESR and other losses): Charge a cap with 1 micro-amp (not enough to be dangerous) for 1000 seconds. It can now deliver 1000 Amps for 1 micro-second.

Glad it's working!

-ERD50


You just added more scary sounding info to a person that has a fear because he doesn't have any understanding of electricity, capacitors, etc.
 
You just added more scary sounding info to a person that has a fear because he doesn't have any understanding of electricity, capacitors, etc.

That was my point. His fear is based on the fact that he doesn't understand what's going on. So I took an example of something that can sound scary, but really isn't, at least not without more information to determine if it is scary or not. It could be scary, it really all depends (low voltage and high currents won't electrocute you, but it could melt something and spray you with molten metal - this is actually a very real-world concern with a car battery). But any normal sized motor cap doesn't store enough energy for that.

Instead of being scared, and jumping to illogical conclusions, he should just calmly ask about the potential dangers. He was told, you probably don't even need to discharge the cap, but it's easy so just do it. You don't have to go to extremes of worrying about the breakdown voltage of the plastic screwdriver handle, or the conductivity of the metal blade. If you follow the "one hand in the pocket" rule, you are unlikely to have any problem, even if it was charged and you touched it (with one hand, and no other body part in contact with any part of the A/C).

-ERD50
 
Well, how did you determine it was the right cap for this application? Was it based on the model number?

I remembered that these things aren't exact. Maximum capacities and temperature ratings don't have to match. I think I looked at the voltage and I was satisfied enough to install it. We all have our own ways of taking risks. After installation I saw that the part number was identical. Here's the webpage with the part I ordered. I attached a picture of the part I got (the two pictures to the right). It has a higher voltage rating and higher maximum operating temperature.


...he should just calmly ask about the potential dangers.

I read what pros do on other sites and watched videos. They use resistors to discharge, discharge in multiple ways to be sure, and use insulated handle tools to unplug the capacitor. A retirement forum isn't the place to get this information.
 

Attachments

  • AC-capacitors.jpg
    AC-capacitors.jpg
    649.8 KB · Views: 21
he amps that the A/C draws has almost nothing to do with the amp rating of that capacitor. It's only part of the circuit.

It's a part that runs practically everything aside from the display. Seems it would be touched by the amps that the AC draws at some point. How much of it is stored and discharged is the question. I believe everyone who says it's not deadly but I think you're all right the way people who listen to "the word on the street" are often right. I try not to get life or death information from such sources.
 
Status
Not open for further replies.
Back
Top Bottom