Your recent repair? 2013 - 2020

Status
Not open for further replies.
Laid a new ceramic tile floor in the upstairs bathroom. I'm using a wet saw with a diamond blade, but still have the darnedest time finishing a cut with out having the tile break at that last 1/16" or so. :blush:

Anyway it is done and grout covers many small sins.
 
Laid a new ceramic tile floor in the upstairs bathroom. I'm using a wet saw with a diamond blade, but still have the darnedest time finishing a cut with out having the tile break at that last 1/16" or so. :blush:

Anyway it is done and grout covers many small sins.

I think what I did when I had that problem (it's been a while), is to make a short cut on the last part by running it from behind the saw and pulling it back. Those diamond saws don't really grab like a toothed saw, so this didn't feel too dangerous, but you do need to take a bit of extra care.

As you push forward with the normal cut, it meets the cut you already made and snaps cleanly there. Maybe a little running of the stone over it to clean it up.

Another option might be to lower the blade, and make a pass just barely through the top side. Then flip it over to complete the cut. I'd bet it will follow the line you made on the first cut.

-ERD50
 
Had a problem with my gas water heater, the pilot light wouldn't stay lit, so no hot water. Could have replaced the thermocouple for about $10 which I'm pretty sure would have fixed the problem. The water heater was 18 years old so decided it was a good time to replace it. There sure was a lot of gunk at the bottom of the old tank when I tipped it over to drain the last water out of it. The swap out went smooth, just had to trim the vent pipe because the new water heater was a couple inches taller than the old one. Saved over $500 based on the estimate the big box store gave me to do the install, it took maybe 2-3 hours to swap it out.
 
Last edited:
Had a problem with my gas water heater, the pilot light wouldn't stay lit, so no hot water. Could have replaced the thermocouple for about $10 which I'm pretty sure would have fixed the problem. The water heater was 18 years old so decided it was a good time to replace it. There sure was a lot of gunk at the bottom of the old tank when I tipped it over to drain the last water out of it. The swap out went smooth, just had to trim the vent pipe because the new water heater was a couple inches taller than the old one. Saved over $500 based on the estimate the big box store gave me to do the install, it took maybe 2-3 hours to swap it out.

Was this your first time ?
Just the other day I was thinking this will be the next thing to go on me, and I wondered could I do it ?
Did you look up youtube videos or anything like that to understand the steps ?
 
I have a 2005 BMW 545i. It has had zero problems till this year. I had to replace gaskets and a pump--$5k. Now I have to replace the coils--$1300. Then I also did the front and rear brakes $1.5k.

I love this car and it still looks great but I'm starting to have second thoughts about holding on to it.

There's nothing that makes an auto technician happier than seeing a BMW or Mercedes coming through the front door. They universally rip the heads off their customers because they think "they can afford it."

My family owns a luxury car dealership, and all Bimmers and Mercs are wholesaled out because there's something wrong with every trade in.
 
Laid a new ceramic tile floor in the upstairs bathroom. I'm using a wet saw with a diamond blade, but still have the darnedest time finishing a cut with out having the tile break at that last 1/16" or so. :blush:

I don't even use my tile saw any longer. I'm using a Sharpie to make a line, and cutting porcelain tiles with a 4 1/2" grinder with a diamond blade. It's just so much quicker and efficient than doing it the "old way."
 
Was this your first time ?
Just the other day I was thinking this will be the next thing to go on me, and I wondered could I do it ?
Did you look up youtube videos or anything like that to understand the steps ?

It's fairly straight forward if you have some basic DIY skills. The steps to perform the replacement were actually listed on the outside of the box the new heater came in, I also downloaded the manufacturers instruction manual beforehand. I had flexible water hoses going to the hot/cold connections on the tank which makes things easier. I did have copper pipe going to the pressure relief valve which required a propane torch to disconnect since I wanted to reuse the pipe. The closer the dimensions the new and old water heater are the easier the job will be, and an empty tank weighs +125lbs so a helper might be needed. If you have gas you definitely want to thoroughly check all connections for leaks, it's a good idea to get a plumber in to check everything afterwards. Some cities do require a permit when replacing a water heater.
 
Last edited:
I don't even use my tile saw any longer. I'm using a Sharpie to make a line, and cutting porcelain tiles with a 4 1/2" grinder with a diamond blade. It's just so much quicker and efficient than doing it the "old way."
Good suggestion. Might be a little more dust, but certainly less equipment required.
 
Congrats, did you find some guidance (e.g. troubleshooting to determine if the motor itself was the trouble) and the part online? I gotta say, I'm lazy enough that I probably would have just lived without the turntable, but now I'm inspired to try the repair if ours crumps out.
The turntable began sticking, then tuned in one direction only, then stopped completely. Looking online, there is nothing other than motor and gear and it wasn't the gear. I found a parts store online that had a good customer feedback section where how to install was discussed. It was simple enough so that even I could do it, so I ordered from them at a slightly higher price because of that help.

I considered keeping it even without a working turntable but just the thought of being able to repair something was enough motivation for me. Not many opportunities for us mechanically challenged. :)
 
Good suggestion. Might be a little more dust, but certainly less equipment required.

I used an el-cheapo wet tile saw when I did my floors and bathroom and found what worked best for me was to mark the cut line with masking tape (good side) and push the tile through the blade slowly freehand. Found I got a lot less chip out that way. If I had to do it over again I would have bought a quality high end used tile saw then resell it afterwards, they seem to retain their value pretty good.
 
My propane grill gave less than satisfactory results (imo) on burgers last Sunday - could not get a nice crisp on the outside.

Inspection of the burners showed that the right venturi tube/burner bracket had finally rusted out and it was not getting a full feed of gas from the main jet because of a bad seal.

I figured now would be a good time to give the insides of all of the venturi tubes a brushing out.

Went to Home Depot but they didn't have a grill venturi brush - instead we found a vent cleaning brush that worked. Gave all 3 burners a reaming out with the brush and a bunch of black soot piled up.

Gave all the venturi holes a poking with a nylon bristle.

Then used some metal automotive tape to tape back the broken venturi tube against the inside base.

Fired up the grill and now it gets up to 550F - nice and hot.

This weekend I'm thinking of nice steaks with some good grill marks.

Total cost $6.38 for the vent cleaning brush and about $1 worth of automotive metal tape.

A lot cheaper than throwing in the towel and getting a new grill!

Nice job, ;) we have been keeping an outdoor grill going for 20 years. It's on natural gas. I bought a few burners, a new sheet metal base and formed posts (the grill was built into our wooden deck). Also a cooking grate or four. As long as you can get the parts, the things will go forever.
 
Nice job, ;) we have been keeping an outdoor grill going for 20 years. It's on natural gas. I bought a few burners, a new sheet metal base and formed posts (the grill was built into our wooden deck). Also a cooking grate or four. As long as you can get the parts, the things will go forever.
I need to research the automotive metal tape. The outside is nice, but the inside is pretty close to gone...literally. By "gone" I mean rusted to the point of having holes in the "base casting", except its not a casting, it's just stamped sheet metal. The tents that go over the burners disintegrated a long time ago, and I replaced them with some heavy gauge stainless (cut at a local fab shop for cheaper than buying the stock thin steel tents from charbroil). But my custom tents are all thats left that isn't going into a pile of rust dust. That, and the beautiful outside of the grill...stainless. They should have put the stainless inside!
 
I need to research the automotive metal tape. The outside is nice, but the inside is pretty close to gone...literally. By "gone" I mean rusted to the point of having holes in the "base casting", except its not a casting, it's just stamped sheet metal. The tents that go over the burners disintegrated a long time ago, and I replaced them with some heavy gauge stainless (cut at a local fab shop for cheaper than buying the stock thin steel tents from charbroil). But my custom tents are all thats left that isn't going into a pile of rust dust. That, and the beautiful outside of the grill...stainless. They should have put the stainless inside!

The metal tape is like a thick foil metal, sticky, but you will need a very clean surface for the adhesive to work. If the surface has soot, grease built up - it won't stick.

And it won't offer much insulation/heat retention. Good luck!
 
Nice job, ;) we have been keeping an outdoor grill going for 20 years. It's on natural gas. I bought a few burners, a new sheet metal base and formed posts (the grill was built into our wooden deck). Also a cooking grate or four. As long as you can get the parts, the things will go forever.


The problem with me is the cost of the grates.... I have an infrared grill and to replace my 4 grates would cost me over $200... I can buy a brand new grill (but smaller) for just a bit more money.... also, it is even hard to find grates for my size grill...
 
I have a large garage that I built 30 years ago and the shingle roof needed to be replaced.
It is 1400 sq ft of roof area included ripping off the old roof
and hauling to the landfill, installing new tar paper and shingles. It took 3 weeks to
complete and cost $1300 for supplies and bandaids.
I also opted out on rooftop delivery of shingles because they wanted $7 per bundle extra.
 
Last edited:
I'm not doing the repair myself but I hit a metal post pulling into a parking space and my car is in the shop. My car was in the same shop two months ago when someone hit me! Im doing very well car wise this year.
 
I'm not doing the repair myself but I hit a metal post pulling into a parking space and my car is in the shop. My car was in the same shop two months ago when someone hit me! Im doing very well car wise this year.

So far you are batting 1.000 (2 for 2). :LOL:
 
Came home to water on the kitchen floor in front of the fridge.

A quick search revealed it is a common problem with bottom freezer Whirlpool/Maytags.

The good news it is an easy fix: just open the back panel, pop off the drain grommet, clean it, melt the ice dam, and reinstall.

The bad news is that this evaporator drain clogs easily. There are thousands of hits on it. Problem is stuff like fuzz easily gets sucked into the freezer during normal opening and closing. Some of it will work its way back to the evaporator. This gets in the drain. The drain grommet is there to stop warm air backflow, but in turn catches every possible piece of debris. When the drain stops, it freezes up and eventually flows into the compartment and onto your floor.
 
Speaking of evaporator coil drains, it appears my main drain pan in my A/C coil in the attic is rusted thru and the condensation is leaking into my secondary pan. Just what I need....a 15 year old unit go south and the system is R22. :mad:

I know that replacing the inner pan is a pain as it is part of the coil housing.
 
Came home to water on the kitchen floor in front of the fridge.

A quick search revealed it is a common problem with bottom freezer Whirlpool/Maytags.

The good news it is an easy fix: just open the back panel, pop off the drain grommet, clean it, melt the ice dam, and reinstall.

The bad news is that this evaporator drain clogs easily. There are thousands of hits on it. Problem is stuff like fuzz easily gets sucked into the freezer during normal opening and closing. Some of it will work its way back to the evaporator. This gets in the drain. The drain grommet is there to stop warm air backflow, but in turn catches every possible piece of debris. When the drain stops, it freezes up and eventually flows into the compartment and onto your floor.

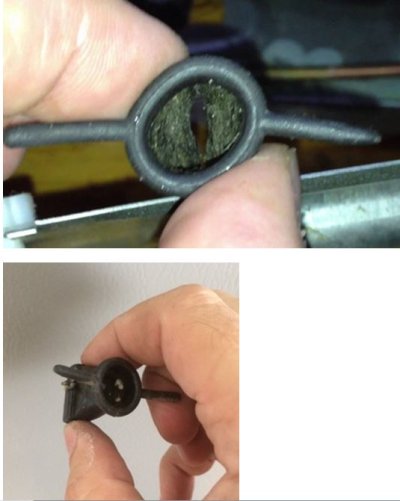
Interesting. What does the grommet look like? Is it a duck-bill (the one-way flexible valve) or just a simple restriction? Is it something that you could force and keep wide open by adding a stent, like a piece of plastic drinking straw or the like?

Our Kenmore (made by Whirlpool then) top-freezer refrig developed an evaporator pan leak at about the 20 year mark. It was hard to find, a pin-hole leak in the galvanized steel pan that allowed water to run down inside the cabinet. It was frustratingly intermittent! I had to loosen the mounting for the evap coils inside the back of the freezer compartment to tilt and slide the pan out, and holding it up to a bright light, saw the pin-hole. I suspect it was a defect in the galvanizing. Only that one pin-hole, no rust anywhere else. A new pan was something like $10. With a new pan in, refrig went on with no problems, I later gave it away after I renovated the kitchen.
Replaced it with a Whirlpool side-by-side that was top-rated by CU. This refrig has electronics, have it plugged into a rated surge suppressor outlet strip that I fastened to the wall. We get lightning.
 
Speaking of evaporator coil drains, it appears my main drain pan in my A/C coil in the attic is rusted thru and the condensation is leaking into my secondary pan. Just what I need....a 15 year old unit go south and the system is R22. :mad:

I know that replacing the inner pan is a pain as it is part of the coil housing.

Bummer! We have two A/C systems also attic mounted. The originals were true horizontal units, I replaced the one for the big part of the house at the 22 year mark. The horizontal evap coil cabinet had a vertical-mount flat coil in it. Later when I looked at the pieces I pulled out, the drain pan and the bottom of the case was just a rust mess. Surprised it hadn't leaked. With its flat-coil design, it would have been possible with some galvanized steel to repair and replace the pan and its supports.

Both replacement systems I installed are actually gas basement upflow furnaces and A-coils, but laid down on their sides. I lucked out in that the guts were installed at the factory so they could be laid down on their left sides, which is the way I needed. Otherwise, I would have had to unbolt everything inside and flip it over.
Unfortunately, I don't remember how the side drain pan for an A-coil that can be laid on it's side is attached, as to how difficult it would be to replace it in the field without discharging the system.
For an A-coil cabinet, there is usually a sheet metal access panel in the side of the cabinet that can be removed for coil cleaning, that would allow a peek inside, to see where the drain pan in use is, and how it is fastened, if it is a separate pan, and not integral with the bottom of the cabinet.
My bigger unit has a separate white plastic pan, and the white plastic can be seen where I attached the PVC pipes to for the drain line.
 
Interesting. What does the grommet look like? Is it a duck-bill (the one-way flexible valve) or just a simple restriction? Is it something that you could force and keep wide open by adding a stent, like a piece of plastic drinking straw or the like?
Picture attached. Yes, you can force it open with a stent. But there's a downside to that. It will allow warm air to flow back, and even worse, a lot of dirt and fuzz to regurgitate backward. This is exiting below the fridge near the coils where dirt and fuzz are in abundance. Better to get the occasional dirt from inside the apartment above. We all think no dirt gets in our fridge, but you'd be surprised what gets in by the "air suction" during door action.

BTW, I'm just going to put the task of cleaning this beast on a 3 year maintenance window. Easier to do before the ice jam develops.
 

Attachments

  • drain restrictor.JPG
    drain restrictor.JPG
    41.5 KB · Views: 13
Status
Not open for further replies.
Back
Top Bottom