Your recent repair? 2013 - 2020

Status
Not open for further replies.
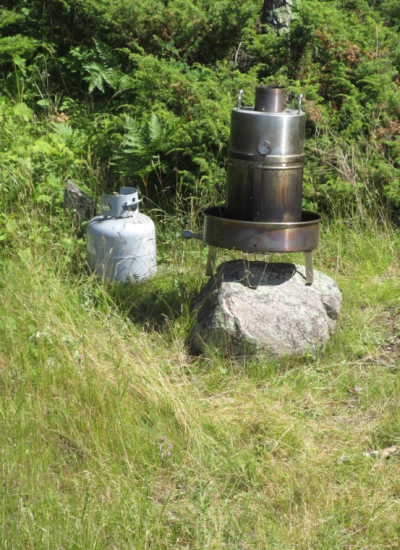
I had to look up to see what an orion cooker is normally like to understand what you did.
I have to say that is a really good job.
The only thing I didn't like much was the copper pipe was too far out of the cooker so the propane burner adjustment knob ended up sticking far out (tripping hazard).

Were you thinking you needed a flap or adjustable hole on the copper pipe to allow some air to mix in before it gets to the burning part ?

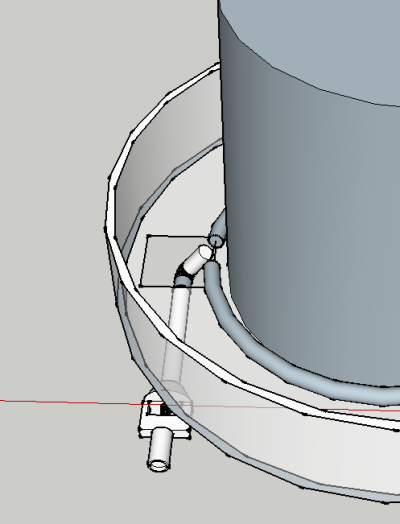
Perhaps you want a few clamps to hold the copper pipe a constant distance from the side of the cooker and the bottom where it currently rests. Quick example:
th
 
Your concoction works well. I wonder how secure the venturi, nozzle, shut-off valve, and the tank hose are. You show them sitting on an empty can. My concern is that if something comes loose, you have a flame thrower on hand.
 
But now my DSis wants to buy not only an Orion Cooker for my BIL, but also the parts to convert it to propane. The question is, how to engineer a better solution than what I threw together and where to get the parts.
Cool, thanks for posting it. Like Sunset, I'd never heard of an Orion cooker.
Parts for the next one: Maybe a replacement tank-top valve and lineset meant for a gas grill, connect that to some 3/8" brass elbows and nipples (to get some distance between the rubber lines and the hot cooker exterior), then to your soft copper burner tube? Your BIL can use the tank-top valve to adjust the gas flow. Hey, he's your BIL, if he wants a deluxe valve he can engineer/buy one himself!

Also, remind him to take it apart and not leave the copper in contact with the steel when he stores it, especially if it can get wet, or he might end up with more holes in the burner than he'd planned on.
 
Last edited:
I've had an Orion cooker for 8 years, love it! It's designed to produce convection cooking currents by putting charcoal in the top cup as well as the bottom ring. Do you put charcoal in the top cup to create this convection effect, while using the gas modification in bottom ring?
 
I've had an Orion cooker for 8 years, love it! It's designed to produce convection cooking currents by putting charcoal in the top cup as well as the bottom ring. Do you put charcoal in the top cup to create this convection effect, while using the gas modification in bottom ring?
Is there any explanation of how this cooker generates the claimed convection action? Seems like the primary heat from the bottom sides would effectively generate convective flow upward around the perimeter of the cooking chamber, and that (without the charcoal on top) the air would return back down through the center (which is opposite to the heat flow shown on the company video--they show hotter air falling, which is a new one on me). Heating the air at the hot lid would encourage stratification of the air (hot air at top) and impede any convection, it wouldn't encourage it.
I'm sure the cooker gets the job done quicker than a smoker, but the responsible mechanism seems more likely to be the direct radiant heat transfer from the 600+ F walls and top of the cooker than any especially effective convective heat transfer.
 
Last edited:
The only thing I didn't like much was the copper pipe was too far out of the cooker so the propane burner adjustment knob ended up sticking far out (tripping hazard).
In trying to build it without going to the store :facepalm: and trying to keep the venturi kind of away from the flames, it did end-up a little more Rube Goldbergish than I'd like. The clamp idea is something to look at. So far, I've avoided drilling the stainless, but that's something I could do.

Your concoction works well. I wonder how secure the venturi, nozzle, shut-off valve, and the tank hose are. You show them sitting on an empty can. My concern is that if something comes loose, you have a flame thrower on hand.
Yeah, the soup can "upcycle" is not producing the safest product. I figure there's got to be an improvement somewhere in my BIL's 2.0 version.

Parts for the next one: Maybe a replacement tank-top valve and lineset meant for a gas grill, connect that to some 3/8" brass elbows and nipples (to get some distance between the rubber lines and the hot cooker exterior), then to your soft copper burner tube? Your BIL can use the tank-top valve to adjust the gas flow. Hey, he's your BIL, if he wants a deluxe valve he can engineer/buy one himself!
I'll look at tank top and brass parts. The biggest issue is the venturi...where to put it so that it's away from the action. Usually on a gas grill, the venturi "bell" is outside of the firebox, but still pretty close to the action:
drawir2valveburner.jpg


Do you put charcoal in the top cup to create this convection effect, while using the gas modification in bottom ring?
Yes, still use charcoal on the top. I can get the original fill, plus an addition one or two to keep the top going without the ashes getting too deep and snuffing new additions out.

Is there any explanation of how this cooker generates the claimed convection action?
I raised an eyebrow when I first saw one of these, but the proof was in the result. I literally whipped out my phone and bought one before getting done eating. Presumably this is a variation on the "cowboy cooker", where you drop a dutch oven pot on the campfire and put some hot coals on the top of the lid.
 
...

Yes, still use charcoal on the top. I can get the original fill, plus an addition one or two to keep the top going without the ashes getting too deep and snuffing new additions out.

I raised an eyebrow when I first saw one of these, but the proof was in the result. I literally whipped out my phone and bought one before getting done eating. Presumably this is a variation on the "cowboy cooker", where you drop a dutch oven pot on the campfire and put some hot coals on the top of the lid.

So the charcoal all goes on the outside (in the bottom pan/ring, and the top pan/cover)? In that case, the type of heat makes no difference - if you are cooking at home, why not go electric? A large hot plate on the bottom, a small one on top. You probably know from brewing, the electric brewers have sources for cheap 'dimmers' that will handle the current of a heating element. or an oven thermostat might work?

No charcoal mess, no propane to run out of, and kWh are much cheaper than either.

-ERD50
 
Electric heaters would work, as long as one can get enough wattage.

A small inexpensive gas grill typically runs 25,000 BTU/hr burning propane. This works out to 7.3kW, so would be more than one can draw on a standard 115V outlet.
 
Electric heaters would work, as long as one can get enough wattage.

A small inexpensive gas grill typically runs 25,000 BTU/hr burning propane. This works out to 7.3kW, so would be more than one can draw on a standard 115V outlet.

Yes, but doing slow cooking like this normally requires far less BTU than an open grill ( a slow cooker is ~ 100 watts, a 115V hot plate ~ 1200 watts, a 220V stove top coil 2600 Watts). Also, much of that gas/charcoal heat just escapes right up into the air. An electric coil, in direct contact with the metal container and under it (rather than blasting from the side) would transfer a much higher % of its heat to the cooker.

Furnaces are rated as BTU input, I assume these burners are as well? I don't know what the efficiency is, but clearly far less than a furnace with a heat exchanger and enclosed combustion. Even the old basic gas furnace were about 55%, so I'm sure these are less than that, say 35%? So that would be .35* 25,000 = 8750 BTU/hr. So that's about 2600 watts, two separate 15A 115V circuits would get close ( ~ 2400 watts). And I doubt the burners are going full 25,000 BTU/hr input, due to the sealed cooking method I mentioned. You could get ~ 2400 watts from two separate 115V 15A outlets.

And here's one (of many):

https://www.amazon.com/Old-Smokey-O...00158QQLI/ref=cm_cr_arp_d_product_top?ie=UTF8

1250 watts, standard NA plug.

-ERD50
 
Last edited:
So the charcoal all goes on the outside (in the bottom pan/ring, and the top pan/cover)? In that case, the type of heat makes no difference - if you are cooking at home, why not go electric?
Yes, all heat is on the outside of the cooking chamber, so electric would be an option.
Electric heaters would work, as long as one can get enough wattage.
This is precisely the same discussion that goes on with going electric in homebrewing. I kind of like being outside brewing and cooking, but there are guys that have all-electric and covered/vented kettles inside. I did do a cook, recently, where there was no electricity, though:
 

Attachments

  • orionwoods.png
    orionwoods.png
    1.3 MB · Views: 9
  • orionwoods3.jpg
    orionwoods3.jpg
    454.8 KB · Views: 10
For the venturi holding, why not just grab one off an old grill in the garbage, then you could rivet it to the outside of the lower pan so it would be secure, but away from the firebox heat.

For the clamps I was thinking something to clamp onto the actual pipe that shoots out the fire, such that the pipe is forced to stay a certain distance from the firebox. No really drilling needed.
I had even thought you could put 3/4 or 1 inch metal screws into the pipe so the head is sticking out and keeps the burner pipe way from the firebox as far as needed (1/2 inch?). Just drill a few extra holes in the burner pipe for the screws.
 
I raised an eyebrow when I first saw one of these, but the proof was in the result. I literally whipped out my phone and bought one before getting done eating. Presumably this is a variation on the "cowboy cooker", where you drop a dutch oven pot on the campfire and put some hot coals on the top of the lid.
I'm sure it works great (like those dutch ovens). Heat transfer via radiation (from the hot sides and top) and conduction through the air medium to the food, there's unlikely to be a significant amount of convection going on. A "regular" smoker just uses conduction without appreciable radiant heat transfer (no hot surfaces to radiate appreciable heat), so the cooking is faster in the Orion. But, "convection" sounds high-tech.
 
Yes, but doing slow cooking like this normally requires far less BTU than an open grill...

Agree. I did not know that the Orion is a slow cooker, judging from the homemade ring burner that Sengsational put in.
 
For the venturi holding, why not just grab one off an old grill in the garbage, then you could rivet it to the outside of the lower pan so it would be secure, but away from the firebox heat.
I was thinking of trying something like the pictures below to keep the venturi tube long enough, but not have it hanging out in the breeze like my original attempt. I might be able to just friction fit with copper for the in-firebox stuff, but not sure how to get leak-free outside firebox connections (the elbow that connects the venturi tube). I could do it with "black pipe" if I cut-off and threaded the (typically) cast iron venturi assembly from the old grill.

Agree. I did not know that the Orion is a slow cooker, judging from the homemade ring burner that Sengsational put in.
It's a slow cooker...seems like the temperatures hang around at 250 F +/- 20, or so. So not too many BTU's required. The orifice/venturi combo I used in my original came from a grill side-burner, so not very much "oomph" there.
 

Attachments

  • orionMountedVenturi.PNG
    orionMountedVenturi.PNG
    51.3 KB · Views: 8
  • orionMountedVenturi2.PNG
    orionMountedVenturi2.PNG
    41.5 KB · Views: 7
Fixed two bad places in the kitchen tile. Looks like someone dropped something and chipped the top layer off the tile. The spots are small, but very noticeable. I filled with spots with grout, then stained them to match the tile using a Q-tip dipped in my morning coffee. Looks great and DW is happy :)
 
Agree. I did not know that the Orion is a slow cooker, judging from the homemade ring burner that Sengsational put in.

Well the thing is, the Orion produces slow cooking results without cooking slow:blush: Turkey at 7 minutes per pound, six full racks of baby back ribs in 1 hour 25 minutes, brisket at 27 minutes per pound etc. "Fill it, light it, forget it". No need to spend hours and hours tending a "slow" smoker. (No affiliation just a very satisfied user for many years).

I've cooked outside in a snowstorm too:D

I watched a you tube video to find out what it was and the guy cooked a big turkey in 2 hours to fall off the bone well done. Very amazing.
 
This one wasn't really a repair, but I figured I'd throw it out here, because it comes with a question.

If you watch the first 10 seconds of this video, you'll see what I "repaired".

But now my DSis wants to buy not only an Orion Cooker for my BIL, but also the parts to convert it to propane. The question is, how to engineer a better solution than what I threw together and where to get the parts.

Well, BIL proved to have a very good idea...use an existing circular burner! He already had a thing called "The Big Easy", so, without giving up the option to move it back, we fitted the Big Easy burner into the Orion. I never would have come up with that on my own, since I didn't know about this circular burner.

 
Replaced a rusted out transmission cooling line on 2006 GMC. A royal PITA in getting the line in place. Almost as much PITA in setting the retaining clips. Would be an easy job on lift, which I don't have.
 
My 18 year old Kenmore dryer still runs good but definitely showing some wear on the outside so picked up a can of Rust-Oleum Appliance Epoxy to freshen up the look. Came out looking pretty good, not bad for $4.
 
I scored a bunch of stainless nuts and bolts for cheap and I was pleased to replace a rusty bolt and nut on my camper's propane bracket. I ran the new stainless bolt home with an electric impact gun, but realized that I had it misaligned. The gun would not back it off so I got a big ratchet and reefed on it. The bolt twisted in two. So, I got my first lesson in stainless steel galling. :(
 
First lesson in impact wrench use:

Never start bolts/nuts with an impact wrench.:)
I did not start it with an impact gun (I put myself through college working as a mechanic, so this is a no-brainer). I started the nut well onto the bolt, but ran it home with the impact gun. The combination of the speed, torque and the lack of lubrication was what cold welded the nut on.
 
... So, I got my first lesson in stainless steel galling. :(

I also was not familiar with all this detail. I didn't know that much heat built up on a bolt. I know a wood screw or nail can get hot, but that's a lot of friction as the screw forces its way through all those wood fibers, along the entire length.
I always thought the anti-seize stuff was for getting it apart later - not preventing jamming up on installation.


-ERD50
 
Status
Not open for further replies.
Back
Top Bottom