Can I replace this gas water heater myself (pics)?

Also, someone installed black foam insulation on the cold water pipe. I understand the insulation on the hot water line, but is there any reason to put it on the cold water supply line?


Yes, the cold water coming in will form condensation in humid weather, and drip and make a mess or cause mold if it's bad. The insulation can help with that.

-ERD50
 
I've never bothered with a permit for a water-heater repair. I'm not sure that it's even necessary.

In California you're not allowed to touch a gas line with a tool unless you're a qualified contractor...who wont do it without a permit.

Not that this has ever stopped me from doing water heaters and stoves anyhow.

Twice I wasnt called on it by a buyer. Once i was. I said "Gee, I dont know if that was done with a permit. Guy who did it is on vacation, so if you want to wait a couple of weeks for me to get a hold of him and find out...but it looks like a good hookup to me..." and it seems they didnt feel like waiting.

You'll want insulation on both pipes if the WH is in an unconditioned space that gets cold in the winter.
 
In California you're not allowed to touch a gas line with a tool unless you're a qualified contractor...who wont do it without a permit.
Just the nanny state I had in mind.

Twice I wasnt called on it by a buyer. Once i was. I said "Gee, I dont know if that was done with a permit. Guy who did it is on vacation, so if you want to wait a couple of weeks for me to get a hold of him and find out...but it looks like a good hookup to me..." and it seems they didnt feel like waiting.
Yeah, no kidding.

And then:
*Shoulder shrug* "I dunno. If the home inspector thinks it's structurally unsafe then we can take a look at it. If you're concerned about a paperwork problem then you can apply for a permit after escrow closes. But if you think this is going to delay closing then I'll be happy to return your check and move on to our backup offer."

You'll want insulation on both pipes if the WH is in an unconditioned space that gets cold in the winter.
Oops, I stand corrected. I forgot all about cold-weather condensation. It's almost as if I haven't had any recent experience with the phenomenon...
 
drip leg

drip_leg_70.jpg


The old furnace had a drip leg, which is used to prevent any debris in the gas line from entering the furnace valve. It consists of a TEE (instead of a 90) and a short piece of pipe capped pipe.

Drip Leg

-ERD50
Thanks, I've seen them but thought it was to add another gas item off of that.
 
Nah, just to collect dust and stray moisture that comes down the gas line from clogging up the works.
 
Nah, just to collect dust and stray moisture that comes down the gas line from clogging up the works.
There's actually some debate as to whether drip legs actually perform any function at all. After all, nobody ever empties the dreaded dust and moisture they are supposed to collect--wouldn't they eventually fill up? Their required length seems to vary between municipalities, so it is best to ask a local plumber or other tradesman before adding one to be sure it is the right length. Anyway, they are required by code, so we'll keep putting them in.
 
samclem - re: drip leg - yes, but if it is moisture, maybe due to sudden temp changes, it would eventually get absorbed back into the gas (I think?).

Probably overkill, but that's usually a good thing with natural gas.

-ERD50
 
Exactly. Gas supposedly has a range of moisture content, but sometimes it gets a little excessive or condenses. Eventually the drips get picked up by the gas when the moisture content is lower. Intent is to reduce the rusting and clogging of the burners.

I havent emptied any drip legs to see if they've collected anything, but I also havent had any appliances that have had them in place for very long. I put them on the appliances I replaced at my old house, and the new one, but the new stuff has only been in service a short time.

I'll unscrew one in a couple of years and tell you what I find.
 
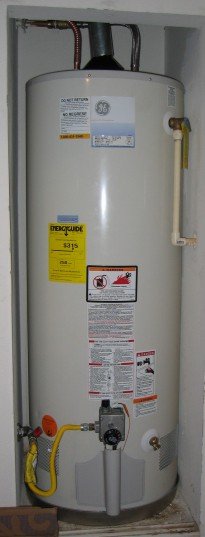
Thanks for all the helpful advice. When I said the heater was +10 years old, I actually meant it was 14 years old. So it's had a good run.

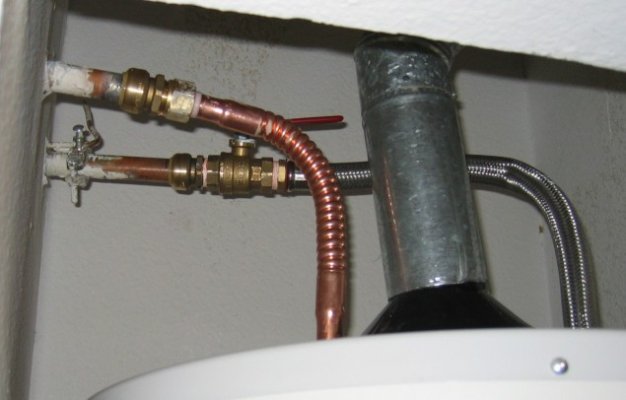
I might be willing to learn to sweat the pipe, but this is kind of an awkward space and if I foul it up, there's not much pipe left to cut and start over with. I'd also be worried about torching the drywall and/or myself.

I installed a compression fitting on a toilet supply line in order to replace the shutoff valve, and it looks like the sharkbite connectors are even easier than that. My only concern is how they will hold up over time with the heat and pressure (seems like a no brainer for a drain pipe). I could give the sharkbites a try and get the new heater installed. If they don't work, then I'd call a plumber to sweat on some new fittings - even if it comes to that, it should be much cheaper than paying them for the whole installation.

I called Sears and they wanted about $270 plus permit for delivery and installation. However, they seemed to think that new flex hoses could just be screwed on - if the delivery crew had to remove and sweat on new connectors, the cost could increase.

This photo is the cold water supply line, I assume I would just use the pipecutter at the arrow?

go about 1/2" to the left of the arrow...away from the solder

But it does look like you might be able to unscrew that....gotta take a nice 12" wrench and give it a shot....

Dont forget to add shutoff valves if you cut one off....and shut off the water further upline
 
Just make sure you hold onto the main pipe pretty good with something while you try to unscrew it.

You might end up turning the pipe at some joint in the wall somewhere instead.

I say this because I'm the master of breaking off pipes. Last time I did it I pulled up a piece of PVC irrigation pipe after a half a day of digging and while I was gluing the replacement in felt the pipe in the ground turn.

Another half a day and 12' of dirt later I found the joint I broke... :p
 
Are you sure about that? I saw the handle as well and thought I could unscrew the flex connector rather than cutting off the valve. But looking at it again, I wasn't sure if the flex connector could be unscrewed from the valve, or if it was sweated or permanently attached some other way.

I'm not sure about it, but you should be able to tell by looking to see if the flex connector is screwed into the valve body or if it is sweated into it. Do you see any solder in the joint? Maybe a loose pieve of white teflon tape sticking out (indicating it is screwed in).

BTW, it is possible to ruin the valve if you get it too hot. This is less likely to happen if you use a propane torch, easier if you use MAPP gas. It's not a bad idea to put a wet rag over the nearest downstream joint or valve when you start sweating pipes. There's nothing more frustrating than doing a nice new connection, but realizing that you got the pipe too hot and the previously good nearby connection had the solder drip out and is no longer good. Especially if that now-leaking connection is in a wall. With a wet rag, the pipe under it shouldn't exceed 212 deg F until it has boiled the water off that is in the rag and in contact with the pipe. Try to keep this rag as far as possible from your work so you can get the "target joint" hot enough with the torch--copper conducts heat very well.
 
The one thing I noticed from your Pics is the TP relief line is plumed kinda different. Most are plumed to discharge to the floor. Restricting the discharge of the relieff valve can turn your water heater into a bomb. I'm not saying yours is wrong just different than I've seen for a residential instillation.
A recommendation for the replacement. solder a sweat x npt fitting on the end of the supply line feeding the water heater. Where you have the arrow in your post. Then install a a ball valve, a short nipple then an npt x npt flex connector to the heater. On the discharge side of the heater install an sweat x npt fitting where the piping goes out to the house a ball valve ( optional) and a flex connector to the tank.
Oh yea hat puppy the old one) is gonna be Heavy.
 
There's actually some debate as to whether drip legs actually perform any function at all. After all, nobody ever empties the dreaded dust and moisture they are supposed to collect--wouldn't they eventually fill up? Their required length seems to vary between municipalities, so it is best to ask a local plumber or other tradesman before adding one to be sure it is the right length. Anyway, they are required by code, so we'll keep putting them in.
We have a 30-year-old rental that's collected plenty in its drip leg. I just don't know whether it's happened a little at a time over the years or all at once-- I don't open it up unless we're working on the water heater.

Now air systems, especially HP but even 100 psi systems-- filthy. Filters and drip legs are essential.
 
We have a 30-year-old rental that's collected plenty in its drip leg. I just don't know whether it's happened a little at a time over the years or all at once-- I don't open it up unless we're working on the water heater.
Cool! Wadjaget? Mostly little bits of rust and flecks of paste from the pipe joints? Does the inside of the cap look rustd, like there's been water in there? (I wonder if a natural gas environment even supports an oxidation reaction in iron). Our gas line is less than 4 years old, so I don't think I'd find many "treasures" in ours yet.
It wouldn't take much to clog a jet orifice, so I guess these drip legs things do perform a service. It would seem that there would be some rational sizing requirement for them, maybe based on distance from the last one. Also, specifying a length of drip leg seems arbitrary, it would be more rational to specify volume. Most of us would still use the same diameter as the main pipe, but there are locations where a shorter but "fatter" leg would be easier to fit.
 
Cool! Wadjaget? Mostly little bits of rust and flecks of paste from the pipe joints? Does the inside of the cap look rustd, like there's been water in there? (I wonder if a natural gas environment even supports an oxidation reaction in iron). Our gas line is less than 4 years old, so I don't think I'd find many "treasures" in ours yet.
Yep. All of the above. Gas isn't widely used on Oahu and that house is in one gas neighborhood surrounded by mostly all-electric areas. What's far more worrisome in an old water heater is flakes of rust in the combustion area around the bottom of the tank.

Which flakes bring up another thought for Soupcxan. If you have any minerals in your house water, especially if you're using a well, this may be a good time to add a whole-house water conditioner to the water-heater project. It'll dramatically lengthen the life of the water heater along with greatly reducing the mineral deposits in the piping... and the sinks, tubs, faucets, & toilets. It'll also greatly reduce your use of shampoo, soap, laundry detergent, and dishwasher detergent. Water conditioners are widely available at places like Home Depot & Lowes for around $500 and they're well within the capability of the average DIY homeowner who doesn't shrink from doing his own water heaters.
 
Last edited:
this may be a good time to add a whole-house water conditioner to the water-heater project.
Please, no more home improvement projects! My plate was already full before the garage door opener started buzzing...
 
Thanks to everyone who posted their tips here. We got the new water heater installed (see pics), took about 8 hours but we could've done it in four if not for some minor snafus that a pro would've recognized up front. We unsweated the old flex hoses and used the sharkbite connectors which so far, have worked like a charm - not a drop of a leak from them. We'll see how they hold up over time but based on initial impressions, I would definitely recommend them. Ended up buying the 12-year GE, a few extra bucks but hopefully it'll last longer and it has a better recovery rate than the 9-year model. The hoses don't match because when we couldn't fit a braided hose in the space without kinking it. I may replace the current copper hose with a longer one to do the gooseneck hot-water-loss-prevention trick when I have time.
 

Attachments

  • newwh1.jpg
    newwh1.jpg
    23.3 KB · Views: 9
  • newwh2.jpg
    newwh2.jpg
    49 KB · Views: 5
Thanks to everyone who posted their tips here. We got the new water heater installed (see pics), took about 8 hours but we could've done it in four if not for some minor snafus that a pro would've recognized up front.
Looks very good.

Makes me want to clean up some of the [-]mistakes[/-] suboptimal design decisions I made on ours.

BTW, unlike your radiant-foil project, I didn't get any spam from installers or sellers...
 
There was an interesting "unknown unknowns" we ran into on this project. The width of the cut-out area is 23 inches. The width of the old water heater was 19. So it was no problem to remove it. The new water heater is 21 wide, but it is approved for zero clearance on the sides and rear, so we figured no problem when we bought it. HOWEVER, we didn't notice that the gas pipe on the left and the overpressure relief tube on the right reduce that clearance by about 3 inches total. So the disassembly of those junctions added some time to the project.

We also had a hard time finding the correct size drain pan, all the stock at home depot and lowe's is much larger than 23 inches. Ended up buying one at Ace Hardware.

I don't know exactly what setting the old thermostat was set on, although I know we turned it up from the default. However the new water heater is so hot that I actually had to turn the thermostat below the default (which is supposed to be 120). The old burner was probably clogged, reducing heat output. In removing the old unit, I was amazed at how much rust came out of every part of that monster. In retrospect, I think it was leaking much more than we suspected (the water collecting in the drain pan appeared to staying level so I thought if leaking=evaporation then it can't be leaking that much. I didn't know there was a drain tube behind the heater that was secretly allowing the runoff to dissapate). So maybe we'll see some incremental gas and water savings next month.

Also, I would like to express my irritation at Home Depot for having a "10% off appliances" sale and despite the fact that the sale does not explicitly exclude water heaters, they are not considered to be an appliance. And yet, when you go to homedepot.com, the drop down menu for Appliances lists water heaters. So if a water heater isn't an appliance, wtf is it? :rant:
 
Back
Top Bottom