Your recent repair? - 2021 to ?

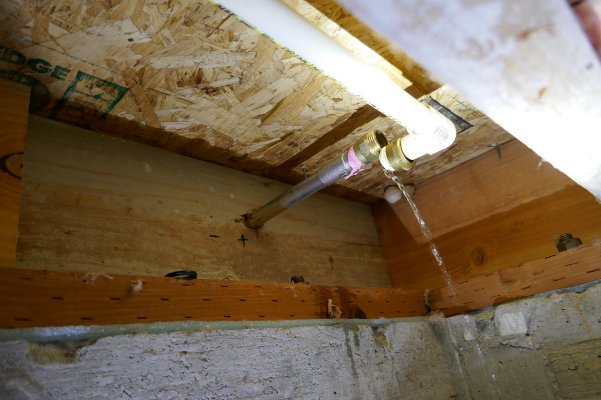
Based on my recent experience, I'd get that capacitor in my possession. With this recent heat wave in Portlandia, every capacitor in every supplier has vaporized. The demand is like a tidal wave as the ACs run nonstop and the capacitors fry. Store it where it is room temperature as opposed to inside the AC case and it will stay good. Amazon or Supply House has 'em for $20 or less.

Of course, once I buy it, I won't need it, but I guess that's a good thing, lol. Grainger is where I found it locally. I loved the sitcom "Portlandia", by the way.
 
Yes, I don't know why this collusion is not illegal. I don't see auto parts stores refusing to sell auto parts to force people to go to a mechanic.

The other collusion thing is when the HVAC people charge you some outrageous price to install it, and you call around, and all the other HVAC guys are charging something equally outrageous. Something's definitely up with that.
 
When I see a small-time looking HVAC van while driving around, I take a picture of it. So I've got a small collection of "little guys" to go to, if I find I can't do it myself. I called and got a call back from the owner / chief wrench turner and asked if he'd braze the line set, evacuate and charge. He asked all the right questions and gave me a price range, but with a disclaimer that he might have to put it off if he was busy. Perfect! My old A/C is limping along, but when it goes, I'm back on Amazon to buy a Goodman. I'll get the components in place and call him, or someone like him. The big guys can't be bothered.
 
The other collusion thing is when the HVAC people charge you some outrageous price to install it, and you call around, and all the other HVAC guys are charging something equally outrageous. Something's definitely up with that.
I had quotes to replace the drain pipes in my basement floor. Everyone gave the same outrageous price.
I asked the third guy what was up. He said the going rate was a specific amount per drain. Kind of a scam. Certainly collusion like.
 
When we built our house in 2003 I installed American Valve 2264 frost proof faucets on the back and side of our house. Seventeen years later they started leaking. A temporary repair lasted about a year, but those failed and started leaking around the stem too. It would have been a simple repair except the faucet used non-standard seals which (after only 18 years!) are no longer available. Figures.

So today I replaced them both with Prier P-164D10 frost proof faucets. It would have been a simple job, other than having to crawl all the way back through the crawlspace to get access under the floor. Once I pulled down the insulation, and cut away the old pipe, it was another trip back through the crawlspace to remove the faucet from outside. Install the new faucet, crawl back under the house again, and rework the plumbing. Crawl back out again, turn on the water, then crawl back under again to check for leaks. All good, take pictures for future reference, reinstall insulation, and crawl back out again. Repeat process for the other faucet. :)

I thought about switching to PEX for this repair as it seems to be the most popular plumbing system these days. But the cost of the tools and materials was still too much for such a small job. CPVC fittings are getting harder to find, but I still have a good supply on hand and was able to find everything I needed.

The new faucets have a much steeper slope built in for drainage than the old one, so I had to change the plumbing a bit accommodate.

It would have been a lot easier to repair the old faucets, if only the parts would have been available. Oh well. Hopefully next time will go smoother. I have to say, crawling around in the crawlspace at 57 is a lot harder on my body than it was at 39! Sheesh I'm getting old... :)
 

Attachments

  • 2021-07-04 140201 - Replacing frost free faucet on back of house - Old faucet.jpg
    2021-07-04 140201 - Replacing frost free faucet on back of house - Old faucet.jpg
    252.2 KB · Views: 34
  • 2021-07-06 101105 - Replacing frost free faucet on back of house.jpg
    2021-07-06 101105 - Replacing frost free faucet on back of house.jpg
    211 KB · Views: 33
  • 2021-07-06 102301 - Replacing frost free faucet on side of house - Old faucet.jpg
    2021-07-06 102301 - Replacing frost free faucet on side of house - Old faucet.jpg
    236.7 KB · Views: 30
  • 2021-07-06 112205 - Replacing frost free faucet on side of house.jpg
    2021-07-06 112205 - Replacing frost free faucet on side of house.jpg
    258.2 KB · Views: 29
  • 2021-07-06 120201 - Replacing frost free faucet on back of house.jpg
    2021-07-06 120201 - Replacing frost free faucet on back of house.jpg
    227.7 KB · Views: 27
Laid a strip of pavers to extend a landing outside our screened patio door. For some reason, there was a strip of about a foot of grass directly in front of the door before the pavers started.

I assume that someone thought this strip was needed for drainage, but the roof doesn't drain onto it and they are below the concrete pad of the patio. If I'm wrong about the grass being needed for drainage, I'll find a half-dozen perforated pavers in the same size or some smaller bricks and put them there instead.
 
Last edited:
When we built our house in 2003 I installed American Valve 2264 frost proof faucets on the back and side of our house. Seventeen years later they started leaking. .....

So today I replaced them both with Prier P-164D10 frost proof faucets.
....
It would have been a lot easier to repair the old faucets, if only the parts would have been available. Oh well. Hopefully next time will go smoother. I have to say, crawling around in the crawlspace at 57 is a lot harder on my body than it was at 39! Sheesh I'm getting old... :)

Nice photos. :flowers:

Imagine how easier it would have been to just have someone else there to insert the new pipe, turn on the water, etc, saving trips.

You forgot to mention how you removed the wasp nests while in the crawl space.. :cool:
 
Imagine how easier it would have been to just have someone else there to insert the new pipe, turn on the water, etc, saving trips.

Usually my wife would help, but she was working at the time. It worked out because I ran into a few issues that I had to crawl in and out to take care of anyway.

If nothing else, it was an excuse to knock down the spider webs under the house. :)

I always try to photo document any additions or modifications to our house. They have come in handy numerous times over the years.

You forgot to mention how you removed the wasp nests while in the crawl space.. :cool:

Ironically, I didn't even see that until I was done and went to take the final photo. There were actually two or three others also. Thankfully, all were old and unused. I just knocked them down with a piece of pipe.

Live wasps stinging me as I crawl out in a panic would have been a whole different project... :)
 
I posted a few days ago about replacing our electric water heater, spending a total of $500 including the cost of the water heater at Costco and paying a handyman to install it. This cost just dropped by $100 plus tax due to a refund from Costco, who lowered the $199 sale price I paid for the WH by another $100. Since I purchased the WH less than 30 days ago, I requested a price adjustment and they notified me today they were issuing a refund.

Bottom line: A plumbing company quoted me a price of ~$2,100 for the job and I ended up getting it done for ~$400. I love it when I get a bargain. :)
 
Last edited:
I just replaced the pump diaphragm on our water treatment system. It's for pumping a drop or two of chlorinated water into our pipes each time the water is turned on. Without it our well water, even though treated and softened to remove the iron and sulfur, has a bit of a smell to it. But the chlorine removes that.

It wasn't all that hard. The parts cost me $88, which was a decent savings over the $400 repair I was quoted. The instructions were a bit confusing, so I used the old standby of paying attention when I took it apart, and then putting it back together the same way. Easy peasy, for the most part.

Soon I'll have to do the same repair Mountainsoft just did. I already bought the new frost proof faucets. Just waiting for DW to come back from a trip so I don't have to do the crawl in/crawl out thing.
 
A replacement, not a repair, but same idea. Our dehumidifier died. The fan runs but it's not actually doing anything. Some online troubleshooting revealed a couple of different possible causes, and it might be something I can fix myself. In the meantime, though, we can't be without a working dehumidifier so I ordered a new one. It was about $270 and should come tomorrow. If and when I have the time to take it apart and see if I can get the old one up and running again, it won't be a bad thing to have two of them. Our basement gets really damp when we get heavy rains.
 
A replacement, not a repair, but same idea. Our dehumidifier died. The fan runs but it's not actually doing anything. Some online troubleshooting revealed a couple of different possible causes, and it might be something I can fix myself. In the meantime, though, we can't be without a working dehumidifier so I ordered a new one. It was about $270 and should come tomorrow. If and when I have the time to take it apart and see if I can get the old one up and running again, it won't be a bad thing to have two of them. Our basement gets really damp when we get heavy rains.

Update us if you get the old one repaired. I just replaced one, but still have the old one. It's the same way, fan runs but no water is collected. I haven't done any research yet.
 
Update us if you get the old one repaired. I just replaced one, but still have the old one. It's the same way, fan runs but no water is collected. I haven't done any research yet.
Will do. The one site I found identified 3 potential issues: the capacitor, the overload, and the control board. I don't think it's the capacitor based on their description of how to tell that's the problem, so probably the 2nd or 3rd thing.


I have no idea if I'm mechanically inclined enough to fix them, or even properly diagnose the problem, but I'll give it a shot. It's worthless right now anyway so I can't make it any worse.
 
This is the 2nd summer I have had 2 mini-split ACs running on solar power to cool the ground floor of my home. At night, when the lithium battery runs out of power, the ACs are run on grid power.

I have been monitoring my grid usage, and found that I used more power now than last year. Is it because it is hotter now? No, not to that extent. Is it because my ACs are now less efficient? They could be, even though I already recharged them with refrigerant, as described earlier in this thread.

Yesterday, standing under the units, I remembered that their outlets used to blow out air much more strongly. Could it be that their filters got clogged? Checking the filters required me to haul in a tall free-standing ladder, because the units are mounted 12' off the ground in vaulted-ceiling rooms, and I had been lazy.

I bit the bullet to do it. The moment I flipped up the cover to expose the filter, I almost cursed. The darn thing was badly clogged with dust. The other unit was the same. Dang!

After vacuuming and brushing the filters clean and reinstalling them, I stood beneath the units and told myself that the strong blast of cool air was what I experienced right after I installed the ACs. Ah, that was worth the effort.

It will take a few more days to observe the power usage to see if everything was back to where it used to be. This morning, I already saw that the variable-speed ACs were no longer cranking at high-speed, while they were doing that the morning before. You know it's bad when your ACs run at high-speed at sunrise, the time of lowest temperature of the day.
 
Two repairs today.
My camping trailer's refrigerator quit working on LP gas, so I made up a manometer out a piece of clear tubing and set about diagnosing it. I had suspected a bad thermostat, but the issue turned out to be spider webs in the burner tube. Apparently some spiders are attracted by propane.

The pump in our water feature quit running, so I pulled it out of the mini-pond and found it is toast. Oddly, whoever installed it used a 700 watt pump and installed it with outlet valves that were closed down to the almost off position. I found that the same manufacturer sells a 200 watt version of the same pump which I've ordered as a replacement.
 
...
I thought about switching to PEX for this repair as it seems to be the most popular plumbing system these days. But the cost of the tools and materials was still too much for such a small job. ...

I used PEX for a similar frost-proof outdoor faucet replacement. I just used Shark-bite (or equiv) fittings. Cut the copper supply, connect a Shark-bite style Tee, one PEX line to the faucet, one PEX line and fitting to the copper pipe to the next outdoor faucet, and that was it.

The fittings aren't cheap, but not crazy expensive, and no special tools required. Well worth it, IMO. The hardest thing was getting the PEX radius bend between joists to line up with the different fittings w/o too much sideways force on them. But that wasn't too tough either.

-ERD50
 
DW wanted an outside receptacle on our deck. But not a box mounted on the wall. Brick wall. So I cut and chiseled the brick, put in an electrical box, and installed a new receptacle wired to the garage receptacle on the other side of the wall.
 

Attachments

  • Screen Shot 2021-07-10 at 6.15.16 AM.jpg
    Screen Shot 2021-07-10 at 6.15.16 AM.jpg
    599.5 KB · Views: 37
  • Screen Shot 2021-07-10 at 6.15.26 AM.jpg
    Screen Shot 2021-07-10 at 6.15.26 AM.jpg
    691.8 KB · Views: 36
  • Screen Shot 2021-07-10 at 6.15.33 AM.jpg
    Screen Shot 2021-07-10 at 6.15.33 AM.jpg
    832.2 KB · Views: 34
Geez. You're a braver man than I. I have to do the exact same install on the brick wall beside our deck and I have yet to break it to DW that it's gonna have to be a surface mount box despite her explicitly wanting a flush install.

Wait. Maybe I'm going to be the brave one...haha
 
I used PEX for a similar frost-proof outdoor faucet replacement. I just used Shark-bite (or equiv) fittings. Cut the copper supply, connect a Shark-bite style Tee, one PEX line to the faucet, one PEX line and fitting to the copper pipe to the next outdoor faucet, and that was it.

I used Shark-Bite fittings to do some repairs at my mom's house before we sold it a few years ago. They were easy to use and seemed to work fine, but I still have my doubts about long term reliability. We were selling the house, so not my problem... :)

I found this PEX crimper tool on Amazon I'm thinking about picking up for future projects. It's cheap enough to try working with PEX without a major investment. Ideally I shouldn't need to do much plumbing work in the future, but something always seems to come up.

https://www.amazon.com/IWISS-Fastening-Stainless-8-Inch-1-inch-Non-F2098/dp/B0196DLLWM

Hey, thanks.

That crimp tool is just what I need to fix a connection in my high-country boondocks home which was damaged by freezing. I used a hose clamp to secure the repaired connection, but could not apply too much force in fear the clamp thread would slip. A crimp would be more reliable.
 
Geez. You're a braver man than I. I have to do the exact same install on the brick wall beside our deck and I have yet to break it to DW that it's gonna have to be a surface mount box despite her explicitly wanting a flush install.

Wait. Maybe I'm going to be the brave one...haha

Cutting the brick with a grinder wheel and cold chisel was tougher that I thought it would be. Drilling several holes with a hammer drill made it easier. And positioning the box such that one whole side and half of another were in mortar joints.

Have fun!
 
Cutting the brick with a grinder wheel and cold chisel was tougher that I thought it would be. Drilling several holes with a hammer drill made it easier. And positioning the box such that one whole side and half of another were in mortar joints.

Have fun!

That job looks very professional, I'm sure it passed the IMPORTANT inspection :flowers:
 
Cutting the brick with a grinder wheel and cold chisel was tougher that I thought it would be. Drilling several holes with a hammer drill made it easier. And positioning the box such that one whole side and half of another were in mortar joints.

You needed a diamond cutoff blade for your grinder. They make cutting through brick, stone, or tile super easy. Perfect clean cuts.

https://www.homedepot.com/p/Makita-...d-Blade-for-General-Purpose-B-69680/310747790

Still, your outlet turned out great! Congratulations.

Reminds me of when I had to drill a hole through my in-laws basement wall to run a water line. I burned up 5-6 masonry bits with a regular drill. I got the job done but it took a couple hours and multiple trips to the store to finish it. These days I would pull out my rotary hammer with an SDS bit and have the hole done in a matter of minutes. The right tools make difficult jobs so much easier!
 
I'm installing new baseboard trim in my Florida townhome after having the floors replaced.

I've done some of this previously, but I'm very much an amateur.

I was installing one very visible section, and the wood floor had a high point right in the middle of the section, so I couldn't make the piece fit nice on either end.

I placed the board level to the floor, and used a pencil to scribe the bump in the floor onto the wood trim. Then I used a hand planer to remove the material at the bottom on the baseboard where the hump existed.

It turned out great. I sat and admired my work for some time, and now I'm on here bragging about it. Kind of fun.

Take care, JP

View attachment 37450View attachment 37451


i had my baseboards installed a year ago.. i may need to hire you to fix their shoddy work.
 
Back
Top Bottom