Your recent repair? - 2021 to ?

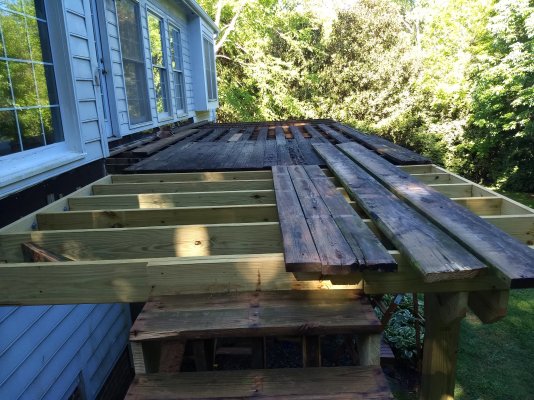
Sump pump switch failed in closed mode. R&R
 
While screwing it on, I first drilled the holes in the wood so it wouldn't split, and drilled right into my finger that was holding the wood underneath :blink:

Boy did it bleed....
Three days later I sold the canoe on craigslist.

My finger is almost healed, pretty sure my fingerprint is different now.


I use the Band-Aid metric to rate repairs - E.G., 3 hours/2 Band-Aids. :)
 
I use the Band-Aid metric to rate repairs - E.G., 3 hours/2 Band-Aids. :)

Over the 20+ years I owned my first electric dryer I had to open it up 3-4 times to replace things like thermostats & heating elements.

That required only removing the rear panel...and discovering everything inside was razor-sharp, stamped sheet metal.

When the motor died the part itself wasn't expensive, around $100, but I realized replacing it would require near complete disassembly of the dryer.

So now I have a new high-efficiency dryer with twice the capacity that I plan never to open up...
 
Last edited:
Inspired by a post by Freedom56 who showed how easy it was to sandblast pool tiles to remove calcium deposit, I have started the same job on my pool today.

Here's his post from 2019. I did not get around to this job until now.

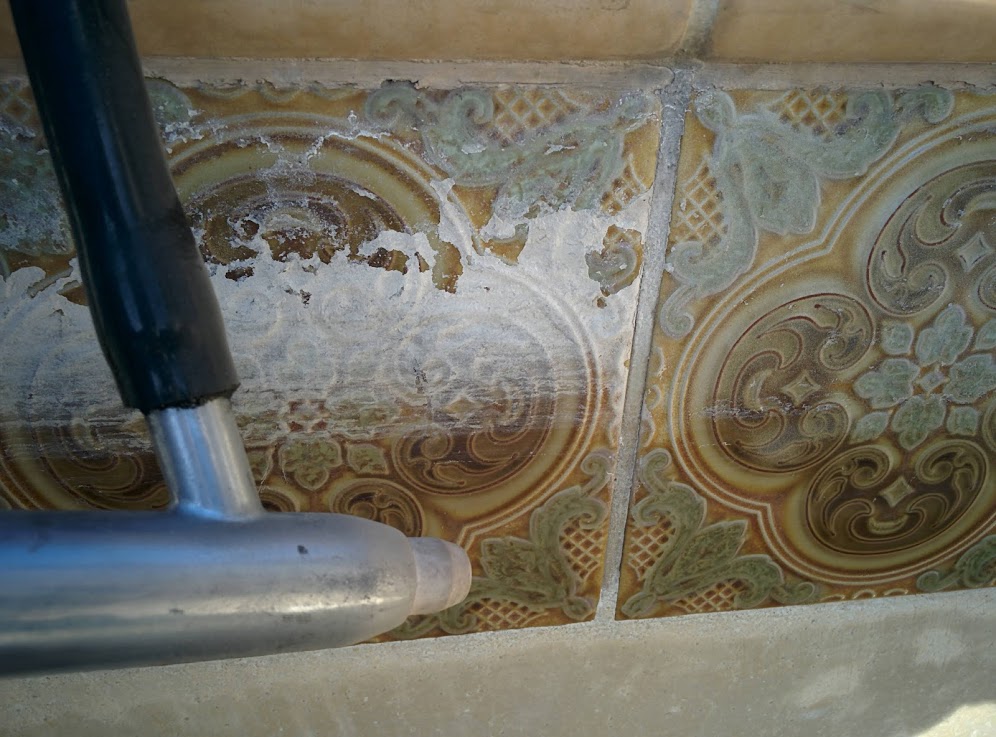
I don't know if this qualifies as a repair, but I just removed heavy calcium build-up from my pool tiles with a $30 abrasive blaster from harbor freight. I paid $850 to do this work in 2013 and the quote this year was $1350 so I decided to try to do the work myself. The results were amazing. I posted a video on YouTube to demonstrate how it was done.


The job is a bit time consuming, but not labor intensive. I have a 2HP air compressor, and it does not provide enough airflow for the job. The calcium built-up on my tiles is horrendous, after 35 years! It is impossible to get the tiles squeaky clean, but because the crud was so bad, the improvement is still impressive.

I am taking this opportunity to drain the pool, in order to sand out some stain spot. And with the plaster exposed, I found that it was really time for the pool to be resurfaced. The last replaster job was 25 years ago. Oh well, perhaps it can limp along for another year or two, before I get it done. It gives me some time to think about other pool surfaces, such as fiberglass.
 
Last edited:
All of our Whirlpools, and Kenmore made by Whirlpool have been like that. Popping off the grill in front and vacuuming was easy... but not on the latest, which is a Whirlpool Gold high efficiency side-by-side, now about 10 years old I think. It says the coils do not need to be cleaned... yeah. They are positioned in this one as front to back banks of angled coils, like a sawtooth pattern. I can only vac the front bank, and maybe another bank in, before it's too deep to pull through with a vac. I have thought about using compressed air, but I wonder how much of a mess that will make.

I can answer that question because I did exactly that the day before yesterday. Just as one would expect it makes one heck of a mess! The dust suspended in the air was so thick I could hardly breathe and I ran to get a mask - glad we had plenty readily available! And of course there was the more dense chunks that blew out along the floor in front of the refrigerator. If all this didn't fill up the vacuum cleaner bag, I'm sure it came pretty close.

And all this reconfirmed that I'm married to an angel. She only said "Well, I guess it really needed cleaning under there."

But the condenser coil is the cleanest it's been since the refrigerator was new, almost 19 years ago.:angel:
 
My pool rehabilitation project took 4 days. Could have done it in 3 days, if I had better equipment.

Day 0 - Ran a sump pump overnight to empty the 25,000-gallon diving pool

Day 1 - Managed to sandblast about 1/4 of the waterline tiles. Worked only about 4 hours, because the midday sun was darn hot. Counted about 190 tiles, of 6" each. So, I had almost 100 ft to do.

Day 2 - Sandblasted another 1/4 of the tiles. Noticed that I spent more time waiting for the 2-HP air compressor to rebuild pressure than sandblasting. Went to my neighbor to borrow his 2-HP compressor.

Day 3 - Went early in the morning to HarborFreight to buy an NPT Tee, in order to join the 2 compressor outputs. Wow, I could now sandblast non-stop, and only needed to stop to refill the hopper.

I discovered that the black aluminum oxide blasting media had some iron particles in it. And there were some wet spots in the pool plaster, which caused the iron to rust and leave rusty little dots on the plaster. ARRGH! Live and learn. I should have waited to get glass bead, which was out at the local stores. The nearest HarborFreight stores that still had glass beads were 120 miles away.

Day 4 - Acid washed the pool. That took out most of the rusty dots. The calcium deposit was a lot harder to remove. I did a somewhat superficial job, because I discovered that the plaster was really weak being more than 25 year old. There were several bad spots of 1" that bloomed like ugly cancer tumors, and they grew from underneath the surface. What the heck are they? Digging them out would cause a divot, so I just shaved off the blooms with a chisel to make the surface even, but the discoloration of course stayed. Dang!

Oh well, the pool will look better than it did. And that has to be until I have it resurfaced.

The pool is being refilled with the backyard faucet running full blast. It took about 48 hours last time.

10965-albums255-picture2407.jpg
 
Last edited:
Fixed a few screens that had holes. Pretty easy job once I picked up the screen, spline and a couple of tools from Home Depot. Maybe 30 minutes a screen, including time to scrub/wash the frame before installing the new screen.
 
The water dispenser quit working on the fridge. Last time it was a frozen hose, which I thawed by shooting hot water up the outlet using a tiny hose with a syringe. I tried and tried the same trick with no luck so I checked out the solenoid that controls the flow and found it to be OK, but I couldn't blow through the hose, so I knew it was plugged. Filter was relatively new and it worked fine yesterday - decided it could only be ice again. Doubled my efforts with the hot water trick and darned if a little chunk of ice and a rush of water did not come out the dispenser.
 
The water dispenser quit working on the fridge. Last time it was a frozen hose, which I thawed by shooting hot water up the outlet using a tiny hose with a syringe. I tried and tried the same trick with no luck so I checked out the solenoid that controls the flow and found it to be OK, but I couldn't blow through the hose, so I knew it was plugged. Filter was relatively new and it worked fine yesterday - decided it could only be ice again. Doubled my efforts with the hot water trick and darned if a little chunk of ice and a rush of water did not come out the dispenser.

Any chance your freezer is set too low ?

If you had a freezer thermometer you could check it.
 
Any chance your freezer is set too low ?

If you had a freezer thermometer you could check it.
Good idea. I have not changed the setting in the last year, but maybe something is awry.
 
Replaced the broken handle on the built-in microwave. Amazon had less expensive replacement parts and several youtube videos showed how to remove the inner door covering. Really easy; took about 15 minutes.
 
We went to Home Depot for something, and stopped to look at their appliances. Nice, nice, new fridges for $1500 or so. Very compact ice/water dispenser built right into the door, including the icemaker, ice container, crusher.

My frugal wife immediately said, no we did not need it. If we got tired of the current main 30 c.f. fridge, we could get rid of it, move the smaller but newer secondary fridge from the utility room into the kitchen, then get a chest freezer for the utility room.

I guess her arrangement could work. I admit that a chest freezer would be better than using our secondary fridge as a freezer.

See how hard it is for me to blow the dough? :)
 
After cleaning dust off the condenser coil of the fridge and giving it a couple of inches more spacing from the back wall, I measured the power usage again with a Kill-A-Watt meter.

The energy as measured over a course of almost a week came to 4.2 kWh/day. My note shows that it was 4.8 kWh/day as measured back in 2018.

So, there was an improvement in energy efficiency, but it was not as large as I hoped.
 
One of my two stereo speakers has always sounded a little quieter than the other one. I looked at the two wires going into the back of the speaker, and one of them only has two strands of copper going into the connector. Out of about eight(?) total strands that comprise the that wire. I'm going to strip the end of that wire and get more strands, all eight, I guess, into the connector and give it a test and see if it gets louder. The other speaker, that is louder, already has all strands connected to its terminals.
 
Any chance your freezer is set too low ?

If you had a freezer thermometer you could check it.

Good idea. I have not changed the setting in the last year, but maybe something is awry.

I've found there to be a lot of temperature variation in fridges. In both our older one in the previous home (a lower end model to fit the space), and the higher end 2018 model in our new-to-us home, we've experienced frozen food in spots, even though it can be 37~38 in other areas.

There are air vents to distribute the cold air from the freezer. I think two things occur to create the problem. One, if something is close to one of those air vents, it gets a blast of freezing air. The manual actually says don't put things near these vents - well, then they should have a cage around them to prevent that, but I suppose that would reduce their cubic foot capacity rating (which would then reflect reality, if it is space you can't use!). Second, (and this seemed to be the main problem in our previous fridge) blocking the air flow might direct it away from the temperature sensor, causing the fridge to think it is warmer, and running it colder and freezing food.

A small plastic jar of water will freeze in some areas.

You'd think that after decades of experience, and the cost of these things, this wouldn't be a problem. I'm thinking of building some cage/keep-outs for around the vents, but it will have to have the minimum SAF, so I'll have to think on this a while. Or maybe a small computer style fan to circulate the air to even out the temperatures?

-ERD50
 
Last edited:
One of my two stereo speakers has always sounded a little quieter than the other one. I looked at the two wires going into the back of the speaker, and one of them only has two strands of copper going into the connector. Out of about eight(?) total strands that comprise the that wire. I'm going to strip the end of that wire and get more strands, all eight, I guess, into the connector and give it a test and see if it gets louder. The other speaker, that is louder, already has all strands connected to its terminals.

I like to tin the leads. Keeps them nice and neat.

-ERD50
 
The deck boards were beyond worn out. I've ordered composite deck boards. I'll be adding joists to the existing 24 OC deck. I'm going with stainless cable for the railings, which I imagine will be very tedious to install.
 

Attachments

  • IMG_20210513_092702733.jpg
    IMG_20210513_092702733.jpg
    931.6 KB · Views: 21
  • IMG_20210513_092749496.jpg
    IMG_20210513_092749496.jpg
    1 MB · Views: 24
What does it mean to tin the leads? Wrap them in a metal foil?

Tinning means to cover the copper with solder. It keeps the strands together, improving rigidity. It also improves conductivity because the tin cover protects the copper from oxidation.

For tinning large wires or conductors and for high volume production, people use a tinning pot to dip the objects into melt solder. Small wires can be tinned using a soldering iron.

PS. Marine wires or cables have multiple strands in order to be flexible to prevent breaking due vibrations. The strands are also individually tinned by electroplating for unequaled conductivity in the presence of salty air. It only costs money to have the best. :)
 
Last edited:
Out of about eight(?) total strands that comprise the that wire. I'm going to strip the end of that wire and get more strands, all eight, I guess, into the connector and give it a test and see if it gets louder. The other speaker, that is louder, already has all strands connected to its terminals.

Little things like that can help.

I once sped up an older, slow computer by avoiding the use of full sized colons and only using semi-colons. ;)
 
"Tin" means to put solder on the strands. Getting 8 strands conducting vs 2 won't make any difference.

Little things like that can help.

I once sped up an older, slow computer by avoiding the use of full sized colons and only using semi-colons. ;)

Having just 2 strands instead of all 8 for the last inch or two will not make a difference.

However, I wonder if this is an old wire that has the strands oxidized going way back under the insulation. When the strands are isolated from each other, in the worse case you have just two strands going the entire length. :) That's why marine wires have the strands individually tinned.

And then, the ends of the two connecting strands may also be oxidized, causing poor conductance onto the speaker terminals.

It is highly likely that the "weak" speaker has a problem. Or one channel of the receiver is itself "weak".

A test by swapping speakers will rapidly pinpoint the problem further.

PS. Even if the strands are oxidized and isolated from each other, by electrically joining them at the two ends by tinning you ensure that all the strands help to conduct current.
 
Last edited:
Having just 2 strands instead of all 8 for the last inch or two will not make a difference.

However, I wonder if this is an old wire that has the strands oxidized going way back under the insulation. When the strands are isolated from each other, in the worse case you have just two strands going the entire length. :) That's why marine wires have the strands individually tinned.

And then, the ends of the two connecting strands may also be oxidized, causing poor conductance onto the speaker terminals.

It is highly likely that the "weak" speaker has a problem. Or one channel of the receiver is itself "weak".

A test by swapping speakers will rapidly pinpoint the problem further.

PS. Even if the strands are oxidized and isolated from each other, by electrically joining them at the two ends by tinning you ensure that all the strands help to conduct current.

Very interesting, Thanks, guys. I trimmed the plastic coating on the end of the wire back a half inch and got 7 of the 8 strands together nice and tight (accidentally sliced one strand off with the razor knife, lol). Then got them all the way through the connector and set it tight. I might be imagining things, but it sounds a little louder now. Placebo effect, maybe, lol. I agree it could just be something in the receiver pr the speaker making it sound weak. It sounds good enough though, so I'm going to call it a success. These speakers and the rest of the stereo system let you hear everything. Great 'separation' so you hear all 20 different instruments in a 20 instrument band. Not gonna mess with it.
 
Replaced the lithium battery in my 6 year old Asus travel Chromebook. It only has a small 11.75 inch screen but it's small, lightweight and has been a lifesaver for us while traveling. Unfortunately, it died suddenly in Belize last week. Had to rough it for a few days until we got home. New battery from Amazon arrived this morning and now the ol' girl is back in business.
 
Just today replaced the User Interface PCB on a dishwasher in a rental house -10 minute job once figure out it is that card. I had previously also replaced the Machine Control board - and while it worked, it finally required too many electrical resets.
 

Attachments

  • B181DA6D-2268-44F1-8D76-8C266247F6E4.jpg
    B181DA6D-2268-44F1-8D76-8C266247F6E4.jpg
    406.2 KB · Views: 20
  • EC2AD6AB-3DE6-4DDB-A660-576397DF9989.jpg
    EC2AD6AB-3DE6-4DDB-A660-576397DF9989.jpg
    540.4 KB · Views: 20
Back
Top Bottom