Your recent repair? - 2021 to ?

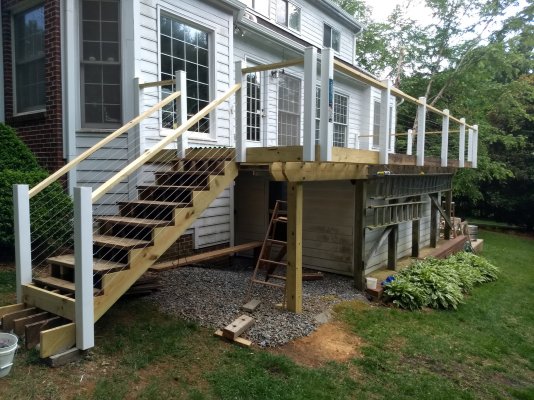
The deck boards were beyond worn out. I've ordered composite deck boards. I'll be adding joists to the existing 24 OC deck. I'm going with stainless cable for the railings, which I imagine will be very tedious to install.

How do you deal with the roof of the extension that is under the deck ?
 
How do you deal with the roof of the extension that is under the deck ?
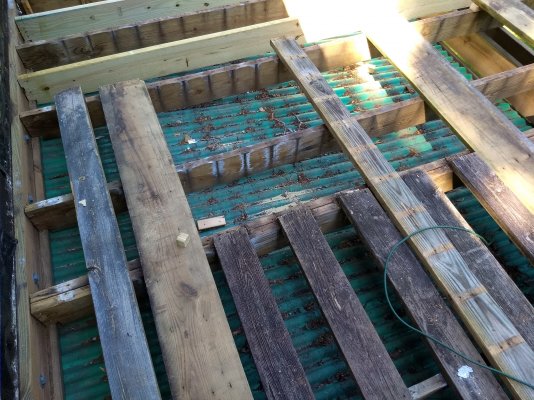
You have observed a detail I didn't think would get attention, hehe! The roof panels aren't going to need any changes. I'm going to add panels to the new part of the deck so we can have some dry-ish storage (for DW's potting soil and stuff). They're screwed onto the bottom of the ledger board and slope down to rest on a gutter. In the middle I have 1x4, on edge (vertical), so the slope is constant (so it doesn't sag). I put those up "temporarily" 25 years ago, when I first moved here (before the slab and shed walls) to have a rain-free place to throw stuff.

Not sure I answered your question, though.
 

Attachments

  • IMG_20210514_101214398.jpg
    IMG_20210514_101214398.jpg
    928.1 KB · Views: 27
Last edited:
Inspired by a post by Freedom56 who showed how easy it was to sandblast pool tiles to remove calcium deposit, I have started the same job on my pool today.

Here's his post from 2019. I did not get around to this job until now.


The job is a bit time consuming, but not labor intensive. I have a 2HP air compressor, and it does not provide enough airflow for the job. The calcium built-up on my tiles is horrendous, after 35 years! It is impossible to get the tiles squeaky clean, but because the crud was so bad, the improvement is still impressive.

I am taking this opportunity to drain the pool, in order to sand out some stain spot. And with the plaster exposed, I found that it was really time for the pool to be resurfaced. The last replaster job was 25 years ago. Oh well, perhaps it can limp along for another year or two, before I get it done. It gives me some time to think about other pool surfaces, such as fiberglass.


It's too late to warn you, but sandblasting glazed tiles with hard abrasives will remove the glazed surface. Aluminum oxide and silicon carbide are the two hardest abrasives that are used for carving granite monuments.

I'd suggest a milder abrasive for blasting glazed tiles. Soda is one commonly used that might work.

Yes. If I held the nozzle for too long at a spot, I could see the raised features on the tile getting worn out. :blink:

So, I tried to be quick, and not shooting to get all the calcium out, just the heavier crud. My wife then cleaned the tiles further with LimeAway.

If I were to do this again, I would try salt as suggested on the Web.
 
You have observed a detail I didn't think would get attention, hehe! The roof panels aren't going to need any changes. I'm going to add panels to the new part of the deck so we can have some dry-ish storage (for DW's potting soil and stuff). They're screwed onto the bottom of the ledger board and slope down to rest on a gutter. In the middle I have 1x4, on edge (vertical), so the slope is constant (so it doesn't sag). I put those up "temporarily" 25 years ago, when I first moved here (before the slab and shed walls) to have a rain-free place to throw stuff.

Not sure I answered your question, though.

That's what I was wondering.

So it seems that these panels have a very long lifespan.
 
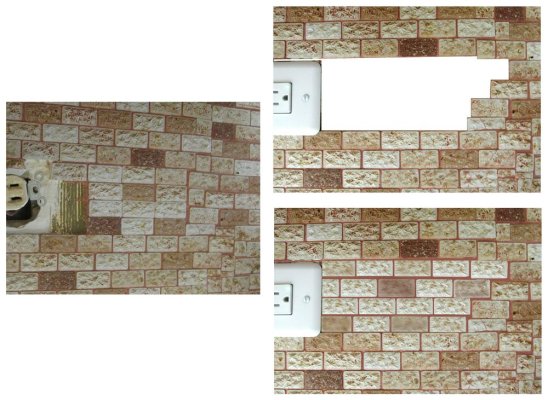
I've been designing a backsplash fix of a botched tile job some guy did in the 1960s. Fixing it perfectly requires taking off half the tiles, or all and starting over, and that's a lot so he and his wife settled for it and so did my family. When I redo the kitchen I may replace it with grey scale tile so this may be a temporary fix. For the adobe grout, which I only realized was adobe recently (I kept thinking it's some pink/orangy color that I'd have trouble color matching) I experimented mixing old grout with 30 year old air dry adobe colored clay that I recently reconstituted. I can buy adobe colored grout but I may not bother. For thinset, maybe I'll just use my Ready Patch. The lower right is the plan that I designed in graphics software. I'll have to grind down a bunch of tiles about 1/8". Everything to the right and left of the photo is already perfect.
 

Attachments

  • backsplash-repair-plan.jpg
    backsplash-repair-plan.jpg
    141.4 KB · Views: 36
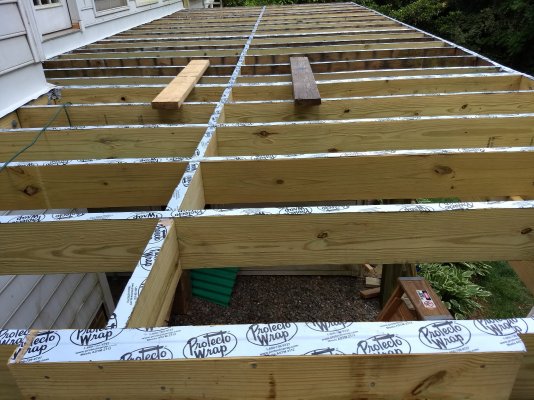
I'm going to be putting composite deck material in place of old splintered pine, and it was suggested in another thread to protect the tops of the joists. I wasn't originally going to do this, but changed my mind.

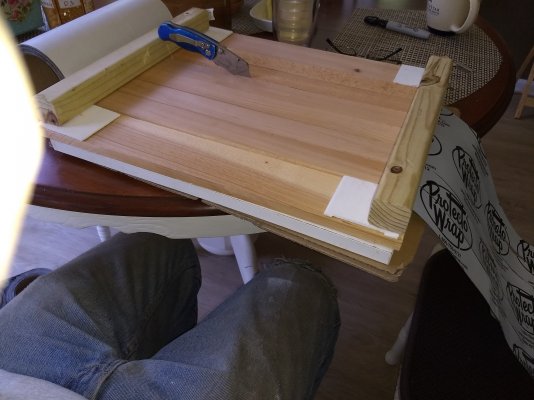
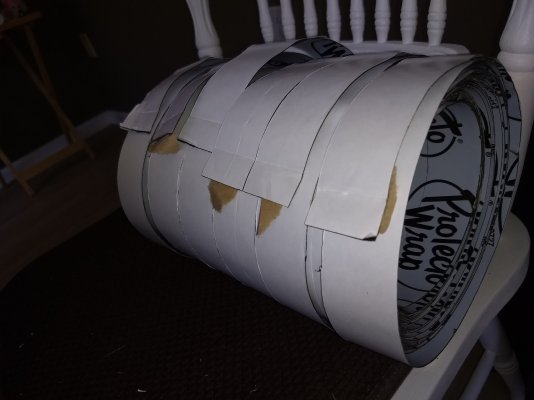
Then I realized it only came in 9 inch width. I tried unrolling it and cutting with a straight edge and that was not only inaccurate, it also had me crawling around on the floor. So I made this jig out of scraps in just a few minutes. Then got the two rolls accurately sliced. It's peel and stick, and quite satisfying to put down.
 

Attachments

  • IMG_20210521_132915247.jpg
    IMG_20210521_132915247.jpg
    562.8 KB · Views: 32
  • IMG_20210521_134422175.jpg
    IMG_20210521_134422175.jpg
    363.3 KB · Views: 30
  • IMG_20210523_082324235.jpg
    IMG_20210523_082324235.jpg
    782.2 KB · Views: 35
Last edited:
I'm going to be putting composite deck material in place of old splintered pine, and it was suggested in another thread to protect the tops of the joists. I wasn't originally going to do this, but changed my mind.

Then I realized it only came in 9 inch width. I tried unrolling it and cutting with a straight edge and that was not only inaccurate, it also had me crawling around on the floor. So I made this jig out of scraps in just a few minutes. Then got the two rolls accurately sliced. It's peel and stick, and quite satisfying to put down.

I like the idea of the jig to be economical with the covering.

I seem to see in the photo, some top edges of the joist because the covering is not wide enough.

It looks to me, as if you will miss out on some of the benefit of the protection as the strips you cut appear too thin for the width of the joist tops.
having ~1/2 inch overhand on both sides of the top so water can drip down cleanly (IMHO) seems best.
 
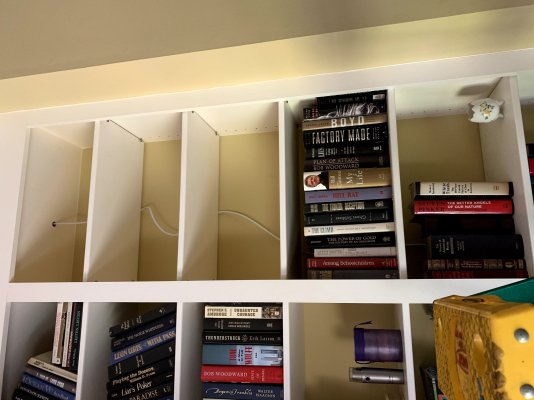
I haven't done many DIY projects recently, but today I was forced to do one myself. We have a 48 inch TV in the master bedroom which is DW's favorite place to veg out in the afternoon. She has to have her Nats games and CSI. We have been experiencing a lot of problems with the set top box freezing - unable to change channels or bring up the guide. Verizon sent a replacement box that they couldn't even figure out how to install with phone help. It got to the last step and then stopped. They sent a technician who concluded that the problem wasn't the box but likely the cable plant feeding that TV. I installed it 35+years ago when I was using a rooftop antenna. It was a total botch from day 1. Connectors crimped on with needle nose pliers, a hodge podge of splitters. I had run this cable in through an attic crawl space vent and then down through a wall to the TV. When central air came in later, the ductwork covered the splitters and made the vent area inaccessible. There is no way to fish a new cable in that way. So I decided to go the other direction. The upstairs TV box is on a shelf in a closet directly above a little living room TV that sits on a shelf with floor to ceiling bookshelves above. The living room TV has a very good cable connection from the basement. Easy-peasy. Just drill a hole through the ceiling, up through the hardwood floor, into the closet. I bought a 16 in long 3/4 in spade bit and drilled up. Unfortunately it didn't reach all the way though. So, trusting the measure twice cut once rule, I drilled down from above, hoping I figured it out right. Ran a coat hanger down and voila. I was able to fish the new cable right thru. So far so good. The TV seems to be working fine. I have some questions about the Internet side of this setup that Verizon can't help with. I will probably ask about that in a separate thread. Here is a photo showing what I am talking about before I trued up the cable on the left side of the case and replaced the books.

Edit: darn iPhone photos - rotate that view 90 degrees clockwise in your head.
 

Attachments

  • cable.jpg
    cable.jpg
    481.1 KB · Views: 18
Last edited:
So if I said you had good luck when you went fishing, that would be accurate?

Back on my project....I did some test applications with wider strips and it was faster to apply if I aligned just one edge. Walking on the joists and squatting down reminds me of tai-chi, hehe, very controlled and thoughtful motions so I don't go crashing down. So ease of installation was high on my list. But I digress. After pulling off the old decking, I noticed the only real wear was where the water got in where the nail pierced the wood, so I figured that was my main problem to solve. I think this stuff will seal around the fasteners. That stuff is really sticky, so I doubt any water will get under it from the sides. But you're right...they do sell it (not locally, but on the Internet) in 1 5/8 wide and 2" rolls. The former would not go down the sides much, but the 2" would.
 
Last edited:
I'm going to be putting composite deck material in place of old splintered pine, and it was suggested in another thread to protect the tops of the joists. I wasn't originally going to do this, but changed my mind.

Then I realized it only came in 9 inch width. I tried unrolling it and cutting with a straight edge and that was not only inaccurate, it also had me crawling around on the floor. So I made this jig out of scraps in just a few minutes. Then got the two rolls accurately sliced. It's peel and stick, and quite satisfying to put down.

When I rebuilt my deck, the lumber yard sold me joist tapes of about 3.5" width.

I also sprayed the joists and beams with Thompson sealer, and it helps them shed water.
 
So if I said you had good luck when you went fishing, that would be accurate?

Back on my project....I did some test applications with wider strips and it was faster to apply if I aligned just one edge. Walking on the joists and squatting down reminds me of tai-chi, hehe, very controlled and thoughtful motions so I don't go crashing down. So ease of installation was high on my list. But I
LOL. Yes, I caught the fish but the problem remains. Every thing works great and then suddenly the channels won't change and the guide won't work, then a few minutes later all is well again. At least I have eliminated the cable as the culprit.
 
I just recharged my 2 DIY-installed mini-split ACs with R-410a.

As I often bragged about it here, I have a DIY off-grid solar system that can provide enough free electricity to run the ACs until it gets to 110F and above. Recently, it got to 100F, and I was already running out of juice in the lithium battery at midnight. The system switched over to running out of the grid.

I looked up the record for May last year, and the system was working a lot better than that. I had enough juice to run the two mini-splits through the night, until the high got to 105F. And this year, I have done some upgrades and should have better overall performance, not less. Hmmm... Something was wrong here.

And then, I noticed that the interior of the house was no longer comfortable, even though the ACs were cranking. Something was really wrong.

I measured the inlet and outlet temperatures of the two ACs. The interior of the house was at 84F. The ACs were set at 78F. One AC was discharging air at 74F, while the other one was blowing air at 80F. Darn!

I switched on the main central 5-ton AC to get some relief, before contemplating my next move. It looked like the ACs were leaking refrigerant. Gotta put in the order for some now, before trying to figure out where the leaks were.

When installing these mini-splits I borrowed from a neighbor some tools such as a vacuum pump, a vacuum gauge, a torque wrench for proper tightening of the flare nuts at the line connections. This time, I decided I needed to own my own tools. So, I ordered them too.

The orders went in yesterday. The Freon cylinder arrived today before dinner. So did the vacuum pump and manifold gauge. I still don't have the torque wrench and the crowfoot wrenches.

After dinner, I decided to check the pressure of the ACs, and recharged at least the AC that was still partially working. The other one may need a teardown of the lines to find and fix the worse leak.

It was good that I ordered a 25-lb R-410a cylinder instead of the 10-lb one. It turned out later that I needed more than I expected. It took 4 lbs of refrigerant to recharge the larger 1.5-ton AC that was partially working. Pressure and temperature are now back to the values when the AC was new.

I decided to recharge the smaller 3/4-ton AC also. It took 3 lbs of R410a. Also is working like new.

So, the bigger AC leaked 4 lbs after 2 years, and the smaller AC leaked 3 lbs after just 1 year. This is bad.

When installing them, I made sure to pull vacuum down to below 50 micron of Hg pressure, and observe that it stayed that low for several hours. Then, I checked the connections afterwards after releasing refrigerant by using soapy water to be sure of no leak. What could I do better?

When I get my own torque wrench with the crowfoot adapters, I will recheck all connections with soapy water, then retorque all the flare nuts. I think I will wait a while, perhaps after a summer to see if the leaks happen again, before tearing down the lines and inspecting all the joints.

There's a new type of seal with the tradename of Flareseal that serves as the interface between the soft copper flared tubing and the brass flare nut. Maybe I will try that.
 
Last edited:
NW-Bound, I'm sorry to hear that your mini's are slowly leaking but I am glad to hear that R-410a is available for purchase. As my unit has only been installed and I have no idea if it is also slowly leaking, I might go ahead and buy a supply of it, just it case it's suddenly outlawed. Also, if you do try the FlareSeal, please let me know what you think. I used NyLog but the seal seems like it would be a better solution for leaking connections.
 
Very interesting, Thanks, guys. I trimmed the plastic coating on the end of the wire back a half inch and got 7 of the 8 strands together nice and tight (accidentally sliced one strand off with the razor knife, lol). Then got them all the way through the connector and set it tight. I might be imagining things, but it sounds a little louder now. Placebo effect, maybe, lol. I agree it could just be something in the receiver pr the speaker making it sound weak. It sounds good enough though, so I'm going to call it a success. These speakers and the rest of the stereo system let you hear everything. Great 'separation' so you hear all 20 different instruments in a 20 instrument band. Not gonna mess with it.

OK, now that I've got the speaker sounding better I have another 'repair' to think about. I'm looking for a new stylus (needle) for the turntable. I've found a lot of different prices online for the same stylus from various vendors. The turntable and stylus is decades old. It's a Pioneer PL514X. The stylus is an OLM 30 MK III. I'm going to leave the cartridge alone. It's whatever came with the turntable. I must have at least 1000 hours on it, maybe 2000. It sounds OK, but may be having some 'sibilance' on high female voices (fuzzy S's and H's) but not on all records. Even if replacing the stylus doesn't show an improvement, I'll be resting assured that I am not ruining my records with an old stylus, which supposedly can happen. Any recommendations for a reputable online source for a buying a new stylus for my vintage setup? Thanks.
 
I am fixing to replace our camper fridge... And ticked about it... brand new camper in 2015... fridge was fixed twice and then replaced under warrantee, and the replacement has now failed for the second time... Have waited 2 months for a control board that didn't fix it.
 
NW-Bound, I'm sorry to hear that your mini's are slowly leaking but I am glad to hear that R-410a is available for purchase. As my unit has only been installed and I have no idea if it is also slowly leaking, I might go ahead and buy a supply of it, just it case it's suddenly outlawed. Also, if you do try the FlareSeal, please let me know what you think. I used NyLog but the seal seems like it would be a better solution for leaking connections.


I also used Nylog Blue on all the flare connections when installing. And as mentioned earlier, I pulled vacuum down to 50 micron Hg, and it held for several hours. That was still not good enough!

I suspect that good sealing under vacuum does not guarantee sealing under high pressure. The atmospheric pressure is less than 15 psi, and it presses against the seal to make it tighter. On the other hand the pressure of the refrigerant is hugely higher, and it presses outward on the seal to open it up.

How high is the operating pressure? For cars, I knew that R-134a ACs run at a much higher pressure than R-12, but I never worked with even the old R-22 residential systems.

It was eye opening for me, as I never had an R-410a system before. When I hooked up the gauge to the larger minisplit that was left running because it was still partially cooling, I saw that the low-side pressure was 50 psi. I recharged to bring it up to 110 psi, which is on the low side of operating range.

On the smaller minisplit that was not cooling at all and turned off, I saw 250 psi when I first hooked up the gauge. It dropped down to 25 psi when I turned on the AC. I also recharged it to 110 psi.

The minisplits had no accessible ports on the high-side pressure. It would be higher than 400 psi when working. That's horrendous.

If I open the connections up and install the FlareSeals, I will still put some Nylog Blue on the shoulder of the flared copper tubing, and also on the threads to serve as a lubricant to ease the tightening.

By the way, the discharged air of the AC is now in the low 50F. And I just checked the status of my solar lithium battery. It still has juice after running the ACs overnight. And one of the fridges, and some other appliances too. That is more like it. :D

PS. FlareSeals are expensive. A kit of 4 seals for one system costs $15. It is however worth it, considering the cost of refrigerant and the hassle.

hero-image.9377235.bb4508b8b2c8ba9f4c6901197e9b3a07.png
 
Last edited:
The tail wheel bearings failed on my tractor... So I bought a replacement hub assembly for $22 on-line and got it in the mail in less than a week... I was actually surprised it was so cheap! It took me about 20 minutes to change it out and I was on my way.


King-Kutter-Wheel-Hub-Assembly-for-Rotary-Cutter.jpg
 
Took my sons car for front end alignment...groupon coupon...they said they could not do it because I needed a new tie rod arm end on the driver's side and a new wheel bearing on the passenger side. They did offer to do the work for me for around $800. Said I will comeback for my paid for alignment in a couple of weeks.

Tie rod end was around $20. Ended up buying one for the other side also , as I messed up the threads getting it out. Real easy repair. Indeed, the tie rod end on the driver side was quite loose.

Wheel Bearing passenger side - Just went with the whole knuckle because I did not want to mess with getting the bearing out and putting the new one in. New knuckle was $110 (wheel bearing would have been around $25). There was a tiny amount of play in the wheel bearing...not sure if it should have prevented the alignment but so be it.

Job took me a few hours total. Total cost was $150 vs. quote of $800.

Took it back and got the front end aligned.
 
Interesting about the mini-split refrigerant saga. Do they require a cert for you to do your own refrigerant work, or is that just for R-22?

My repair continues... the composite is late. Home Depot just shrugs. But I only finished the steel cables today, a week after the deck boards were to be delivered.

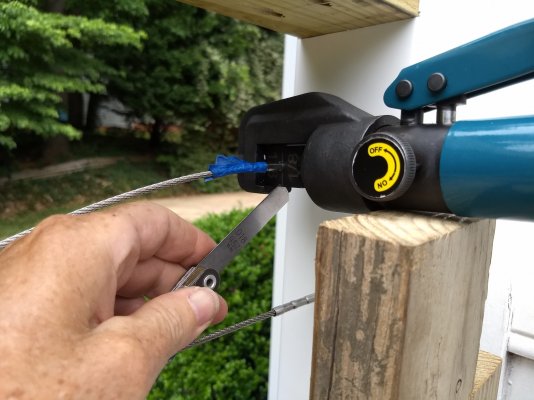
I bought this crimping tool, and it's my least favorite thing. I can give it everything I have, and have a complete crimp, or it can be insufficient. I've taken to measuring the gap every time. Finally done, though. No need to go to the gym for hand/arm strength.
 

Attachments

  • IMG_20210604_164321104.jpg
    IMG_20210604_164321104.jpg
    869.4 KB · Views: 19
  • IMG_20210603_142649623.jpg
    IMG_20210603_142649623.jpg
    446.1 KB · Views: 19
^^^ R-134a for cars and R-410a for home ACs are free for purchase by anyone.
 
The wife's Nissan Rogue drain line from the sunroof clogged, causing water to drain in the cabin. Got a piece of stiff clothesline and rodded it out about 3 ft. Not enough. Got the air hose out, lowered the regulated pressure down to 40 psi then blew the rest of the clog out.
 
Took my sons car for front end alignment...groupon coupon...they said they could not do it because I needed a new tie rod arm end on the driver's side and a new wheel bearing on the passenger side. They did offer to do the work for me for around $800. Said I will comeback for my paid for alignment in a couple of weeks.

Tie rod end was around $20. Ended up buying one for the other side also , as I messed up the threads getting it out. Real easy repair. Indeed, the tie rod end on the driver side was quite loose.

Wheel Bearing passenger side - Just went with the whole knuckle because I did not want to mess with getting the bearing out and putting the new one in. New knuckle was $110 (wheel bearing would have been around $25). There was a tiny amount of play in the wheel bearing...not sure if it should have prevented the alignment but so be it.

Job took me a few hours total. Total cost was $150 vs. quote of $800.

Took it back and got the front end aligned.

Congratulations! Great save!
 
........
Job took me a few hours total. Total cost was $150 vs. quote of $800.

Took it back and got the front end aligned.
I've found the same thing - I can buy assemblies a lot cheaper than pay someone to replace individual parts - like whole strut assemblies, for example. Plus, the markup on the parts is obscene at the repair shops, in addition to the labor charges. And, the parts at independent shops are generally not even OEM quality.
 
NW-Bound, I'm sorry to hear that your mini's are slowly leaking but I am glad to hear that R-410a is available for purchase. As my unit has only been installed and I have no idea if it is also slowly leaking, I might go ahead and buy a supply of it, just it case it's suddenly outlawed. Also, if you do try the FlareSeal, please let me know what you think. I used NyLog but the seal seems like it would be a better solution for leaking connections.

Have you bought some R-410a? Did my post cause a run on refrigerant or what? I happened to check the price at the same place I bought mine less than 4 weeks ago, and the 25-lb cylinder for which I paid $179 is now sold for $249.

Maybe it's just inflation. Or perhaps a shortage of refrigerant when people turned on their AC and found it not working too well. AC servicemen may know, based on their business condition.

About FlareSeal, I will wait till fall before I take apart the flare connections to inspect them. I cannot afford to take risk with the ACs now, when I need them to run 24/7.
 
Last edited:
Back
Top Bottom