Fixed My Laptop

easysurfer

Give me a museum and I'll fill it. (Picasso) Give me a forum ...
Joined
Jun 11, 2008
Messages
13,152
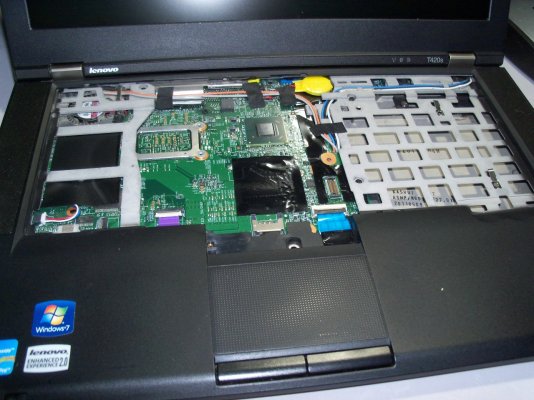
Feeling proud of myself. Over the past couple of days, went ahead and replaced the loud, whining fan on my Thinkpad T420s laptop to a quieter sounding one.

Wasn't easy as I had to pretty much disassemble the whole thing to access the fan. But luckily I had some documentation to follow along.

My ears will thank me :).

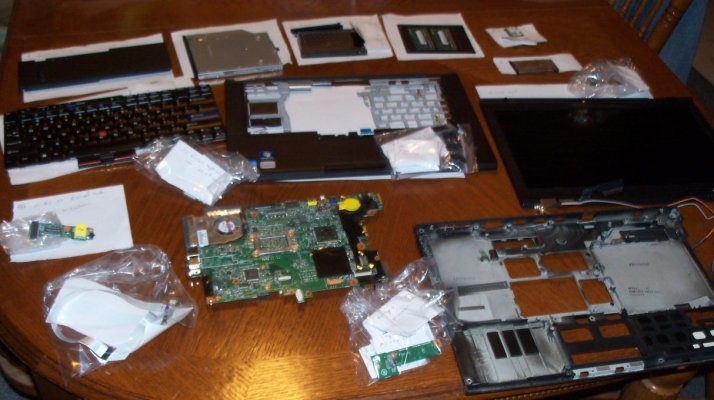
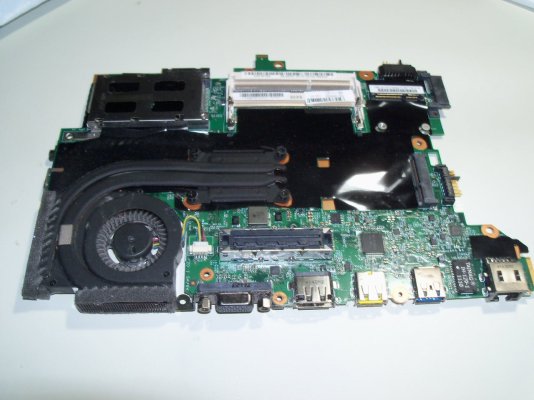
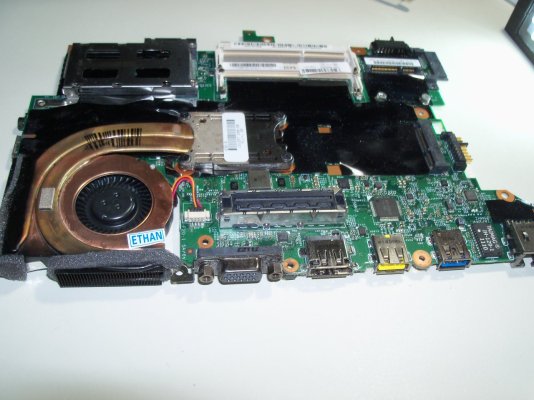
Attached are some photos (new fan is the shiny, gold colored one).
 

Attachments

  • keyboard removed.JPG
    keyboard removed.JPG
    606.8 KB · Views: 22
  • parts.JPG
    parts.JPG
    186.1 KB · Views: 24
  • old fan.JPG
    old fan.JPG
    487.1 KB · Views: 23
  • new fan.JPG
    new fan.JPG
    521.4 KB · Views: 27
Last edited:
I know what a pain it can be, I had to go through a disassembly similar to yours just to upgrade the RAM in my HP Sleekbook laptop. With every other laptop I owned replacing RAM was as simple as removing a cover on the bottom and adding/replacing as needed. First time I read through HP's manual I thought 'this can't be right', but it was. With all those different styles of micro connectors and ribbon cables it's very easy to break one or not fully seat it, especially when the instructions don't give details on how to properly remove/install them. Sure enough when I had it all back together one of the small connectors on the motherboard wasn't properly seated and I had to go through the entire procedure again. Next time I buy a new laptop that will be something I definitely look at beforehand.
 
I have a Dell Lattitude where adding two RAM chips involves unscrewing a small cover on back for one chip and then having to take out the keyboard for the other. At least not a full disassemble.

Of all the laptops I've seen for easy hardware access are some Dell Precision workstations. Just one screw opens up the back case, then there is easy access to all components. But they are heftier in size, so have more room to arrange things inside. I think of the workstations as laptops that believe they are desktops.
 
Last edited:
Great job!

I have a Toshiba Satellite L55 laptop that I purchased ~5 years ago. When traveling, I used to take it in my hand-carried backpack on the planes. I don't recall it ever being dropped. When not traveling, I just leave the laptop sitting open on a desk or table, ready for use.

A few months ago, I noticed that the lower right corner of the frame surrounding the screen along with the adjacent hinge, keeps "popping open" (the screen's frame is designed to snap into the lid of the laptop, as there are no visible fasteners) and I gently try to push the parts back in place. It's gotten so frequent, that I simply try not to move the screen at all. The other day I found the head of a screw laying nearby :confused:...and as the screw doesn't match any of the external screws on the case, I'm assuming somehow that is associated with the internal workings of the screen.

I briefly toyed with the idea of prying the screen open and attempting a proper fix but soon came to my senses. :D At the moment, everything else in it is working well. I have an older Asus tablet that I've been taking along with me when I travel, so the laptop no longer needs to leave home except for my annual "snowbird migrations".

My current plan is to "baby" this laptop until either the screen breaks and finally becomes unusable or the unit is so out-dated that it needs to be replaced. <keeping my fingers crossed that that is a ways off>

omni
 
Thanks. I couldn't have done this without referring the a nice Hardware Maintenance Manual for my laptop that I found as a PDF.

I even tried messaging a place that services laptops (they change LCD screens, among other things) asking would they do the job, I have a manual as reference. Never heard back from them (was willing to give $100 for the labor to get some peace and quiet from that loud fan).

My big tip from this experience is keep envelops for the screws for each component. Otherwise, you may end up having different sized screws or lose track of which screw goes where.
 
Last edited:
My big tip from this experience is keep envelops for the screws for each component. Otherwise, you may end up having different sized screws or lose track of which screw goes where.

That's a huge part of any repair. Screws and parts need to be labeled.

If I remember to, I often also shoot photos as I'm disassembling things -- helps a lot when trying to remember how it all goes back together, especially if I don't have a manual to reference.

omni
 
That's a huge part of any repair. Screws and parts need to be labeled.

If I remember to, I often also shoot photos as I'm disassembling things -- helps a lot when trying to remember how it all goes back together, especially if I don't have a manual to reference.

omni

Good point. Yes, I too photos too and referred to them a few times during the reassembly. That manual I had was nice in that it showed in order to maintain one part, which parts had to be removed ahead of time. In my case, I had to almost disassemble almost everything to get to the fan. Even separating the motherboard from the base.
 
I found a great video on YouTube showing the disassembly/reassembly of the ASUS laptop I own. I used it to replace the keyboard (which I bought on eBay).

I usually check YouTube these days anytime I attempt an electronics repair. Most recently I used a video guide to fix a Sony carousel CD player.
 
I found a great video on YouTube showing the disassembly/reassembly of the ASUS laptop I own. I used it to replace the keyboard (which I bought on eBay).

I usually check YouTube these days anytime I attempt an electronics repair. Most recently I used a video guide to fix a Sony carousel CD player.

I saw a video on YouTube on the disassembly of the laptop I own. There was no narration. After seeing, I had concluded, "no &#%$ way am I going to take apart and try!". But finding the hardware manual gave me to confidence to try. I did refer to the video too during the assembly/disassembly along with the manual.
 
You made me look!

Here's a guy with the same broken screw problem (which seems to be part of the hinge) on his lap top, but on the opposite corner.

From reading the many comments, it seems to be a Toshiba design flaw -- where the hinge bracket is literally screwed into a tiny piece of plastic. Toshiba wouldn't even handle this issue under warranty, claiming people didn't properly close the covers on their laptops. ?!?!?


Other videos show "Frankenstein" repairs of drilling clear through the bezel frame and cover and either running a rather large-ish bolt through both and putting a nut on the outside of the cover while leaving the end of the bolt sticking out (not very aesthetic) or running a zip-tie through the hole and tightening it. Others show filling the corners of the lid, behind the bezel frame with hot glue, etc. etc.

omni
 
Last edited:
Laptop was getting quite hot. Temperature sensor showed 96 degrees celsius under heavy load.

Ended up having to take apart and put on some artic sliver thermal paste (what I should have done first time around) instead of just using the thermal paste that came with the cpu fan/heat sink.

Now under load the temperature goes up to 89 degrees celsius. Not perfect but more tolerable :dance:.
 
Back
Top Bottom