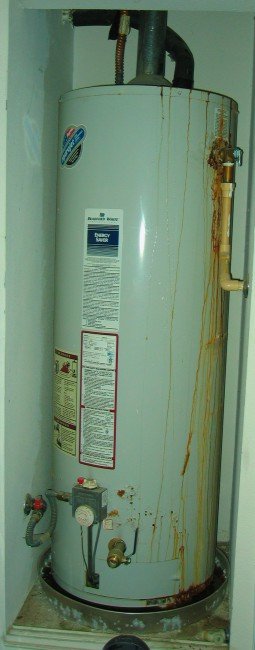
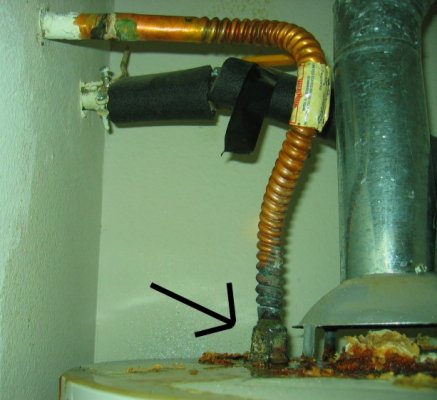
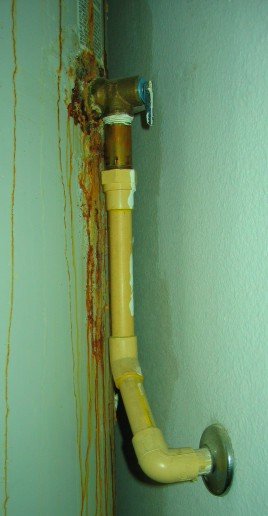
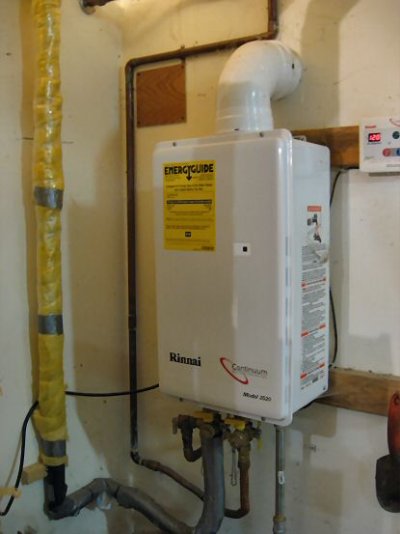
Our lovely water heater is more than 10 years old and it's probably time for a new one. Home Depot and Lowe's want ~$500 to install a new one (on top of the $500 for the unit itself) and this seems awfully high. I am not a particularly skilled plumber, but can I do this myself? My biggest question is, are the water connections as simple as unscrewing the bolt at the end of the flex connector (see the black arrow in the second photo). Or is that bolt going to be so corroded that is it unusable or un-unscrewable? In which case, I would have to hacksaw the flex-connector at the top and then sweat a new one on? I don't know how to sweat a pipe, and this probably isn't the project to learn. The other question is, it looks like most newer heaters have a temperature and pressure value located somewhere other than where mine currently is (see third photo). Is it hard to extend this pipe up to where it will be on the new heater? Just a matter of some PVC welds?
You are using an out of date browser. It may not display this or other websites correctly.
You should upgrade or use an alternative browser.
You should upgrade or use an alternative browser.
Can I replace this gas water heater myself (pics)?
- Thread starter soupcxan
- Start date
jazz4cash
Give me a museum and I'll fill it. (Picasso) Give me a forum ...
The flex connector looks shot to me so I would expect a new one would need to be soldered on. I think you're correct that the The T&P relief valve will be higher up on the side or on the top of the new heater. I think this valve needs a minimum length of metal before going into plastic. You could probably just buy a threaded copper extension pipe. I think $500 is way too much. I would check around and find out what other places charge for the job or by the hour. I would want someone that could identify potential problems with the gas supply and exhaust lines. Ten yrs old doesn't seem like a long time unless you have hard water.
REWahoo
Give me a museum and I'll fill it. (Picasso) Give
You might get lucky and be able to unscrew the connection, but that's only half the issue. The bigger question is will it hold up to being reused and make a sturdy, long lasting and watertight connection to the new tank. I'm not sure I would risk it. Sweating a new connection really isn't all that difficult - I did it for the first time on an almost identical water heater replacement a couple of years ago. You can find lots of DIY instructions on line.
Extending the pipe to the pressure relief valve is a simple task - looks like PVC which can be easily cut with a saw and the fittings glued (actually, cemented with solvent).
Extending the pipe to the pressure relief valve is a simple task - looks like PVC which can be easily cut with a saw and the fittings glued (actually, cemented with solvent).
honobob
Thinks s/he gets paid by the post
- Joined
- May 8, 2006
- Messages
- 1,036
Made me go look at mine. I installed a 12 year GE 50 gal tank about 10 years ago completely by myself from picking it up at Home Depot. I have shut off valves on the supply side of the flex connectors and replaced them when I installed. Probably could have kept them but the expense over 12-20 years is minimal. I think yours are just dirty from exhaust altho you have a lot of "water" stains everywhere it seems. My overflow is on the top and it would be real easy with PVC to run to where ever you need. I'd check to see where it goes past the wall. Usually the $500 is to upgrade and strap in a unit to new codes. I wouldn't spend the money.
cute fuzzy bunny
Give me a museum and I'll fill it. (Picasso) Give me a forum ...
Both ends of that flexi are corroded from minute leakage. Chances are that when you unscrew the end thats attached to the water heater that the flare at the end of the pipe will be pretty much gone.
Practice sweating a couple of pieces of pipe to get the hang of it. Then solder a FIP connection of the appropriate size so you can use a fip to fip screw on flexi for this and the next WH.
Changing the overpressure is easy and you dont have to worry about that connection carrying 60PSI of water pressure. On one I did the connection was too close to the WH to use a torch so I used a copper epoxy to glue the pipe on. Worked fine.
Only other problems with a WH are that they're heavy. That old one probably weighed 180lbs when it was installed, it'll have a few gallons of leftover water in it, and its probably got 30-40lbs of sediment in the bottom.
If you want to do some DIY and still have a pro job done, drain that one, unscrew it and cut the drain connection as high up as you can. Dispose of the old one at the dump and go to sears and buy one of their 12 year models and put it on the pedestal with a friend. Go to the permit office and pay the ~$50 for a water heater permit. Then get a plumber to come out just to do the hookup. It'll be a LOT cheaper than a full replacement where they do all the work. A plumber ought to be able to do the three solders and add a drip leg to your gas line to bring it to code in about an hour. More like 30 minutes.
You might have to put some straps on it or raise the platform, but you should check on your local code to see what requirements are in your area.
Oh, yea, that baby looks like her time is up.
I don't think you need metal on the T&P valve output. The color (ivory rather than white ) looks like it might be CPVC rather than PVC. Both are available in your local Lowes/Home Depot. PVC has an upper temp limit of about 140 deg F, while CPVC is good up to 220 deg F. I would use CPVC. CPVC (and PVC) will embrittle if exposed to sunlight, so maybe paint the line if it is near a window.
You won't be able to re-use that flex pipe, and you don't want to. Get a tubing cutter (don't use a hack saw, the copper pipe won't be round anymore and you'll be really sorry. Spend the $10 and get the right tool!) and cut off the copper pipes as far away from the wall as you can. Buy the new flex pipes at the hardware store and buy ones that have female screw-on fittings at both ends. In the next step, you'll attach a fitting with male threads tot he copper pipe coming out of the wall, so you'll never have this problem again (next time, you'll just unscrew the flex pipe to replace it without need for a torch.
There are two ways to atach the male fittings to the pipes sticking ot of the wall:
- Sweat them on. This isn't hard, really. Buy a cheap propane torch for doing the sweating. Read up on it. Buy some scrap pipe and fittings for practice (hey--you're saving hudreds of dollars here, and acquiring a skill you can use forever!) The tricks are to clean the pipe well, use enough flux, and get everything good and hit before adding the solder. Be careful!!--extra solder can leak out and drip-I've got some beautiful scars on my arm from a similar solder/napalm encounter. If they are available, defiitely buy the fittings that have the solder already in them--I've never had one of these leak.
- Use one of the new "Sharkbite" type mechanical fittings for copper pipe. They have O-rings and little teeth that hold onto the pipe. No torch. I hear they work well. Not very manly, not likely to cause scars.
Teflon tape--you'll ned the cheap thin teflon tape for the water connections, and the thicker slightly yellow special teflon tape for thatgas line I see coming out of the wall.
If you new water heater doesn't have the special little flapper valves that help eliminate thermosyphoning through the water heater, you might want to install those, too, before you hook up the water. They go between the flex pipe and the water heater. I think these are included with most new water heaters, so don't buy them unless they aren't.
Good luck
CFB had a good point on the installation of a drip leg on the gas line-- I missed that. Adding one yourself isn't hard, but you'll need a few pieces of black-iron pipe, a pipe wrench, and some Teflon paste. And some soapy water to test it all when you are done. And the potential that you could blow up your house. If this is all sounding a little involved, follow his advice and do the grunt work yourself and get a pro to do the pipework. But, I warn you that you'll be cheating yourself out of at least 3 good stories and a trip to the ER!
thefed
Thinks s/he gets paid by the post
- Joined
- Oct 29, 2005
- Messages
- 2,203
You can do it! Here's my lazy man approach
1)Turn off gas at red knob by gas line. Use pipe wrench to disconnect gas line from wall...leave it on the water heater as you will buy another
2) Turn off water up-stream somewhere
3) Use the aforementioned tube cutter ($6 bucks...has a little cutting wheel and looks like a c-clamp) to cut that supply line right where the paint ends. Clean the pain really well with a solvent, and clean the pipe with a wire-bristled tube cleaner ($3-plumbing section). Repeat this step for the outlet copper as well
4)Drain that bad-boy and haul it outta there
5)Set new heater in place, lining up exhaust vent
6)Use a shark-bite male threaded fitting coming off each stubs for easy removal down the road (NO soldering! just slip the fitting right onto the pipe and BAM it's done) Then, attach your new flex-lines (with 2 female threaded ends pre- attached) to the copper 'stubs' and the tank. Of course use teflon tape on the threads
7) Ask someone at home depot how to make the 'drip leg' for the gas line. Google a pics of water heaters and you will see this 5" black iron line going down to nowhere,directly next to the gas connection. REALLY simple using 2 pipe wrenches, position a tee fitting sideways,a 3" length on the bottom with a cap...a 3" length going into the tank, and a double male fitting on the top. To the double male you will attach a new flex line that goes to the wall...probably only $12 and good insurance. Use the yellow teflon for gas fittings, and check with soapy water
And that's it...should take a well-prepared rookie only 2 hrs or so.
cute fuzzy bunny
Give me a museum and I'll fill it. (Picasso) Give me a forum ...
I'd strongly recommend getting a permit and everything required to get a sign off.
Half the time you'll get away with it, and the other half the buyer wants you to get the permit and re-do it.
I'd just as soon have it done right up front, in a way that keeps me from worrying too much about leaks and whatnot it for the next xx years.
Half the time you'll get away with it, and the other half the buyer wants you to get the permit and re-do it.
I'd just as soon have it done right up front, in a way that keeps me from worrying too much about leaks and whatnot it for the next xx years.
Brat
Give me a museum and I'll fill it. (Picasso) Give me a forum ...
Your insurer might have an issue if you didn't get a permit and the puppy blew, particularly if it wasn't installed per code.
Ronstar
Moderator Emeritus
You dont need to sweat any fittings - just buy compression fittings - valves, flex tubing, etc. Show your pics to a knowledgable person at a hardware store so that he / she can get you the fittings you need. Buy a new water heater, and follow the installation instructions. Your 3rd pic is the emergency pressure relief valve. You should have no problem using CPVC fitting to tie into the discharge line as long as the relief valve on the new water heater is high enough and on the same side .
CRABBY JERRY
Recycles dryer sheets
- Joined
- Jan 26, 2006
- Messages
- 77
Drip leg
What is a drip leg if you don't mind me asking?You can do it! Here's my lazy man approach
1)Turn off gas at red knob by gas line. Use pipe wrench to disconnect gas line from wall...leave it on the water heater as you will buy another
2) Turn off water up-stream somewhere
3) Use the aforementioned tube cutter ($6 bucks...has a little cutting wheel and looks like a c-clamp) to cut that supply line right where the paint ends. Clean the pain really well with a solvent, and clean the pipe with a wire-bristled tube cleaner ($3-plumbing section). Repeat this step for the outlet copper as well
4)Drain that bad-boy and haul it outta there
5)Set new heater in place, lining up exhaust vent
6)Use a shark-bite male threaded fitting coming off each stubs for easy removal down the road (NO soldering! just slip the fitting right onto the pipe and BAM it's done) Then, attach your new flex-lines (with 2 female threaded ends pre- attached) to the copper 'stubs' and the tank. Of course use teflon tape on the threads
7) Ask someone at home depot how to make the 'drip leg' for the gas line. Google a pics of water heaters and you will see this 5" black iron line going down to nowhere,directly next to the gas connection. REALLY simple using 2 pipe wrenches, position a tee fitting sideways,a 3" length on the bottom with a cap...a 3" length going into the tank, and a double male fitting on the top. To the double male you will attach a new flex line that goes to the wall...probably only $12 and good insurance. Use the yellow teflon for gas fittings, and check with soapy water
And that's it...should take a well-prepared rookie only 2 hrs or so.
ERD50
Give me a museum and I'll fill it. (Picasso) Give me a forum ...

The old furnace had a drip leg, which is used to prevent any debris in the gas line from entering the furnace valve. It consists of a TEE (instead of a 90) and a short piece of pipe capped pipe.
Drip Leg
-ERD50
ls99
Give me a museum and I'll fill it. (Picasso) Give me a forum ...
- Joined
- May 2, 2008
- Messages
- 6,506
All really good advice above.
However, if your skills are limited, better spend the bucks to get it right once, the first time. Sometimes getting rid of the old tank is more hassle than the whole job.
I am all for DIY in general. I do darn near everything around house. Including fighting town hall when necessary. (permits etc.)
With limited skills, you can end up with re-doing stuff several times, then still have to pay to get it right. Agree $500 is over the top.
TromboneAl
Give me a museum and I'll fill it. (Picasso) Give me a forum ...
- Joined
- Jun 30, 2006
- Messages
- 12,880
I'm with CFB -- find out how much a plumber would charge to finish it off, and do the demolition and pre-hookup yourself.
Also, look into on-demand water heaters. We more than paid back the costs of ours in a few years, YMMV.
Also, look into on-demand water heaters. We more than paid back the costs of ours in a few years, YMMV.
tryan
Thinks s/he gets paid by the post
- Joined
- Mar 25, 2005
- Messages
- 2,604
Make sure the tank has water in it BEFORE you fire it up. Else it'll blow ... from the air pressure.
If I've never sweat a joint ... I'ld call an independent plumber (probably will charge 1/2 the depot rate). It's only an hour of work for a pro.
If I've never sweat a joint ... I'ld call an independent plumber (probably will charge 1/2 the depot rate). It's only an hour of work for a pro.
cute fuzzy bunny
Give me a museum and I'll fill it. (Picasso) Give me a forum ...
And a second plug for 12 year Kenmore water heaters. Better insulation and efficiency ratings than the GE and Whirlpool units that home depot and lowes sells. ball valves. Dual magnesium anode rods instead of a single aluminum. Made by AO Smith (same brand that most plumbers like to install) and theres always one on sale. They make both a tall and short version of their 40's and 50's, so you should have no trouble finding one to fit.
Most installs are $400-500. They need two guys to come out and remove the old one and take it to the dump, two guys to go get the new one and set it in place, someone to go to the county office and get the permit, and someone to do the actual hookup and code updates.
None of that requires any particular skill except the hookup.
I'm not really in favor of compression fittings on continuous pressure lines like a WH. I think they're fine on a piece of pipe that only periodically has pressure in it. Maybe I'm just a little overly cautious but I like to have the main water lines soldered.
Make sure you get a hookup line long enough to put a 'gooseneck' on the hot water line. Picture below. Heat in water rises. When it hits a peak in the pipe it stops. At that point you've effectively prevented hot water losses by the pipes in your wall siphoning heat from the water heater.
TromboneAl
Give me a museum and I'll fill it. (Picasso) Give me a forum ...
- Joined
- Jun 30, 2006
- Messages
- 12,880
That's interesting -- it really works, huh?Make sure you get a hookup line long enough to put a 'gooseneck' on the hot water line. Picture below. Heat in water rises. When it hits a peak in the pipe it stops. At that point you've effectively prevented hot water losses by the pipes in your wall siphoning heat from the water heater.
The biggest disadvantage I found, in going to an on-demand water heater, is that it takes longer before you get hot water at the tap. This is because the hot water doesn't diffuse into the pipes.
So the bunny loop may not be entirely a good thing.
soupcxan
Thinks s/he gets paid by the post
Thanks for all the helpful advice. When I said the heater was +10 years old, I actually meant it was 14 years old. So it's had a good run.
I might be willing to learn to sweat the pipe, but this is kind of an awkward space and if I foul it up, there's not much pipe left to cut and start over with. I'd also be worried about torching the drywall and/or myself.
I installed a compression fitting on a toilet supply line in order to replace the shutoff valve, and it looks like the sharkbite connectors are even easier than that. My only concern is how they will hold up over time with the heat and pressure (seems like a no brainer for a drain pipe). I could give the sharkbites a try and get the new heater installed. If they don't work, then I'd call a plumber to sweat on some new fittings - even if it comes to that, it should be much cheaper than paying them for the whole installation.
I called Sears and they wanted about $270 plus permit for delivery and installation. However, they seemed to think that new flex hoses could just be screwed on - if the delivery crew had to remove and sweat on new connectors, the cost could increase.
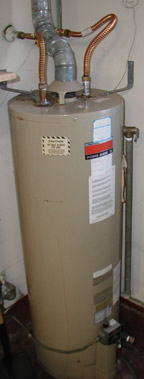
This photo is the cold water supply line, I assume I would just use the pipecutter at the arrow?
I might be willing to learn to sweat the pipe, but this is kind of an awkward space and if I foul it up, there's not much pipe left to cut and start over with. I'd also be worried about torching the drywall and/or myself.
I installed a compression fitting on a toilet supply line in order to replace the shutoff valve, and it looks like the sharkbite connectors are even easier than that. My only concern is how they will hold up over time with the heat and pressure (seems like a no brainer for a drain pipe). I could give the sharkbites a try and get the new heater installed. If they don't work, then I'd call a plumber to sweat on some new fittings - even if it comes to that, it should be much cheaper than paying them for the whole installation.
I called Sears and they wanted about $270 plus permit for delivery and installation. However, they seemed to think that new flex hoses could just be screwed on - if the delivery crew had to remove and sweat on new connectors, the cost could increase.
This photo is the cold water supply line, I assume I would just use the pipecutter at the arrow?
Attachments

cute fuzzy bunny
Give me a museum and I'll fill it. (Picasso) Give me a forum ...
Oh yeah, it works. If you put one in, you can feel the tank side of the gooseneck and its hot, the other side of the gooseneck is cool to warm. In a straight pipe the whole pipe will be hot. The copper and water will continue to conduct some heat even with a gooseneck, but at a dramatically reduced rate.
As far as getting hot water to the faucet...eh, you're going to get lukewarm water until you get whats in the heater tank to travel to the faucet if the waters been off a while.
If all your pipes are insulated in the wall, then I suppose its no issue. Otherwise all the pipes in your house act as a radiator pulling heat from the HWH and dispersing it into your walls. Sort of a lot of loss for someone who puts bubblewrap on his windows in the winter...")
As far as getting hot water to the faucet...eh, you're going to get lukewarm water until you get whats in the heater tank to travel to the faucet if the waters been off a while.
If all your pipes are insulated in the wall, then I suppose its no issue. Otherwise all the pipes in your house act as a radiator pulling heat from the HWH and dispersing it into your walls. Sort of a lot of loss for someone who puts bubblewrap on his windows in the winter...
Hey, you are in luck! There's no need to sweat/sharkbite a new fitting on the cold water "in line--just turn off the valve and unscrew the current flex line. They did the job right on that side. It's only on the outlet side you'll need a new (male) fitting.
I didn't see the fitting in your earlier photo (covered in insulation, and I didn't notice the valve handle)
P.S. That's not a very pretty sweat job they did, either. It looks like some of mine--maybe the last guy did his first pipe soldering there, just like you are thinking about doing.. But, if it isn't leaking--it's fabulous.
That's interesting -- it really works, huh?
The biggest disadvantage I found, in going to an on-demand water heater, is that it takes longer before you get hot water at the tap. This is because the hot water doesn't diffuse into the pipes.
There might be some lag from that, but my guess is that it's more likely a lag caused by the time needed for the flow-demand sensor to trip the gas ignitor for the gas jets to come to full speed, for them to heat up the copper pipe, and (most significantly) for that heat to be transfered to the water in the heat exchanger. Of course, if you are using just a little hot water (e.g. washing your face with a low flow to begin with, combined with just a little hot water added to the cold) the tankless heaters wont come on at all and the water will just stay cold.
I wasn't convinced by the energy savings/payback of these things, and their long-term reliabilty hasn't been proven. A lot of folks havethem and like them, but i wasn't wiling to buy one. The last Consumer Reports comparison I saw wasn't very positive on them, either.
for that heatAl, can you explain this a little more? If the distance from yoeur old tank heater and the new tankless heater is the same, and if the hot water n te pipes (
soupcxan
Thinks s/he gets paid by the post
Hey, you are in luck! There's no need to sweat/sharkbite a new fitting on the cold water "in line--just turn off the valve and unscrew the current flex line. They did the job right on that side. It's only on the outlet side you'll need a new (male) fitting.
Are you sure about that? I saw the handle as well and thought I could unscrew the flex connector rather than cutting off the valve. But looking at it again, I wasn't sure if the flex connector could be unscrewed from the valve, or if it was sweated or permanently attached some other way.
Also, someone installed black foam insulation on the cold water pipe. I understand the insulation on the hot water line, but is there any reason to put it on the cold water supply line?
TromboneAl
Give me a museum and I'll fill it. (Picasso) Give me a forum ...
- Joined
- Jun 30, 2006
- Messages
- 12,880
Agreed. Our system actually had a little pump that pumped the hot water through the pipes so that one could have instant hot water. I never used that.If all your pipes are insulated in the wall, then I suppose its no issue. Otherwise all the pipes in your house act as a radiator pulling heat from the HWH and dispersing it into your walls. Sort of a lot of loss for someone who puts bubblewrap on his windows in the winter...
Here's how I figure it. Let's say it's 20 feet to your hot water heater. With a tank, the (say) 10 feet of pipe closest to the heater always has hot water. The rest of it is a little warm. You turn on the faucet, and get pretty hot water after the water has moved 10 feet.or that heatAl, can you explain this a little more? If the distance from yoeur old tank heater and the new tankless heater is the same, and if the hot water n te pipes (
With the tankless, the water's got to move 20 feet.
You're right about the heating start time, but that's pretty minimal. Here's how I know. Let's say I use hot water, and then wait 30 minutes and use it again. What happens is that I get lukewarm water for a while (the water that is cooling off in the pipes), then cold water, then hot water. That cold water represents the water heater start up time. It isn't that long, compared with the water travel time delay.
Payback depends a lot on installation costs and energy costs. We pay $3.31/gallon for propane.
Attachments
A few things before you start:
First, we've found Family Handyman magazine to be well worth the cost of a $12-$20 annual subscription. They're either teaching you how to do things you never knew you wanted to do, or showing you the cool new tools that you never knew you needed, or helping you decide what you have no interest in doing.
Second, here's some soldering links to get you going:
The Family Handyman Magazine: Keyword Search Results
Third, more than you ever wanted to know about replacing water heaters:
The Family Handyman Magazine: Keyword Search Results
Fourth, if you're still with us and if your family/roomates aren't standing around hoping to get a hot shower within the next 24 hours, then you could experiment. I hate the performance pressure of breaking into a pipe at 8 AM and having to be done by 4 PM (including trips to the hardware store). But if you're patient, and especially if you don't mind a day or two of cold showers, then this job is well within the capacity of a first-time DIYer.
Fifth, see if your local utility company has a rebate for high-efficiency water heaters. I don't know if gas is cheap in your area-- if it is then no one may want to pay you to buy a high-e heater.
Sixth, considering the heat you went through in your attic-insulation project, does your area offer solar water heating? Again if gas is cheap then this may not be worth the payback. But if you're going this route then all you have to do is find a solar contractor, and installing the new water heater (special models for solar systems) will be part of the job.
I've never bothered with a permit for a water-heater repair. I'm not sure that it's even necessary.
Some nanny states have incredibly detailed code specs for mounting gas water heaters-- off the floor to avoid gas accumulation or exposure to other flammable vapors, strapped to the wall in case of earthquakes or hurricanes, exhaust duct draft requirements, enclosed in a pan with a separate drain in case the shell leaks, and so on. The code might be more recent than your old heater, and it's worth checking your local newspapers or websites to see if there's any discussion of how to mount the new heater. If it's not done correctly then you'll have problems passing the home inspection when you sell the place.
You can drain the water from the pressure-temperature relief any way you want. What's there now is just intended to keep the relief from making a mess if there's a problem. Ideally the water never gets hotter than about 180 degrees, so the PVC will probably be fine-- they usually print the temperature limits on the piping.
Gas piping is very low pressure and hard to detect a leak, yet you really don't wanna screw it up. Use the soapy leak detector after you reconnect the joints.
When you're done with the heater and you've turned the water back on, leave the piping insulation off for a day or two in case you have leaks. After that waiting period, give all the joints one more torque before you hide them behind the insulation.
Other things that I wish I'd known before I started a water-heater job:
- First and foremost, shut that cold-water isolation valve and make sure it does not leak before you disconnect any other gas or hot-water piping. You don't want to have to shut off the house water as well as the hot water.
- You're going to appreciate having two Ford (pipe) wrenches, each at least 12" long.
- You're also gonna appreciate having an equipment dolly and a ratchet strap (or strong rope) to rassle that water heater out of its hole and to get the new one in.
- Get a firecloth for soldering near the walls. The traditional (cheap) ones look like woven asbestos fibers but the modern (more expensive) ones look cool and are even easier to use.
- Depending on how close those pipes are to the wall and to each other, you may need a compact rotary pipe cutter. The regular ones are about 5-6" long but they make them as tiny as 2". Far better than a hacksaw of last resort.
- If you happen to remove that clamp/wire from the cold-water supply pipe, be sure to verify good contact with the bare piping when you put it back on. That's a grounding wire, and hopefully you won't have to mess with it.
- Before putting in the new heater, groom its anode rod. Buy a deep socket head to get the anode rod out of the heater. The socket will probably be something like 1&1/16" on a 3/8" drive, which means you may also need a 3/8" drive socket wrench. (You might even need a 2-3' iron pipe to slip around the end of the socket wrench for a torque assist.) Before you install the new water heater, unscrew the anode rod, wrap Teflon plumber's tape around the threads, and reinstall it. You'll be checking it every 2-3 years depending on your water conditions, but consider taking pictures/measurements of the anode rod for the day 3-5 years from now when you have to replace it.
- Buy extra copper pipe, fittings, and flex piping. You'll probably be returning it later but it's cheap insurance against the inevitable mistakes. You might even want to buy extra extra supplies for soldering practice.
- Soldering is 99% tedious prep work and 1% [-]fun[/-] flame. Clean the pipe ends with fine-grit sandpaper or steel wool before putting on the flux. You want the pipe as clean & smooth as possible before you put on the flux & solder or you'll inevitably get a leak and have to start over.
First, we've found Family Handyman magazine to be well worth the cost of a $12-$20 annual subscription. They're either teaching you how to do things you never knew you wanted to do, or showing you the cool new tools that you never knew you needed, or helping you decide what you have no interest in doing.
Second, here's some soldering links to get you going:
The Family Handyman Magazine: Keyword Search Results
Third, more than you ever wanted to know about replacing water heaters:
The Family Handyman Magazine: Keyword Search Results
Fourth, if you're still with us and if your family/roomates aren't standing around hoping to get a hot shower within the next 24 hours, then you could experiment. I hate the performance pressure of breaking into a pipe at 8 AM and having to be done by 4 PM (including trips to the hardware store). But if you're patient, and especially if you don't mind a day or two of cold showers, then this job is well within the capacity of a first-time DIYer.
Fifth, see if your local utility company has a rebate for high-efficiency water heaters. I don't know if gas is cheap in your area-- if it is then no one may want to pay you to buy a high-e heater.
Sixth, considering the heat you went through in your attic-insulation project, does your area offer solar water heating? Again if gas is cheap then this may not be worth the payback. But if you're going this route then all you have to do is find a solar contractor, and installing the new water heater (special models for solar systems) will be part of the job.
I've never bothered with a permit for a water-heater repair. I'm not sure that it's even necessary.
Some nanny states have incredibly detailed code specs for mounting gas water heaters-- off the floor to avoid gas accumulation or exposure to other flammable vapors, strapped to the wall in case of earthquakes or hurricanes, exhaust duct draft requirements, enclosed in a pan with a separate drain in case the shell leaks, and so on. The code might be more recent than your old heater, and it's worth checking your local newspapers or websites to see if there's any discussion of how to mount the new heater. If it's not done correctly then you'll have problems passing the home inspection when you sell the place.
You can drain the water from the pressure-temperature relief any way you want. What's there now is just intended to keep the relief from making a mess if there's a problem. Ideally the water never gets hotter than about 180 degrees, so the PVC will probably be fine-- they usually print the temperature limits on the piping.
Gas piping is very low pressure and hard to detect a leak, yet you really don't wanna screw it up. Use the soapy leak detector after you reconnect the joints.
When you're done with the heater and you've turned the water back on, leave the piping insulation off for a day or two in case you have leaks. After that waiting period, give all the joints one more torque before you hide them behind the insulation.
That solder looks kinda ugly. You could shut off that cold water valve, open a hot water valve to bleed off the residual pressure, put a wrench on the hex nut, and see what happens with gentle torque. You might need a second wrench on the valve to counter-torque it against the flex (and to avoid breaking the solder joint between the valve and the copper pipe of the supply line).Are you sure about that? I saw the handle as well and thought I could unscrew the flex connector rather than cutting off the valve. But looking at it again, I wasn't sure if the flex connector could be unscrewed from the valve, or if it was sweated or permanently attached some other way.
Not unless it feels warm to the touch. Some water heaters have thermal isolation fittings where the cold water enters the heater to keep hot water from heating the cold-water supply pipe. But a plumber figures that insulation is cheap and it keeps ignorant homeowners from thinking that they're not using enough of it.Also, someone installed black foam insulation on the cold water pipe. I understand the insulation on the hot water line, but is there any reason to put it on the cold water supply line?
Other things that I wish I'd known before I started a water-heater job:
- First and foremost, shut that cold-water isolation valve and make sure it does not leak before you disconnect any other gas or hot-water piping. You don't want to have to shut off the house water as well as the hot water.
- You're going to appreciate having two Ford (pipe) wrenches, each at least 12" long.
- You're also gonna appreciate having an equipment dolly and a ratchet strap (or strong rope) to rassle that water heater out of its hole and to get the new one in.
- Get a firecloth for soldering near the walls. The traditional (cheap) ones look like woven asbestos fibers but the modern (more expensive) ones look cool and are even easier to use.
- Depending on how close those pipes are to the wall and to each other, you may need a compact rotary pipe cutter. The regular ones are about 5-6" long but they make them as tiny as 2". Far better than a hacksaw of last resort.
- If you happen to remove that clamp/wire from the cold-water supply pipe, be sure to verify good contact with the bare piping when you put it back on. That's a grounding wire, and hopefully you won't have to mess with it.
- Before putting in the new heater, groom its anode rod. Buy a deep socket head to get the anode rod out of the heater. The socket will probably be something like 1&1/16" on a 3/8" drive, which means you may also need a 3/8" drive socket wrench. (You might even need a 2-3' iron pipe to slip around the end of the socket wrench for a torque assist.) Before you install the new water heater, unscrew the anode rod, wrap Teflon plumber's tape around the threads, and reinstall it. You'll be checking it every 2-3 years depending on your water conditions, but consider taking pictures/measurements of the anode rod for the day 3-5 years from now when you have to replace it.
- Buy extra copper pipe, fittings, and flex piping. You'll probably be returning it later but it's cheap insurance against the inevitable mistakes. You might even want to buy extra extra supplies for soldering practice.
- Soldering is 99% tedious prep work and 1% [-]fun[/-] flame. Clean the pipe ends with fine-grit sandpaper or steel wool before putting on the flux. You want the pipe as clean & smooth as possible before you put on the flux & solder or you'll inevitably get a leak and have to start over.
Similar threads
- Replies
- 7
- Views
- 448