Need Suggestions re Woodworking Project

TromboneAl

Give me a museum and I'll fill it. (Picasso) Give me a forum ...
Joined
Jun 30, 2006
Messages
12,880
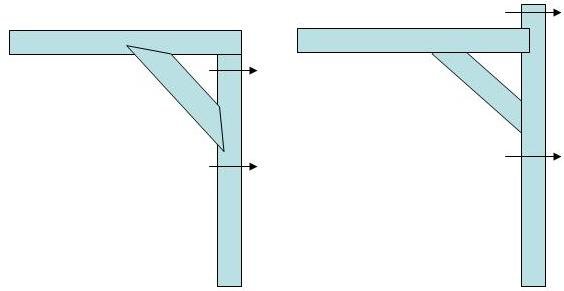
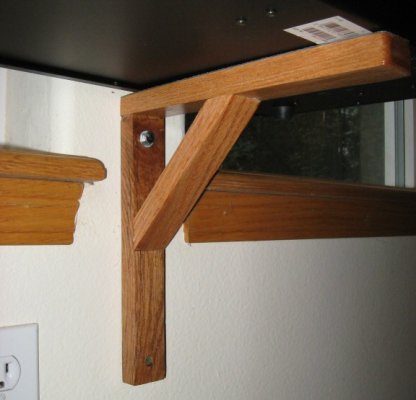
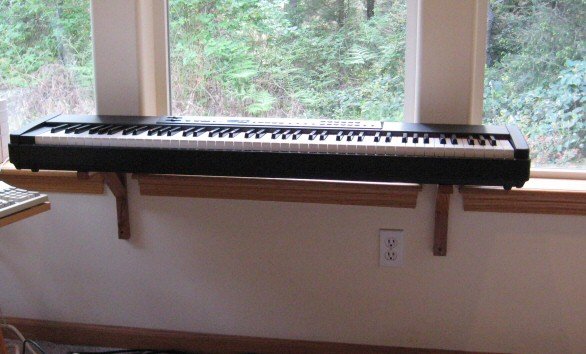
I'm making what is essentially a shelf bracket that will hold my electric piano (38 pounds total), and the current design is like this (the wood is actually nice oak, it will look better when sanded, etc.).

bracket.jpg

The problem is that I will need to screw it into the wall using a screw at point A. The alternatives I see are:

1. Drill a hole at point B as an access point for the screwdriver.

2. Design it such that I can screw it to the wall and then add the 45 degree brace (less than ideal since screws can't come from the back, and I won't want to use glue).

3. Use an offset screwdriver to drive the screw.

4. Scrap this design and do it another way.

Suggestions?
 
How about using a flexible shaft screw driver.......the shaft is pretty much just a semi-stiff spring with a screw driver handle on one end, and the bit on the other. They probably have them at Harbor Freight or somewhere like that.
 
I

3. Use an offset screwdriver to drive the screw.

Suggestions?

How about using a flexible shaft screw driver.......the shaft is pretty much just a semi-stiff spring with a screw driver handle on one end, and the bit on the other. They probably have them at Harbor Freight or somewhere like that.

There are also ratchets that drive screwdriver tips. Have many of them and they are used frequently in tight situations.
 
Could you install the long upright to the wall, attach the 90 degree top piece to the long upright at the top and then install the 45 degree support? I assume they all will be attached with screws/bolts (and glue). Or am I not seeing something?
 
Thanks for the ideas.

Could you install the long upright to the wall, attach the 90 degree top piece to the long upright at the top and then install the 45 degree support? I assume they all will be attached with screws/bolts (and glue). Or am I not seeing something?
That's option 2, and it would make the supports difficult to remove, since I'd want to use glue to make it strong.

I thought of a good solution while out running: I'll use a lag screw instead of a regular screw (that is, a screw with a hex head). I'll then use a wrench to attach it (holes will be pre-drilled).

Hardware-SS-Lag-Screws.jpg

 
You've probably decided on the construction in which case you won't like either of these. On the left, if the angle piece is slotted in, it doesn't even need to be permanently attached. Just slide it out and screw the L to the wall and slide the angled piece in before you load it (with the keyboard). Right is probably self explanatory, easier to make, no "dis-assembly" required to install and maybe even something to keep the keyboard from hitting the wall. FWIW...
 

Attachments

  • Presentation1.jpg
    Presentation1.jpg
    10.9 KB · Views: 4
Drill a hole in the cross piece in line with the screw on the wall piece. Rent a plug cutter and after countersinking the screw heads fill the hole with the plugs cut from the same wood. There will no no holes, just a slightly different woodgrain piece where the holes were drilled. This way you keep your design and still get the screws into the wall and the cross piece. You might need a longer shaft driver for the screw. You can rent this too.

Good luck.
 
Thanks for the ideas.

That's option 2, and it would make the supports difficult to remove, since I'd want to use glue to make it strong.

I thought of a good solution while out running: I'll use a lag screw instead of a regular screw (that is, a screw with a hex head). I'll then use a wrench to attach it (holes will be pre-drilled).

Hardware-SS-Lag-Screws.jpg


lage screws are the ticket here....use a ratchet instead of a wrench...much faster!
 
Midpack, I was going to do the "slotted in" option, but decided that it would severely tax my woodworking skills and available tools, take a lot longer, and it's only value would be that if someone looked at the bracket they would be impressed.

How would you go about cutting those slots?
 
You can also use a metal bracket on top of the shelf. The bracket would be hidden by the piano - the bracket should be recessed to keep shelf flush with the wall.
 
I thought of a good solution while out running: I'll use a lag screw instead of a regular screw (that is, a screw with a hex head). I'll then use a wrench to attach it (holes will be pre-drilled).

Thsi is easiest. It is hard to drive a normal slot head screw with a ratchet. If you use a socket to drive the lag screw you can start it while gripping the driver end and assert pressure to engage the threads.

I have done things like this many times.

Ha
 
I would use a lag screw with a ratchet. Countersink the hole in the brace (maybe with a forstner bit) enough so that the top of the hex head is set is below the surface of the brace. The socket will be able to set the hex head down inside the brace a little. Then plug the hole with a wooden cap to match the brace.
 
Midpack, I was going to do the "slotted in" option, but decided that it would severely tax my woodworking skills and available tools, take a lot longer, and it's only value would be that if someone looked at the bracket they would be impressed.

How would you go about cutting those slots?
The left option would be tough, and I probably wouldn't do it. The right option requires only one slot/dado. So you set your saw blade to the depth of the slot, cut the two outside edges of the slots (to fit the horizontal piece) and then you just run the board back through the saw indexing about a blade width each time (by eye is fine) repeatedly to "nibble" out all the wood in between the two outside cuts. Since you've set the blade depth, it will be the same depth all the way across. Then you can either plane, chisel or sand the bottom of the slot flat - or if you don't care you don't even have to do that as the saw will have taken out most all of it. May sound involved, but it's not. But your lag screw idea should work fine.
 
All Done

Show and tell time. It went well, with the usual hassles of trying to get everything square and level. My plastic miter box just doesn't do it for me -- I'm going to have to upgrade to something better.

Thanks again for the suggestions.
 

Attachments

  • PianoBrackets 001.jpg
    PianoBrackets 001.jpg
    95.7 KB · Views: 2
  • PianoBrackets 004.jpg
    PianoBrackets 004.jpg
    120.7 KB · Views: 2
  • PianoBrackets 005.jpg
    PianoBrackets 005.jpg
    106.6 KB · Views: 3
Back
Top Bottom