Your recent repair? - 2021 to ?

Copper line brazing is required only if you are swapping out components of a traditional HVAC.

Mini-split systems universally use compression couplings with soft copper lines. If you order a line set of the right length, you simply bolt everything together.

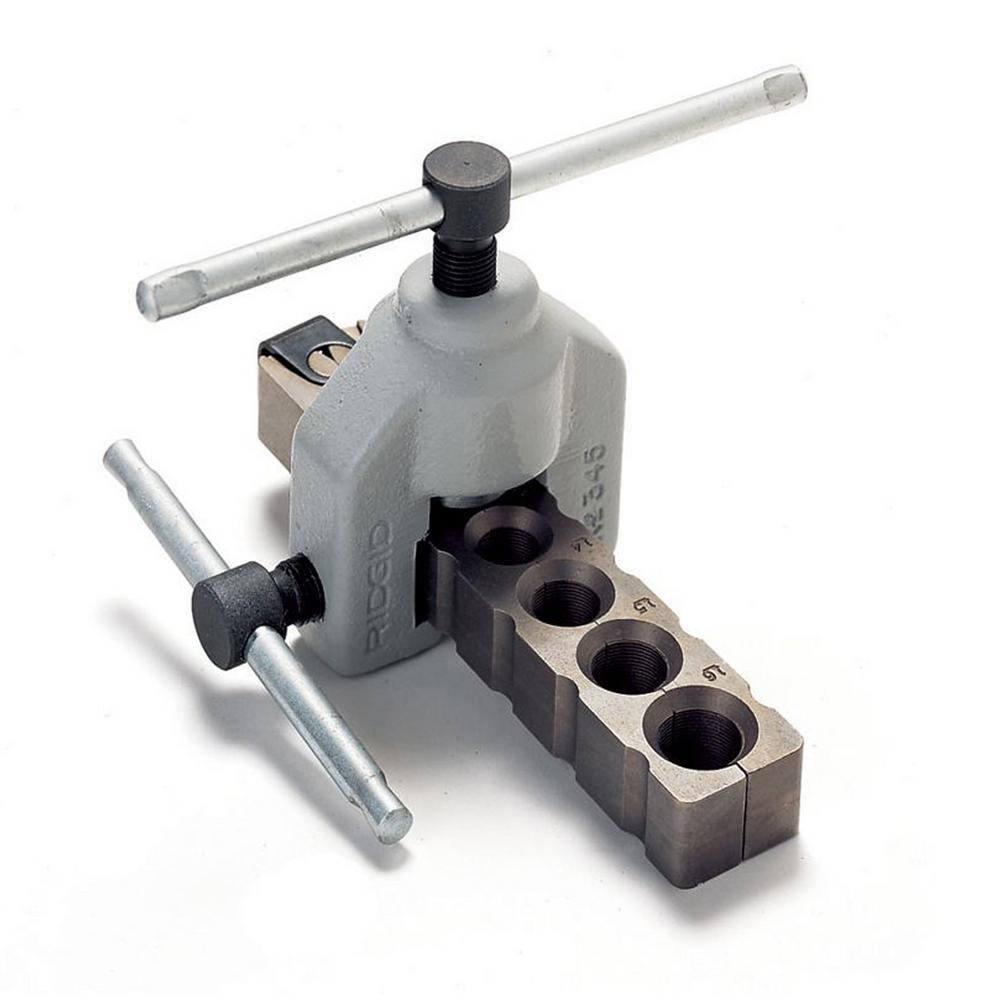
Usually, the line has extra length, which has to be coiled up somewhere. In order to cut a line to the right installation length, you will need a copper tubing flaring tool.
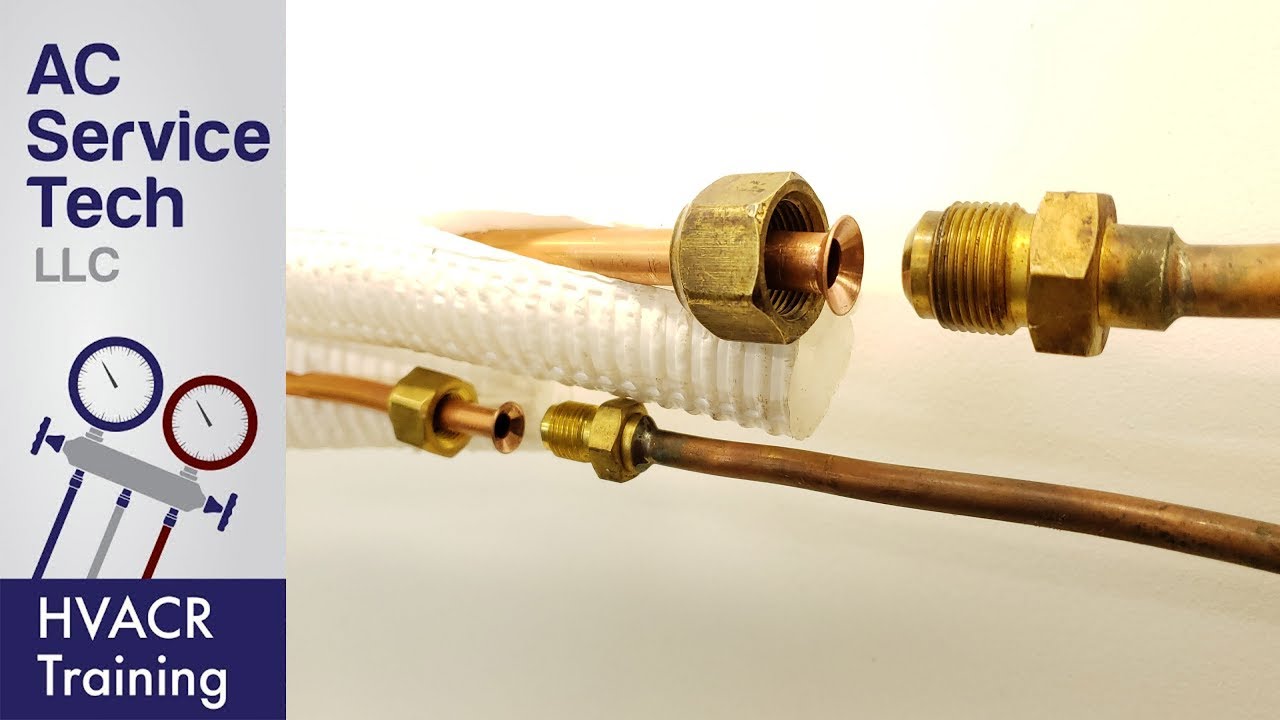
maxresdefault.jpg


ridgid-flaring-swagging-tools-23337-64_600.jpg
 
The main advantage of brazing or high strength soldering (Stay Brite 8) is that a well executed joint is 100% leakproof and this can be known with a high degree of confidence before the system is pressurized.
With a mechanical joint, the system must be fully pressurized before it can be tested. A leak at this point can be problematic.
Personally, I would opt to cut off the fittings and braze/solder if that is possible with these pre-charged units.
 
We received our replacement refrigerator control board from Amazon. It is now operational. One relay shorted on the damaged board as shown. I'm pretty sure I can repair the original control and ordered a new relay for about $7 with shipping. I will keep it as a back-up after repairs. In the mean time we will monitor the refrigerator over the next two weeks during the burn-in period of the new control board. We saved a bundle by repairing it own our own.
 

Attachments

  • damaged.jpg
    damaged.jpg
    453.9 KB · Views: 27
  • relay short.jpg
    relay short.jpg
    595.2 KB · Views: 31
  • new board.jpg
    new board.jpg
    502.3 KB · Views: 27
Got a little cold this morning at the ponderosa. First my well pressure switch stuck, a point file from way back fixed that. Than after everything in the water works got going a hydrant to a buried outside faucet started a geyser. Easy fix with parts on hand. I love/hate pvc work, because every time I need primer and glue I always have to open a new can. They should be sold in smaller cans.
 
The main advantage of brazing or high strength soldering (Stay Brite 8) is that a well executed joint is 100% leakproof and this can be known with a high degree of confidence before the system is pressurized.
With a mechanical joint, the system must be fully pressurized before it can be tested. A leak at this point can be problematic.
Personally, I would opt to cut off the fittings and braze/solder if that is possible with these pre-charged units.


The way mini-split systems are constructed, the fittings for the outdoor unit are right at the compressor inlet/outlet valves, and not at the end of a tubing as shown in the illustration in my earlier post. Therefore they cannot be replaced. For the indoor unit, the compression fittings may be cut off, but soldering/brazing the connections cannot be done with the unit prehung on the wall due to no clearance. The torch heat will burn the wall and the blower unit itself.

With an electronic vacuum gage sensitive to a few microns of absolute pressure, I could be sure of no leakage when I evacuated the system, then let it sit for a long time. Perhaps a compression joint can be tight against a vacuum and still leaks under pressure, but I suspect that's rare.

service_port.jpg
 
Last edited:
The way mini-split systems are constructed, the fittings for the outdoor unit are right at the compressor inlet/outlet valves, and not at the end of a tubing as shown in the illustration in my earlier post. Therefore they cannot be replaced. For the indoor unit, the compression fittings may be cut off, but soldering/brazing the connections cannot be done with the unit prehung on the wall due to no clearance. The torch heat will burn the wall and the blower unit itself.

With an electronic vacuum gage sensitive to a few microns of absolute pressure, I could be sure of no leakage when I evacuated the system, then let it sit for a long time. Perhaps a compression joint can be tight against a vacuum and still leaks under pressure, but I suspect that's rare.


Ah, I see. Thanks for the explanation.
So, a motivated individual (me) could braze/solder a section to the indoor unit before mounting, then cut the tubing to length and braze/solder for a nice fit at that end.
 
The way mini-split systems are constructed, the fittings for the outdoor unit are right at the compressor inlet/outlet valves, and not at the end of a tubing as shown in the illustration in my earlier post. Therefore they cannot be replaced. For the indoor unit, the compression fittings may be cut off, but soldering/brazing the connections cannot be done with the unit prehung on the wall due to no clearance. The torch heat will burn the wall and the blower unit itself.

With an electronic vacuum gage sensitive to a few microns of absolute pressure, I could be sure of no leakage when I evacuated the system, then let it sit for a long time. Perhaps a compression joint can be tight against a vacuum and still leaks under pressure, but I suspect that's rare.

service_port.jpg


Yes and I let mine sit overnight under with the vac pump off and the gauge didn't move at all. I was confident of no leaks and it has worked perfectly since.
 
Not really a repair, but I inspected the septic tank. It is required every 3 years and by taking a short course, I'm allowed to do it myself every other time.

The upshot is that you measure the thickness of the scum on the top and sludge on the bottom and compare it to the depth of the tank. I'm still OK, but will probably be over in 3 years, so I'm thinking of having it pumped now. I was shocked to see what it costs here in Washington - about $600 for a 1250 gallon tank. In Michigan 3 years ago I was paying half that.
 
My repair was quite a bit different than typical listed here; I inherited an as-new-in-box 1977 Colt Diamondback revolver. It has been a safe queen for over 40 years. Never taken out for maintenance, certainly never fired. The cylinder release mechanism was frozen....completely frozen. Tried oil, Ballistol, WD-40, putting a wood dowel through the cylinder and tapping it. Nothing budged it.
Since it was pristine, I wanted a professional to work on it so I took it to my local gunsmith mid-November. Every couple of weeks I called and was told, "well, we've been really busy. We will get to it." After seven weeks, I went and picked it up.
I then decided to be give it a shot. There were/are no videos on Youtube showing the complete dismantling of a Diamondback, but there are some of similar Colts. Right panel off, cylinder removed, left panel off. The cylinder locking pin was completely frozen in its chamber. Took some tapping and pliers to get it free. After a good cleaning and lubrication, time for re-assembly. This is where it went south. At least 10 times, i put it back together but it would not function properly (cylinder was not turning, trigger would not re-set). I put it away for the night. The next morning, I re-visited it, put it together again and it functioned perfectly. No visible scratches on the screws or panels. I am very pleased with my self!
 
Not really a repair, but I inspected the septic tank. It is required every 3 years and by taking a short course, I'm allowed to do it myself every other time.

The upshot is that you measure the thickness of the scum on the top and sludge on the bottom and compare it to the depth of the tank. I'm still OK, but will probably be over in 3 years, so I'm thinking of having it pumped now. I was shocked to see what it costs here in Washington - about $600 for a 1250 gallon tank. In Michigan 3 years ago I was paying half that.

Yowsa. I had our septic tank pumped out back in the fall.
CAD185.00 (usd145.00) same as three years ago.

I had to find and dig up the cleanout, mind you.

Still, you Yanquis must be more full of ..... :LOL::hide:
 
Not really a repair, but I inspected the septic tank. It is required every 3 years and by taking a short course, I'm allowed to do it myself every other time.
The upshot is that you measure the thickness of the scum on the top and sludge on the bottom and compare it to the depth of the tank. I'm still OK, but will probably be over in 3 years, so I'm thinking of having it pumped now. I was shocked to see what it costs here in Washington - about $600 for a 1250 gallon tank. In Michigan 3 years ago I was paying half that.

Had my septic tank pumped out 2 months ago for $375 here in AZ. No periodic inspections required here, only required when selling the home. I do pull the filter out annually and clean it. During the last pump out the septic guy suggested pouring a quart of buttermilk (better if spoiled) down the drain about every 3 months, it's suppose to help break up the solids better, seems like cheap ($2/qt) maintenance. Anyone else do this?
 
Not really a repair, but I inspected the septic tank. It is required every 3 years and by taking a short course, I'm allowed to do it myself every other time.

The upshot is that you measure the thickness of the scum on the top and sludge on the bottom and compare it to the depth of the tank. I'm still OK, but will probably be over in 3 years, so I'm thinking of having it pumped now. I was shocked to see what it costs here in Washington - about $600 for a 1250 gallon tank. In Michigan 3 years ago I was paying half that.

Yowsa. I had our septic tank pumped out back in the fall.
CAD185.00 (usd145.00) same as three years ago.

Had my septic tank pumped out 2 months ago for $375 here in AZ. No periodic inspections required here, only required when selling the home.

Are your septic systems aerobic or the traditional type? I have a 600 gallon/day aerobic system which consists of three tanks and a total of about 1500 gallons of "content". Last time I had them pumped out (2017) the cost was $585.
 
Not really a repair, but I inspected the septic tank. It is required every 3 years and by taking a short course, I'm allowed to do it myself every other time.

The upshot is that you measure the thickness of the scum on the top and sludge on the bottom and compare it to the depth of the tank. I'm still OK, but will probably be over in 3 years, so I'm thinking of having it pumped now. I was shocked to see what it costs here in Washington - about $600 for a 1250 gallon tank. In Michigan 3 years ago I was paying half that.

That seems REALLY expensive. Maybe you should shop around more.

I have to pay $500 to pump mine out every 5 years (once I get it in and approved).
Catch is mine is on an island, so of course it's expensive, and the 5 yr rule applies, even if the place was empty for 5 yrs.
 
My septic is the traditional type, 1200 gal two chamber tank.
 
Are your septic systems aerobic or the traditional type? I have a 600 gallon/day aerobic system which consists of three tanks and a total of about 1500 gallons of "content". Last time I had them pumped out (2017) the cost was $585.
My septic system is a traditional gravity flow, two chambered tank. I suspect the required regular inspection as well as relatively stringent guidelines on when to pump drive the price up, or allow gouging.
 
Not really a repair, but I inspected the septic tank. It is required every 3 years and by taking a short course, I'm allowed to do it myself every other time.

The upshot is that you measure the thickness of the scum on the top and sludge on the bottom and compare it to the depth of the tank. I'm still OK, but will probably be over in 3 years, so I'm thinking of having it pumped now. I was shocked to see what it costs here in Washington - about $600 for a 1250 gallon tank. In Michigan 3 years ago I was paying half that.

Yikes. $130 around here.
 
I replaced our kitchen faucet today, but that is not the whole story.

I remodeled our kitchen about 6 years ago. I found a high-arc faucet with a pull-down sprayer that I liked, but it had some small problems from the get-go, e.g., the pull-down sprayer did not "dock" in the faucet arm correctly. Then it developed some other problems with the sprayer, and they got worse and worse. I finally decided to just buy a new faucet.

I liked the look of this faucet, and it has a longer "reach" than is usual. I tried to find a similar one, but was striking out. Due to the problems with the original, I didn't really want the same faucet, but I looked at the company where I bought it from originally in desperation. But they no longer had this model. Finally, I found a similar-looking faucet from a well-known Italian company (Paini), and ordered it.

It turns out to be the EXACT SAME faucet as the first one. :facepalm: I installed it today, nevertheless. And, for two of the components of the faucet, those nincompoops had shipped the wrong part. :mad: However, I was able to scavenge the relevant part from the old faucet, and get it installed today. Phew.
 
I'm thinking of having it pumped now. I was shocked to see what it costs here in Washington - about $600 for a 1250 gallon tank. In Michigan 3 years ago I was paying half that.

Yep, I had our 1250 gallon tank pumped in 2019 for $539 here in SW Washington.

We get it inspected every 3 years, but haven't had it pumped since 1999 (10 years earlier). We had the septic installed years before we lived on the property, so I had the larger 1250 tank installed not knowing what our future needs might be. We've had no issues with it in over 30 years.
 
I'm installing new baseboard trim in my Florida townhome after having the floors replaced.

I've done some of this previously, but I'm very much an amateur.

I was installing one very visible section, and the wood floor had a high point right in the middle of the section, so I couldn't make the piece fit nice on either end.

I placed the board level to the floor, and used a pencil to scribe the bump in the floor onto the wood trim. Then I used a hand planer to remove the material at the bottom on the baseboard where the hump existed.

It turned out great. I sat and admired my work for some time, and now I'm on here bragging about it. Kind of fun.

Take care, JP

20210120_143435.jpeg20210120_141715.jpeg
 
This is how my handle repair technique has advanced over the last 30 years. I'm expecting a better Dremel bit for this on Monday that I'll use to fix another handle, and I may try a thicker pin between the holes (either a piece of hanger or baling wire instead of a paper clip), but I have to use needle nose pliers to straighten the bent pin and it was difficult even with the paper clip. The furniture is over 55 years old.

Don't be afraid to use a Dremel bit in a hammer drill. As long as it's not in hammer mode.
 

Attachments

  • dresser-handle-repair-2021.jpg
    dresser-handle-repair-2021.jpg
    632.5 KB · Views: 25
  • handle-draw-repair.jpg
    handle-draw-repair.jpg
    81.8 KB · Views: 24
...
It turned out great. I sat and admired my work for some time, and now I'm on here bragging about it. Kind of fun.

Take care, JP

You deserve it, very nicely done. Not many people will take the time to fit it the right way, as you did. Looks great!


-ERD50
 
We were given an outside butterfly mobile by our sons. As time went by, the original little pieces between the bars of the mobile and the butterflies broke.
My efforts to solder them with my 125 watt soldering gun were unsuccessful, so I bought a 260 watt gun. It sort of worked, until I thought to my self, stop screwing around and get a torch.
I bought a Bernzomatic torch, and that was the end of my problems. I also discovered the the refillable 18 ounce propane bottles I bought for my little fire pit will also work with the torch.
 
I thought to my self, stop screwing around and get a torch.

I considered everything but that. I didn't want to repair and use my jewelry kiln to allow me to bend the handle because I was afraid of fumes from the mystery finish on the handle. I didn't think Gorillaweld would be strong enough. I looked up the melting temperature of iron and steel last night. I finally settled on a mechanically attached paperclip. I'll probably revisit it in the future for Handle Repair 4.
 
Almost two months ago, I replaced the thermal fuse in my air fryer. The fuse failed open again yesterday, despite having a higher temperature of 180C vs the original's 172C.

They came in a package of 5, so I just installed a new one, and will see how long that lasts.

If the fuses keep blowing, then the fryer is running hotter than it should. Determining the cause will not be so easy. I guess I may tell my wife to not use the highest setting of 400F. I will try to remember to check its internal operating temperature with an infrared thermometer.

The thermal fuse inside the air fryer blew again. I just replaced it, and am down to 2 spare fuses out of the ordered package of 5. Dang!

Here's how long they last.

1) Original factory fuse: 3 years.
2) Replacement fuse #1: 2 months
3) Replacement fuse #2: 3 weeks
4) Replacement fuse #3: to be determined

I suspected that perhaps the wire crimp on the fuse was not tight, and the extra heat caused by the ohmic loss at the two fuse leads might have caused additional temperature rise at the fuse, causing it to blow. But when I replaced the fuse, carefully inspected the crimp leads, and they were tight.

Could it be that the replacement fuses had the wrong rating? Maybe I should order another pack of a few degrees higher?

PS. When the fuse blew, my wife was running it at 350F. The max temperature setting is 400F.
 
Last edited:
Back
Top Bottom