Your recent repair? - 2021 to ?

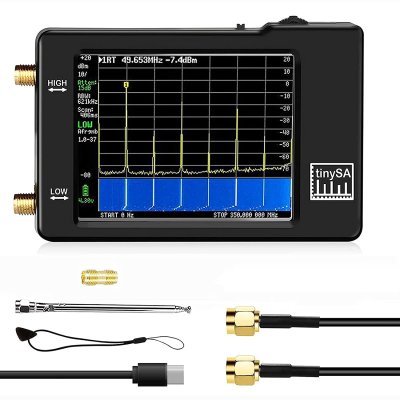
Oohh, spectrum analyzer! That's a sexy piece of instrument. I have two HP analyzers myself.

We had HP/Agilent analyzers at work but mine is just a tinySA. It has a USB interface to a PC/Laptop for more detailed graphing and data analysis and opensource firmware for those who want to improve it. It got the job done
 

Attachments

  • tiny SA.jpg
    tiny SA.jpg
    124.1 KB · Views: 39
We had HP/Agilent analyzers at work but mine is just a tinySA. It has a USB interface to a PC/Laptop for more detailed graphing and data analysis and opensource firmware for those who want to improve it. It got the job done

Holy cow, less than $60 shipped from China ( ~ 1 month).

https://tinysa.org/wiki/pmwiki.php?n=Main.HomePage

https://www.aliexpress.com/item/4001274404758.html

I paid about 2x that for a limited frequency 2 channel scope (with sig gen) that needs the computer for the display.

https://www.picotech.com/oscilloscope/2000/picoscope-2000-overview


-ERD50

I got it for $60 with free shipping from a local seller on eBay. It would not be practical to carry a full size analyzer around my property to do these quick near and far field measurements. This is a great tool for troubleshooting noise. I used it also to isolate and fix a noise source that was interfering with some powerline internet adapters. There also appears to be a cult like following for this tinySA.
 
Last edited:
Couple quick easy fixes for annoying buzzers:
1. On a golf cart the reverse buzzer was really loud. Opened up the dash where the buzzer was located, and stuck a foam ear plug in the hole. Now it is a low volume buzz enough to warn the driver that it's in reverse; without annoying everyone within 50 ft radius.
2. Clothes dryer buzzer was very loud. No switch to turn it off. Opened up control panel and just disconnected the buzzer. Problem solved.
 
Couple quick easy fixes for annoying buzzers:
1. On a golf cart the reverse buzzer was really loud. Opened up the dash where the buzzer was located, and stuck a foam ear plug in the hole. Now it is a low volume buzz enough to warn the driver that it's in reverse; without annoying everyone within 50 ft radius.

Interesting. I always figured that buzzer was supposed to be loud so that those within50ft (and especially behind) of the vehicle are aware you are backing up. Seems like the driver usually knows he/she is backing up, even without a buzzer? :D
 
Interesting. I always figured that buzzer was supposed to be loud so that those within50ft (and especially behind) of the vehicle are aware you are backing up. Seems like the driver usually knows he/she is backing up, even without a buzzer? :D


Does your car have a reverse buzzer to warn people you are ready to back up? No, because you are supposed to look. I viewed the reverse buzzer as more of warning for the driver. Golf cart doesn't have a shifter like a car where you need to make deliberate effort for reverse. It can be left in reverse on the forward/reverse switch, where a person might not check.


It's a good question though, guess it depends on your perspective of the reason for it.
 
Today I went out via the garage and noticed a lot of water on the garage floor. An area roughly 5x8 in size.
We have no water pipes in the garage.

While on my errand, thinking about it, I concluded it could only be the new fridge with the old water line attached.

When I got back I pulled out the fridge and found the ceramic tile floor wet.
I turned off the water for the water line and mopped up the floor.
Put a fan on it to speed drying.
My worry of course is that the plywood subfloor which must have gotten a lot a water will swell and ruin the ceramic tile.
The problem was the plastic water line split right near the connection to the fridge, and sprayed a fine mist for some time. I can tell by the water drops 5 feet up the wall, etc..
Tomorrow I'm getting a braided line to replace the old one.
 
I'll bite, although this was a week ago, so technically 2020. I repaired my clothes dryer. I found a bootleg copy of the technical service manual online for my model, which allowed me to press the correct button sequence to have the machine self diagnose itself. Turned out to be the door switch. About $20 later and a small bit of effort and wallah dryer works great again.


Fixed our dryer a few days ago by tapping a relay with a screwdriver (with the cycle done and power off the drum kept spinning). Thanks YouTube. We'll see if the issue comes back at some point but so far it's working just fine!
 
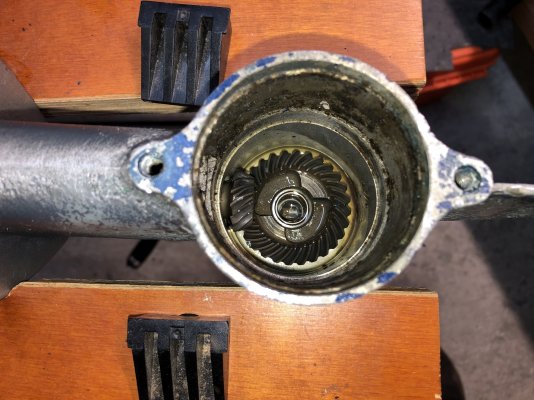
Repairing the lower unit of my outboard…just a small 5hp kicker for my sailboat.
 

Attachments

  • AB311706-F717-4D34-B8E7-3BE629F80047.jpg
    AB311706-F717-4D34-B8E7-3BE629F80047.jpg
    673.1 KB · Views: 20
I replaced the defrost heater of my main 30-cf refrigerator.

Yesterday, the "De" warning light on the GE fridge started flashing. The fridge seemed to work fine, so I reset the power, and the light went away.

This morning, the warning light came on again. I checked the temperature of the freezer, and saw that it was 0F. The refrigerator side was 42F, which was not cold enough.

A quick check on the Web showed that the most likely culprit was a failed defrost heater. An appliance part store near me opened until 1PM today, and it was 11AM already. So, I rushed out to get the replacement part, before I could remove it to bring to the store for a cross-check.

Back at home, the heater replacement took 2 hours. It took that long because the 30-cf fridge was deep and being a side-by-side, its freezer side was narrow, and I could fit only one shoulder inside at a time, and some tasks required two hands. This fridge required all the racks to be removed along with the ice maker before the cooling coil cover could be removed.

The moment I removed the interior panel to expose the cooling coil, it was clear that the coil had iced over, and the airflow was blocked. A look at the defrost heater showed obvious signs that it had burned out. Indeed, an ohmmeter check confirmed that it was the case.

The fridge is back working now, and my wife already reloaded all the food. Lots of stuff there that I reminded her to either eat or throw away.

Cost of the repair: $61 for the defrost heater, tax included.
 
Last edited:
......
Cost of the repair: $61 for the defrost heater, tax included.


Success is good. :D


Our fridge, the icemaker died and after 2 or 3 tries at repair we gave up. Then the inside lights quit, and the water dispenser quit in the door quit too. Repair guy (that has been good before) said 50 / 50 it is the main circuit board.


Beer stays cold and ice frozen. So we use the dining room light or a flashlight to see inside as needed. Done wasting money on the damm thing. It is not quite 10 yo. All the other appliances we bought at the same time are rocking on, no worries.
 
This fridge is 20-year-old. The ice maker and the fan for the condenser fan were replaced at around the 12-year mark.

The other day, while at Home Depot we looked at some new fridges and I asked my wife if we should get one. She said "Nah".


PS. Perhaps the door switch on your fridge fails.

On this fridge, the inside lights are just skinny bulbs with a regular base. I replaced them with LED lights.
 
Last edited:
I replaced the defrost heater of my main 30-cf refrigerator.

Yesterday, the "De" warning light on the GE fridge started flashing. The fridge seemed to work fine, so I reset the power, and the light went away.

This morning, the warning light came on again. I checked the temperature of the freezer, and saw that it was 0F. The refrigerator side was 42F, which was not cold enough.

A quick check on the Web showed that the most likely culprit was a failed defrost heater. An appliance part store near me opened until 1PM today, and it was 11AM already. So, I rushed out to get the replacement part, before I could remove it to bring to the store for a cross-check.

Back at home, the heater replacement took 2 hours. It took that long because the 30-cf fridge was deep and being a side-by-side, its freezer side was narrow, and I could fit only one shoulder inside at a time, and some tasks required two hands. This fridge required all the racks to be removed along with the ice maker before the cooling coil cover could be removed.

The moment I removed the interior panel to expose the cooling coil, it was clear that the coil had iced over, and the airflow was blocked. A look at the defrost heater showed obvious signs that it had burned out. Indeed, an ohmmeter check confirmed that it was the case.

The fridge is back working now, and my wife already reloaded all the food. Lots of stuff there that I reminded her to either eat or throw away.

Cost of the repair: $61 for the defrost heater, tax included.
I've done the same repair on our old fridge which is now relegated to the garage. But the freezer side is pretty wide making the job pretty easy.
 
Three seemingly unrelated issues on my Chevy Colorado happened in quick succession. The meter warning lights for airbag and stabilitrac started going on and off together. I also noticed a worsening musty odor.
The problems started with a leaky high mount stop light seal above sliding glass window. Water travelled down a well designed creek across back roof channel, down the c-pillar, across both rear and front door jambs on both sides, and finally forming pools of water in the front floors under the carpet. The WeatherTec floor matts kept my feet nice and dry, so I didn't notice what was going on with the water.
A power source line corroded/broke and caused the meter warning lights. The water was there for a while and caused the swampy odor.
I had the connector and a wire fixed at a repair shop. They found the water issue.
I replaced the stop lamp seal with closed cell foam rubber. I used a shop vac to get over a gallon of water out from under the carpets. With the carpets propped up (I didn't want to remove them, needed vehicle occasionally), I ran an electric heater and a dehumidifier (2 extension cords, 2 separate circuits), and remote started the vehicle in foot mode. This process was about 5 days long and I used the truck occasionally. After the dehumidifier pulled out as much water as it could (another 1/2 gallon), I sprayed Lysol on the carpets, both bottom and top. I put the carpet back in place and replaced the trim parts. Finally, I sprayed Fabreeze on the top carpet surfaces. After allowing Fabreeze to dry, I put the WeatherTec matt's back in place. No odor in about a week, but it's been cold weather.
Water always wins.
 
Last edited:
Three seemingly unrelated issues on my Chevy Colorado happened in quick succession. The meter warning lights for airbag and stabilitrac started going on and off together. I also noticed a worsening musty odor.
The problems started with a leaky high mount stop light seal above sliding glass window. Water travelled down a well designed creek across back roof channel, down the c-pillar, across both rear and front door jambs on both sides, and finally forming pools of water in the front floors under the carpet. The WeatherTec floor matts kept my feet nice and dry, so I didn't notice what was going on with the water.
A power source line corroded/broke and caused the meter warning lights. The water was there for a while and caused the swampy odor.
I had the connector and a wire fixed at a repair shop. They found the water issue.
I replaced the stop lamp seal with closed cell foam rubber. I used a shop vac to get over a gallon of water out from under the carpets. With the carpets propped up (I didn't want to remove them, needed vehicle occasionally), I ran an electric heater and a dehumidifier (2 extension cords, 2 separate circuits), and remote started the vehicle in foot mode. This process was about 5 days long and I used the truck occasionally. After the dehumidifier pulled out as much water as it could (another 1/2 gallon), I sprayed Lysol on the carpets, both bottom and top. I put the carpet back in place and replaced the trim parts. Finally, I sprayed Fabreeze on the top carpet surfaces. After allowing Fabreeze to dry, I put the WeatherTec matt's back in place. No odor in about a week, but it's been cold weather.
Water always wins.

Nice job finding that leak. I'll bet a lot of Colorado owners are mystified about where the water is coming from in their trucks. Sunroof drains plugging up got me one time in a VW.
 
Nice job finding that leak. I'll bet a lot of Colorado owners are mystified about where the water is coming from in their trucks. Sunroof drains plugging up got me one time in a VW.

Sunroof drain line plugged and separated sunroof rubber seal got my wife's Nissan Rogue at separate times. At least the water pooled in her WeatherTec floor mats.
 
Does this count? Dad rescued a broken desk in the 80s, patched it very well. I inherited it in 2004. It's about time to refinish it so it can be a focal point in the entryway. Not repairing just getting it back to its former beauty.
 
Failed Repair!

Re soldered cracked solder on Chamberlain garage door opener PCB four years ago - worked great. Recently, the driveshaft bushing failed and the sprocket broke off.

Ordered $20 replacement kit, but motor would not run, again ... timing is suspect, but re soldering various suspect connections did not work this time.

Thinking about belt drive Genie with DC motor.
 
Front door knob was loose so I tried tightening the screws. Somehow I managed to break off the mounting tab inside the lock. So yesterday I bought new lock sets for the front and back doors. Originally I was just going to replace the front broken lock set, but found two identical coded sets at Home Depot. Now we just have one key for the house instead of two.

I'm planning to reuse the back door lock set on the garage since that one is kind of beat up.

The deadbolt on the front door has always been kind of finicky, so I'm planning to readjust the strike plate today so it will work better. It only took me 17 years to get around to it. :)
 
Replaced the spark ignitors, thermostat, and oven ignitor (hot-surface) on my range. I had been limping along lighting some of the burners with a propane torch, but I finally broke the knob off the old thermostat, necessitating some action. The new thermostat is electronic rather than mechanical. The oven ignitor was just a maintenance item, and the oven lights more quickly now.
 
The GFI outlet in the guest bathroom of my Florida townhome opened when a guest used a hairdryer.
It wouldn't reset. A VOM confirmed no power was getting to the outlet. Strange.
I confirmed all the breakers were closed, and that voltage was on the wire exiting all of the breakers.
I was stumped.
Then we figured out the master bathroom GFI outlet was in the same situation.
Now I was really confused.

The easy final conclusion:
The main level bathroom GFI was also open, but this outlet reset. Then the second GFI reset, and then the third.
So they are all wired in series, and the upstairs bathrooms have unnecessary GFI outlets.

Very weird, but I was thrilled to resolve this problem. I earned my evening happy hour beer.

Take care, JP
 
If you have more than one GFI in series tripping the first one could trip all the others after it.
 
... The easy final conclusion:
The main level bathroom GFI was also open, but this outlet reset. Then the second GFI reset, and then the third.
So they are all wired in series, and the upstairs bathrooms have unnecessary GFI outlets.

Very weird, but I was thrilled to resolve this problem. I earned my evening happy hour beer.

Take care, JP

It may actually be against code to daisy-chain multiple GFCIs. It's not a direct safety concern, any one of them that is upstream from the fault will protect you. But I think the code calls it out to avoid this exact situation - a downstream GFCI won't reset, and the homeowner is confused, since some other GFCI (maybe in another room) is the one needed to be reset. Makes it all look like magic!

If you have more than one GFI in series tripping the first one could trip all the others after it.

To be more exact, tripping the first one (by "first" we mean "the first one wired to the breaker panel") will cut power to all the outlets chained after it (GFCI or not). But those later GFCI won't be tripped. Now, if the fault occurs at the end of the line, any of the upstream GFCI may trip. Maybe just one (if it is more sensitive or faster than the others), or maybe more/all of them if the fault was large enough to trip them even as one or more of them cut power to the others. Hard to say w/o really digging into it, and it may be unpredictable in some situations.

An easy (hopefully!) fix for JP.mpls would be to get the downstream Guest Bathroom GFCI tapped into the source side of the Master Bathroom GFCI. That may be not-so-easy if the GFCI is also protecting other downstream outlets (test with a lamp or radio in the other outlets while test/resetting the Master GFCI). In that case you would need to run wires back the source side of the GFCI. If that isn't practical, then replacing that protected regular outlet with its own GFCI, and keeping everything wired to the source may be better. You still have the situation with #2 might trip #1, but if they are in the same room, that's less of a problem.

-ERD50
 
Last edited:
I'm hoping I finally might have fixed the bathroom towel rail that has fallen down quite a few times over the years.
My son has already replaced the wall anchor a couple of times but it always loosens off probably from my heavy bath towels.
I happened to see a video of how to use expanding Gorilla Glue to fix it so I coated the plastic anchor with a thin film per instructions and screwed it back into the wall. The next day it was solid so hopefully the problem is fixed forever.
 
Back
Top Bottom